Page 234 of 531

236 2−5. Driving information
nBefore towing
Check that the following conditions are met:
lThe vehicle’s tires are properly inflated.
lTrailer tires are inflated according to the trailer manufacturer ’s recom−
mendation.
lAll trailer lights work.
lAll lights work each time you connect them.
lThe trailer ball is set up at the proper height for the coupler on the trailer.
lThe vehicle remains level when a loaded or unloaded trailer is hitched.
Do not drive if the vehicle is not level, and check for improper tongue
load, overloading, worn suspension, or other possible causes.
lThe trailer cargo is securely loaded.
lThe rear view mirrors conform to all applicable federal, state/provincial or
local regulations. If they do not, install rear view mirrors appropriate for
towing purposes.
nBreak�in schedule
Toyota recommends that you do not use a new vehicle or a vehicle with any
new power train components (engine, transmission, differential, wheel bear−
ings, etc.) to tow a trailer for the first 500 miles (800 km) of driving.
nMaintenance
lIf you tow a trailer, your vehicle will require more frequent maintenance
due to the additional load. (See “Scheduled Maintenance Guide” or
“Owner ’s Manual Supplement”.)
lRetighten the fixing bolts of the towing ball after approximately 600 miles
(1000 km) of trailer towing.
Page 236 of 531

238 2−5. Driving information
CAUTION
nHitches
lLubricate the hitch ball with a light coat of grease.
lIf using a weight distributing hitch when towing, keep your vehicle level
with the ground.
nWhen towing a trailer
lIf the gross trailer weight exceeds 1000 lb. (453 kg), trailer brakes are
required. Toyota recommends trailers with brakes that conform to all appli−
cable federal and state/provincial regulations.
lNever tap into your vehicle’s hydraulic system, as this will lower the vehi−
cle’s braking effectiveness.
lNever tow a trailer without using a safety chain securely attached to both
the trailer and the vehicle. If damage occurs to the coupling unit or hitch
ball, there is danger of the trailer wandering into another lane.
NOTICE
nWhen installing a trailer hitch
lUse only the position recommended by your Toyota dealer. Do not install
the trailer hitch on the bumper; this may cause body damage.
lDo not use axle−mounted hitches, as they can cause damage to the axle
housing, wheel bearings, wheels or tires.
nSafety chain
A safety chain must always be used between the towing vehicle and the
trailer. Leave sufficient slack in the chain for turns. The chain should cross
under the trailer tongue to prevent the tongue from dropping to the ground in
the case that it becomes damaged or separated. For the correct safety chain
installation procedure, ask your Toyota dealer.
nDo not directly splice trailer lights
Directly splicing trailer lights may damage your vehicle’s electrical system
and cause a malfunction.
Page 345 of 531
349
3−6. Other interior features
3
Interior features
Floor mats
CAUTION
nWhen inserting the floor mat
Observe the following precautions.
Failure to do so may result in the floor mat slipping and interfering with the
movement of the pedals during driving, resulting in an accident.
lMake sure the floor mat is properly placed on the vehicle carpet and the
correct side faces upward.
l
Do not place floor mats on top of existing mats.
Securely place a mat that matches the size of the space on the car�
pet.
Secure the floor mat using the
hooks provided.
ITY35C020
Page 346 of 531
350
3−6. Other interior features
Luggage compar tment features
nCargo hooks
Cargo hooks are provided for
securing loose items.
nCargo net hooks
To hang the cargo net, use the
cargo net hooks and rear tie−
down hooks.
The cargo net itself is not
included as an original equip−
ment.
nStorage compartment
Open the storage compart−
ment as shown.
ITY35C022
ITY35C024
Page 348 of 531
352
3−6. Other interior features
Garage door opener
The garage door opener (HomeLink Universal Transceiver) is manufac−
tured under license from HomeLink
.
Programming HomeLink (for U.S.A. owners)
The HomeLink compatible transceiver in your vehicle has 3 buttons
which can be programmed to operate 3 different devices. Refer to the
programming method below appropriate for the device.
Buttons
Indicator
The garage door opener can be programmed to operate garage
doors, gates, entry do ors, door locks, home lighting systems, secu�
rity systems, and other devices.
ITY35C029
Page 352 of 531
/Programming
all devices in the Canadian market
Place your transmitter 1 to 3 in. (25 to 75 mm) away from the
surface")
356 3−6. Other interior features
nProgramming an entry gate (f or U.S.A. owners)/Programming
all devices in the Canadian market
Place your transmitter 1 to 3 in. (25 to 75 mm) away from the
surface of the HomeLink
.
Keep the HomeLink indicator light in view while programming.
Press and hold the selected HomeLink button.
Repeatedly press and release (cycle) the device’s remote
control button for two seconds each until step 4 is completed.
When the indicator light on the HomeLink
compatible trans−
ceiver starts to flash rapidly, release the buttons.
Test the operation of the HomeLink
by pressing the newly
programmed button. Check to se e if the gate/device operates
correctly.
Repeat the steps above to program another device for each of
the remaining HomeLink
buttons.
nProgramming other devices
To program other devices such
as home security systems, home
door locks or lighting, contact your authorized Toyota dealer for
assistance.
nReprogramming a button
The individual HomeLink
buttons cannot be erased but can be
reprogrammed. To reprogram a button, follow the “Reprogramming
a HomeLink
button” instructions.
STEP1
STEP 2
STEP 3
STEP 4
STEP 5
STEP6
Page 363 of 531
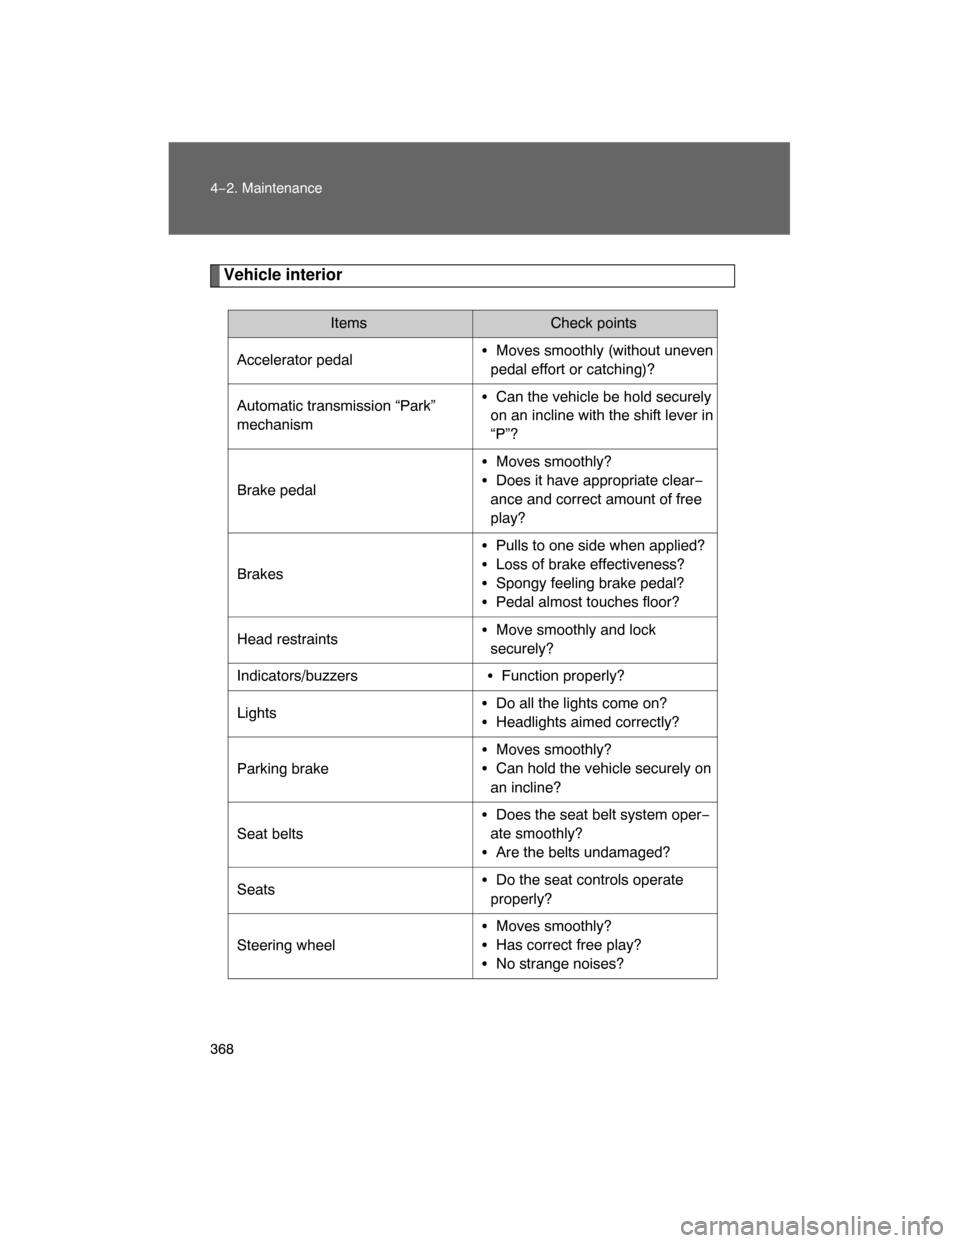
368 4−2. Maintenance
Vehicle interior
Items Check points
Accelerator pedal�Moves smoothly (without uneven
pedal effort or catching)?
Automatic transmission “Park”
mechanism�Can the vehicle be hold securely
on an incline with the shift lever in
“P”?
Brake pedal�Moves smoothly?
�Does it have appropriate clear−
ance and correct amount of free
play?
Brakes�Pulls to one side when applied?
�Loss of brake effectiveness?
�Spongy feeling brake pedal?
�Pedal almost touches floor?
Head restraints�Move smoothly and lock
securely?
Indicators/buzzers�Function properly?
Lights�Do all the lights come on?
�Headlights aimed correctly?
Parking brake�Moves smoothly?
�Can hold the vehicle securely on
an incline?
Seat belts�Does the seat belt system oper−
ate smoothly?
�Are the belts undamaged?
Seats�Do the seat controls operate
properly?
Steering wheel
�Moves smoothly?
�Has correct free play?
�No strange noises?
Page 412 of 531
417
4−3. Do−it−yourself maintenance
4
Maintenance and care
Fuse layout and amperage ratings
n
Engine compartment
FuseAmpere Circuit
1 A/F15 A
A/F heater
2 HORN10 A
Horn
3 EFI MAIN25 A
EFI, A/F heater
4 IG2 MAIN30 A
Injector, ignition, meter
5 RR A/C50 A
No circuit
6 SEAT−A/C LH25 A
No circuit
7 RR S/HTR20 A
Rear seat heater
8 DEICER20 A
Windshield wiper de−icer
9 CDS FAN25 A
Condenser fan
10 TOW TAIL30 A
Towing tail
11 RR P/SEAT30 A
No circuit
12 ALT−CDS10 A
Alternator condenser
13 FR FOG15 A
Front fog lights
14 SECURITY5 A
Security horn
15 SEAT−A/C RH25 A
No circuit


 is manufac−
tured under license from HomeLink
.
Programming HomeLink (for U.S.A. owner")