Page 262 of 496
250
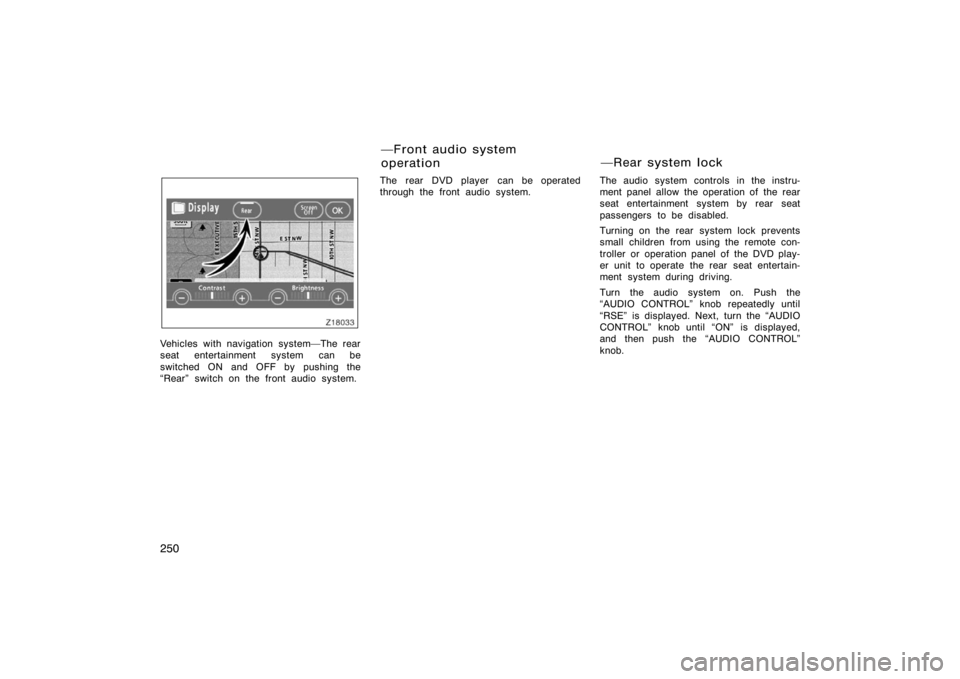
Z18033
Vehicles with navigation system�The rear
seat entertainment system can be
switched ON and OFF by pushing the
�Rear" switch on the front audio system.The rear DVD player can be operated
through the front audio system.
The audio system controls in the instru-
ment panel allow the operation of the rear
seat entertainment system by rear seat
passengers to be disabled.
Turning on the rear system lock prevents
small children from using the remote con-
troller or operation panel of the DVD play-
er unit to operate the rear seat entertain-
ment system during driving.
Turn the audio system on. Push the
�AUDIO CONTROL" knob repeatedly until
�RSE" is displayed. Next, turn the �AUDIO
CONTROL" knob until �ON" is displayed,
and then push the �AUDIO CONTROL"
knob.
�Front audio system
operation
�Rear system lock
Page 263 of 496

251
Z18031E
Vehicles with navigation system�
Push the �INFO" button to change the
screen to �Screen Setting".
Push the �ON" switch on the �Screen
Setting" screen to turn on the �Rear
system lock". Then push �OK".
Z17443
When the rear system lock is on and any
button is pushed on the remote controller
or the operation panel, the screen shown
above is displayed for approximately 6
seconds.
Even when the rear system lock is turned
on during play mode, the images and
sounds continue without interruption.
The condition of the rear system lock is
maintained, even when the engine switch
is turned off.The DVD player can play audio CDs/
MP3 CDs, DVD video discs, CD texts,
dts−CDs and video CDs.
For appropriate discs for this player, see
�Audio/video system operating hints" on
page 280 in this Section.
The DVD player works when the engine
switch is in the �ACC" or �ON" position.
To turn on the DVD player, a disc must
be loaded in the player.
To turn off the player, eject the disc.
Error messages
If the player malfunctions, your audio sys-
tem will display following error messages.
If �DISC CHECK" appears on the
screen:
It indicates that the disc is dirty,
damaged or it was inserted upside down.
Clean the disc or insert it correctly.
If �REGION CODE ERROR" appears on
the screen: It indicates that the DVD re-
gion code is not set properly.
If �DVD ERROR" appears on the
screen: There is a problem inside the
player. Eject the disc. Set the disc again.
If the malfunction still exists, take your
vehicle to your Toyota dealer.
�DVD player
Page 264 of 496
252
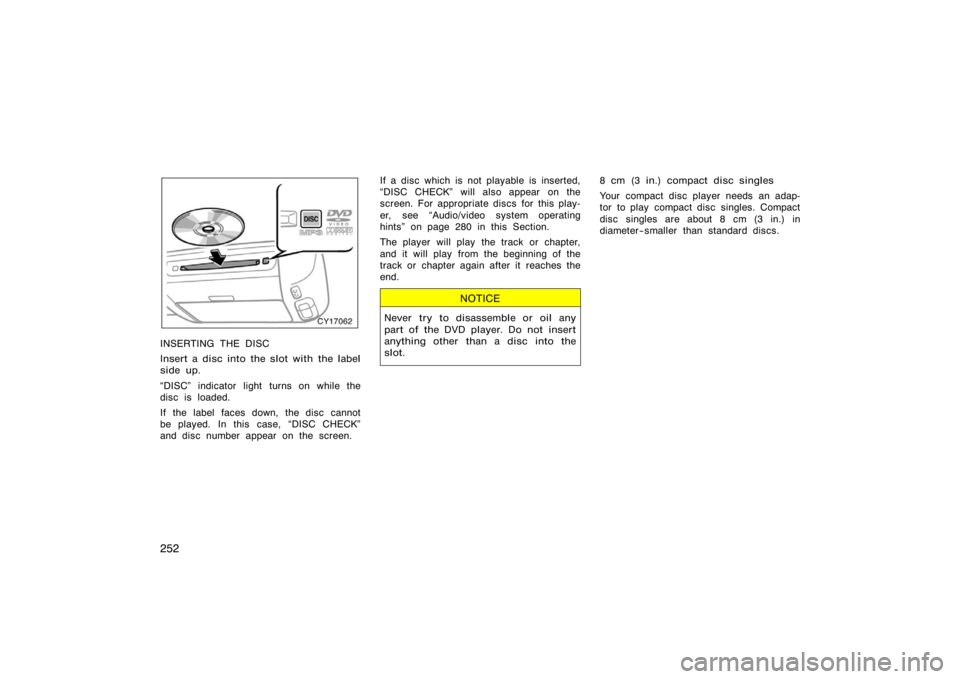
CY17062
INSERTING THE DISC
Insert a disc into the slot with the label
side up.
�DISC" indicator light turns on while the
disc is loaded.
If the label faces down, the disc cannot
be played. In this case, �DISC CHECK"
and disc number appear on the screen.If a disc which is not playable is inserted,
�DISC CHECK" will also appear on the
screen. For appropriate discs for this play-
er, see �Audio/video system operating
hints" on page 280 in this Section.
The player will play the track or chapter,
and it will play from the beginning of the
track or chapter again after it reaches the
end.
NOTICE
Never try to disassemble or oil any
part of the DVD player. Do not insert
anything other than a disc into the
slot.
8 cm (3 in.) compact disc singles
Your compact disc player needs an adap-
tor to play compact disc singles. Compact
disc singles are about 8 cm (3 in.) in
diameter−smaller than standard di
scs.
Page 265 of 496
253
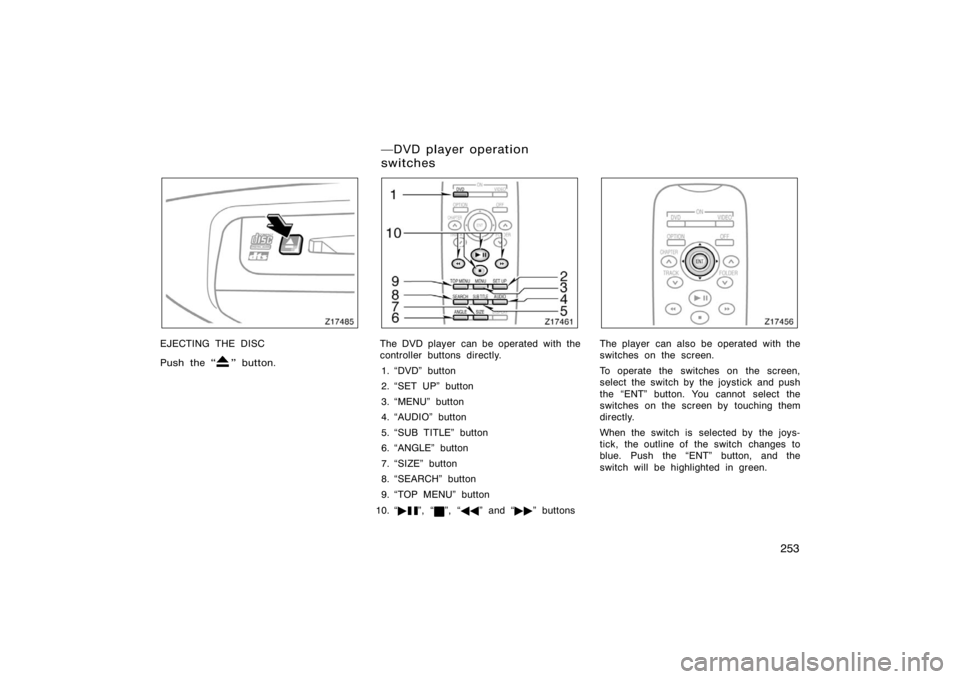
Z17485
EJECTING THE DISC
Push the �
" button.
Z17461
The DVD player can be operated with the
controller buttons directly.1. �DVD" button
2. �SET UP" button
3. �MENU" button
4. �AUDIO" button
5. �SUB TITLE" button
6. �ANGLE" button
7. �SIZE" button
8. �SEARCH" button
9. �TOP MENU" button
10. � �
", �", ��� " and ��� " buttons
Z17456
The player can also be operated with the
switches on the screen.
To operate the switches on the screen,
select the switch by the joystick and push
the �ENT" button. You cannot select the
switches on the screen by touching them
directly.
When the switch is selected by the joys-
tick, the outline of the switch changes to
blue. Push the �ENT" button, and the
switch will be highlighted in green.
�DVD player operation
switches
Page 268 of 496

256
To turn off the switches on the screen,
push the �OPTION" button on the control-
ler once again or push the �Hide Buttons"
on the screen.
�DVD player operation
NOTE: The playback condition of some
DVD video discs may be determined by
the DVD video software producer. This
DVD player plays discs as the software
producer intended. Therefore, some
functions may not work properly. Be
sure to read the instruction manual for
the DVD video disc separately provided.
For detailed information about DVD
video discs, see ��DVD video disc
information" on page 276 in this
Section.
Precautions for DVD video discs
When recording on a DVD video, video
CD or audio tracks may not record in
some cases while the menu is displayed.
As audio will not play in this case, verify
that the video tracks are playing and then
activate playback.
The title/chapter number and playback
time display may not appear while playing
back certain DVD video discs.CAUTION
Conversational speech on some DVDs
is recorded at a low volume to em-
phasize the impact of sound effects.
If you adjust the volume assuming
that the conversations represent the
maximum volume level available for
the DVD, you may be startled by
louder sound effects or when you
change to a different audio source.
Loud sounds may have a significant
impact on the human body or pose a
driving hazard. Keep this in mind
when you adjust the volume.
Page 273 of 496
261
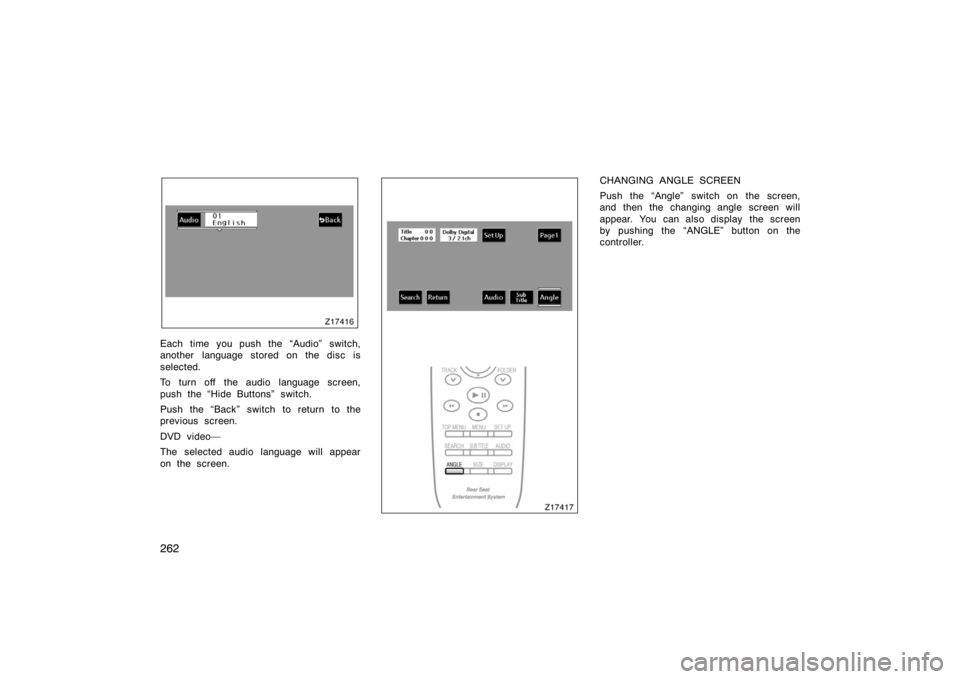
Z17414
Each time you push the �Sub Title" switch,
another language stored on the disc is
selected.
To turn off the subtitles, push the �Hide
Buttons" switch.
Push the �Back" switch to return to the
previous screen.
The selected subtitle language will appear
on the screen.Z17415
CHANGING AUDIO LANGUAGE
Push the �Audio" switch on the screen
and then the changing audio language
screen will appear. You can also display
the screen by pushing the �AUDIO" button
on the controller.
Page 274 of 496
262
Z17416
Each time you push the �Audio" switch,
another language stored on the disc is
selected.
To turn off the audio language screen,
push the �Hide Buttons" switch.
Push the �Back" switch to return to the
previous screen.
DVD video�
The selected audio language will appear
on the screen.Z17417
CHANGING ANGLE SCREEN
Push the �Angle" switch on the screen,
and then the changing angle screen will
appear. You can also display the screen
by pushing the �ANGLE" button on the
controller.
Page 276 of 496

264
Z18017
Setup Menu screen
There are initial setting switches on the
�Setup Menu" screen.
After you change the initial setting, push
the �Enter" switch. The initial setting
switch will be turned off and return to the
picture previously.
When the �Default" switch is pushed, all
menus are initialized.
Z18018
CHANGING THE AUDIO LANGUAGE
Push the �Audio Language" switch on the
�Setup Menu" and the �Select Audio
Lang." screen appears.
Select the language you want to hear by
pushing the appropriate switch on the
screen.
To return to the �Setup Menu" screen,
push the �Back" switch.
If you cannot find the language you want
to hear, push the �Others" switch. The
�Enter Audio Lang. Code" screen will ap-
pear.
Z18019
To select an audio language, use the joys-
tick to enter the appropriate 4−digit lan-
guage code. For details of the language
codes, see the language code list.
If a code which is not on the list is en-
tered and the �ENT" button is pushed, the
�Incorrect Code" screen will appear. Enter
the code of the language you want to hear
again.
To return to the �Select Audio Lang."
screen, push the �Back" switch.