Page 227 of 278

9-38
INSPECTION AND MAINTENANCE
80J21-03E
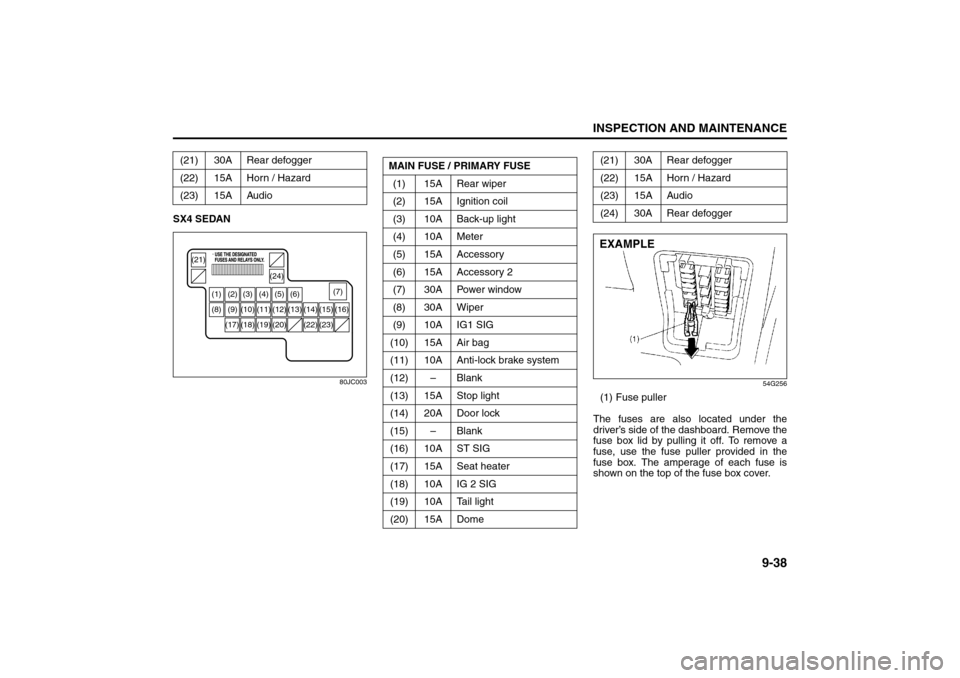
SX4 SEDAN
80JC003
54G256
(1) Fuse puller
The fuses are also located under the
driver’s side of the dashboard. Remove the
fuse box lid by pulling it off. To remove a
fuse, use the fuse puller provided in the
fuse box. The amperage of each fuse is
shown on the top of the fuse box cover. (21) 30A Rear defogger
(22) 15A Horn / Hazard
(23) 15A Audio
(1) (2) (3) (4) (5) (6)
(8) (9) (10) (11) (12) (13)
(21)
(24)
(14) (15) (16)
(18) (17) (19) (20) (22) (23)(7)
MAIN FUSE / PRIMARY FUSE
(1) 15A Rear wiper
(2) 15A Ignition coil
(3) 10A Back-up light
(4) 10A Meter
(5) 15A Accessory
(6) 15A Accessory 2
(7) 30A Power window
(8) 30A Wiper
(9) 10A IG1 SIG
(10) 15A Air bag
(11) 10A Anti-lock brake system
(12) – Blank
(13) 15A Stop light
(14) 20A Door lock
(15) – Blank
(16) 10A ST SIG
(17) 15A Seat heater
(18) 10A IG 2 SIG
(19) 10A Tail light
(20) 15A Dome
(21) 30A Rear defogger
(22) 15A Horn / Hazard
(23) 15A Audio
(24) 30A Rear defoggerEXAMPLE
Bulb Replacement: 7
Page 228 of 278

9-39INSPECTION AND MAINTENANCE
80J21-03E
65D046
NOTE:
Make sure that the fuse box always carries
spare fuses.
Headlight AimingSince special procedures are required, we
recommend you take your vehicle to your
SUZUKI dealer for headlight alignment.
Bulb ReplacementNOTE:
If it is difficult to replace headlight bulbs or
parking light bulbs due to under-hood com-
ponents trust this job to your dealer.
WARNING
Always be sure to replace a blown
fuse with a fuse of the correct amper-
age. Never use a substitute such as
aluminum foil or wire to replace a
blown fuse. If you replace a fuse and
the new one blows in a short period
of time, you may have a major electri-
cal problem. Have your vehicle
inspected immediately by your
SUZUKI dealer.
BLOWN OK
WARNING
Light bulbs can be hot enough to
burn your finger right after being
turned off. This is true especially
for halogen headlight bulbs.
Replace the bulbs after they
become cool enough.
The headlight bulbs are filled with
pressurized halogen gas. They can
burst and injure you if they are hit
or dropped. Handle them carefully.
CAUTION
The oils from your skin may cause a
halogen bulb to overheat and burst
when the lights are on. Grasp a new
bulb with a clean cloth.
CAUTION
Frequent replacement of a bulb indi-
cates the need for an inspection of
the electrical system. This should be
carried out by your SUZUKI dealer.
Wiper Blades: 3
Page 229 of 278
9-40
INSPECTION AND MAINTENANCE
80J21-03E
Center Interior Light (if equipped)
60G115
Pull down the lens by using a plain screw
driver covered with a soft cloth as shown.
To install it, simply push it back in.
The bulb can be removed by simply pulling
it out. When replacing the bulb, make sure
that the contact springs are holding the
bulb securely.
Headlights
65D149
54G121
Open the engine hood. Remove the cou-
pler and the rubber cover. Then unhook
the bulb holding spring and replace the
bulb.
Other General LightsBulb holder
54G123
(1) Removal
(2) Installation
To remove a bulb holder from a light hous-
ing, turn the holder counterclockwise and
pull it out. To install the holder, push the
holder in and turn it clockwise.
(1)
(1) (2)(2)
EXAMPLE
Wiper Blades: 3
Page 230 of 278
9-41INSPECTION AND MAINTENANCE
80J21-03E
Bulb
54G124
(3) Removal
(4) Installation
There are two types of bulb, “Full glass
type” (1) and “Glass/metal type” (2).
To remove and install a full glass type bulb
(1), simply pull out or push in the bulb.
To remove a glass metal type bulb (2) from
a bulb holder, push in the bulb and turn it
counterclockwise. To install a new bulb,
push it in and turn it clockwise.
You can access the individual bulb or bulb
holders as follows.Front parking light (1)
Front turn signal light (2)
79J012
Front fog light (if equipped)
SX4
80J006
SX4 SEDAN
55KS039
(1)
(2) (3)
(4)EXAMPLE
(1)
(2)
Wiper Blades: 3
Page 231 of 278
9-42
INSPECTION AND MAINTENANCE
80J21-03E
Rear combination light
(tail, stop, turn signal, etc.)
SX4
79J014
SX4 SEDAN
80JC046
Spot light
79J131
License plate light
SX4
75F087
SX4 SEDAN
56KN048
EXAMPLE
Wiper Blades: 3
Air Conditioning System: 4
Page 232 of 278
9-43INSPECTION AND MAINTENANCE
80J21-03E
Luggage compartment light (SX4)
79J015
Trunk room light (SX4 SEDAN)
56KN004
High-mount stop light (if equipped)
SX4
80J100
To remove a high-mounted stop light hous-
ing the following procedure:
1) Open the tailgate, and remove the nuts
(1) as shown in the illustration.
63J127
2) Close the tailgate. Remove a high-
mounted stop light housing (2) from the
tailgate.
63J107
(1)
(2)
(3) (3)
(4)
Page 233 of 278
9-44
INSPECTION AND MAINTENANCE
80J21-03E
63J108
3) Pushing the unguiform prongs (3)
toward inside and remove the bulb
holder (4).
4) Replace the bulbs.
To install a high-mounted stop light
housing in the reverse order of removal.SX4 SEDAN
80JC047
Wiper Blades
80G083
If the wiper blades become brittle or dam-
aged, or make streaks when wiping,
replace the wiper blades.
To install new wiper blades, follow the pro-
cedures below.
NOTE:
Some wiper blades may be different from
the ones described here depending on
vehicle specifications. If so, consult your
SUZUKI dealer for proper replacement
method.
CAUTION
To avoid scratching or breaking the
window, do not let the wiper arm
strike the window while replacing the
wiper blade.
Page 242 of 278

10-3EMERGENCY SERVICE
80J21-03E
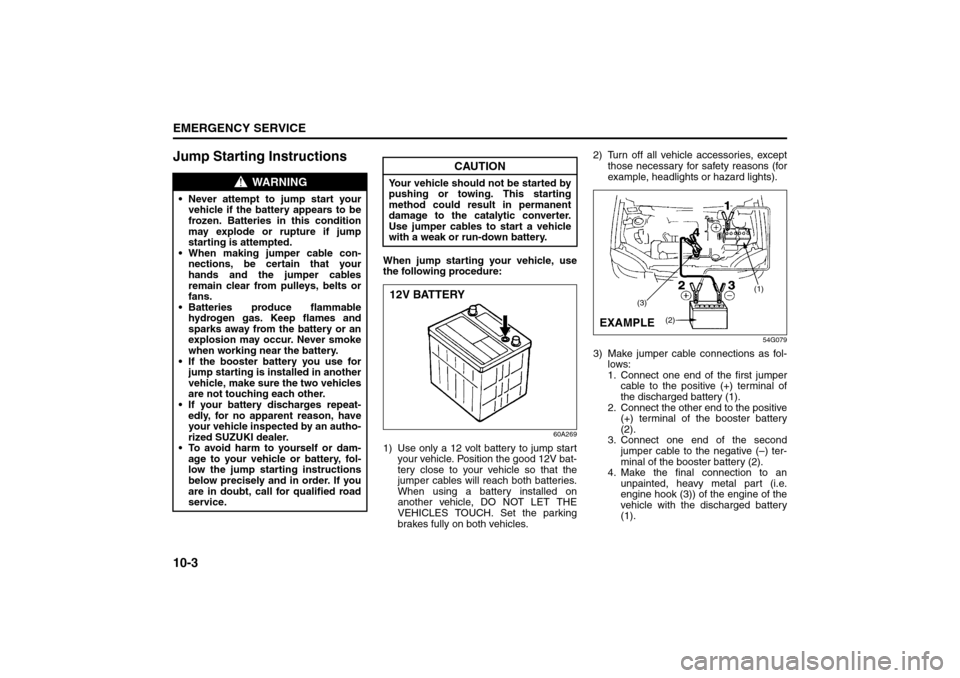
Jump Starting Instructions
When jump starting your vehicle, use
the following procedure:
60A269
1) Use only a 12 volt battery to jump start
your vehicle. Position the good 12V bat-
tery close to your vehicle so that the
jumper cables will reach both batteries.
When using a battery installed on
another vehicle, DO NOT LET THE
VEHICLES TOUCH. Set the parking
brakes fully on both vehicles.2) Turn off all vehicle accessories, except
those necessary for safety reasons (for
example, headlights or hazard lights).
54G079
3) Make jumper cable connections as fol-
lows:
1. Connect one end of the first jumper
cable to the positive (+) terminal of
the discharged battery (1).
2. Connect the other end to the positive
(+) terminal of the booster battery
(2).
3. Connect one end of the second
jumper cable to the negative (–) ter-
minal of the booster battery (2).
4. Make the final connection to an
unpainted, heavy metal part (i.e.
engine hook (3)) of the engine of the
vehicle with the discharged battery
(1).
WARNING
Never attempt to jump start your
vehicle if the battery appears to be
frozen. Batteries in this condition
may explode or rupture if jump
starting is attempted.
When making jumper cable con-
nections, be certain that your
hands and the jumper cables
remain clear from pulleys, belts or
fans.
Batteries produce flammable
hydrogen gas. Keep flames and
sparks away from the battery or an
explosion may occur. Never smoke
when working near the battery.
If the booster battery you use for
jump starting is installed in another
vehicle, make sure the two vehicles
are not touching each other.
If your battery discharges repeat-
edly, for no apparent reason, have
your vehicle inspected by an autho-
rized SUZUKI dealer.
To avoid harm to yourself or dam-
age to your vehicle or battery, fol-
low the jump starting instructions
below precisely and in order. If you
are in doubt, call for qualified road
service.
CAUTION
Your vehicle should not be started by
pushing or towing. This starting
method could result in permanent
damage to the catalytic converter.
Use jumper cables to start a vehicle
with a weak or run-down battery.12V BATTERY
(1)
(3)
(2)
EXAMPLE
Jacking Instructions: 5