Page 9 of 96

Quick Reference Guide
8Whenever the directions of this manual tell you to press one of these two
function buttons, you can choose whether to use the buttons on your screen
or the unlabelled buttons underneath them.
Starting functions or enabling functions with “checkboxes”
Some functions are immediately started and stopped by pressing a button,
for example the scan function ⇒page 17, “Scan function”.
Other additional functions and displays can be permanently enabled or disa-
bled. These function buttons appear with a “checkbox”.
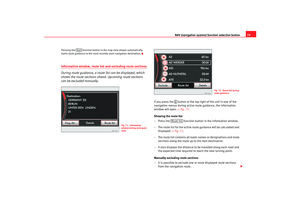
A tick in the checkbox
indicates that the function is enabled, and an empty
checkbox
indicates that it is disabled ⇒page 7, fig. 2 .
For instance, traffic news monitoring or station button display in Radio
mode ⇒page 9, fig. 3 can be enabled or disabled ⇒page 7,
fig. 2 .
Any functions enabled by checkbox can only be disabled by opening the pop-
up window again and pressing the respective checkbox.
Additional screen displays
If no function buttons are displayed on the screen in the navigation map view,
briefly press the bottom-left or bottom-right area of the screen to display the
available function buttons.
In some vehicles, changes to the climate control settings are briefly displayed
on the screen in a pop-up window.
Brief displays may appear on the screen with some factory-fitted driver assist-
ance systems3). These displays disappear automatically when they are not
longer required.
3)Optional equipment!
A11
TP
Presets
AA
media_system_ingles.book Seite 8 Donnerstag, 5. Februar 2009 3:31 15
Page 10 of 96

Quick Reference Guide9
Operating the unit with the setting knob
You can use the setting knob to open submenus and select
displayed menu items.
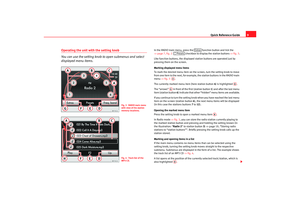
In the RADIO main menu, press the function button and tick the
⇒ page 7, fig. 2 checkbox to display the station buttons ⇒ fig. 3.
Like function buttons, the displayed station buttons are operated just by
pressing them on the screen.
Marking displayed menu items
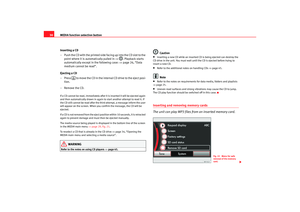
To mark the desired menu item on th e screen, turn the setting knob to move
from one item to the next, for example, the station buttons in the RADIO main
menu ⇒fig. 3 .
The currently marked menu item (here station button 4) is highlighted .
The “arrows” in front of the first (station button 1) and after the last menu
item (station button 6) indicate that other “hidden” menu items are available.
If you continue to turn the setting knob when you have reached the last menu
item on the screen (station button 6), the next menu items will be displayed
(in this case the stations buttons 7 to 12).
Opening the marked menu item
Press the setting knob to open a marked menu item .
In Radio mode ⇒fig. 3 , you can store the radio station currently playing to
the marked station button and pressing and holding the setting known (in
the illustration: “ Radio 2” to station button 3) ⇒ page 19, “Storing radio
stations to “station buttons””. Briefly pressing the setting knob calls up the
station stored.
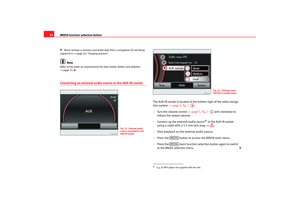
Marking and opening items in a list
If the main menu contains no menu items that can be selected using the
setting knob, turning the setting knob moves straight to the respective
submenu. Submenus are displayed in the form of a list. The example shows
the track list of an MP3 CD ⇒fig. 4 .
A list opens at the position of the curre ntly selected track/station, which is
also highlighted .
Fig. 3 RADIO main menu
with view of the station
memory locations.Fig. 4 Track list of the
MP3 CD.
Extras
PresetsAA
AB
AG
AB
AB
media_system_ingles.book Seite 9 Donnerstag, 5. Februar 2009 3:31 15
Page 11 of 96

Quick Reference Guide
10Turn the setting knob to move a selection box ⇒page 9, fig. 4 within the
list. When the selection box is moved to the end of the list, the list view
“jumps” to the next set of menu items.
Press the setting knob to open the item (track/station) marked within the
selection box.
Moving the scroll marker on the screen
If there are more items available than can be displayed on the screen, this is
indicated by a form of “scroll bar” on the left of the screen. The coloured semi-
circle indicates the size of the overall list and the “ scroll marker” ⇒ page 9,
fig. 4 shows the position of the section of the list currently displayed. The
size of the scroll marker corresponds to the size of the current section of the
list relative to the list as a whole. The smaller the scroll marker, the longer the
overall list (see ⇒page 15, fig. 9 ).
To view the list page by page, briefly press the screen above or below the
scroll marker.
To quickly move through the list, you can also “drag” the scroll marker
manually. To do so, place your finger on the scroll marker and move your
finger downwards across the screen without losing contact.
The scroll marker follows your moveme nts, but only along the pre-defined
line (semi-circle). When it is in the co rrect position, lift your finger from the
screen.
Closing a submenu or a list view
Press the button at the bottom of the unit ⇒page 3, fig. 1 to move
from any submenu to the next menu up. You can go back as far as the respec-
tive main menu.
Vehicles with multi-function steering wheel
4)
Some actions (e.g. adjusting the volume, changing track) can also be carried
out with the controls on the multi-func tion steering wheel. See your vehicle owner's manual for instructions on
operation using the multi-function
steering wheel.
About this operating manualTo facilitate your comprehension, we have included a brief
description of the operations an d functions contained in this
manual.If changes have already been made to the basic settings, you may find that
some aspects of the unit's operation diff er from the descriptions given in this
manual ⇒page 11, “Resetting the unit to the factory settings”.
Unit buttons, function select ion buttons and function buttons
In the text of this instruction manual, there is a distinction made between the
hardkeys and the “function buttons” (softkeys) that appear on the screen.
The printed unit buttons (e.g. the function selection buttons ⇒page 3, fig. 1
) are always accompanied by the word “button”. For example, then, the
phrase in the manual would be: “Briefly press the function selection
button.” If the manual is talking about a “button” or a “main menu button”
along with a symbol of a button , you will always find this button on the
equipment and not on the screen. You will find an overview and brief descrip-
tion of the unit buttons at the beginning of the manual ⇒page 3, fig. 1 .
The function buttons are shown in the text with the words “function button”
and the symbol of the button or perhaps only with the symbol of the
button .
The first time a function button is referenced in an illustration, a reference to
the illustration is added to the symbol of the button. The reference of a figure
can be found at the beginning of the de scription of the figure. When the text
refers to another illustration, a new re ference will be added to the illustration.
4)Optional equipment!
AC
AH
AH
A8
A2
RADIO
......
...
media_system_ingles.book Seite 10 Donnerstag, 5. Februar 2009 3:31 15
Page 12 of 96
 and additional control elements are explaine")
Quick Reference Guide11
Structure of the operating manual
The unit overview is at the beginning of the operating manual. Here the unit
buttons (hard keys) and additional control elements are explained in a brief
overview.
In the following manual, when the position of the control is described in
detail, a reference to the equipment overview and the number used to distin-
guish it will be used. In the followi ng figures of the manual, only the the
content of the screens will be shown.
At the beginning of each main chapter, there is an overview with a brief expla-
nation of the functions available. An explanation of the individual steps can
be found in the following chapters.
Altered display appearance
The unit's software may have been mod ified with vehicle-specific updates
since the publication of this operating manual. if this is the case, the names
of certain function button and the display colours may differ from the descrip-
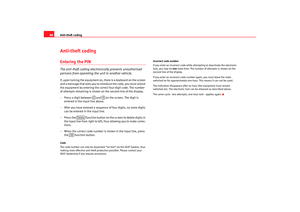
tions given in this operating manual.Resetting the unit to the factory settingsIt is possible to reset the radio-navigation system to its orig-
inal state as described in this manual.If changes have already been made to the basic settings, you may
find that some aspects of the unit's operation differ from the
descriptions given in this manual. We therefore recommend that you
reset the unit to the factory settings if you are operating it for the first
time.
– Press the function selection button on the right of the unit ⇒page 3, fig. 1 . – Press the function button on the screen.
– This opens the system settings menu. Now press the
function button.
– You are then asked to confirm the command. Press the func- tion button at the bottom left of the screen to confirm.
Note
Please not that resetting to the fact ory settings will erase all previously
entered data and settings. Any destinations you have saved or navigated to
will also be deleted!
SETUP
A2
System
Factory settings
Ye s
media_system_ingles.book Seite 11 Donnerstag, 5. Februar 2009 3:31 15
Page 13 of 96

Quick Reference Guide
12Sound and volume settingsIn this menu, you can adjust the sound character and the
volume settings to suit your individual needs.
The various sound and volume settings can either be switched on
and off or are steplessly adjustable ⇒page 7, “Touchscreen,
buttons and function buttons”.
Calling up the Sound settings main menu
– From any menu, press the function selection button and then press the function button at the bottom left of the
screen.
– The menu for adjusting the sound and volume settings opens ⇒fig. 5. The current settings for volume distribution and sound
character are each indicated by a graphic scale in the circle next
to the respective menu item.
Changing the volume distribution (Balance and Fader) or sound
character
– Press or to open the settings menu for changing the sound focus to the left or the right (Balance) and to the front
or rear (Fader
5)).
– Press , or to open the respective settings menu for changing the “sound character”.
– Turn the setting knob or press one of the function buttons at the bottom of the screen to alter the current settings. The graphic
scale shows the adjustment of the setting.
Changing volume settings
–Press ⇒fig. 5 to adjust a volume setting. The currently
selected volume settings are indicated by the graphic scale in
the circle next to the respective menu item.
Fig. 5 Selection menu for
sound settings.Fig. 6 Settings menu for
speed-dependent volume
control (GALA).
5)Optional equipment! Only in vehicles with additional loudspeakers in the rear
SETUP
Sound
Balance
Fader
Treble
Mid
Bass
Volume
media_system_ingles.book Seite 12 Donnerstag, 5. Februar 2009 3:31 15
Page 14 of 96

Quick Reference Guide13
– Press the function button ,
, or
to open the corresponding
settings menu.
– Turn the setting knob or use the or function buttons to alter
the current setting. The graphic scale shows the adjustment of
the setting ⇒page 12, fig. 6 .
To give you an idea of the changes you are making when adjusting the volume
settings, the current audio source is played at the adjusted settings while you
make an adjustment.
Changes to tone, volume and volume distribution always apply to all audio
sources.
Functional description of speed- dependent volume control (GALA)
You can set the degree to which the volume increases with speed (GALA) on
a scale between 1 and 7. At 0, speed-dependent volume control is switched
off (display: Off).
The noise level in the vehicle increases with vehicle speed. The GALA function
automatically adjusts the volume in line with the speed of the vehicle.
If a low value is set, the volume rises only slightly when the speed of the
vehicle increases.
If a high value is set, the volume rises significantly when the speed of the
vehicle increases.
In this way you can always adjust the GALA function in each situation in the
most optimum manner (for example, if dr iving with the windows open or if the
vehicle is equipped with a roof carrier).
The basic volume is still changed with the volume control ⇒page 3, fig. 1
.
Switch-on volume
Traffic announcements (TP)
Navigation volume
Speed-dependent vol. adjustment SCV
+
-
A1
media_system_ingles.book Seite 13 Donnerstag, 5. Februar 2009 3:31 15
Page 15 of 96

RADIO function selection button
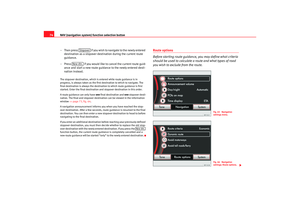
14RADIO function selection buttonRadio modeSelecting the RADIO main menu and the frequency band
Press the button to open the RADIO main menu and to
change the frequency band.Opening the RADIO main menu
– Press the button to open the RADIO main menu. The
station you are currently listening to is shown in the middle of the
screen ⇒ fig. 7. With RDS-compatible
6) stations, the station
name is displayed if reception is strong enough, e.g. “ Radio 2”. Changing frequency band
–In the RADIO
main menu, press the button to change the
frequency band. The currently selected frequency band (FM or
AM) is indicated above the station name and in the bottom line
of the screen ⇒fig. 7.
– Alternatively, in the RADIO main menu, you can change
frequency band by pressing the function button for the
desired frequency band ⇒page 15, fig. 8 .
The AM and FM frequency bands
The AM frequency band (amplitude modula tion) is equivalent to the medium
wave frequency band. The FM frequency band (frequency modulation) is
equivalent to very high frequency.
6)“ R adio Data System” - is used to transmit programme identifiers and additional serv-
ices ⇒page 21
RADIO
Fig. 7 RADIO main menu.
RADIO
RADIO
Band
media_system_ingles.book Seite 14 Donnerstag, 5. Februar 2009 3:31 15
Page 16 of 96

RADIO function selection button15
Changing and selecting radio stations
You can switch through all stations that can currently be
received one after the other. All FM radio stations with a
strong reception are stored in the FM station list and can be
selected individually from the list.
Open the RADIO main menu ⇒ page 14.
Automatically changing radio station
– Briefly press the arrow buttons or ⇒page 3, fig. 1 to
change to the next receivable station on the current frequency
band.
–If TP is displayed on the screen, you will only receive stations that
support the traffic news function (TP ⇒ page 23) or EON
⇒ page 24, “EON (Enhanced Other Network)”.
–If “
” is displayed in the RADIO main menu ⇒page 20,
fig. 15 , press the arrow buttons only changes to stored stations
⇒ page 21.
Opening the FM station list
– Change to the FM frequency band ⇒page 14.
Fig. 8 RADIO main menu:
Band function button.
Fig. 9 FM station list:
Radio 2 currently playing.
A3
media_system_ingles.book Seite 15 Donnerstag, 5. Februar 2009 3:31 15