2008 Seat Ibiza 5D ECU
[x] Cancel search: ECUPage 180 of 260
Checking and refilling levels
178Checking and refilling levelsRefuellingThe tank flap is released manually. The tank holds approxi-
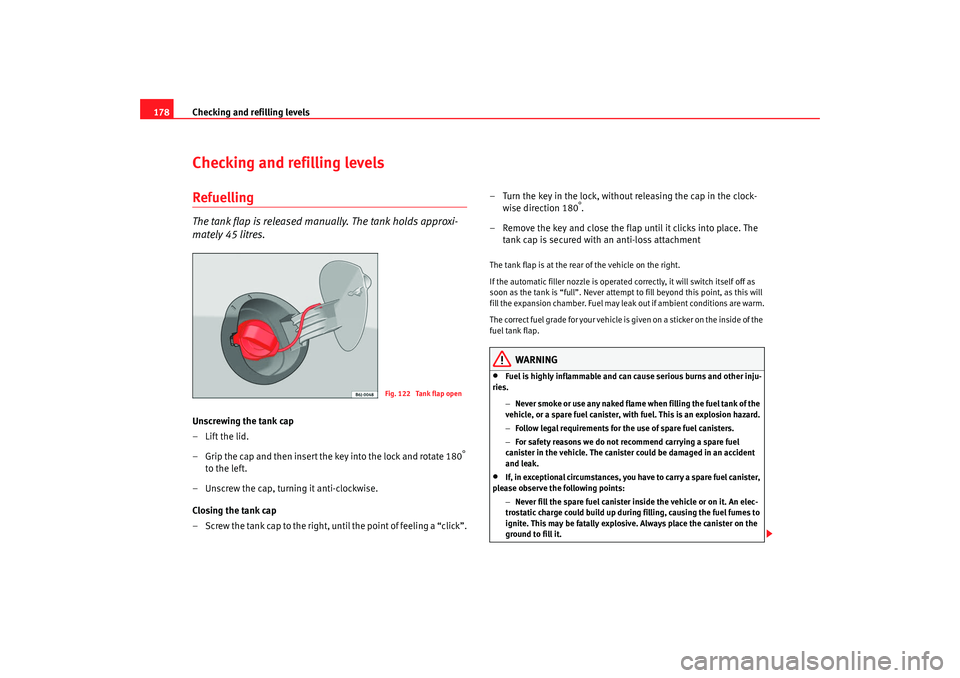
mately 45 litres.Unscrewing the tank cap
–Lift the lid.
– Grip the cap and then insert the key into the lock and rotate 180
°
to the left.
– Unscrew the cap, turning it anti-clockwise.
Closing the tank cap
– Screw the tank cap to the right, until the point of feeling a “click”. – Turn the key in the lock, without releasing the cap in the clock-
wise direction 180
°.
– Remove the key and close the flap until it clicks into place. The tank cap is secured with an anti-loss attachment
The tank flap is at the rear of the vehicle on the right.
If the automatic filler nozzle is operated correctly, it will switch itself off as
soon as the tank is “full”. Never attempt to fill beyond this point, as this will
fill the expansion chamber. Fuel may leak out if ambient conditions are warm.
The correct fuel grade for your vehicle is given on a sticker on the inside of the
fuel tank flap.
WARNING
•
Fuel is highly inflammable and can cause serious burns and other inju-
ries.
−Never smoke or use any naked flame when filling the fuel tank of the
vehicle, or a spare fuel canister, with fuel. This is an explosion hazard.
− Follow legal requirements for the use of spare fuel canisters.
− For safety reasons we do not recommend carrying a spare fuel
canister in the vehicle. The canister could be damaged in an accident
and leak.
•
If, in exceptional circumstances, you have to carry a spare fuel canister,
please observe the following points:
−Never fill the spare fuel canister inside the vehicle or on it. An elec-
trostatic charge could build up during filling, causing the fuel fumes to
ignite. This may be fatally explosive. Always place the canister on the
ground to fill it.
Fig. 122 Tank flap open
Ibiza250_angles Seite 178 Dienstag, 5. August 2008 1:11 13
Page 184 of 260

Checking and refilling levels
182•
Avoid causing short-circuits in the electrical system, particularly at the
points where the jump leads are attached ⇒page 227. The battery could
explode.
•
Never touch the radiator fan. It is temperature controlled and could
start automatically, even when the engine has been switched off and the
key removed from the ignition!
•
Do not unscrew the cap on the expansion tank when the engine is hot.
If the coolant is hot, the cooling system will be pressurised!
•
Protect face, hands and arms by covering the cap with a large, thick
cloth to protect against escaping coolant and steam.
•
Always make sure you have not left any objects, such as cleaning cloths
and tools, in the engine compartment.
•
If you have to work underneath the vehicle, you must use suitable
stands additionally to support the vehicle, there is a risk of accident!. A
hydraulic jack is insufficient for securing the vehicle and there is a risk of
injury.
•
If any work has to be performed when the engine is started or with the
engine running, there is an additional, potentially fatal, safety risk from the
rotating parts, such as the drive belts, alternator, radiator fan, etc., and
from the high-voltage ignition syst em. You should also observe the
following points:
−Never touch the electrical wiri ng of the ignition system.
− Ensure that jewellery, loose clothing and long hair do not get
trapped in rotating engine parts. Danger of death. Before starting any
work remove jewellery, tie back and cover hair, and wear tight-fitting
clothes.
− Always think carefully about pressing the accelerator if a gear is
engaged in either an automatic or manual gearbox. The vehicle could
move, even if the handbrake is applied. Danger of death.
•
If work has to be carried out on the fuel system or on electrical compo-
nents, you must observe the following safety notes in addition to the above
warnings:
−Always disconnect the battery. The vehicle must be unlocked when
this is done, otherwise the alarm will be triggered.
− Do not smoke.
− Never work near naked flames.
− Always have a fire extinguisher on hand.Caution
When changing or topping up service fluids, make absolutely certain that you
fill the fluids into the correct reservoirs. Failure to observe this point will result
in serious malfunctions and engine damage!
For the sake of the environment
Service fluids leaks are harmful to th e environment. For this reason you
should make regular checks on the ground underneath your vehicle. If you
find spots of oil or other fluids, have your vehicle inspected in a qualified
workshop.
WARNING (continued)
WARNING (continued)
Ibiza250_angles Seite 182 Dienstag, 5. August 2008 1:11 13
Page 185 of 260
Checking and refilling levels183
Safety First
Operating instructions
Practical tips
Te c h n i c a l D a t a
Opening the bonnet
The bonnet is released from inside the vehicle.
Before opening the bonnet ensure that the windscreen wipers are in
rest position.
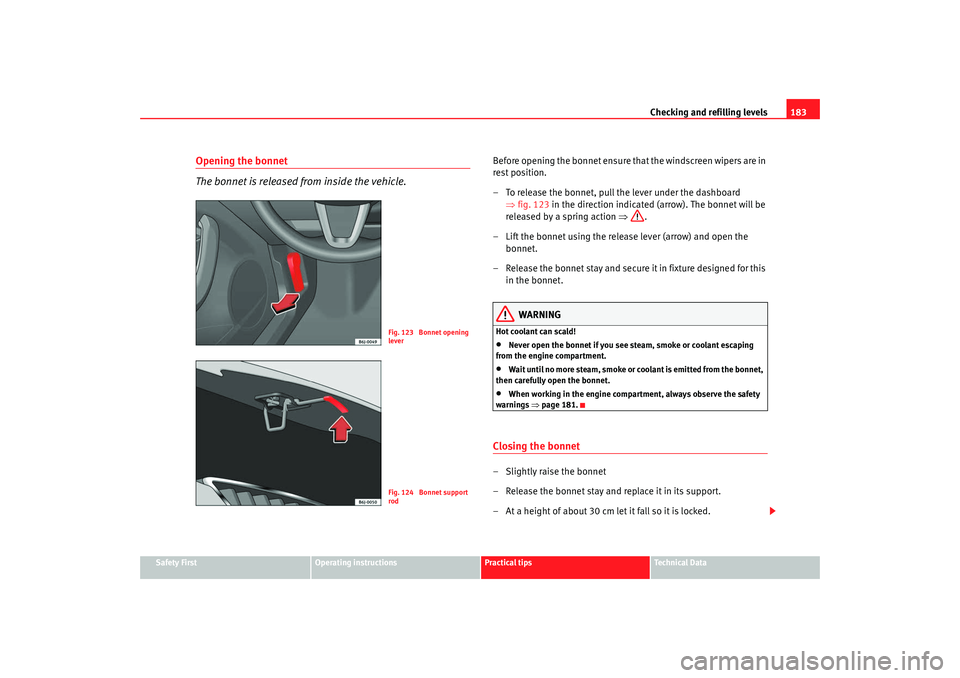
– To release the bonnet, pull the lever under the dashboard
⇒fig. 123 in the direction indicated (arrow). The bonnet will be
released by a spring action ⇒.
– Lift the bonnet using the rele ase lever (arrow) and open the
bonnet.
– Release the bonnet stay and secure it in fixture designed for this in the bonnet.
WARNING
Hot coolant can scald!•
Never open the bonnet if you see steam, smoke or coolant escaping
from the engine compartment.
•
Wait until no more steam, smoke or coolant is emitted from the bonnet,
then carefully open the bonnet.
•
When working in the engine compartm ent, always observe the safety
warnings ⇒page 181.
Closing the bonnet– Slightly raise the bonnet
– Release the bonnet stay and replace it in its support.
– At a height of about 30 cm let it fall so it is locked.
Fig. 123 Bonnet opening
leverFig. 124 Bonnet support
rod
Ibiza250_angles Seite 183 Dienstag, 5. August 2008 1:11 13
Page 186 of 260
Checking and refilling levels
184If the bonnet does not close, do not press downwards. Open it once more and
let it fall as before.
WARNING
If the bonnet is not closed properly, it could open while you are driving and
completely obscure your view of the road. Risk of accident.•
After closing the bonnet, always check that it is properly secured. The
bonnet must be flush with the surrounding body panels.
•
If you notice that the bonnet latch is not secured when the vehicle is
moving, stop the vehicle immediately and close the bonnet properly. Risk
of accident.
Engine oilEngine oil specifications
The engine oil used must conform with exact specifications.Specifications
The engine comes with a special, high quality, multi grade oil that can be
used in all seasons of the year except for those regions affected by extreme
cold.
As the use of good qualit y oil is necessary for the correct operation and long
service life of the engine, when it be comes necessary to replenish or change
the oil, always use an oil that complies to the VW standards.
If it is not possible to find oil conforming to the VW standards then oil
conforming to the ACEA or API standards with an appropriate viscosity at
atmospheric temperature should be used instead. The use of this type of oil may have some repercussions on the performance of the engine for example,
long starting time, increased consumption and a higher emission level.
If a top up is required then different oils may be mixed as long as they all
conform to the VW standards.
The specifications (VW standards) set out in the following page should
appear on the container of the service oil; the container will display together
the different standards for petrol and diesel engines, the oil can be used for
both types of engines.
Ibiza250_angles Seite 184 Dienstag, 5. August 2008 1:11 13
Page 194 of 260
Checking and refilling levels
192
– Press on the securing tab.
– Extract the wiper blade from the wiper arm.
Fitting the wiper blade
– Insert the wiper blade onto the windscreen wiper arm until it clicks into place.
– Make sure that the blade faces down when fitting a blade with integrated deflector blade.
– Place the wiper arms in their initial position.If the windscreen wipers smear , they should be replaced if they are damaged,
or cleaned if they are soiled.
If this does not produce the desired results, the setting angle of the wind-
screen wiper arms might be incorrect. They should be checked by a qualified
workshop and corrected if necessary.
WARNING
Do not drive unless you have good visibility through all windows!•
Clean the windscreen wiper blades and all windows regularly.
•
The wiper blades should be changed once or twice a year.Caution
•
Damaged or dirty windscreen wipers could scratch the windscreen.
•
Never use fuel, nail varnish remover, paint thinner or similar products to
clean the windows. This could damage the windscreen wiper blades.
•
Never move the windscreen wiper or windscreen wiper arm manually. This
could cause damage.
Note
•
The wiper arms can be moved to the service position only when the
bonnet is properly closed.
Changing the rear wiper blade
A good rear wiper blade is essential for clear rear vision.
Damaged wiper blades should be replaced immediately.Removing the wiper blade
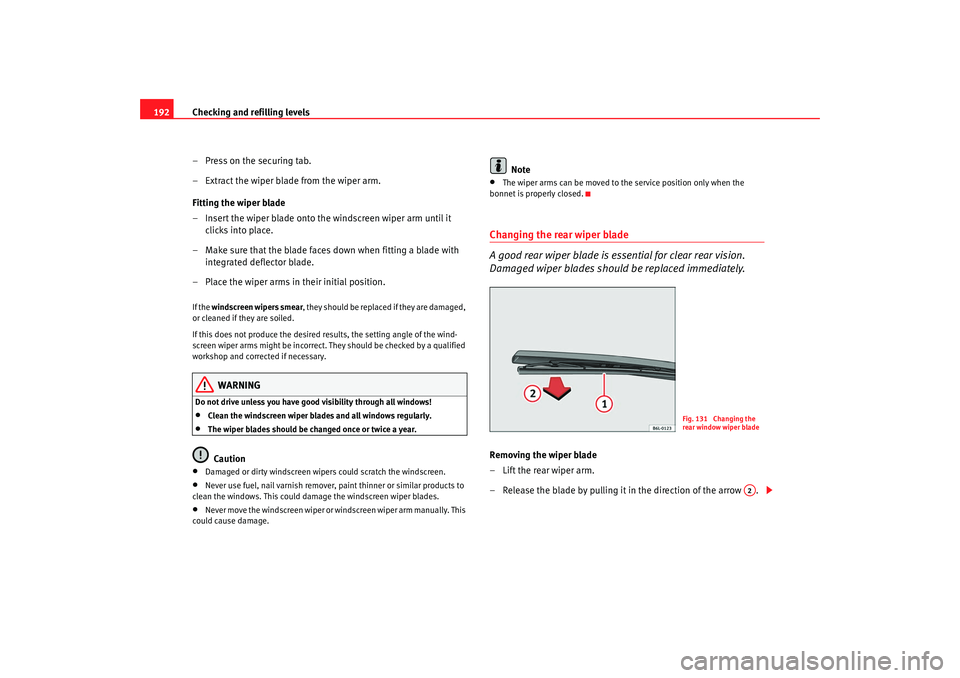
– Lift the rear wiper arm.
– Release the blade by pulling it in the direction of the arrow .
Fig. 131 Changing the
rear window wiper blade
A2
Ibiza250_angles Seite 192 Dienstag, 5. August 2008 1:11 13
Page 203 of 260
Checking and refilling levels201
Safety First
Operating instructions
Practical tips
Te c h n i c a l D a t a
heads must be used. This ensures that wheels are fitted securely and that the
brake system functions correctly.
In certain circumstances, you may not
use wheel bolts from a different car -
even if it is the same model ⇒page 173.
WARNING
If the wheel bolts are not tightened correctly, the wheel could become
loose while driving. Risk of accident.•
The wheel bolts must be clean and turn easily. Never apply grease or oil
to them.
•
Use only wheel bolts which belong to the wheel.
•
If the prescribed torque of the wheel bolts is too low, they could loosen
whilst the vehicle is in motion. Risk of accident! If the tightening torque is
too high, the wheel bolts and threads can be damaged.Caution
The prescribed torque for wheel bolts for steel and alloy wheels is 120 Nm.Winter tyres
Winter tyres will improve the vehicles handling on snow and
ice.In winter conditions winter tyres will considerably improve the vehicles
handling. The design of summer tyre s (width, rubber compound, tread
pattern) gives less grip on ice and snow.
Winter tyres must be inflated to a pressure 0.2 bar higher than the pressures
specified for summer tyres (see sticker on tank flap).
Winter tyres must be fitted on all four wheels. Information on permitted
winter tyre sizes can be found in the vehicle's regis-
tration documents. Use only radial winter tyres. All tyre sizes listed in the
vehicle documentation also apply to winter tyres.
Winter tyres lose their effectiveness when the tread is worn down to a depth
of 4 mm.
The speed rating code ⇒page 199, “New tyres and wheels” determines the
following speed limits applicable to winter tyres: ⇒
Q max. 160 km/h
S max. 180 km/h
T max. 190 km/h
H max. 210 km/h
In some countries, vehicles which can exceed the speed rating of the fitted
tyre must have an appropriate sticker in the driver's field of view. These
stickers are available from your Authorised Service Centre. The legal require-
ments of each country must be followed.
Do not have winter tyres fitted for unnecessarily long periods. Vehicles with
summer tyres handle better when the roads are free of snow and ice.
If you have a flat tyre, please refer to the notes on the spare wheel
⇒ page 199, “New tyres and wheels”.
WARNING
The maximum speed for the winter tyres must not be exceeded. Otherwise,
this could lead to tyre damage and thus, an accident risk.
For the sake of the environment
Fit your summer tyres in good time. They are quieter, do not wear so quickly
and reduce fuel consumption.
Ibiza250_angles Seite 201 Dienstag, 5. August 2008 1:11 13
Page 207 of 260
If and when205
Safety First
Operating instructions
Practical tips
Te c h n i c a l D a t a
WARNING
Switch on the hazard warning lights on and place the warning triangles in
position. This is for your own safety and also warns other road users.
Caution
If you have to change the wheel on a s lope, it is essential to lock the wheel
parallel and on the same axle as that to be changed, with a wedge or similar
in order to immobilise the vehicle.
Note
Please observe legal requirements when doing so.Changing a wheelChange the wheel as described below
– Remove the hub caps or the integral trim .
– Slacken the wheel bolts.
– Raise the car with the jack in the corresponding zone.
– Remove the wheel and then put on the spare wheel.
– Lower the vehicle.
– Tighten the wheel bolts firmly with the box spanner.
–Replace the hub cap.
After changing a wheel
After changing the wheel there are still tasks to complete.– Put the tools and jack back in the luggage compartment.
– Place the wheel with the defective tyre in the luggage compart-
ment and secure it.
– Check the tyre pressure of the newly fitted tyre as soon as
possible.
– Have the tightening torque of the wheel bolts checked as soon as possible with a torque wrench. The prescribed torque must be
120 Nm.
Note•
If you notice that the wheel bolts are corroded and difficult to turn when
changing a wheel, they must be replaced before having the wheel bolt torque
checked.
•
For your safety, drive at moderate speeds until the wheel bolt torque has
been checked.
Ibiza250_angles Seite 205 Dienstag, 5. August 2008 1:11 13
Page 208 of 260
If and when
206Wheel covers*
The wheel covers must be removed for access to the wheel
boltsRemoving
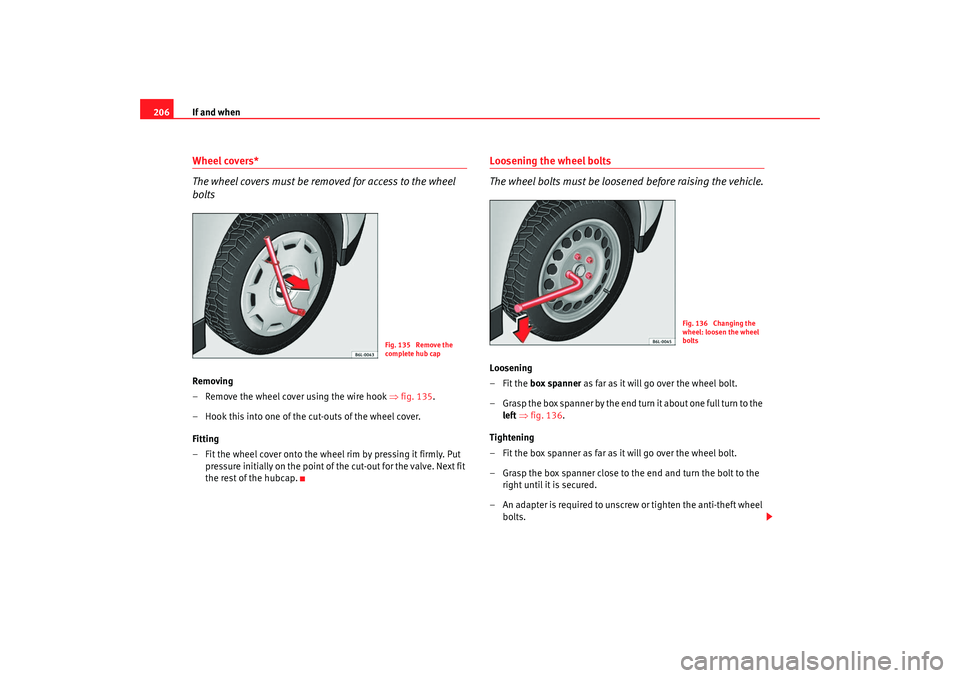
– Remove the wheel cover using the wire hook ⇒fig. 135.
– Hook this into one of the cut-outs of the wheel cover.
Fitting
– Fit the wheel cover onto the wheel rim by pressing it firmly. Put pressure initially on the point of the cut-out for the valve. Next fit
the rest of the hubcap.
Loosening the wheel bolts
The wheel bolts must be loosened before raising the vehicle.Loosening
–Fit the box spanner as far as it will go over the wheel bolt.
– Grasp the box spanner by the end turn it about one full turn to the left ⇒ fig. 136.
Tightening
– Fit the box spanner as far as it will go over the wheel bolt.
– Grasp the box spanner close to the end and turn the bolt to the right until it is secured.
– An adapter is required to unscrew or tighten the anti-theft wheel bolts.
Fig. 135 Remove the
complete hub cap
Fig. 136 Changing the
wheel: loosen the wheel
bolts
Ibiza250_angles Seite 206 Dienstag, 5. August 2008 1:11 13