2008 Seat Ibiza 5D diagram
[x] Cancel search: diagramPage 136 of 260
Driving
134After switching the engine off, the radiator fan may run on for up to 10
minutes. It is also possible that the fan turns itself on once more if the coolant
temperature increases due to the heat accumulated in the engine compart-
ment or due to its prolonged exposure to solar radiation.
WARNING
•
Never switch the engine off until the vehicle is completely stationary.
•
The brake servo works only when the engine is running. With the
engine switched off, more strength is needed to brake. As normal brake
operation cannot be performed, risk of accidents and serious injury may
exist.
•
The steering lock can be immediately blocked once the key is removed
from the ignition lock. The vehicle cannot be steered. Risk of accident.Caution
If the engine has been driven hard for a long period, the engine could over-
heat when it is switched off. Risk of engine damage. For this reason, you
should idle the engine for approx. 2 m inutes before you switch it off.
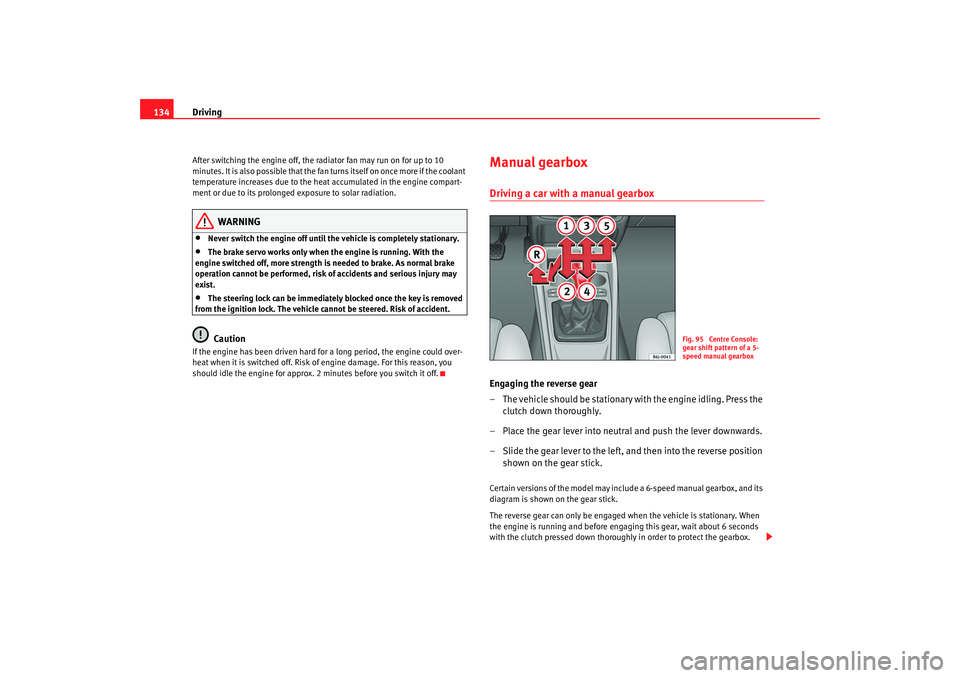
Manual gearboxDriving a car with a manual gearboxEngaging the reverse gear
– The vehicle should be stationary with the engine idling. Press the
clutch down thoroughly.
– Place the gear lever into neutral and push the lever downwards.
– Slide the gear lever to the left, and then into the reverse position shown on the gear stick.Certain versions of the model may include a 6-speed manual gearbox, and its
diagram is shown on the gear stick.
The reverse gear can only be engaged when the vehicle is stationary. When
the engine is running and before engagi ng this gear, wait about 6 seconds
with the clutch pressed down thoroughly in order to protect the gearbox.
Fig. 95 Centre Console:
gear shift pattern of a 5-
speed manual gearbox
Ibiza250_angles Seite 134 Dienstag, 5. August 2008 1:11 13
Page 187 of 260
Checking and refilling levels185
Safety First
Operating instructions
Practical tips
Te c h n i c a l D a t a
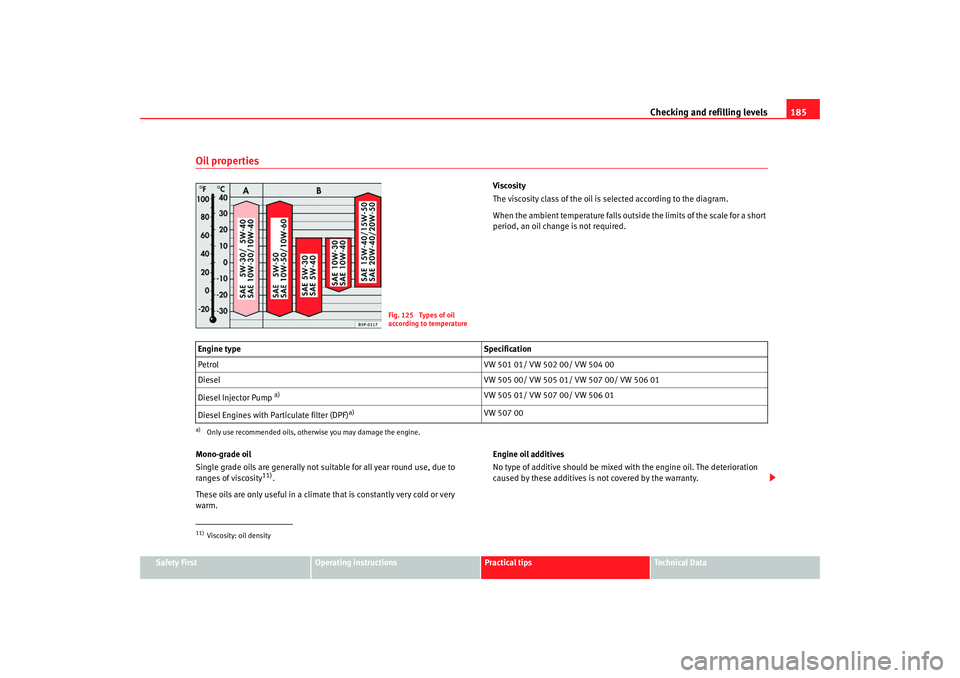
Oil properties
Viscosity
The viscosity class of the oil is selected according to the diagram.
When the ambient temperature falls outside the limits of the scale for a short
period, an oil change is not required.
Mono-grade oil
Single grade oils are generally not suitable for all year round use, due to
ranges of viscosity
11).
These oils are only useful in a climate that is constantly very cold or very
warm. Engine oil additives
No type of additive should be mixed with the engine oil. The deterioration
caused by these additives is not covered by the warranty.
Fig. 125 Types of oil
according to temperature
Engine type
Specification
Petrol VW 501 01/ VW 502 00/ VW 504 00
Diesel VW 505 00/ VW 505 01/ VW 507 00/ VW 506 01
Diesel Injector Pump
a)
a)Only use recommended oils, otherwise you may damage the engine.
VW 505 01/ VW 507 00/ VW 506 01
Diesel Engines with Particulate filter (DPF)
a)
VW 507 00
11)Viscosity: oil density
Ibiza250_angles Seite 185 Dienstag, 5. August 2008 1:11 13
Page 189 of 260
Checking and refilling levels187
Safety First
Operating instructions
Practical tips
Te c h n i c a l D a t a
Topping up engine oil
Top up gradually with small quantities of oil.
Before opening the bonnet, read and observe the warnings ⇒ in
“Safety instructions on working in the engine compartment” on
page 181.
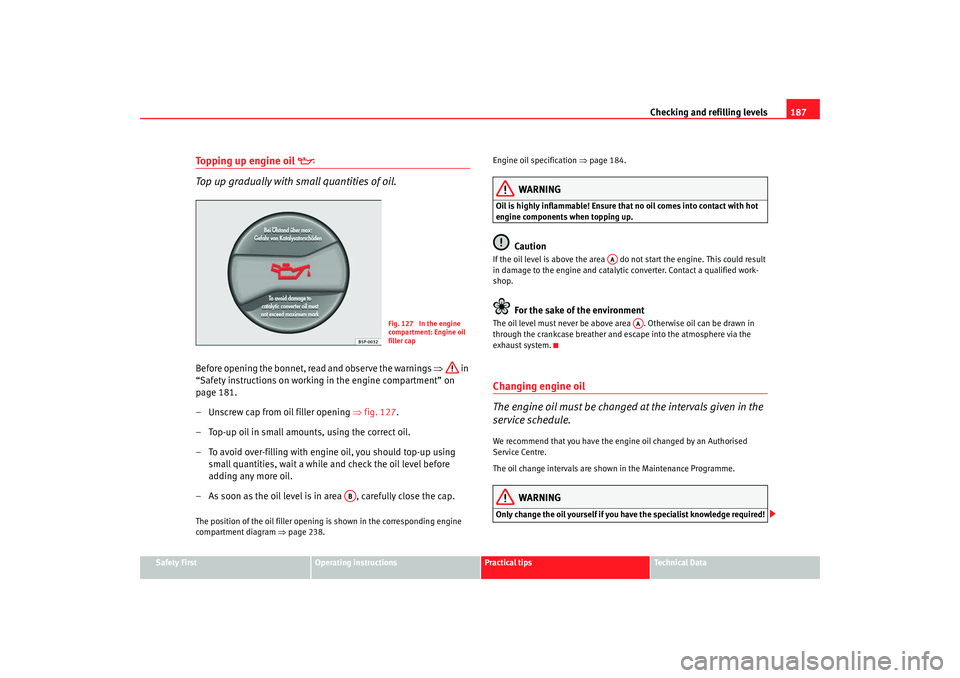
– Unscrew cap from oil filler opening ⇒fig. 127.
– Top-up oil in small amounts, using the correct oil.
– To avoid over-filling with engine oil, you should top-up using small quantities, wait a while and check the oil level before
adding any more oil.
– As soon as the oil level is in area , carefully close the cap.The position of the oil filler opening is shown in the corresponding engine
compartment diagram ⇒page 238. Engine oil specification
⇒page 184.
WARNING
Oil is highly inflammable! Ensure that no oil comes into contact with hot
engine components when topping up.
Caution
If the oil level is above the area do not start the engine. This could result
in damage to the engine and catalytic converter. Contact a qualified work-
shop.
For the sake of the environment
The oil level must never be above area . Otherwise oil can be drawn in
through the crankcase breather and escape into the atmosphere via the
exhaust system.Changing engine oil
The engine oil must be changed at the intervals given in the
service schedule.We recommend that you have the engine oil changed by an Authorised
Service Centre.
The oil change intervals are shown in the Maintenance Programme.
WARNING
Only change the oil yourself if you have the specialist knowledge required!
Fig. 127 In the engine
compartment: Engine oil
filler cap
AB
AA
AA
Ibiza250_angles Seite 187 Dienstag, 5. August 2008 1:11 13
Page 191 of 260
Checking and refilling levels189
Safety First
Operating instructions
Practical tips
Te c h n i c a l D a t a
Caution
•
Other additives may give considerably inferior corrosion protection. The
resulting corrosion in the cooling system can lead to a loss of coolant,
causing serious damage to the engine.
•
If additive G12++ is not available, t his can be mixed with G12+, bearing in
mind that the protection against corrosion will be reduced.
Checking the coolant level and topping up
The correct coolant level is important for fault-free func-
tioning of the engine cooling system.Before opening the bonnet, read and observe the warnings ⇒ in
“Safety instructions on working in the engine compartment” on
page 181. Opening the coolant expansion tank
– Switch off the engine and allow it to cool.
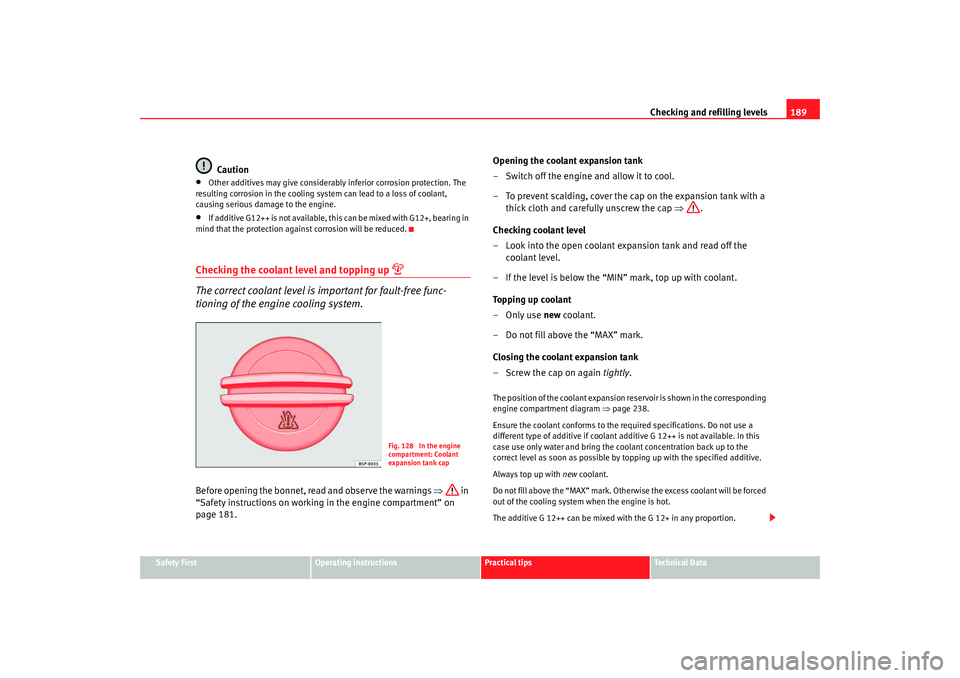
– To prevent scalding, cover the cap on the expansion tank with a
thick cloth and carefully unscrew the cap ⇒.
Checking coolant level
– Look into the open coolant expansion tank and read off the coolant level.
– If the level is below the “MIN” mark, top up with coolant.
Topping up coolant
–Only use new coolant.
– Do not fill above the “MAX” mark.
Closing the coolant expansion tank
–Screw the cap on again tightly.
The position of the coolant expansion reservoir is shown in the corresponding
engine compartment diagram ⇒page 238.
Ensure the coolant conforms to the required specifications. Do not use a
different type of additive if coolant ad ditive G 12++ is not available. In this
case use only water and bring the coolant concentration back up to the
correct level as soon as possible by topping up with the specified additive.
Always top up with new coolant.
Do not fill above the “MAX” mark. Otherwise the excess coolant will be forced
out of the cooling system when the engine is hot.
The additive G 12++ can be mixed with the G 12+ in any proportion.
Fig. 128 In the engine
compartment: Coolant
expansion tank cap
Ibiza250_angles Seite 189 Dienstag, 5. August 2008 1:11 13
Page 195 of 260
Checking and refilling levels193
Safety First
Operating instructions
Practical tips
Te c h n i c a l D a t a
Fitting the wiper blade
– Insert the wiper blade onto the windscreen wiper arm until it
clicks into place.Check the condition of the wiper blade regularly. Change as required.
If the windscreen wiper scrapes, it should be replaced if damaged, or cleaned
if soiled.
If this is not sufficient, refer to a qualified workshop.
WARNING
Do not drive unless you have good visibility through all windows!•
Clean the windscreen wiper blades and all windows regularly.
•
The wiper blades should be changed once or twice a year.Caution
•
A damaged or dirty window wiper could scratch the rear window.
•
Never use fuel, nail varnish remover, paint thinner or similar products to
clean the window.
•
Never move the windscreen wiper by hand. This could cause damage.
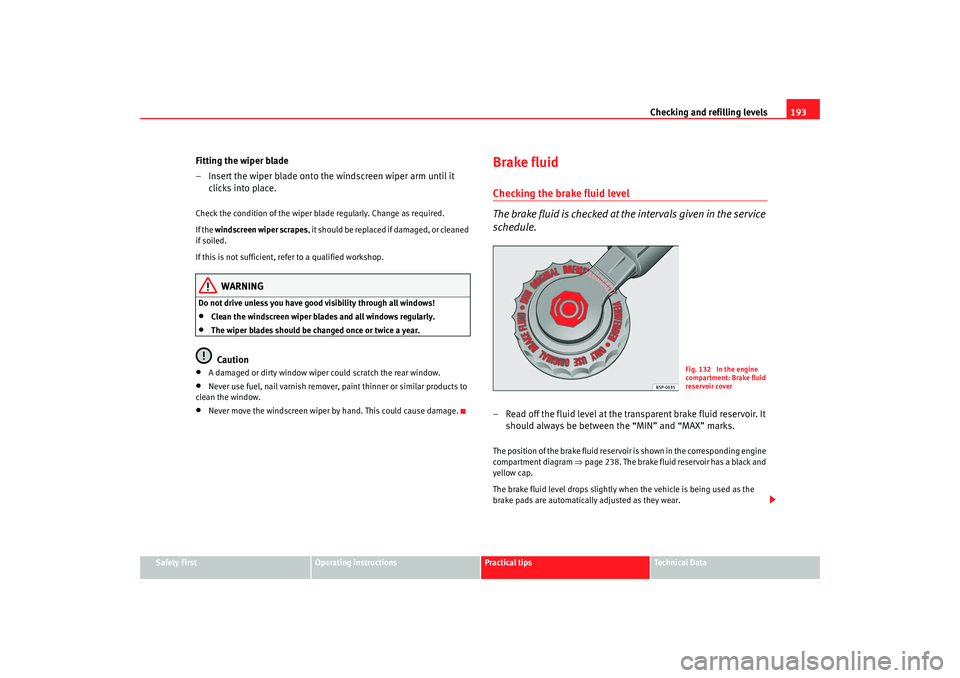
Brake fluidChecking the brake fluid level
The brake fluid is checked at the intervals given in the service
schedule.– Read off the fluid level at the transparent brake fluid reservoir. It should always be between the “MIN” and “MAX” marks.The position of the brake fluid reservoir is shown in the corresponding engine
compartment diagram ⇒page 238. The brake fluid reservoir has a black and
yellow cap.
The brake fluid level drops slightly when the vehicle is being used as the
brake pads are automatically adjusted as they wear.
Fig. 132 In the engine
compartment: Brake fluid
reservoir cover
Ibiza250_angles Seite 193 Dienstag, 5. August 2008 1:11 13
Page 198 of 260
Checking and refilling levels
196•
If the vehicle is left standing in cold conditions for a long period, protect
the battery from frost. If it “freezes” it will be damaged.
Checking the electrolyte level
The electrolyte level should be checked regularly in high-
mileage vehicles, in hot countries and in older batteries.– Open the bonnet and open the battery cover at the front ⇒ in
“Safety instructions on working in the engine compartment” on
page 181 ⇒ in “Warnings on handling the battery” on
page 195.
– Check the colour display in the "magic eye" on the top of the battery.
– If there are air bubbles in the window, tap the window gently until they disperse.The position of the battery is shown in the corresponding engine compart-
ment diagram ⇒page 238.
The round window (“magic eye”) on the top of the battery changes colour,
depending on the charge level and electrolyte level of the battery.
If the colour in the window is colourless or bright yellow, the electrolyte level
of the battery is too low. Have the battery checked by a qualified workshop.
The colours green and black are used by the workshops for diagnostic
purposes.
Charging and changing the vehicle battery
The battery is maintenance-free and is checked during the
inspection service. All work on the vehicle battery requires
specialist knowledge.If you often drive short distances or if the vehicle is not driven for long
periods, the battery should be checked by a qualified workshop between the
scheduled services.
If the battery has discharged and you have problems starting the vehicle, the
battery might be damaged. If this happens, we recommend you have the
vehicle battery checked by an Authorised Service Centre where it will be re-
charged or replaced.
Charging the battery
The vehicle battery should be charged by a qualified workshop only, as
batteries using special technology have been installed and they must be
charged in a controlled environment.
Replacing a vehicle battery
The battery has been developed to suit the conditions of its location and has
special safety features.
Genuine SEAT batteries fulfil the maintenance, performance and safety spec-
ifications of your vehicle.
WARNING
•
We recommend you use only maintenance-free or cycle free leak-proof
batteries which comply with the standards T 825 06 and VW 7 50 73. This
standard applies as of 2001.
•
Before starting any work on the batteries, you must read and observe
the warnings ⇒ in “Warnings on handling the battery” on page 195.
Ibiza250_angles Seite 196 Dienstag, 5. August 2008 1:11 13
Page 200 of 260
Checking and refilling levels
198
2. The tyre pressures should only be checked when the tyres are cold. The slightly raised pressures of warm tyres must not be
reduced.
3. Adjust the tyre pressure to the load you are carrying.Tyre pressure
The correct tyre pressure is especially important at high speeds. The pressure
should therefore be checked at least once a month and before starting a
journey.
WARNING
A tyre can easily burst if the pressure is too low, causing an accident!•
At continuously high speeds, a tyre with insufficient pressure flexes
more. In this way it becomes too hot, and this can cause tread separation
and tyre blow-out. Always observ e the recommended tyre pressures.
•
If the tyre pressure is too low or too high, the tyres will wear prema-
turely and the vehicle will not h andle well. Risk of accident!For the sake of the environment
Under-inflated tyres will increase fuel consumption.
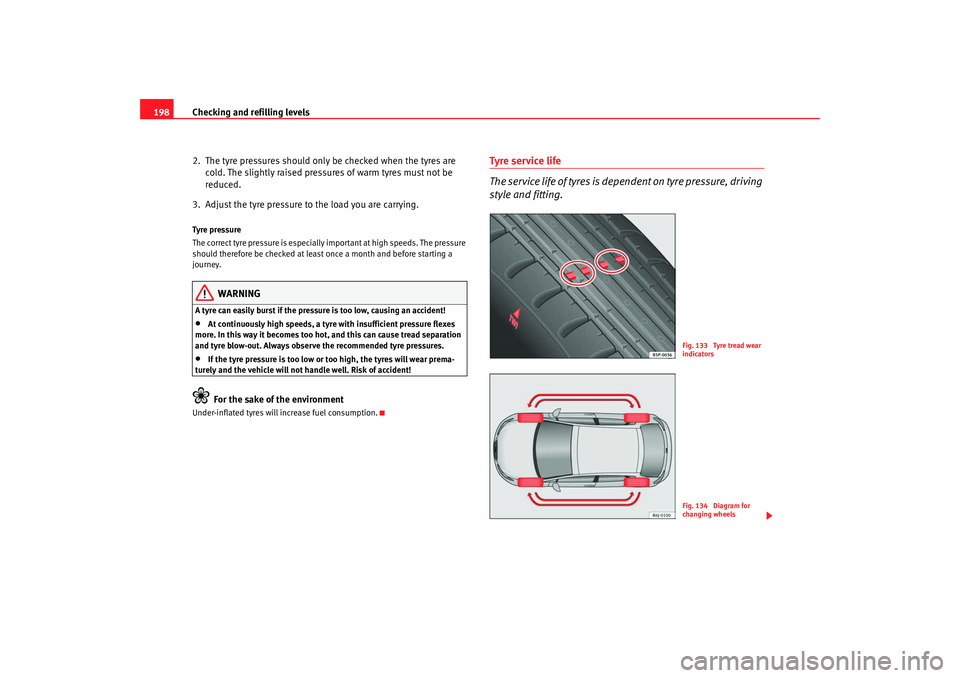
Tyre service life
The service life of tyres is dependent on tyre pressure, driving
style and fitting.
Fig. 133 Tyre tread wear
indicatorsFig. 134 Diagram for
changing wheels
Ibiza250_angles Seite 198 Dienstag, 5. August 2008 1:11 13
Page 240 of 260
Technical Data
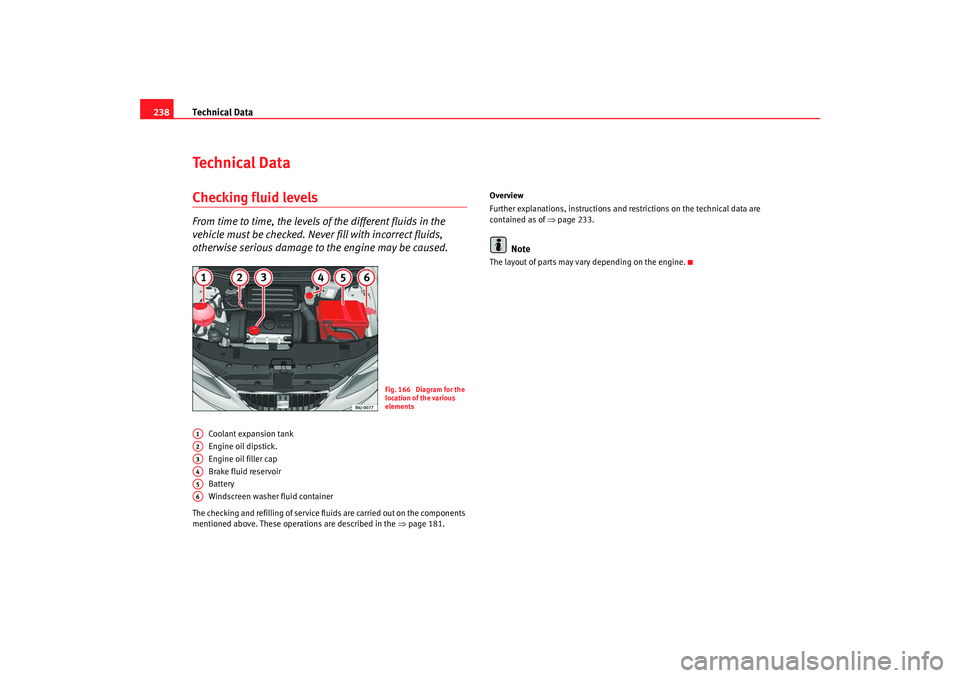
238Te c h n i c a l D a t aChecking fluid levelsFrom time to time, the levels of the different fluids in the
vehicle must be checked. Never fill with incorrect fluids,
otherwise serious damage to the engine may be caused.
Coolant expansion tank
Engine oil dipstick.
Engine oil filler cap
Brake fluid reservoir
Battery
Windscreen washer fluid container
The checking and refilling of service fluids are carried out on the components
mentioned above. These operations are described in the ⇒page 181. Overview
Further explanations, instructions and restrictions on the technical data are
contained as of
⇒page 233.
Note
The layout of parts may vary depending on the engine.
Fig. 166 Diagram for the
location of the various
elements
A1A2A3A4A5A6
Ibiza250_angles Seite 238 Dienstag, 5. August 2008 1:11 13