2008 Seat Ibiza 5D ECU
[x] Cancel search: ECUPage 77 of 260
Unlocking and locking75
Safety First
Operating instructions
Practical tips
Te c h n i c a l D a t a
Central locking button
The central locking button allows you to lock and unlock the
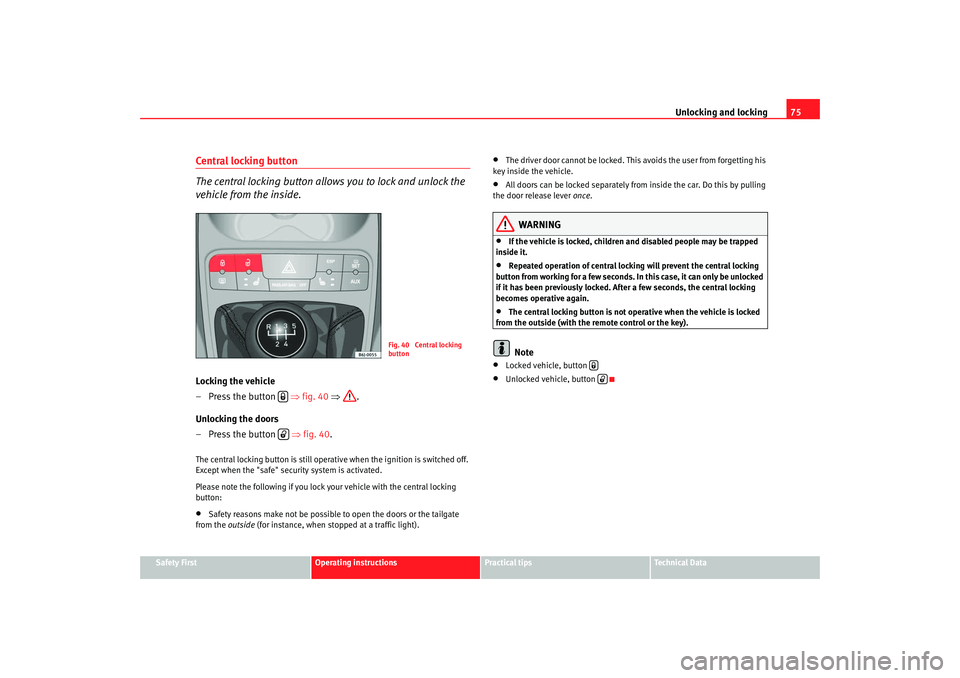
vehicle from the inside.Locking the vehicle
– Press the button ⇒fig. 40 ⇒ .
Unlocking the doors
– Press the button ⇒ fig. 40.The central locking button is still operative when the ignition is switched off.
Except when the "safe" security system is activated.
Please note the following if you lock your vehicle with the central locking
button:•
Safety reasons make not be possible to open the doors or the tailgate
from the outside (for instance, when stopped at a traffic light).
•
The driver door cannot be locked. This avoids the user from forgetting his
key inside the vehicle.
•
All doors can be locked separately from inside the car. Do this by pulling
the door release lever once.
WARNING
•
If the vehicle is locked, children and disabled people may be trapped
inside it.
•
Repeated operation of central locking will prevent the central locking
button from working for a few seconds. In this case, it can only be unlocked
if it has been previously locked. Afte r a few seconds, the central locking
becomes operative again.
•
The central locking button is not op erative when the vehicle is locked
from the outside (with the remote control or the key).Note
•
Locked vehicle, button
•
Unlocked vehicle, button
Fig. 40 Central locking
button
Ibiza250_angles Seite 75 Dienstag, 5. August 2008 1:11 13
Page 81 of 260
Unlocking and locking79
Safety First
Operating instructions
Practical tips
Te c h n i c a l D a t a
•
Never leave children or disabled persons in the vehicle. In case of emer-
gency, they may not be able to leave the vehicle and not manage on their
own.
•
Never forget the keys inside the vehicle. Otherwise, this could result in
serious injuries, accidents or even the theft of your vehicle. Always take the
key with you when you leave the vehicle.
•
An uncontrolled use of the key could start the engine or activate any
electric equipment(e.g. electric win dows), causing risk of accident. The
vehicle can be locked when using the remote control key. This could
complicate the aid in cas of emergency.Note
•
The remote control key functions only when you are within range
⇒ page 78, fig. 44 .
•
If the vehicle cannot be unlocked or locked by using the radio-frequency
remote control, the remote control key wi ll have to be re-synchronised. In this
case, please refer to your Technical Service.
Changing the batteryIf the battery indicator does not flash when the buttons are pushed, the
battery must be replaced.
Caution
The use of inappropriate batteries may damage the radio frequency remote
control. For this reason, always replace the dead battery with another of the
same size and power.
For the sake of the environment
The flat batteries must be thrown away in accordance with regulations
governing the protection of the environment.Anti-theft alarm system*Description of anti-theft alarm system*
The anti-theft alarm triggers if unauthorised movements are
detected around the vehicle.The anti-theft alarm makes it more difficult to break into the vehicle or steal
it. The system will emit acoustic an d optical warning signals if someone is
trying to force your vehicle.
The anti-theft alarm system is automatically connected on locking the
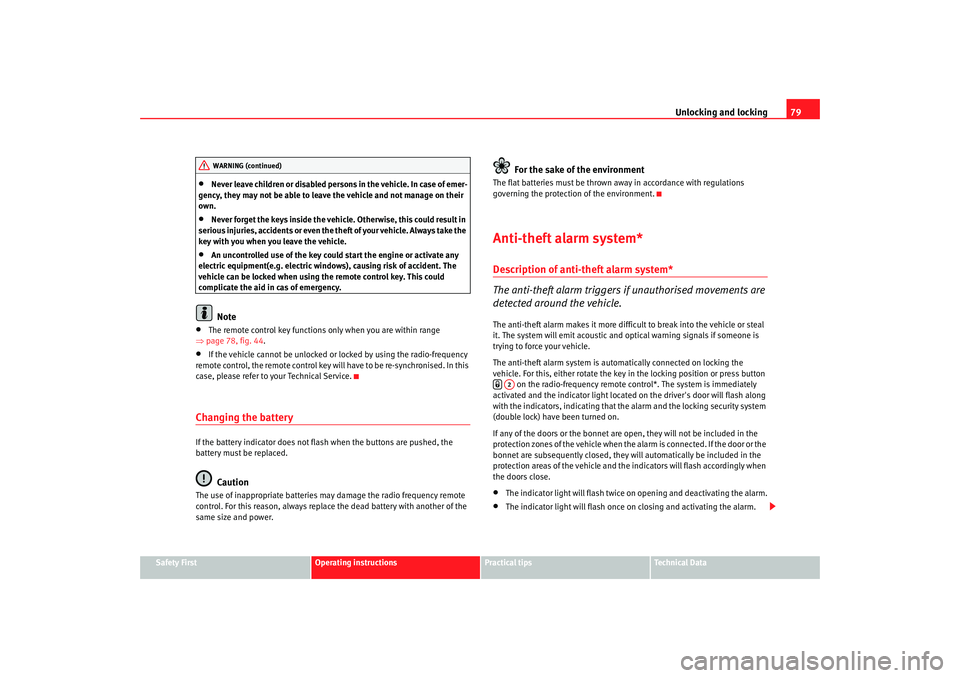
vehicle. For this, either rotate the key in the locking position or press button on the radio-frequency remote control*. The system is immediately
activated and the indicator light located on the driver's door will flash along
with the indicators, indicating that the alarm and the locking security system
(double lock) have been turned on.
If any of the doors or the bonnet are open, they will not be included in the
protection zones of the vehicle when the alarm is connected. If the door or the
bonnet are subsequently closed, they will automatically be included in the
protection areas of the vehicle and the indicators will flash accordingly when
the doors close.•
The indicator light will flash twice on opening and deactivating the alarm.
•
The indicator light will flash once on closing and activating the alarm.
WARNING (continued)
A2
Ibiza250_angles Seite 79 Dienstag, 5. August 2008 1:11 13
Page 107 of 260
Seats and stowage105
Safety First
Operating instructions
Practical tips
Te c h n i c a l D a t a
Removing or adjusting head restraints
The head restraints can be adju sted by moving them up and
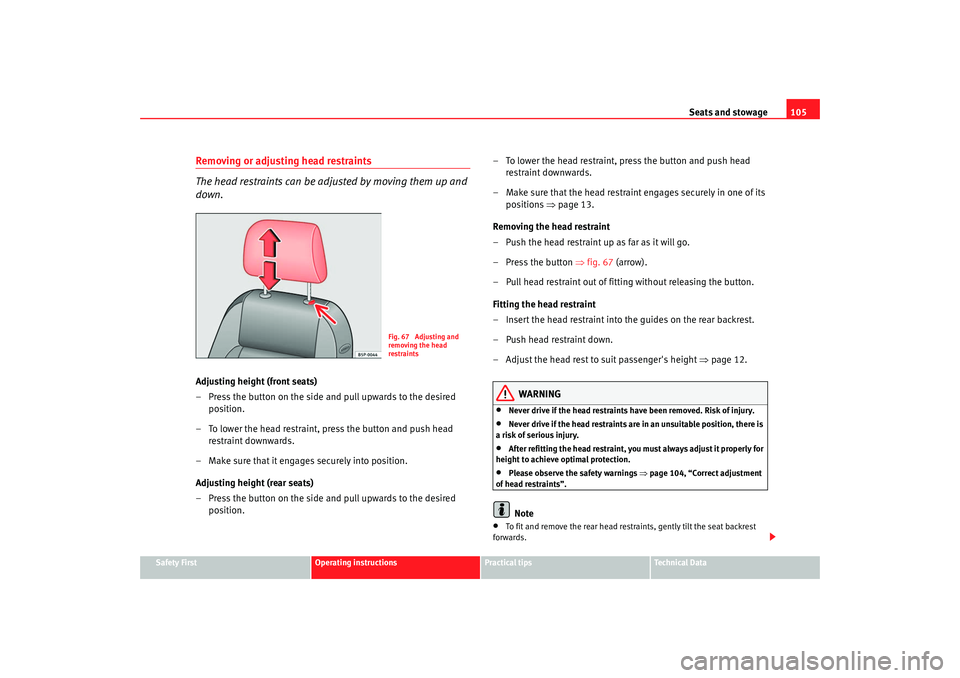
down.Adjusting height (front seats)
– Press the button on the side and pull upwards to the desired
position.
– To lower the head restraint, press the button and push head restraint downwards.
– Make sure that it engages securely into position.
Adjusting height (rear seats)
– Press the button on the side and pull upwards to the desired
position. – To lower the head restraint, press the button and push head
restraint downwards.
– Make sure that the head restraint engages securely in one of its positions ⇒ page 13.
Removing the head restraint
– Push the head restraint up as far as it will go.
– Press the button ⇒fig. 67 (arrow).
– Pull head restraint out of fitting without releasing the button.
Fitting the head restraint
– Insert the head restraint into the guides on the rear backrest.
– Push head restraint down.
– Adjust the head rest to suit passenger's height ⇒page 12.
WARNING
•
Never drive if the head restraints have been removed. Risk of injury.
•
Never drive if the head restraints are in an unsuitable position, there is
a risk of serious injury.
•
After refitting the head restraint, you must always adjust it properly for
height to achieve optimal protection.
•
Please observe the safety warnings ⇒page 104, “Correct adjustment
of head restraints”.Note
•
To fit and remove the rear head restraints, gently tilt the seat backrest
forwards.
Fig. 67 Adjusting and
removing the head
restraints
Ibiza250_angles Seite 105 Dienstag, 5. August 2008 1:11 13
Page 108 of 260
Seats and stowage
106•
When fitting the head restraints again, insert the tubes as far as possible
into the guides without pressing the button.
Front seatsAdjustment of the front seats
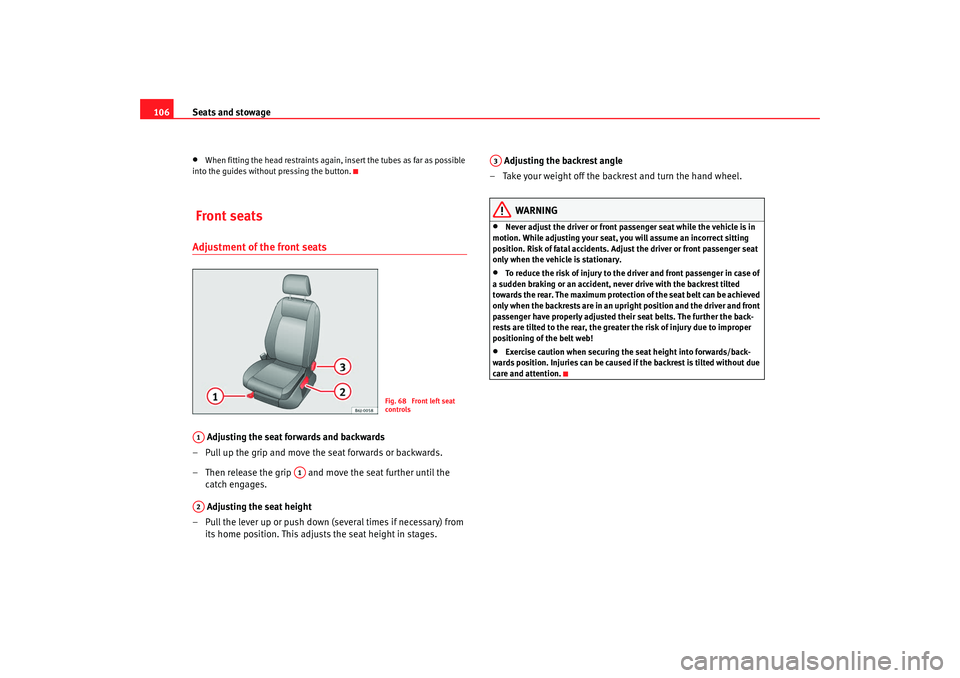
Adjusting the seat forwards and backwards
– Pull up the grip and move th e seat forwards or backwards.
– Then release the grip and move the seat further until the catch engages.
Adjusting the seat height
– Pull the lever up or push down (s everal times if necessary) from
its home position. This adjusts the seat height in stages. Adjusting the backrest angle
– Take your weight off the backrest and turn the hand wheel.
WARNING
•
Never adjust the driver or front passenger seat while the vehicle is in
motion. While adjusting your seat, you will assume an incorrect sitting
position. Risk of fatal accidents. Adju st the driver or front passenger seat
only when the vehicle is stationary.
•
To reduce the risk of injury to the driver and front passenger in case of
a sudden braking or an accident, neve r drive with the backrest tilted
towards the rear. The maximum protection of the seat belt can be achieved
only when the backrests are in an uprigh t position and the driver and front
passenger have properly adjusted their seat belts. The further the back-
rests are tilted to the rear, the greater the risk of injury due to improper
positioning of the belt web!
•
Exercise caution when securing th e seat height into forwards/back-
wards position. Injuries can be caused if the backrest is tilted without due
care and attention.
Fig. 68 Front left seat
controls
A1
A1
A2
A3
Ibiza250_angles Seite 106 Dienstag, 5. August 2008 1:11 13
Page 117 of 260
Seats and stowage115
Safety First
Operating instructions
Practical tips
Te c h n i c a l D a t a
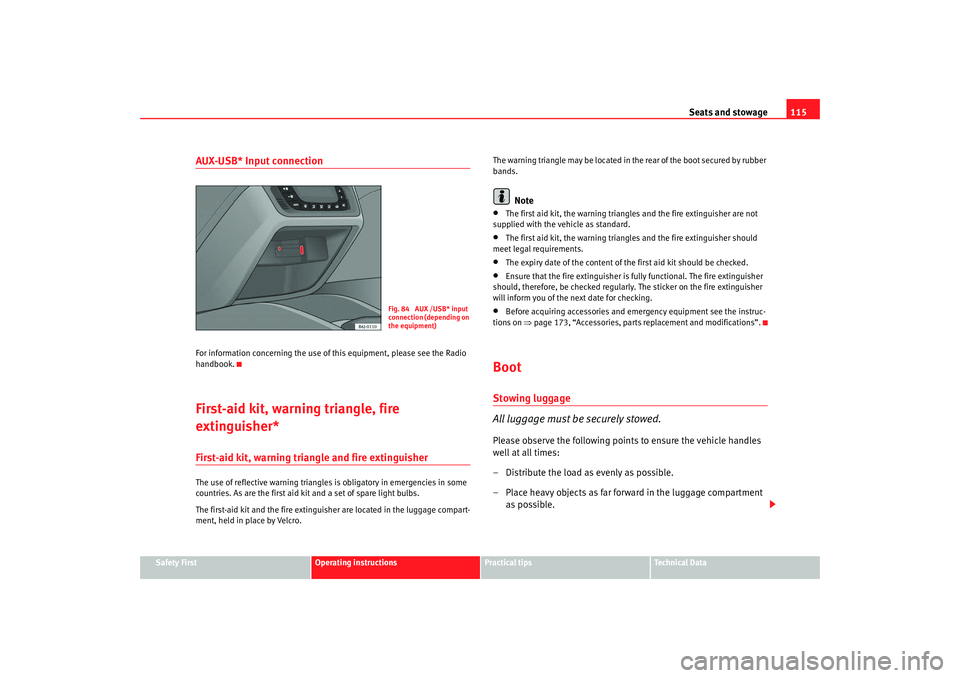
AUX-USB* Input connection For information concerning the use of this equipment, please see the Radio
handbook.First-aid kit, warning triangle, fire
extinguisher*First-aid kit, warning triangle and fire extinguisherThe use of reflective warning triangles is obligatory in emergencies in some
countries. As are the first aid kit and a set of spare light bulbs.
The first-aid kit and the fire extinguisher are located in the luggage compart-
ment, held in place by Velcro. The warning triangle may be located in th
e rear of the boot secured by rubber
bands.
Note
•
The first aid kit, the warning triangles and the fire extinguisher are not
supplied with the vehicle as standard.
•
The first aid kit, the warning triangles and the fire extinguisher should
meet legal requirements.
•
The expiry date of the content of the first aid kit should be checked.
•
Ensure that the fire extinguisher is fully functional. The fire extinguisher
should, therefore, be checked regularly. The sticker on the fire extinguisher
will inform you of the next date for checking.
•
Before acquiring accessories and em ergency equipment see the instruc-
tions on ⇒page 173, “Accessories, parts replacement and modifications”.
BootStowing luggage
All luggage must be securely stowed.Please observe the following points to ensure the vehicle handles
well at all times:
– Distribute the load as evenly as possible.
– Place heavy objects as far forward in the luggage compartment
as possible.
Fig. 84 AUX /USB* input
connection (depending on
the equipment)
Ibiza250_angles Seite 115 Dienstag, 5. August 2008 1:11 13
Page 145 of 260
Driving143
Safety First
Operating instructions
Practical tips
Te c h n i c a l D a t a
–Switch the engine off and remove the key from the ignition lock.
Turn the steering wheel slightly to engage the steering lock.
– Always take you car keys with you when you leave the vehicle ⇒ .Additional notes on parking the vehicle on gradients:
Turn the steering wheel so that the vehicle rolls against the kerb if it started
to roll.•
If the vehicle is parked facing downhill, turn the front wheels so that they
point towards the kerb .
•
If the vehicle is parked facing uphill, turn the front wheels so that they
point away from the kerb .
•
Secure the vehicle as normal by applying the handbrake firmly and
engaging first gear.
WARNING
•
Take measures to reduce the risk of injury when you leave your vehicle
unattended.
•
Never park where the hot exhaust system could ignite inflammable
materials, such as dry grass, low bushes, spilt fuel etc.
•
Never allow vehicle occupants to re main in the vehicle when it is
locked. They would be unable to open the vehicle from the inside, and
could become trapped in the vehicle in an emergency. In the event of an
emergency, locked doors will delay assistance to occupants.
•
Never leave children alone in the vehi cle. They could set the vehicle in
motion, for example, by releasing the handbrake or the gear lever /
selector lever.
•
Depending on weather conditions, it may become extremely hot or cold
inside the vehicle. This can be fatal.
Starting on a hill*
This function is only included in vehicles with ESP.This device helps when starting uphill.
These are the basic operating conditions: doors closed, brake pedal pressed
down and vehicle in neutral. The system is activated on engaging gear.
After removing your foot from the brake pedal, the braking force is maintained
for a few seconds to prevent the vehicle from moving backward when put into
gear. This short space of time is enough to start the vehicle with ease.
This system also works when reversing uphill.
WARNING
•
If you do not start the vehicle immedi ately after taking your foot off the
brake pedal, the vehicle may start to roll back under certain conditions.
Depress the brake pedal or use the hand brake immediately.
•
If the engine stalls, depress the brake pedal or use the hand brake
immediately.
•
When following a line of traffic uphill, if you want to prevent the vehicle
from rolling back accidentally when starting off, hold the brake pedal down
for a few seconds before starting off.Note
The Official Service or a specialist workshop can tell you if your vehicle is
equipped with this system.
Ibiza250_angles Seite 143 Dienstag, 5. August 2008 1:11 13
Page 164 of 260
Driving and the environment
162When possible, operate the trailer with the maximum permitted draw bar
weight on the ball joint of the towing bracket, but do not exceed the specified
limit.
The figures for trailer weights and draw bar weights that are given on the
data plate of the towing bracket are for certification purposes only. The
correct figures for your specific model, which may be lower than these figures
for the towing bracket, are given in the registration documents ⇒Section
“Technical data”.
Distributing the load
Distribute loads in the trailer so that heavy objects are as near to the axle as
possible. Loads carried in the trailer must be secured to prevent them
moving.
Tyre pressure
Set tyre pressure to the maximum permissible pressure shown on the sticker
on the inside of the fuel tank flap. Set the tyre pressure of the trailer tyres in
accordance with the trailer manufacturer's recommendations.
Exterior mirrors
Check whether you can see enough of the road behind the trailer with the
standard mirrors. If this is not the case, you should have additional mirrors
fitted. Both exterior mirrors should be mounted on hinged extension
brackets. Adjust the mirrors to give sufficient vision to the rear.
WARNING
Never transport people in a trailer. This could result in fatal accidents.
Note
•
Towing a trailer places additional demands on the vehicle. We recom-
mend additional services between the normal inspection intervals if the
vehicle is used frequently for towing a trailer.
•
Find out whether special regulations apply to towing a trailer in your
country.
Ball coupling of towing bracket*The ball coupling is provided with inst ructions on fitting and removing the
ball coupling of the towing bracket.
WARNING
The towing bracket ball coupling must be stored securely in the luggage
compartment to prevent them being flung through the vehicle and causing
injury.
Note
•
By law, the ball coupling must be re moved if a trailer is not being towed
and it obscures the number plate.
Driving tips
Driving with a trailer always requires extra care.Weight distribution
The weight distribution of a loaded trailer with an unladen vehicle is very
unfavourable. However, if this cannot be avoided, drive extra slowly to allow
for the unbalanced weight distribution.
Speed
The stability of the vehicle and trailer is reduced with increasing speed. For
this reason, it is advisable not to drive at the maximum permissible speed in
Ibiza250_angles Seite 162 Dienstag, 5. August 2008 1:11 13
Page 179 of 260
Accessories, parts replacement and modifications177
Safety First
Operating instructions
Practical tips
Te c h n i c a l D a t a
If a towing bracket is to be fitted after the vehicle is purchased, this must be
completed according to the instructions of the towing bracket manufacturer.
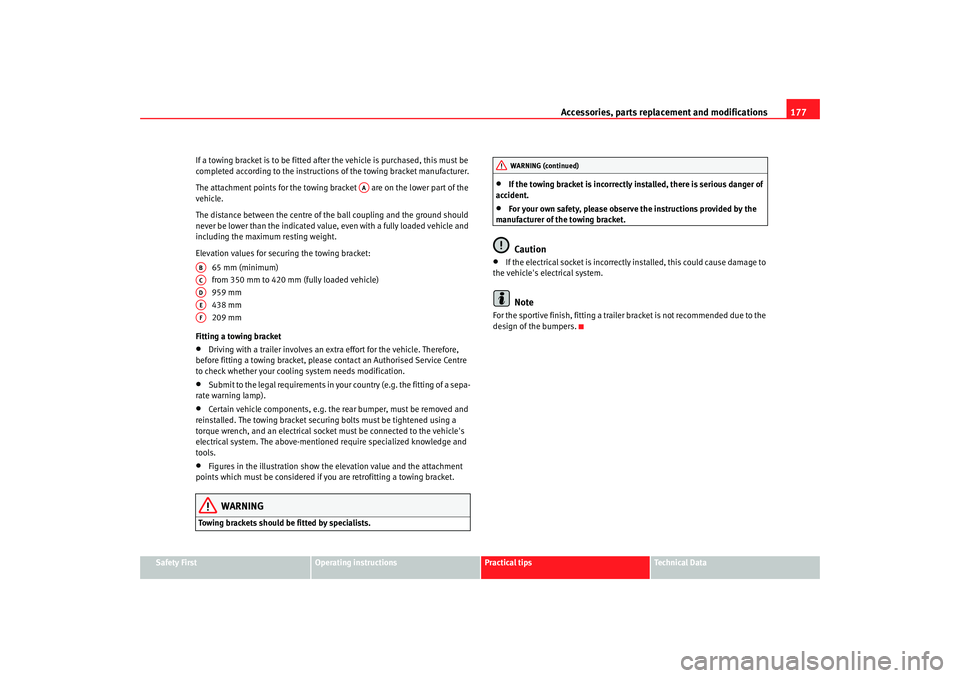
The attachment points for the towing bracket are on the lower part of the
vehicle.
The distance between the centre of th
e ball coupling and the ground should
never be lower than the indicated value, even with a fully loaded vehicle and
including the maximum resting weight.
Elevation values for securing the towing bracket:
65 mm (minimum)
from 350 mm to 420 mm (fully loaded vehicle)
959 mm
438 mm
209 mm
Fitting a towing bracket
•
Driving with a trailer involves an extra effort for the vehicle. Therefore,
before fitting a towing bracket, please contact an Authorised Service Centre
to check whether your cooling system needs modification.
•
Submit to the legal requirements in your country (e.g. the fitting of a sepa-
rate warning lamp).
•
Certain vehicle components, e.g. the rear bumper, must be removed and
reinstalled. The towing bracket securi ng bolts must be tightened using a
torque wrench, and an electrical socket must be connected to the vehicle's
electrical system. The above-mentioned require specialized knowledge and
tools.
•
Figures in the illustration show the elevation value and the attachment
points which must be considered if you are retrofitting a towing bracket.
WARNING
Towing brackets should be fitted by specialists.
•
If the towing bracket is incorrectly installed, there is serious danger of
accident.
•
For your own safety, please observe the instructions provided by the
manufacturer of the towing bracket.Caution
•
If the electrical socket is incorrectly installed, this could cause damage to
the vehicle's electrical system.Note
For the sportive finish, fitting a trailer bracket is not recommended due to the
design of the bumpers.
AA
ABACADAEAF
WARNING (continued)
Ibiza250_angles Seite 177 Dienstag, 5. August 2008 1:11 13