2008 NISSAN TIIDA exhaust
[x] Cancel search: exhaustPage 1729 of 2771
EM-52
< SERVICE INFORMATION >
CAMSHAFT
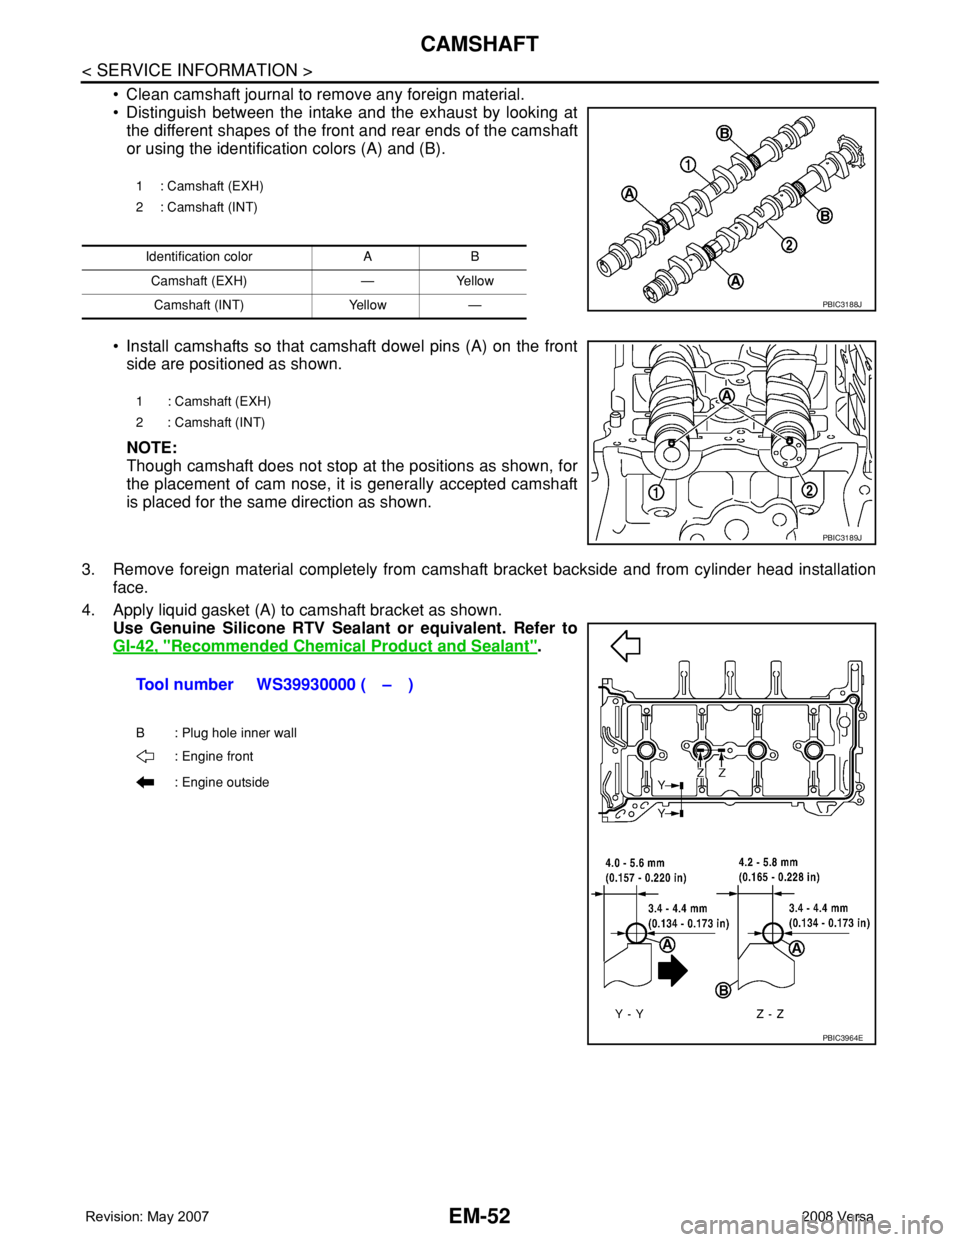
• Clean camshaft journal to remove any foreign material.
• Distinguish between the intake and the exhaust by looking at
the different shapes of the front and rear ends of the camshaft
or using the identification colors (A) and (B).
• Install camshafts so that camshaft dowel pins (A) on the front
side are positioned as shown.
NOTE:
Though camshaft does not stop at the positions as shown, for
the placement of cam nose, it is generally accepted camshaft
is placed for the same direction as shown.
3. Remove foreign material completely from camshaft bracket backside and from cylinder head installation
face.
4. Apply liquid gasket (A) to camshaft bracket as shown.
Use Genuine Silicone RTV Sealant or equivalent. Refer to
GI-42, "
Recommended Chemical Product and Sealant".
1 : Camshaft (EXH)
2 : Camshaft (INT)
Identification color A B
Camshaft (EXH) — Yellow
Camshaft (INT) Yellow —
PBIC3188J
1 : Camshaft (EXH)
2 : Camshaft (INT)
PBIC3189J
Tool number WS39930000 ( – )
B : Plug hole inner wall
: Engine front
: Engine outside
PBIC3964E
Page 1731 of 2771
EM-54
< SERVICE INFORMATION >
CAMSHAFT
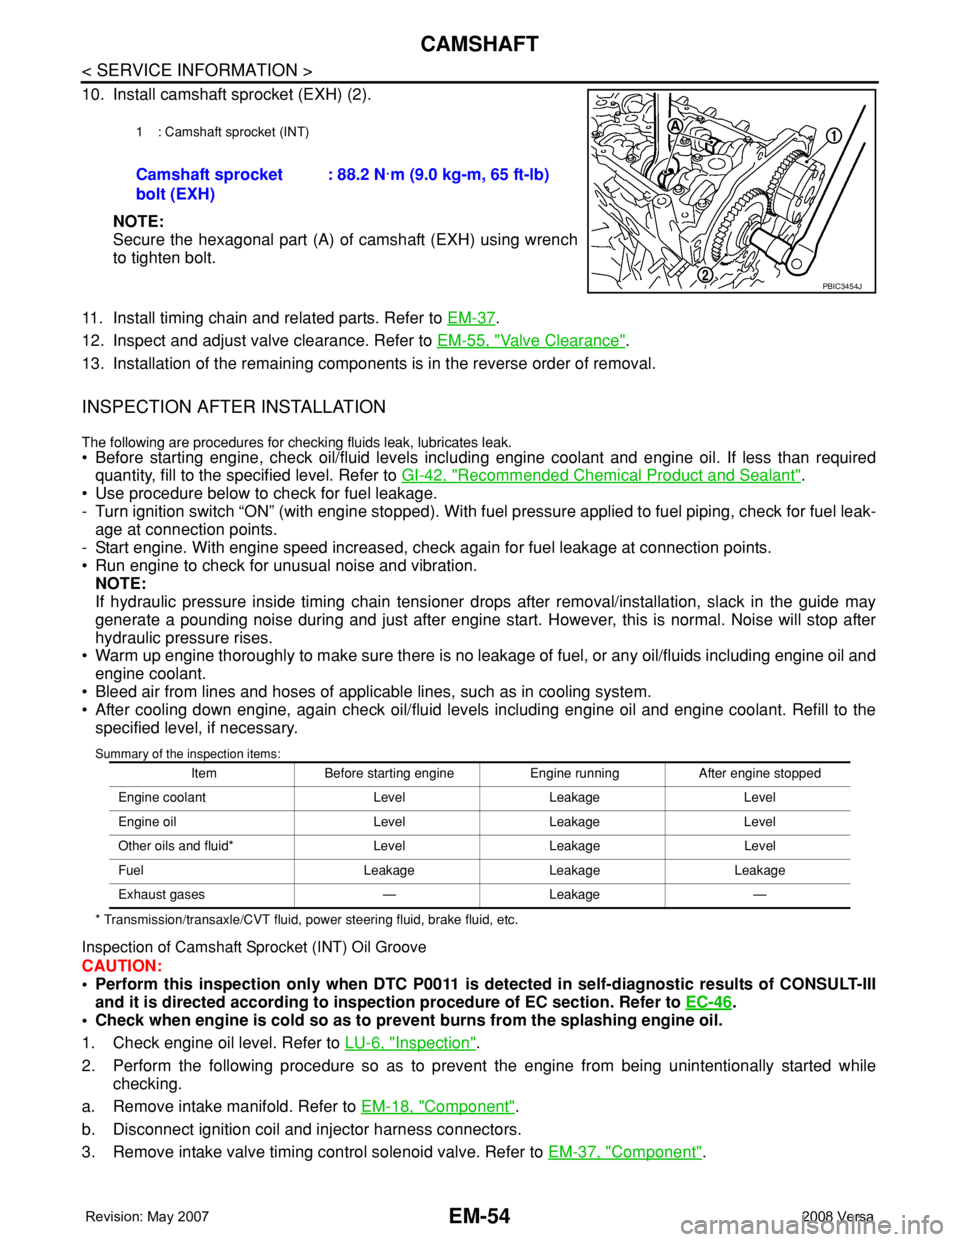
10. Install camshaft sprocket (EXH) (2).
NOTE:
Secure the hexagonal part (A) of camshaft (EXH) using wrench
to tighten bolt.
11. Install timing chain and related parts. Refer to EM-37
.
12. Inspect and adjust valve clearance. Refer to EM-55, "
Valve Clearance".
13. Installation of the remaining components is in the reverse order of removal.
INSPECTION AFTER INSTALLATION
The following are procedures for checking fluids leak, lubricates leak.
• Before starting engine, check oil/fluid levels including engine coolant and engine oil. If less than required
quantity, fill to the specified level. Refer to GI-42, "
Recommended Chemical Product and Sealant".
• Use procedure below to check for fuel leakage.
- Turn ignition switch “ON” (with engine stopped). With fuel pressure applied to fuel piping, check for fuel leak-
age at connection points.
- Start engine. With engine speed increased, check again for fuel leakage at connection points.
• Run engine to check for unusual noise and vibration.
NOTE:
If hydraulic pressure inside timing chain tensioner drops after removal/installation, slack in the guide may
generate a pounding noise during and just after engine start. However, this is normal. Noise will stop after
hydraulic pressure rises.
• Warm up engine thoroughly to make sure there is no leakage of fuel, or any oil/fluids including engine oil and
engine coolant.
• Bleed air from lines and hoses of applicable lines, such as in cooling system.
• After cooling down engine, again check oil/fluid levels including engine oil and engine coolant. Refill to the
specified level, if necessary.
Summary of the inspection items:
* Transmission/transaxle/CVT fluid, power steering fluid, brake fluid, etc.
Inspection of Camshaft Sprocket (INT) Oil Groove
CAUTION:
• Perform this inspection only when DTC P0011 is detected in self-diagnostic results of CONSULT-III
and it is directed according to inspection procedure of EC section. Refer to EC-46
.
• Check when engine is cold so as to prevent burns from the splashing engine oil.
1. Check engine oil level. Refer to LU-6, "
Inspection".
2. Perform the following procedure so as to prevent the engine from being unintentionally started while
checking.
a. Remove intake manifold. Refer to EM-18, "
Component".
b. Disconnect ignition coil and injector harness connectors.
3. Remove intake valve timing control solenoid valve. Refer to EM-37, "
Component".
1 : Camshaft sprocket (INT)
Camshaft sprocket
bolt (EXH): 88.2 N·m (9.0 kg-m, 65 ft-lb)
PBIC3454J
Item Before starting engine Engine running After engine stopped
Engine coolant Level Leakage Level
Engine oil Level Leakage Level
Other oils and fluid* Level Leakage Level
Fuel Leakage Leakage Leakage
Exhaust gases — Leakage —
Page 1733 of 2771
EM-56
< SERVICE INFORMATION >
CAMSHAFT
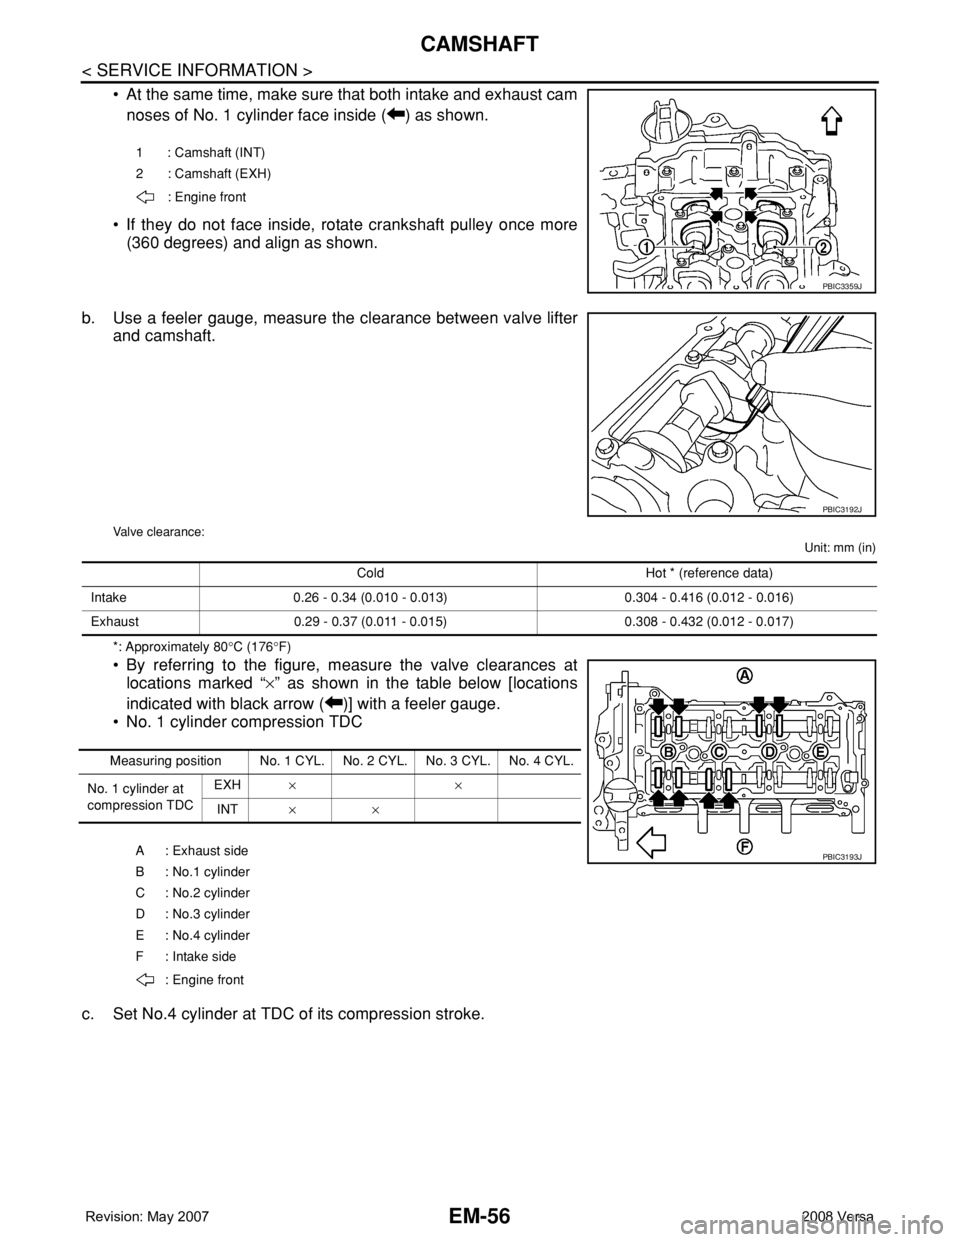
• At the same time, make sure that both intake and exhaust cam
noses of No. 1 cylinder face inside ( ) as shown.
• If they do not face inside, rotate crankshaft pulley once more
(360 degrees) and align as shown.
b. Use a feeler gauge, measure the clearance between valve lifter
and camshaft.
Valve clearance:
Unit: mm (in)
*: Approximately 80°C (176°F)
• By referring to the figure, measure the valve clearances at
locations marked “×” as shown in the table below [locations
indicated with black arrow ( )] with a feeler gauge.
• No. 1 cylinder compression TDC
c. Set No.4 cylinder at TDC of its compression stroke.
1 : Camshaft (INT)
2 : Camshaft (EXH)
: Engine front
PBIC3359J
PBIC3192J
Cold Hot * (reference data)
Intake 0.26 - 0.34 (0.010 - 0.013) 0.304 - 0.416 (0.012 - 0.016)
Exhaust 0.29 - 0.37 (0.011 - 0.015) 0.308 - 0.432 (0.012 - 0.017)
Measuring position No. 1 CYL. No. 2 CYL. No. 3 CYL. No. 4 CYL.
No. 1 cylinder at
compression TDCEXH× ×
INT× ×
A : Exhaust side
B : No.1 cylinder
C : No.2 cylinder
D : No.3 cylinder
E : No.4 cylinder
F: Intake side
: Engine front
PBIC3193J
Page 1734 of 2771
CAMSHAFT
EM-57
< SERVICE INFORMATION >
C
D
E
F
G
H
I
J
K
L
MA
EM
N
P O
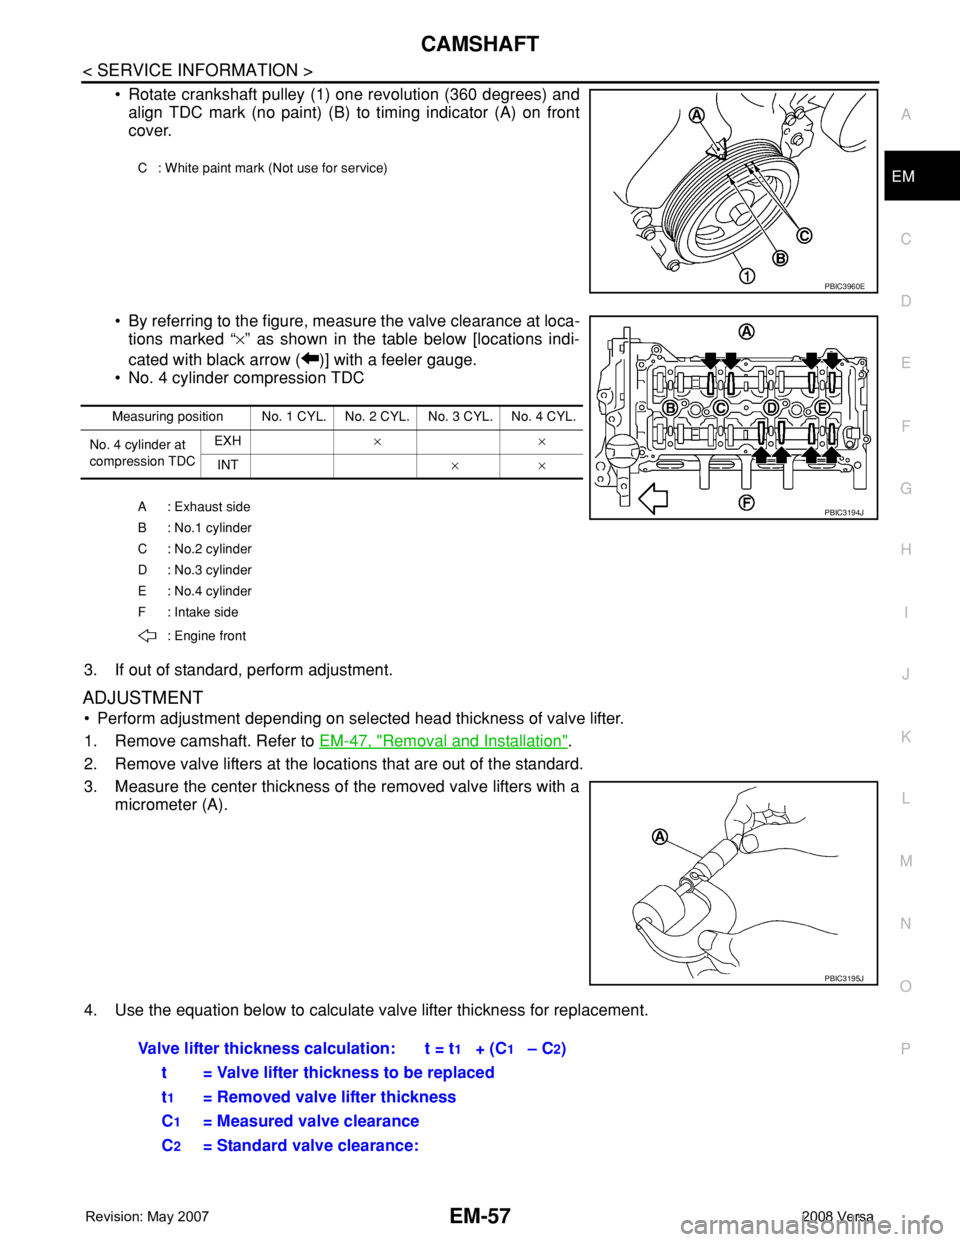
• Rotate crankshaft pulley (1) one revolution (360 degrees) and
align TDC mark (no paint) (B) to timing indicator (A) on front
cover.
• By referring to the figure, measure the valve clearance at loca-
tions marked “×” as shown in the table below [locations indi-
cated with black arrow ( )] with a feeler gauge.
• No. 4 cylinder compression TDC
3. If out of standard, perform adjustment.
ADJUSTMENT
• Perform adjustment depending on selected head thickness of valve lifter.
1. Remove camshaft. Refer to EM-47, "
Removal and Installation".
2. Remove valve lifters at the locations that are out of the standard.
3. Measure the center thickness of the removed valve lifters with a
micrometer (A).
4. Use the equation below to calculate valve lifter thickness for replacement.
C : White paint mark (Not use for service)
PBIC3960E
Measuring position No. 1 CYL. No. 2 CYL. No. 3 CYL. No. 4 CYL.
No. 4 cylinder at
compression TDCEXH × ×
INT × ×
A : Exhaust side
B : No.1 cylinder
C : No.2 cylinder
D : No.3 cylinder
E : No.4 cylinder
F : Intake side
: Engine front
PBIC3194J
PBIC3195J
Valve lifter thickness calculation: t = t1 + (C1 – C2)
t = Valve lifter thickness to be replaced
t
1 = Removed valve lifter thickness
C
1= Measured valve clearance
C
2= Standard valve clearance:
Page 1735 of 2771
EM-58
< SERVICE INFORMATION >
CAMSHAFT
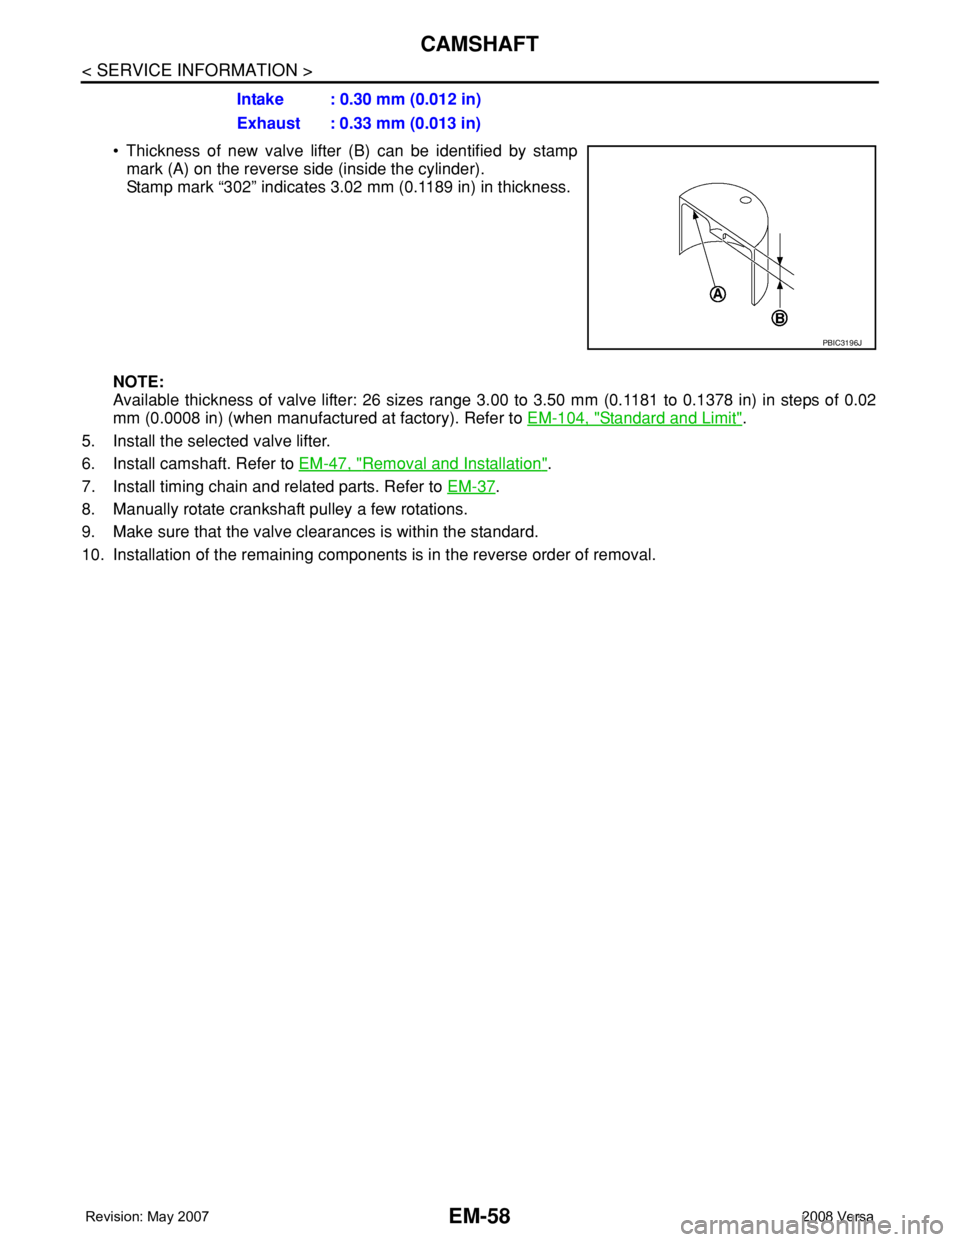
• Thickness of new valve lifter (B) can be identified by stamp
mark (A) on the reverse side (inside the cylinder).
Stamp mark “302” indicates 3.02 mm (0.1189 in) in thickness.
NOTE:
Available thickness of valve lifter: 26 sizes range 3.00 to 3.50 mm (0.1181 to 0.1378 in) in steps of 0.02
mm (0.0008 in) (when manufactured at factory). Refer to EM-104, "
Standard and Limit".
5. Install the selected valve lifter.
6. Install camshaft. Refer to EM-47, "
Removal and Installation".
7. Install timing chain and related parts. Refer to EM-37
.
8. Manually rotate crankshaft pulley a few rotations.
9. Make sure that the valve clearances is within the standard.
10. Installation of the remaining components is in the reverse order of removal.Intake : 0.30 mm (0.012 in)
Exhaust : 0.33 mm (0.013 in)
PBIC3196J
Page 1740 of 2771
CYLINDER HEAD
EM-63
< SERVICE INFORMATION >
C
D
E
F
G
H
I
J
K
L
MA
EM
N
P O
• If the engine speed is out of the specified range, check battery liquid for proper gravity. Check engine
speed again with normal battery gravity.
• If compression pressure is below minimum value, check valve clearances and parts associated with
combustion chamber (Valve, valve seat, piston, piston ring, cylinder bore, cylinder head, cylinder head
gasket). After the checking, measure the compression pressure again.
• If some cylinder has low compression pressure, pour small amount of engine oil into the spark plug hole
of the cylinder to re-check it for compression.
- If the added engine oil improves the compression, piston rings may be worn out or damaged. Check pis-
ton rings and replace if necessary.
- If the compression pressure remains at low level despite the addition of engine oil, valves may be mal-
functioning. Check valves for damage. Replace valve or valve seat accordingly.
• If two adjacent cylinders have respectively low compression pressure and their compression remains
low even after the addition of engine oil, cylinder head gasket is leaking. In such a case, replace cylinder
head gasket.
9. After inspection is completed, install removed parts.
10. Start the engine, and confirm that the engine runs smoothly.
11. Perform trouble diagnosis. If DTC appears, erase it. Refer to EC-81
.
ComponentINFOID:0000000001702502
Removal and InstallationINFOID:0000000001702503
REMOVAL
WARNING:
• Put a “CAUTION: FLAMMABLE” sign in the workshop.
• Be sure to work in a well ventilated area and furnish workshop with a CO
2 fire extinguisher.
• Do not smoke while servicing fuel system. Keep open flames and sparks away from the work area.
1. Release the fuel pressure. Refer to EC-78, "
Fuel Pressure Check".
2. Drain engine coolant and engine oil. Refer to CO-8
and LU-6.
3. Remove front fender protector (RH). Refer to EI-23
.
4. Remove drive belt. Refer to EM-13, "
Removal and Installation".
5. Remove the following components and related parts.
• Exhaust manifold; Refer to EM-21
.
• Intake manifold; Refer to EM-18
.
• Fuel tube and fuel injector assembly; Refer to EM-33
.
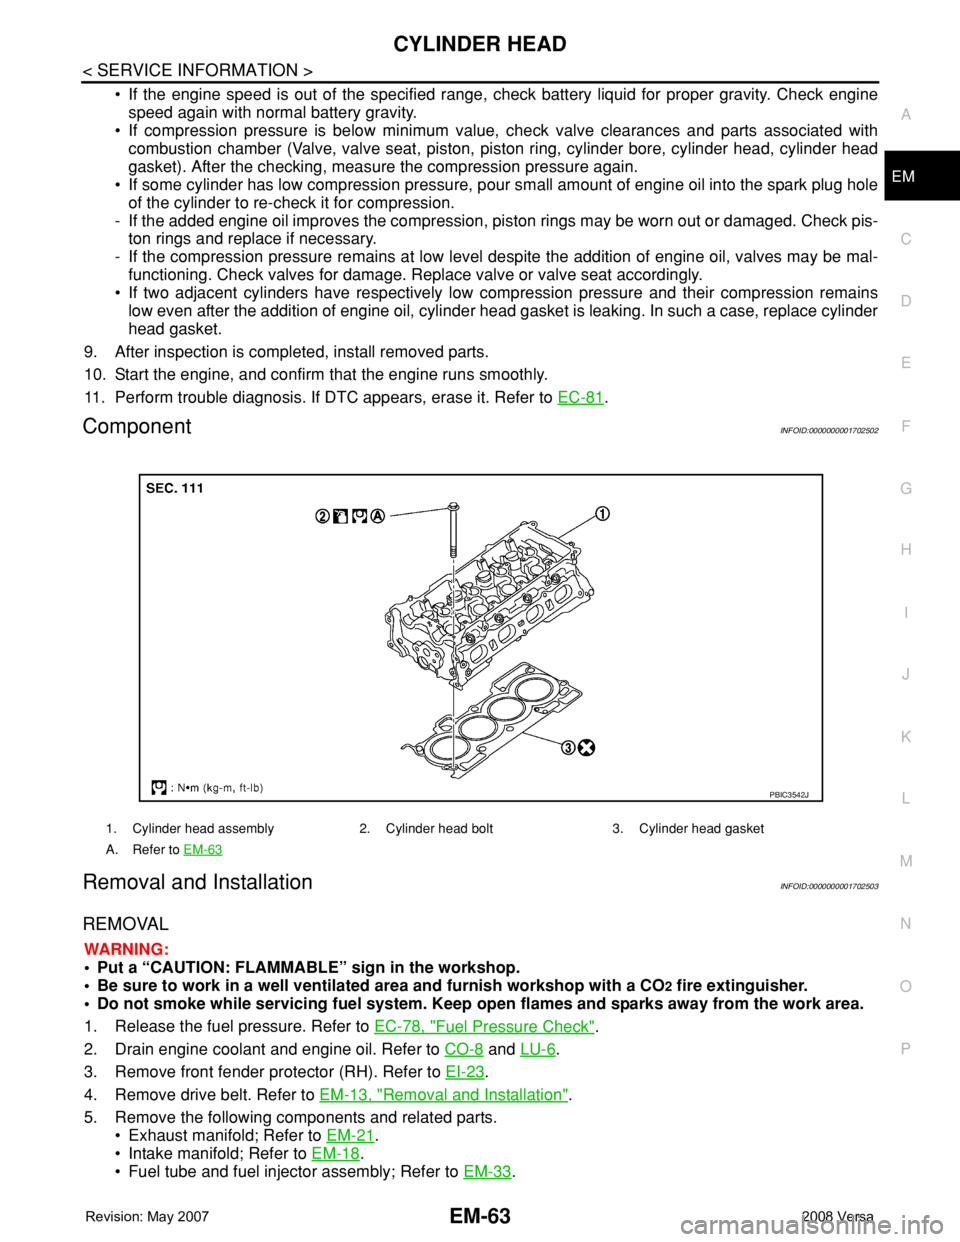
1. Cylinder head assembly 2. Cylinder head bolt 3. Cylinder head gasket
A. Refer to EM-63
PBIC3542J
Page 1744 of 2771
CYLINDER HEAD
EM-67
< SERVICE INFORMATION >
C
D
E
F
G
H
I
J
K
L
MA
EM
N
P O
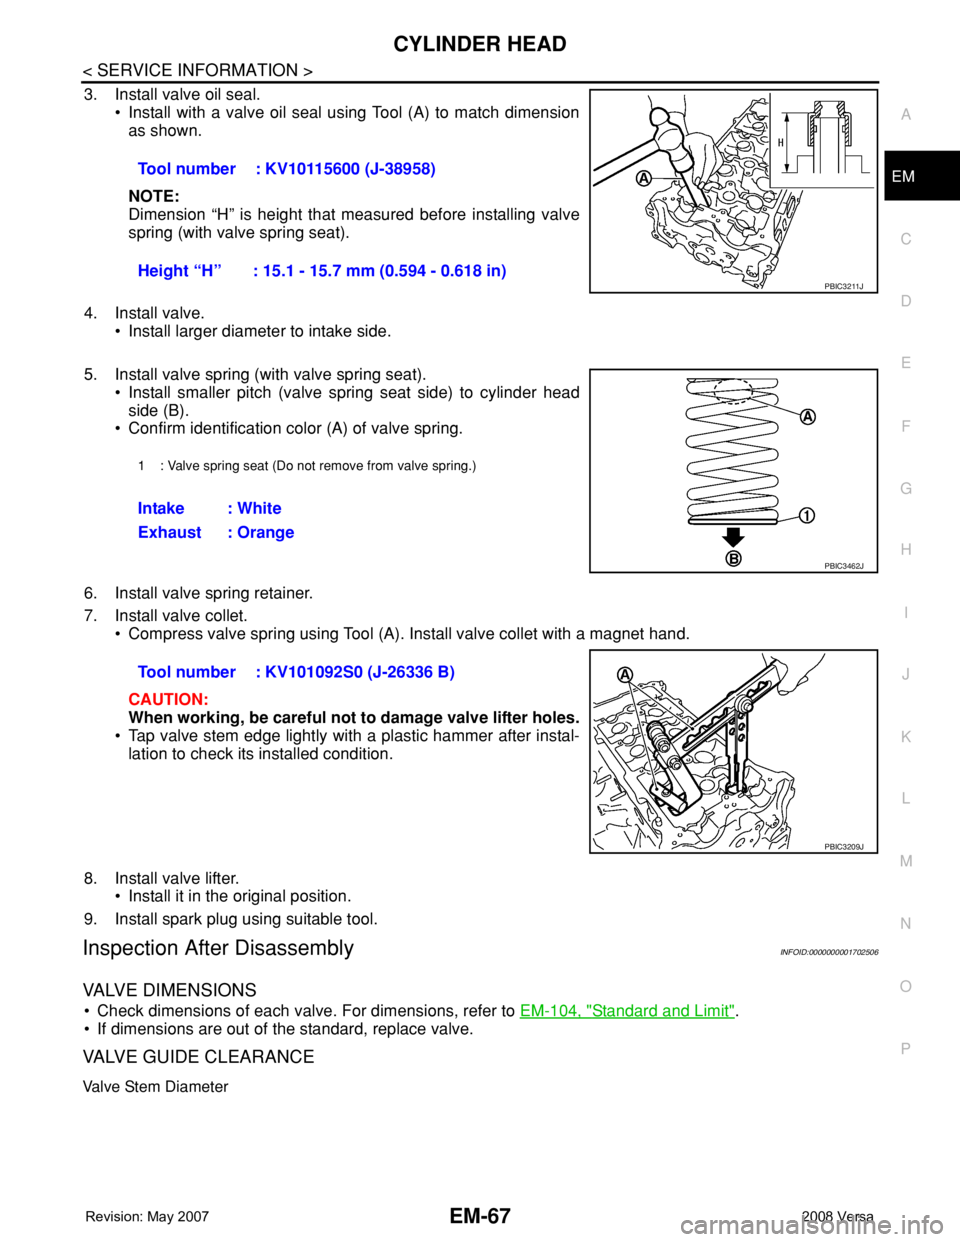
3. Install valve oil seal.
• Install with a valve oil seal using Tool (A) to match dimension
as shown.
NOTE:
Dimension “H” is height that measured before installing valve
spring (with valve spring seat).
4. Install valve.
• Install larger diameter to intake side.
5. Install valve spring (with valve spring seat).
• Install smaller pitch (valve spring seat side) to cylinder head
side (B).
• Confirm identification color (A) of valve spring.
6. Install valve spring retainer.
7. Install valve collet.
• Compress valve spring using Tool (A). Install valve collet with a magnet hand.
CAUTION:
When working, be careful not to damage valve lifter holes.
• Tap valve stem edge lightly with a plastic hammer after instal-
lation to check its installed condition.
8. Install valve lifter.
• Install it in the original position.
9. Install spark plug using suitable tool.
Inspection After DisassemblyINFOID:0000000001702506
VALVE DIMENSIONS
• Check dimensions of each valve. For dimensions, refer to EM-104, "Standard and Limit".
• If dimensions are out of the standard, replace valve.
VALVE GUIDE CLEARANCE
Valve Stem Diameter
Tool number : KV10115600 (J-38958)
Height “H” : 15.1 - 15.7 mm (0.594 - 0.618 in)
PBIC3211J
1 : Valve spring seat (Do not remove from valve spring.)
Intake : White
Exhaust : Orange
PBIC3462J
Tool number : KV101092S0 (J-26336 B)
PBIC3209J
Page 1745 of 2771
EM-68
< SERVICE INFORMATION >
CYLINDER HEAD
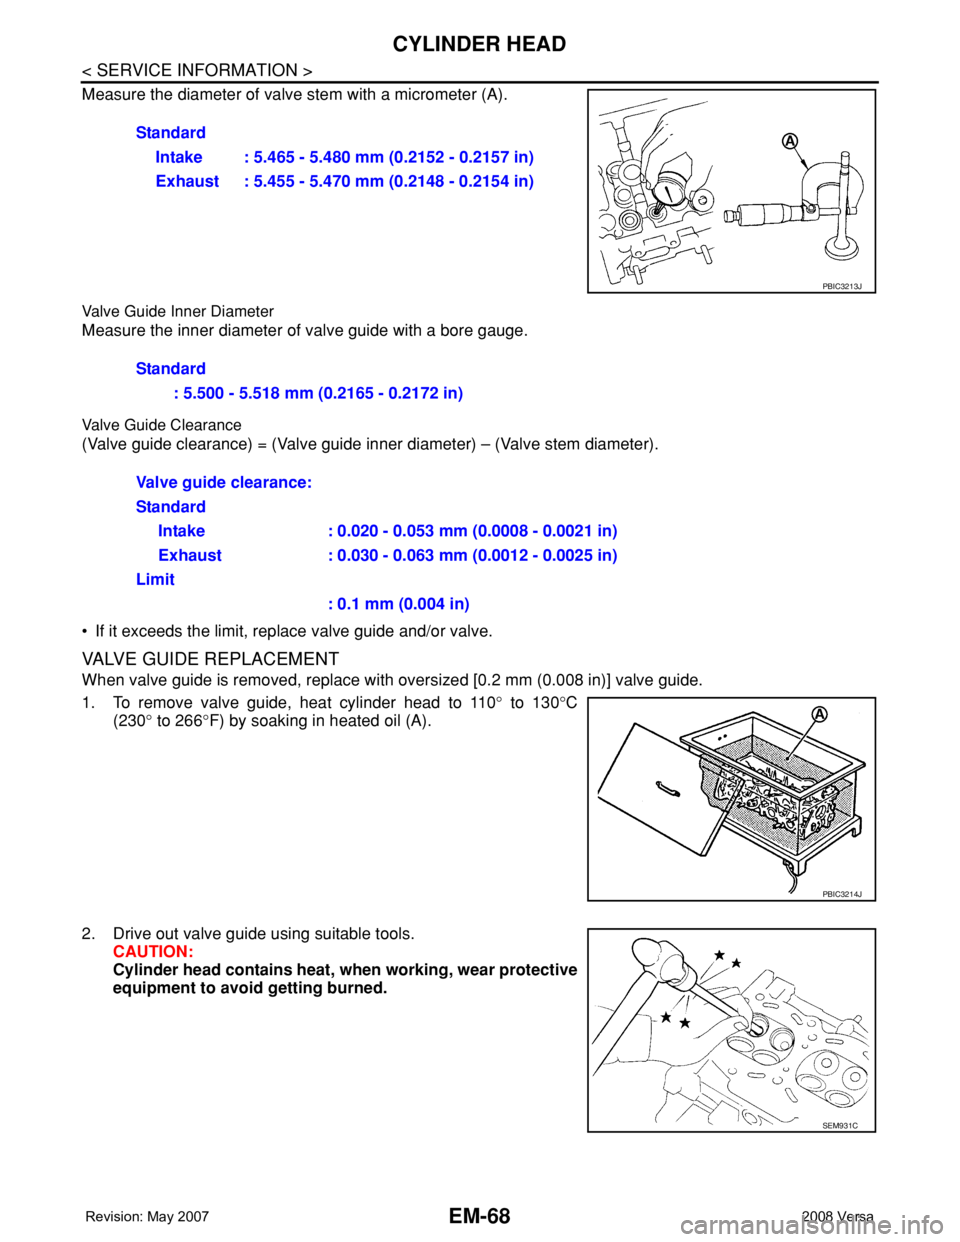
Measure the diameter of valve stem with a micrometer (A).
Valve Guide Inner Diameter
Measure the inner diameter of valve guide with a bore gauge.
Valve Guide Clearance
(Valve guide clearance) = (Valve guide inner diameter) – (Valve stem diameter).
• If it exceeds the limit, replace valve guide and/or valve.
VALVE GUIDE REPLACEMENT
When valve guide is removed, replace with oversized [0.2 mm (0.008 in)] valve guide.
1. To remove valve guide, heat cylinder head to 110° to 130°C
(230° to 266°F) by soaking in heated oil (A).
2. Drive out valve guide using suitable tools.
CAUTION:
Cylinder head contains heat, when working, wear protective
equipment to avoid getting burned.Standard
Intake : 5.465 - 5.480 mm (0.2152 - 0.2157 in)
Exhaust : 5.455 - 5.470 mm (0.2148 - 0.2154 in)
PBIC3213J
Standard
: 5.500 - 5.518 mm (0.2165 - 0.2172 in)
Valve guide clearance:
Standard
Intake : 0.020 - 0.053 mm (0.0008 - 0.0021 in)
Exhaust : 0.030 - 0.063 mm (0.0012 - 0.0025 in)
Limit
: 0.1 mm (0.004 in)
PBIC3214J
SEM931C