2008 NISSAN TIIDA connector d2
[x] Cancel search: connector d2Page 1213 of 2771
POWER SUPPLY AND GROUND CIRCUIT
EC-139
< SERVICE INFORMATION >
C
D
E
F
G
H
I
J
K
L
MA
EC
N
P O
OK or NG
OK >> GO TO 5.
NG >> Repair or replace ground connections.
5.CHECK ECM GROUND CIRCUIT FOR OPEN AND SHORT-I
1. Disconnect ECM harness connector.
2. Check harness continuity between ECM terminals 10, 11, 108 and ground.
Refer to Wiring Diagram.
3. Also check harness for short to power.
OK or NG
OK >> GO TO 7.
NG >> GO TO 6.
6.DETECT MALFUNCTIONING PART
Check the following.
• Harness connectors F8, E8
• Harness for open or short between ECM and ground
>> Repair open circuit or short to power in harness or connectors.
7.CHECK ECM POWER SUPPLY CIRCUIT-II
1. Reconnect ECM harness connector.
2. Turn ignition switch ON.
3. Check voltage between IPDM E/R terminal 3 and ground with
CONSULT-II or tester.
OK or NG
OK >> Go to EC-531.
NG >> GO TO 8.
8.CHECK ECM POWER SUPPLY CIRCUIT-III
1. Turn ignition switch OFF and wait at least 10 seconds.
2. Turn ignition switch ON and then OFF.
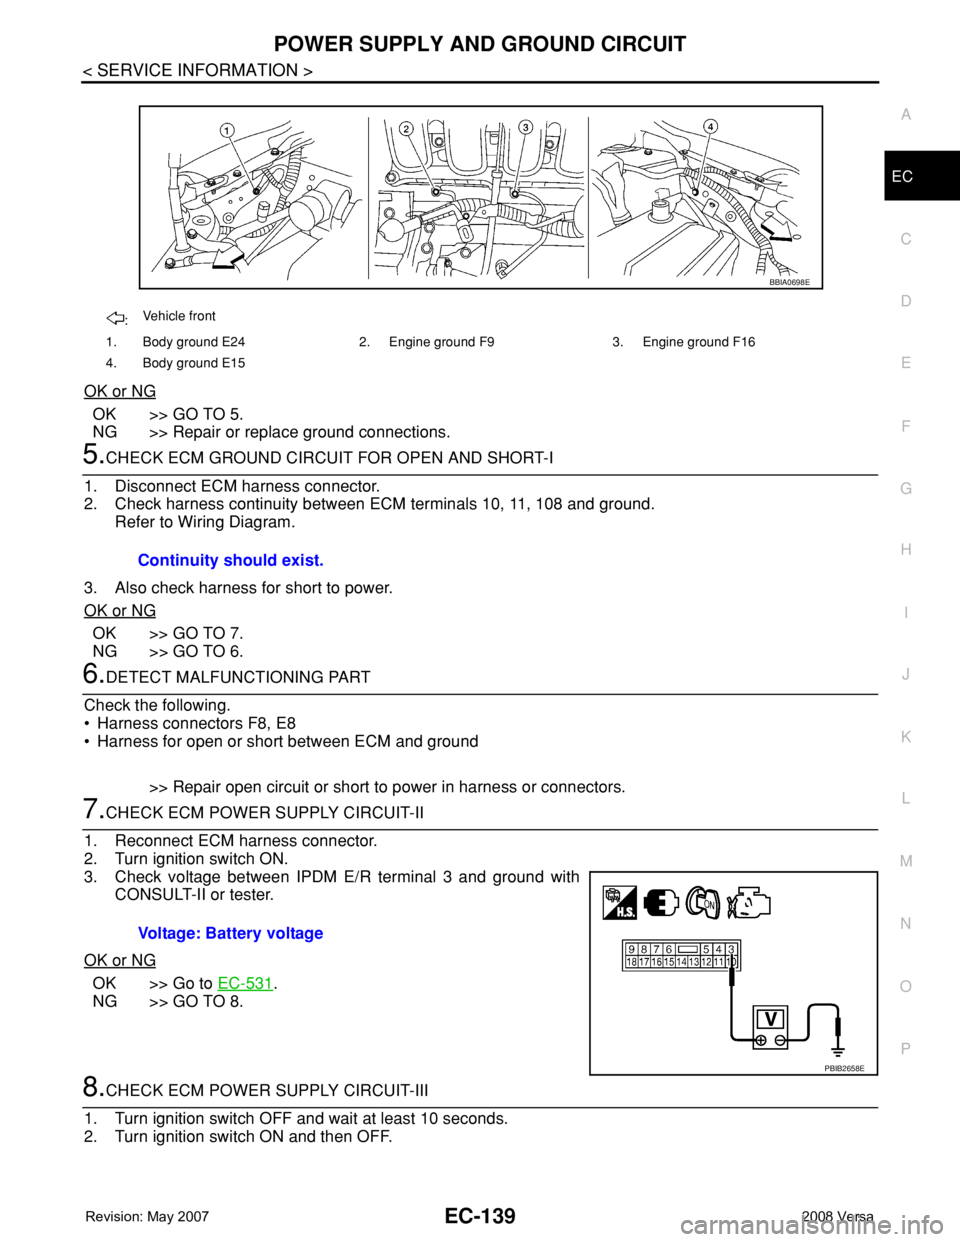
:Vehicle front
1. Body ground E24 2. Engine ground F9 3. Engine ground F16
4. Body ground E15
BBIA0698E
Continuity should exist.
Voltage: Battery voltage
PBIB2658E
Page 1214 of 2771
EC-140
< SERVICE INFORMATION >
POWER SUPPLY AND GROUND CIRCUIT
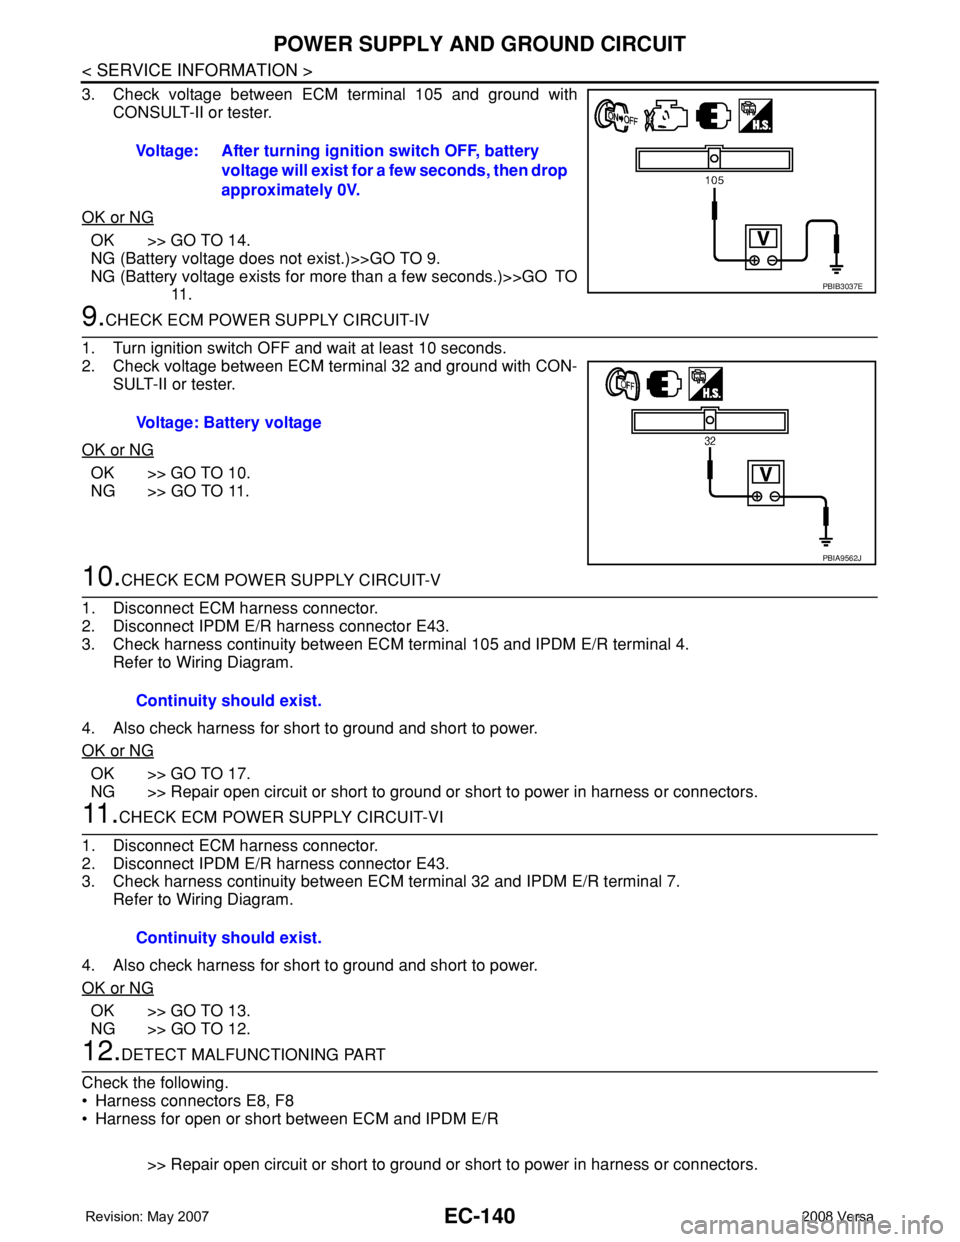
3. Check voltage between ECM terminal 105 and ground with
CONSULT-II or tester.
OK or NG
OK >> GO TO 14.
NG (Battery voltage does not exist.)>>GO TO 9.
NG (Battery voltage exists for more than a few seconds.)>>GO TO
11 .
9.CHECK ECM POWER SUPPLY CIRCUIT-IV
1. Turn ignition switch OFF and wait at least 10 seconds.
2. Check voltage between ECM terminal 32 and ground with CON-
SULT-II or tester.
OK or NG
OK >> GO TO 10.
NG >> GO TO 11.
10.CHECK ECM POWER SUPPLY CIRCUIT-V
1. Disconnect ECM harness connector.
2. Disconnect IPDM E/R harness connector E43.
3. Check harness continuity between ECM terminal 105 and IPDM E/R terminal 4.
Refer to Wiring Diagram.
4. Also check harness for short to ground and short to power.
OK or NG
OK >> GO TO 17.
NG >> Repair open circuit or short to ground or short to power in harness or connectors.
11 .CHECK ECM POWER SUPPLY CIRCUIT-VI
1. Disconnect ECM harness connector.
2. Disconnect IPDM E/R harness connector E43.
3. Check harness continuity between ECM terminal 32 and IPDM E/R terminal 7.
Refer to Wiring Diagram.
4. Also check harness for short to ground and short to power.
OK or NG
OK >> GO TO 13.
NG >> GO TO 12.
12.DETECT MALFUNCTIONING PART
Check the following.
• Harness connectors E8, F8
• Harness for open or short between ECM and IPDM E/R
>> Repair open circuit or short to ground or short to power in harness or connectors. Voltage: After turning ignition switch OFF, battery
voltage will exist for a few seconds, then drop
approximately 0V.
PBIB3037E
Voltage: Battery voltage
PBIA9562J
Continuity should exist.
Continuity should exist.
Page 1215 of 2771
POWER SUPPLY AND GROUND CIRCUIT
EC-141
< SERVICE INFORMATION >
C
D
E
F
G
H
I
J
K
L
MA
EC
N
P O
13.CHECK 20A FUSE
1. Disconnect 20A fuse from IPDM E/R.
2. Check 20A fuse.
OK or NG
OK >> GO TO 17.
NG >> Replace 20A fuse.
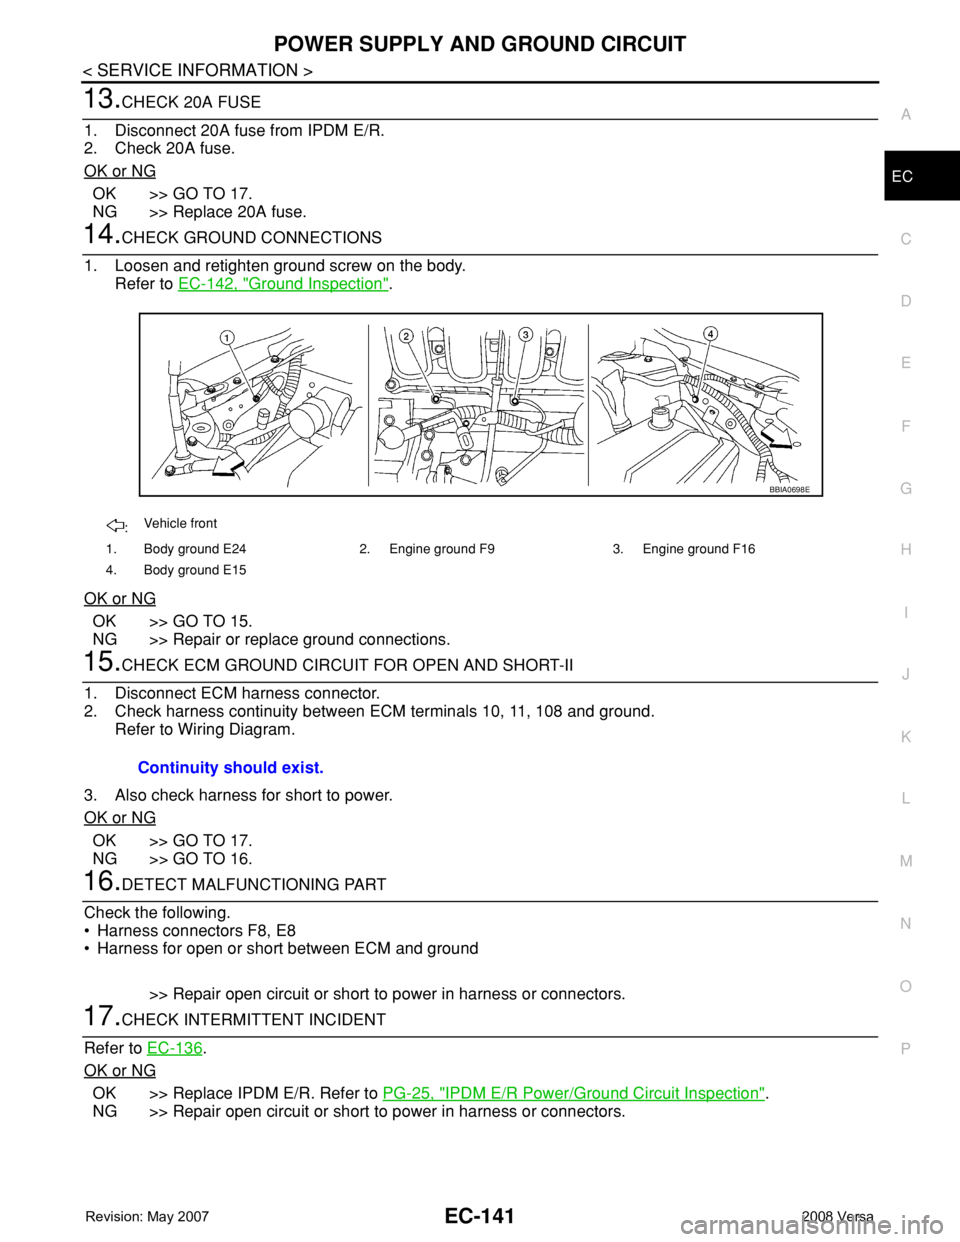
14.CHECK GROUND CONNECTIONS
1. Loosen and retighten ground screw on the body.
Refer to EC-142, "
Ground Inspection".
OK or NG
OK >> GO TO 15.
NG >> Repair or replace ground connections.
15.CHECK ECM GROUND CIRCUIT FOR OPEN AND SHORT-II
1. Disconnect ECM harness connector.
2. Check harness continuity between ECM terminals 10, 11, 108 and ground.
Refer to Wiring Diagram.
3. Also check harness for short to power.
OK or NG
OK >> GO TO 17.
NG >> GO TO 16.
16.DETECT MALFUNCTIONING PART
Check the following.
• Harness connectors F8, E8
• Harness for open or short between ECM and ground
>> Repair open circuit or short to power in harness or connectors.
17.CHECK INTERMITTENT INCIDENT
Refer to EC-136
.
OK or NG
OK >> Replace IPDM E/R. Refer to PG-25, "IPDM E/R Power/Ground Circuit Inspection".
NG >> Repair open circuit or short to power in harness or connectors.
:Vehicle front
1. Body ground E24 2. Engine ground F9 3. Engine ground F16
4. Body ground E15
BBIA0698E
Continuity should exist.
Page 1217 of 2771

DTC U1000, U1001 CAN COMMUNICATION LINE
EC-143
< SERVICE INFORMATION >
C
D
E
F
G
H
I
J
K
L
MA
EC
N
P O
DTC U1000, U1001 CAN COMMUNICATION LINE
DescriptionINFOID:0000000001702608
CAN (Controller Area Network) is a serial communication line for real time application. It is an on-vehicle mul-
tiplex communication line with high data communication speed and excellent error detection ability. Many elec-
tronic control units are equipped onto a vehicle, and each control unit shares information and links with other
control units during operation (not independent). In CAN communication, control units are connected with 2
communication lines (CAN H line, CAN L line) allowing a high rate of information transmission with less wiring.
Each control unit transmits/receives data but selectively reads required data only.
On Board Diagnosis LogicINFOID:0000000001702609
*1: This self-diagnosis has the one trip detection logic (A/T, CVT).
The MIL will not light up for this self-diagnosis (M/T).
*2: The MIL will not light up for this self-diagnosis.
DTC Confirmation ProcedureINFOID:0000000001702610
1. Turn ignition switch ON and wait at least 3 seconds.
2. Select “DATA MONITOR” mode with CONSULT-II.
3. If 1st trip DTC is detected, go to EC-144, "
Diagnosis Procedure".
DTC No.Trouble diagnosis
nameDTC detecting condition Possible cause
U1000*
1
1000*1CAN communication
lineWhen ECM is not transmitting or receiving CAN
communication signal of OBD (emission related
diagnosis) for 2 seconds or more.• Harness or connectors
(CAN communication line is open or
shorted.)
U1001*
2
1001*2
When ECM is not transmitting or receiving CAN
communication signal other than OBD (emission-
related diagnosis) for 2 seconds or more.
Page 1224 of 2771
EC-150
< SERVICE INFORMATION >
DTC P0011 IVT CONTROL
Are there any service records that may cause timing chain misaligned?
Ye s o r N o
Yes >> Check timing chain installation. Refer to EM-37.
No >> GO TO 7.
7.CHECK LUBRICATION CIRCUIT
Refer to EM-47, "
Removal and Installation".
OK or NG
OK >> GO TO 8.
NG >> Clean lubrication line.
8.CHECK INTERMITTENT INCIDENT
Refer to EC-136
.
For Wiring Diagram, refer to EC-297, "
Wiring Diagram" for CKP sensor (POS) and EC-304, "Wiring Diagram"
for CMP sensor (PHASE).
>>INSPECTION END
Component InspectionINFOID:0000000001702622
INTAKE VALVE TIMING CONTROL SOLENOID VALVE
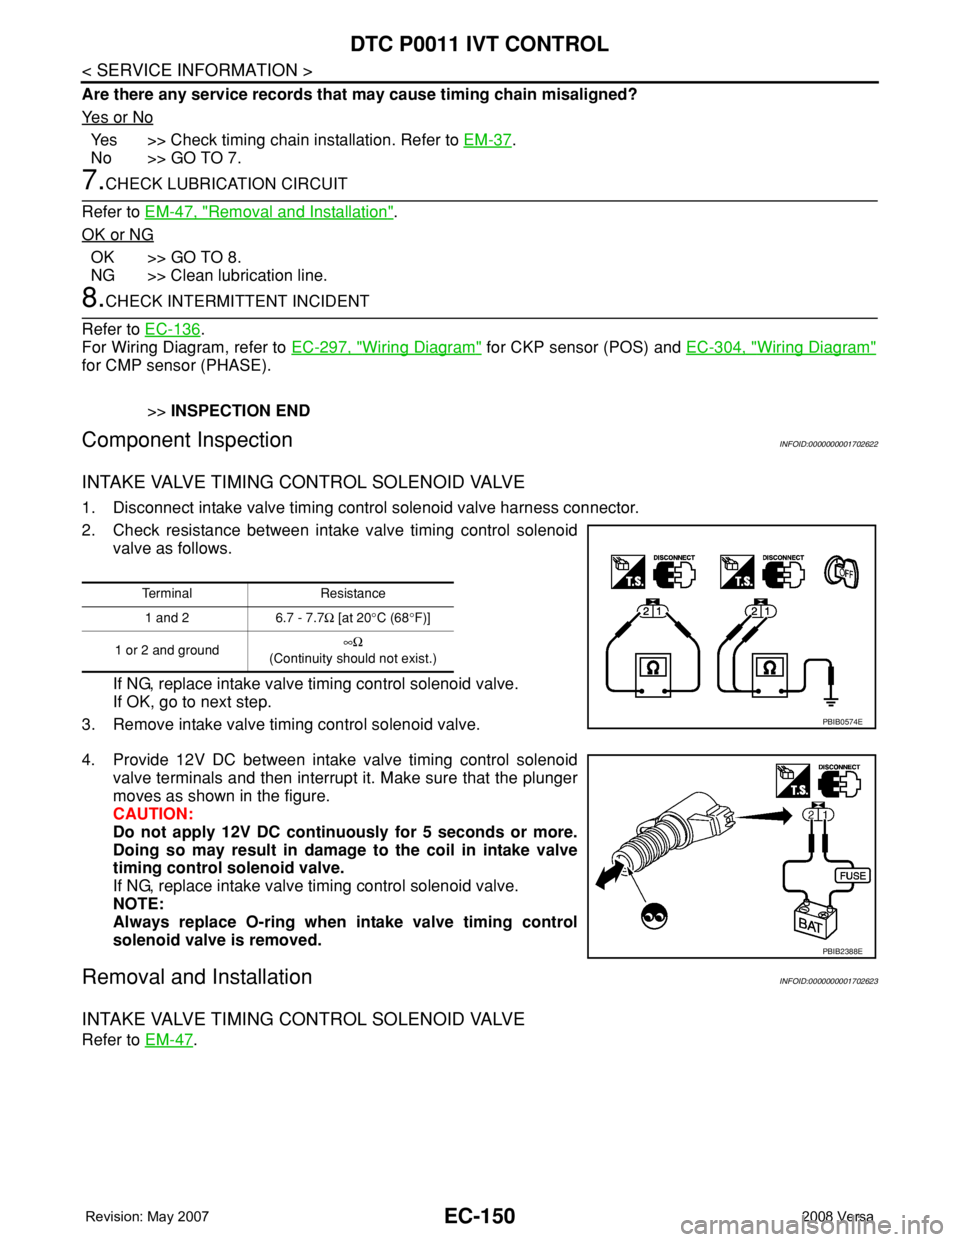
1. Disconnect intake valve timing control solenoid valve harness connector.
2. Check resistance between intake valve timing control solenoid
valve as follows.
If NG, replace intake valve timing control solenoid valve.
If OK, go to next step.
3. Remove intake valve timing control solenoid valve.
4. Provide 12V DC between intake valve timing control solenoid
valve terminals and then interrupt it. Make sure that the plunger
moves as shown in the figure.
CAUTION:
Do not apply 12V DC continuously for 5 seconds or more.
Doing so may result in damage to the coil in intake valve
timing control solenoid valve.
If NG, replace intake valve timing control solenoid valve.
NOTE:
Always replace O-ring when intake valve timing control
solenoid valve is removed.
Removal and InstallationINFOID:0000000001702623
INTAKE VALVE TIMING CONTROL SOLENOID VALVE
Refer to EM-47.
Terminal Resistance
1 and 2 6.7 - 7.7Ω [at 20°C (68°F)]
1 or 2 and ground∞Ω
(Continuity should not exist.)
PBIB0574E
PBIB2388E
Page 1225 of 2771

DTC P0031, P0032 A/F SENSOR 1 HEATER
EC-151
< SERVICE INFORMATION >
C
D
E
F
G
H
I
J
K
L
MA
EC
N
P O
DTC P0031, P0032 A/F SENSOR 1 HEATER
DescriptionINFOID:0000000001702624
SYSTEM DESCRIPTION
The ECM performs ON/OFF duty control of the A/F sensor 1 heater corresponding to the engine operating
condition to keep the temperature of A/F sensor 1 element at the specified range.
CONSULT-II Reference Value in Data Monitor ModeINFOID:0000000001702625
Specification data are reference values.
On Board Diagnosis LogicINFOID:0000000001702626
DTC Confirmation ProcedureINFOID:0000000001702627
NOTE:
If DTC Confirmation Procedure has been previously conducted, always turn ignition switch OFF and wait at
least 10 seconds before conducting the next test.
TESTING CONDITION:
Before performing the following procedure, confirm that battery voltage is between 10.5V and 16V at
idle.
With CONSULT-II
WITH CONSULT-II
1. Turn ignition switch ON and select “DATA MONITOR” mode with
CONSULT-II.
2. Start engine and run it for at least 10 seconds at idle speed.
3. If 1st trip DTC is detected, go to EC-153, "
Diagnosis Procedure".
Sensor Input Signal to ECMECM
functionActuator
Camshaft position sensor (PHASE)
Crankshaft position sensor (POS)Engine speed
Air fuel ratio (A/F) sensor 1
heater controlAir fuel ratio (A/F) sensor 1 heat-
er
Mass air flow sensor Amount of intake air
MONITOR ITEM CONDITION SPECIFICATION
A/F S1 HTR (B1)• Engine: After warming up, idle the engine
(More than 140 seconds after starting engine.)4 - 100%
DTC No.Trouble diagnosis
nameDTC detecting condition Possible cause
P0031
0031Air fuel ratio (A/F)
sensor 1 heater
control circuit lowThe current amperage in the air fuel ratio (A/F)
sensor 1 heater circuit is out of the normal range.
[An excessively low voltage signal is sent to ECM
through the air fuel ratio (A/F) sensor 1 heater.]• Harness or connectors
[Air fuel ratio (A/F) sensor 1 heater circuit is
open or shorted.]
• Air fuel ratio (A/F) sensor 1 heater
P0032
0032Air fuel ratio (A/F)
sensor 1 heater
control circuit highThe current amperage in the air fuel ratio (A/F)
sensor 1 heater circuit is out of the normal range.
[An excessively high voltage signal is sent to ECM
through the air fuel ratio (A/F) sensor 1 heater.]• Harness or connectors
[Air fuel ratio (A/F) sensor 1 heater circuit is
shorted.]
• Air fuel ratio (A/F) sensor 1 heater
SEF058Y
Page 1228 of 2771
EC-154
< SERVICE INFORMATION >
DTC P0031, P0032 A/F SENSOR 1 HEATER
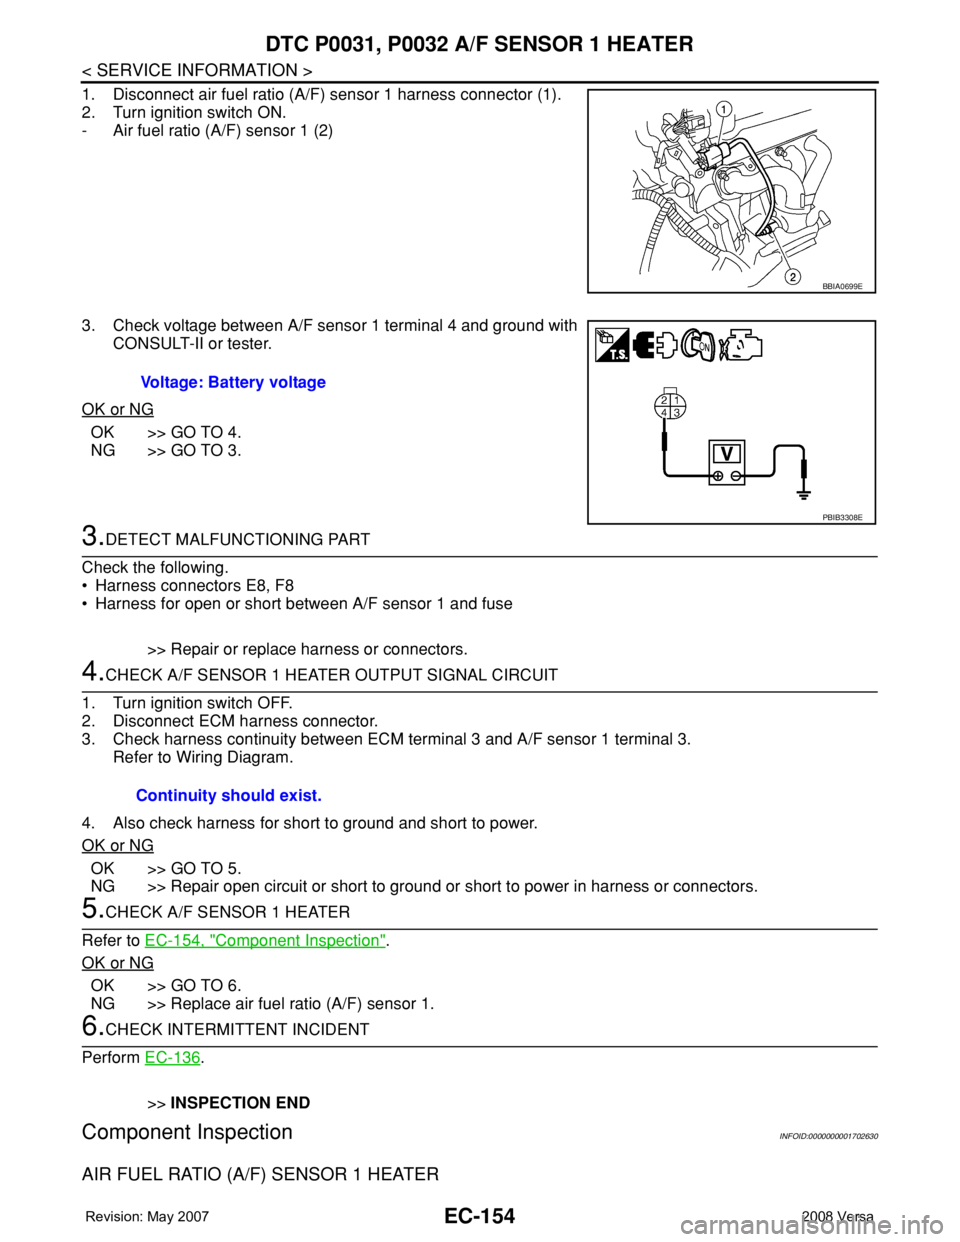
1. Disconnect air fuel ratio (A/F) sensor 1 harness connector (1).
2. Turn ignition switch ON.
- Air fuel ratio (A/F) sensor 1 (2)
3. Check voltage between A/F sensor 1 terminal 4 and ground with
CONSULT-II or tester.
OK or NG
OK >> GO TO 4.
NG >> GO TO 3.
3.DETECT MALFUNCTIONING PART
Check the following.
• Harness connectors E8, F8
• Harness for open or short between A/F sensor 1 and fuse
>> Repair or replace harness or connectors.
4.CHECK A/F SENSOR 1 HEATER OUTPUT SIGNAL CIRCUIT
1. Turn ignition switch OFF.
2. Disconnect ECM harness connector.
3. Check harness continuity between ECM terminal 3 and A/F sensor 1 terminal 3.
Refer to Wiring Diagram.
4. Also check harness for short to ground and short to power.
OK or NG
OK >> GO TO 5.
NG >> Repair open circuit or short to ground or short to power in harness or connectors.
5.CHECK A/F SENSOR 1 HEATER
Refer to EC-154, "
Component Inspection".
OK or NG
OK >> GO TO 6.
NG >> Replace air fuel ratio (A/F) sensor 1.
6.CHECK INTERMITTENT INCIDENT
Perform EC-136
.
>>INSPECTION END
Component InspectionINFOID:0000000001702630
AIR FUEL RATIO (A/F) SENSOR 1 HEATER
BBIA0699E
Voltage: Battery voltage
PBIB3308E
Continuity should exist.
Page 1230 of 2771

EC-156
< SERVICE INFORMATION >
DTC P0037, P0038 HO2S2 HEATER
DTC P0037, P0038 HO2S2 HEATER
DescriptionINFOID:0000000001702632
SYSTEM DESCRIPTION
The ECM performs ON/OFF control of the heated oxygen sensor 2 heater corresponding to the engine speed,
amount of intake air and engine coolant temperature.
OPERATION
CONSULT-II Reference Value in Data Monitor ModeINFOID:0000000001702633
Specification data are reference values.
On Board Diagnosis LogicINFOID:0000000001702634
DTC Confirmation ProcedureINFOID:0000000001702635
NOTE:
If DTC Confirmation Procedure has been previously conducted, always turn ignition switch OFF and wait at
least 10 seconds before conducting the next test.
TESTING CONDITION:
Before performing the following procedure, confirm that battery voltage is between 10.5V and 16V at
idle.
WITH CONSULT-II
Sensor Input Signal to ECM ECM Function Actuator
Camshaft position sensor (PHASE)
Engine speed
Heated oxygen sensor 2
heater controlHeated oxygen sensor 2 heater Crankshaft position sensor (POS)
Engine coolant temperature sensorEngine coolant tempera-
ture
Mass air flow sensor Amount of intake air
Engine speed rpm Heated oxygen sensor 2 heater
Above 3,600OFF
• Below 3,600 rpm after the following conditions are met.
- Engine: After warming up
- Keeping the engine speed between 3,500 and 4,000 rpm for 1
minute and at idle for 1 minute under no loadON
MONITOR ITEM CONDITION SPECIFICATION
HO2S2 HTR (B1)• Engine speed: Below 3,600 rpm after the following conditions are met
- Engine: After warming up
- Keeping the engine speed between 3,500 and 4,000 rpm for 1 minute and
at idle for 1 minute under no load.ON
• Engine speed: Above 3,600 rpm OFF
DTC No.Trouble diagnosis
nameDTC detecting condition Possible cause
P0037
0037Heated oxygen
sensor 2 heater
control circuit lowThe current amperage in the heated oxygen sensor
2 heater circuit is out of the normal range.
(An excessively low voltage signal is sent to ECM
through the heated oxygen sensor 2 heater.)• Harness or connectors
(Heated oxygen sensor 2 heater circuit is
open or shorted.)
• Heated oxygen sensor 2 heater
P0038
0038Heated oxygen
sensor 2 heater
control circuit highThe current amperage in the heated oxygen sensor
2 heater circuit is out of the normal range.
(An excessively high voltage signal is sent to ECM
through the heated oxygen sensor 2 heater.)• Harness or connectors
(Heated oxygen sensor 2 heater circuit is
shorted.)
• Heated oxygen sensor 2 heater