Page 391 of 2771
AV-32
< SERVICE INFORMATION >
AUDIO
OK or NG
OK >> GO TO 2.
NG >> • Check connector housings for disconnected or loose terminals.
• Repair harness or connector.
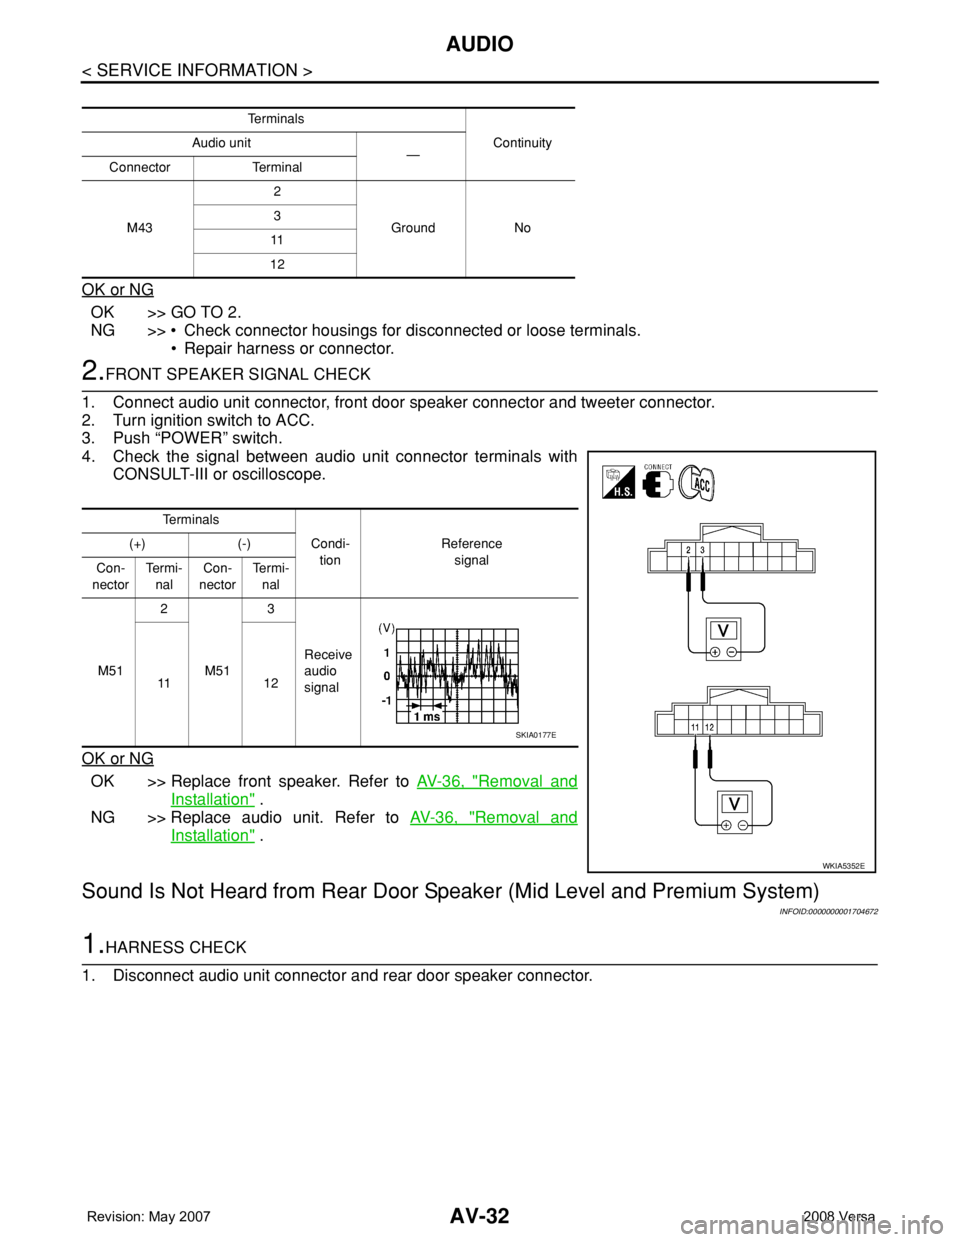
2.FRONT SPEAKER SIGNAL CHECK
1. Connect audio unit connector, front door speaker connector and tweeter connector.
2. Turn ignition switch to ACC.
3. Push “POWER” switch.
4. Check the signal between audio unit connector terminals with
CONSULT-III or oscilloscope.
OK or NG
OK >> Replace front speaker. Refer to AV-36, "Removal and
Installation" .
NG >> Replace audio unit. Refer to AV-36, "
Removal and
Installation" .
Sound Is Not Heard from Rear Door Speaker (Mid Level and Premium System)
INFOID:0000000001704672
1.HARNESS CHECK
1. Disconnect audio unit connector and rear door speaker connector.
Te r m i n a l s
Continuity Audio unit
—
Connector Terminal
M432
Ground No 3
11
12
Te r m i n a l s
Condi-
tionReference
signal (+) (-)
Con-
nectorTe r m i -
nalCon-
nectorTe r m i -
nal
M512
M513
Receive
audio
signal 11 1 2
WKIA5352E
SKIA0177E
Page 392 of 2771
AUDIO
AV-33
< SERVICE INFORMATION >
C
D
E
F
G
H
I
J
L
MA
B
AV
N
O
P
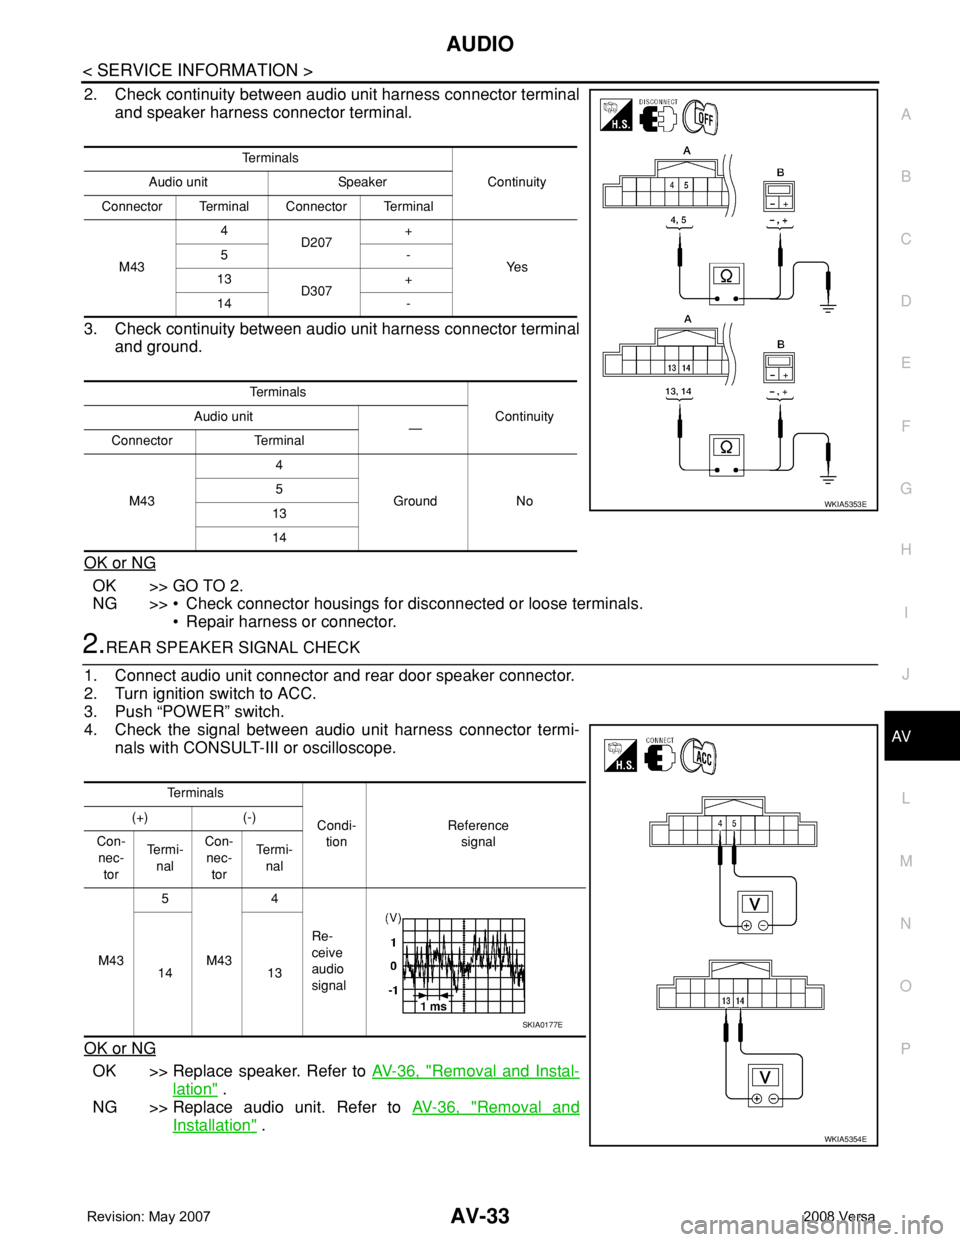
2. Check continuity between audio unit harness connector terminal
and speaker harness connector terminal.
3. Check continuity between audio unit harness connector terminal
and ground.
OK or NG
OK >> GO TO 2.
NG >> • Check connector housings for disconnected or loose terminals.
• Repair harness or connector.
2.REAR SPEAKER SIGNAL CHECK
1. Connect audio unit connector and rear door speaker connector.
2. Turn ignition switch to ACC.
3. Push “POWER” switch.
4. Check the signal between audio unit harness connector termi-
nals with CONSULT-III or oscilloscope.
OK or NG
OK >> Replace speaker. Refer to AV-36, "Removal and Instal-
lation" .
NG >> Replace audio unit. Refer to AV-36, "
Removal and
Installation" .
Te r m i n a l s
Continuity Audio unit Speaker
Connector Terminal Connector Terminal
M434
D207+
Ye s 5-
13
D307+
14 -
Te r m i n a l s
Continuity Audio unit
—
Connector Terminal
M434
Ground No 5
13
14
WKIA5353E
Te r m i n a l s
Condi-
tionReference
signal (+) (-)
Con-
nec-
torTe r m i -
nalCon-
nec-
torTe r m i -
nal
M435
M434
Re-
ceive
audio
signal 14 13
WKIA5354E
SKIA0177E
Page 395 of 2771
AV-36
< SERVICE INFORMATION >
AUDIO
OK or NG
OK >> Replace subwoofer. Refer to AV-36, "Removal and Installation" .
NG >> Replace audio unit. Refer to AV-36, "
Removal and Installation" .
Removal and InstallationINFOID:0000000001704674
AUDIO UNIT
Removal
1. Remove cluster lid C. Refer to IP-10.
2. Remove the audio unit screws (A), disconnect the connectors
and remove the audio unit (1).
3. Remove the audio unit bracket.
Installation
Installation is in the reverse order of removal.
FRONT DOOR SPEAKER
Removal
1. Remove the front door finisher. Refer to EI-32.
2. Remove the front door speaker screws (A), disconnect the con-
nector and remove the front door speaker (1).
Installation
Installation is in the reverse order of removal.
REAR DOOR SPEAKER
Removal
1. Remove the rear door finisher. Refer to EI-32.
2. Remove the rear door finisher screws (A), disconnect the con-
nector and remove the rear door speaker (1).
Installation
SKIB4726E
SKIB4728E
SKIB4729E
Page 400 of 2771
AUDIO ANTENNA
AV-41
< SERVICE INFORMATION >
C
D
E
F
G
H
I
J
L
MA
B
AV
N
O
P
AUDIO ANTENNA
Location of AntennaINFOID:0000000001704675
Removal and Installation of Roof AntennaINFOID:0000000001704676
REMOVAL
1. For hatchback, remove the luggage side upper finisher (LH). Refer to EI-51.
2. For sedan, remove the rear pillar finisher. Refer to EI-49, "
Removal and Installation - Sedan".
3. Remove rear assist grip (LH). Refer to EI-45
.
4. Remove three clips of headlining (rear side). Pull down headlining (rear side) and obtain space for work
between vehicle and headlining.
5. Disconnect the roof antenna harness connectors.
LKIA0934E
1. Roof antenna 2. Roof antenna base 3. Audio unit
A. Audio antenna harness connector B. Harness clips C. Roof antenna harness connectors
Page 416 of 2771
TELEPHONE
AV-57
< SERVICE INFORMATION >
C
D
E
F
G
H
I
J
L
MA
B
AV
N
O
P
Sedan
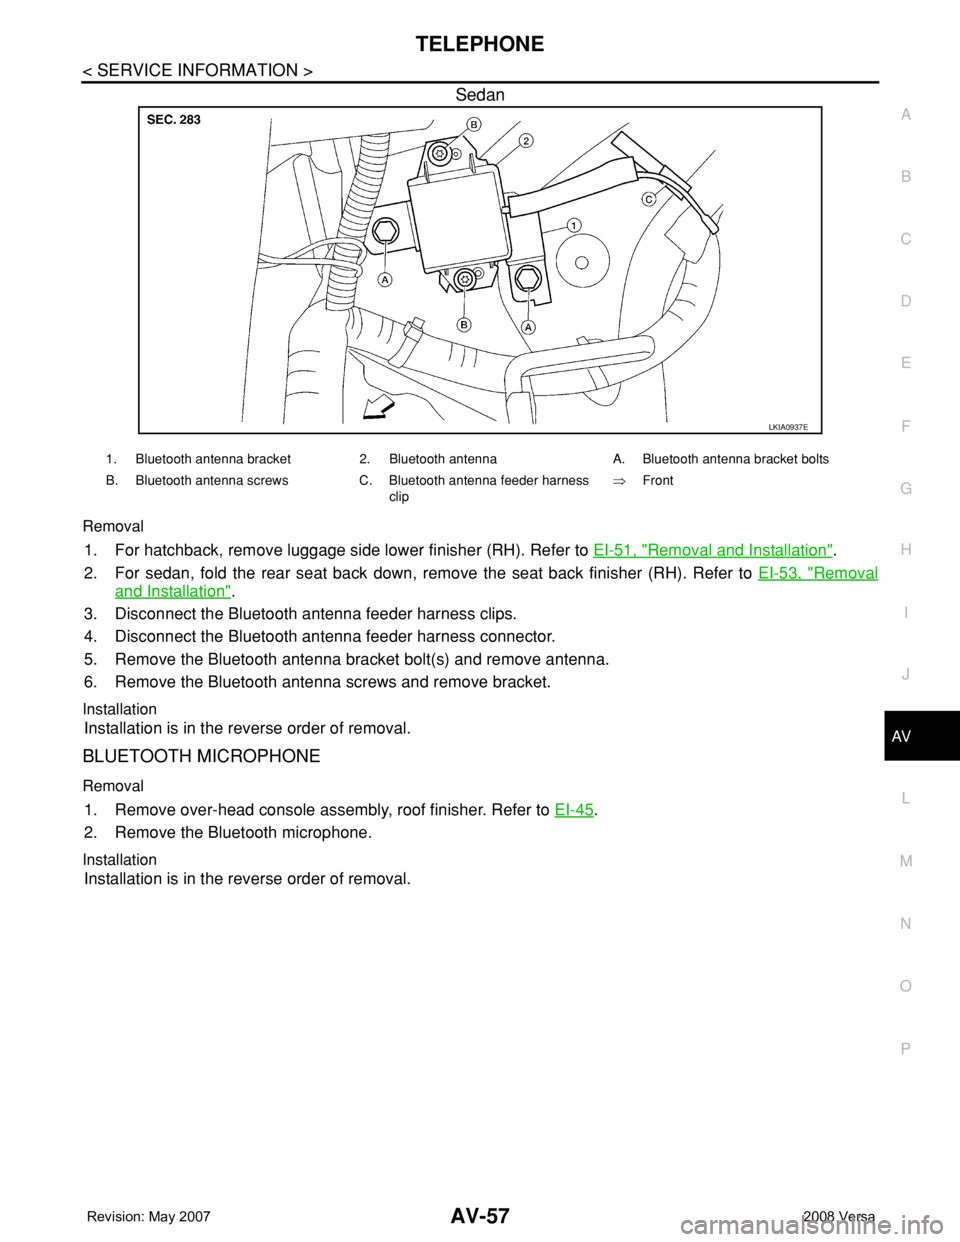
Removal
1. For hatchback, remove luggage side lower finisher (RH). Refer to EI-51, "Removal and Installation".
2. For sedan, fold the rear seat back down, remove the seat back finisher (RH). Refer to EI-53, "
Removal
and Installation".
3. Disconnect the Bluetooth antenna feeder harness clips.
4. Disconnect the Bluetooth antenna feeder harness connector.
5. Remove the Bluetooth antenna bracket bolt(s) and remove antenna.
6. Remove the Bluetooth antenna screws and remove bracket.
Installation
Installation is in the reverse order of removal.
BLUETOOTH MICROPHONE
Removal
1. Remove over-head console assembly, roof finisher. Refer to EI-45.
2. Remove the Bluetooth microphone.
Installation
Installation is in the reverse order of removal.
LKIA0937E
1. Bluetooth antenna bracket 2. Bluetooth antenna A. Bluetooth antenna bracket bolts
B. Bluetooth antenna screws C. Bluetooth antenna feeder harness
clip⇒Front
Page 422 of 2771
BCS-6
< SERVICE INFORMATION >
BCM (BODY CONTROL MODULE)
• When CAN communication operation is detected, it switches to CAN communication status.
• When a state of the following switches changes, it switches to CAN communication state:
- Ignition switch
- Key switch (without Intelligent Key)
- Key switch and ignition knob switch (with Intelligent Key)
- Hazard switch
- Door lock/unlock switch
- Front door switch (LH, RH)
- Rear door switch (LH, RH)
- Back door lock assembly (Hatchback)
- Trunk key cylinder switch (Sedan)
- Trunk lamp switch and trunk release solenoid (Sedan)
- Combination switch (passing, lighting switch 1st position, front fog lamp)
- Keyfob (lock/unlock signal)
- Front door key cylinder switch LH
• When control performed only by BCM is required by switch, it shifts to CAN communication inactive
mode.
• Status of combination switch reading function is changed.
SYSTEMS CONTROLLED BY BCM DIRECTLY
• Power door lock system. Refer to BL-22 .
• Remote keyless entry system. Refer to BL-51
.
• Power window system. Refer to GW-18
. NOTE
• Sunroof system. Refer to RF-10. NOTE
• Room lamp timer. Refer to LT- 8 9 .
• Rear wiper and washer system. Refer to WW-24
.
NOTE:
Power supply only. No system control.
SYSTEMS CONTROLLED BY BCM AND IPDM E/R
• Panic system. Refer to BL-51 .
• Vehicle security (theft warning) system. Refer to BL-187
.
• NVIS(NATS) system. Refer to BL-210
.
• Headlamp, tail lamp and battery saver control systems. Refer to LT- 7 2
, LT- 4 or LT- 2 5 .
• Front fog lamp. Refer to LT- 3 9
.
• Front wiper and washer system. Refer to WW-3
.
• Rear window defogger system. Refer to GW-49
.
SYSTEMS CONTROLLED BY BCM AND COMBINATION METER
• Warning chime. Refer to DI-41 .
• Turn signal and hazard warning lamps. Refer to LT- 4 8
.
SYSTEMS CONTROLLED BY BCM AND INTELLIGENT KEY UNIT
• Intelligent Key system. Refer to BL-74 .
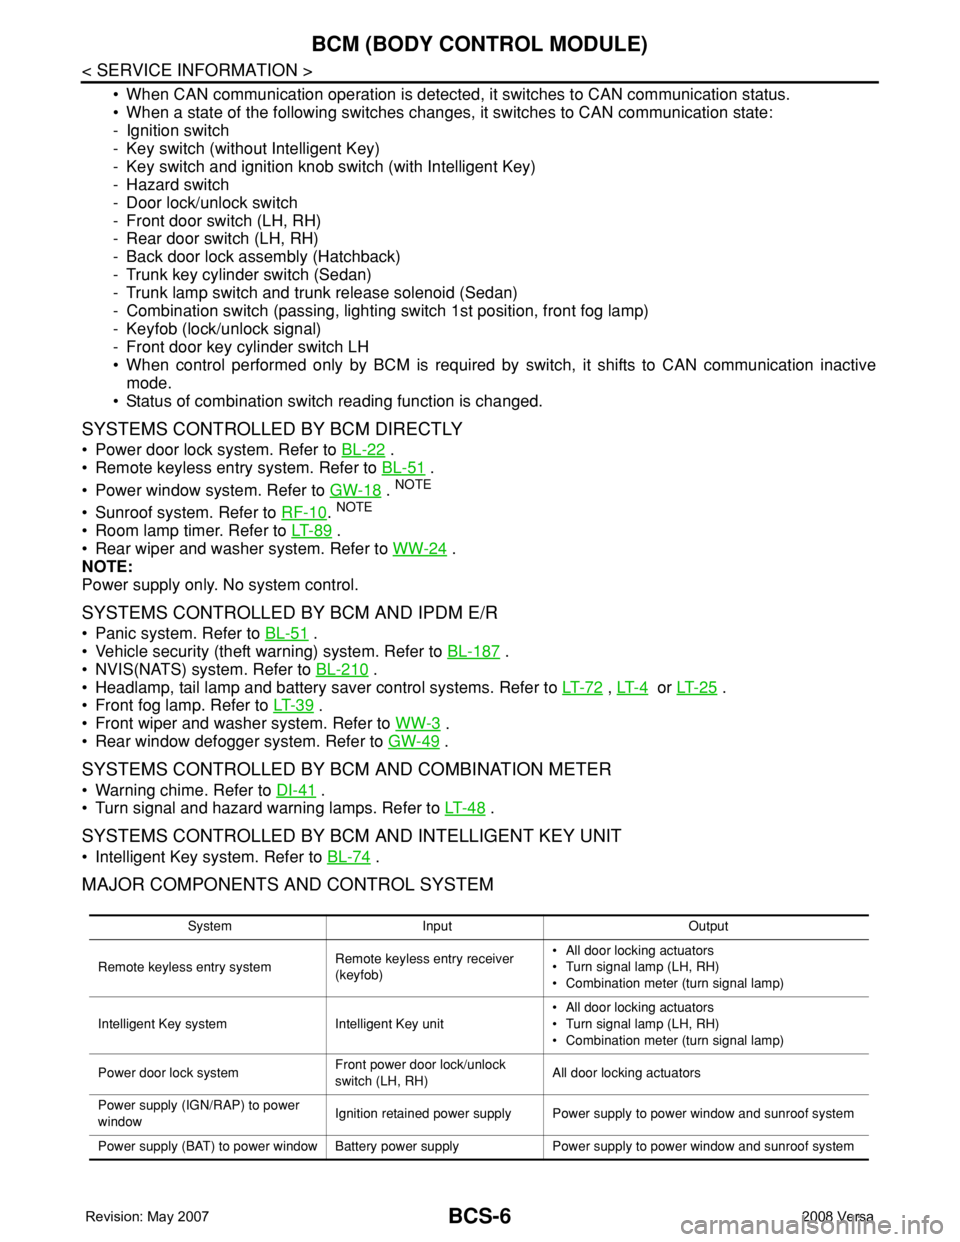
MAJOR COMPONENTS AND CONTROL SYSTEM
System Input Output
Remote keyless entry systemRemote keyless entry receiver
(keyfob)• All door locking actuators
• Turn signal lamp (LH, RH)
• Combination meter (turn signal lamp)
Intelligent Key system Intelligent Key unit• All door locking actuators
• Turn signal lamp (LH, RH)
• Combination meter (turn signal lamp)
Power door lock systemFront power door lock/unlock
switch (LH, RH)All door locking actuators
Power supply (IGN/RAP) to power
windowIgnition retained power supply Power supply to power window and sunroof system
Power supply (BAT) to power window Battery power supply Power supply to power window and sunroof system
Page 423 of 2771

BCM (BODY CONTROL MODULE)
BCS-7
< SERVICE INFORMATION >
C
D
E
F
G
H
I
J
L
MA
B
BCS
N
O
P
CAN Communication System DescriptionINFOID:0000000001704585
Refer to LAN-6, "System Description".
Panic alarm• Key switch
•KeyfobIPDM E/R
Vehicle security system• All door switches
•Keyfob
• Door lock/unlock switch
• Trunk key cylinder switch (Se-
dan)
• Front door key cylinder switch
LH• IPDM/ER
• Security indicator lamp
Battery saver control• Ignition switch
• Combination switchIPDM E/R
Headlamp Combination switch IPDM E/R
Tail lamp Combination switch IPDM E/R
Front fog lamp Combination switch IPDM E/R
Turn signal lamp Combination switch• Turn signal lamp
• Combination meter
Hazard lamp Hazard switch• Turn signal lamp
• Combination meter
Room lamp timer• Key switch
•Keyfob
• Main power window and door
lock/unlock switch
• Front door switch LH
• All door switchInterior room lamp
Back door switch signal (Hatchback) Back door lock assembly Luggage room lamp
Back door lock signal (Hatchback) Back door lock assembly Back door opener
Trunk lamp switch signalTrunk lamp switch and trunk re-
lease solenoidLuggage room lamp
Trunk lid opener signalTrunk lamp switch and trunk re-
lease solenoidTrunk lid opener
Key warning chime• Key switch
• Front door switch LHCombination meter (warning buzzer)
Light warning chime• Combination switch
• Key switch
• Front door switch LHCombination meter (warning buzzer)
Seat belt warning chime• Seat belt buckle switch LH
• Ignition switchCombination meter (warning buzzer)
Front wiper and washer system• Combination switch
• Ignition switchIPDM E/R
Rear window defogger Rear window defogger switch IPDM E/R
Rear wiper and washer system• Combination switch
• Ignition switchRear wiper motor
A/C switch signal Front air control ECM
Blower fan switch signal Front air control ECM
A/C indicator signal Front air control A/C indicator
Low tire pressure warning system Remote keyless entry receiver Combination meterSystem Input Output
Page 427 of 2771
BCM (BODY CONTROL MODULE)
BCS-11
< SERVICE INFORMATION >
C
D
E
F
G
H
I
J
L
MA
B
BCS
N
O
P
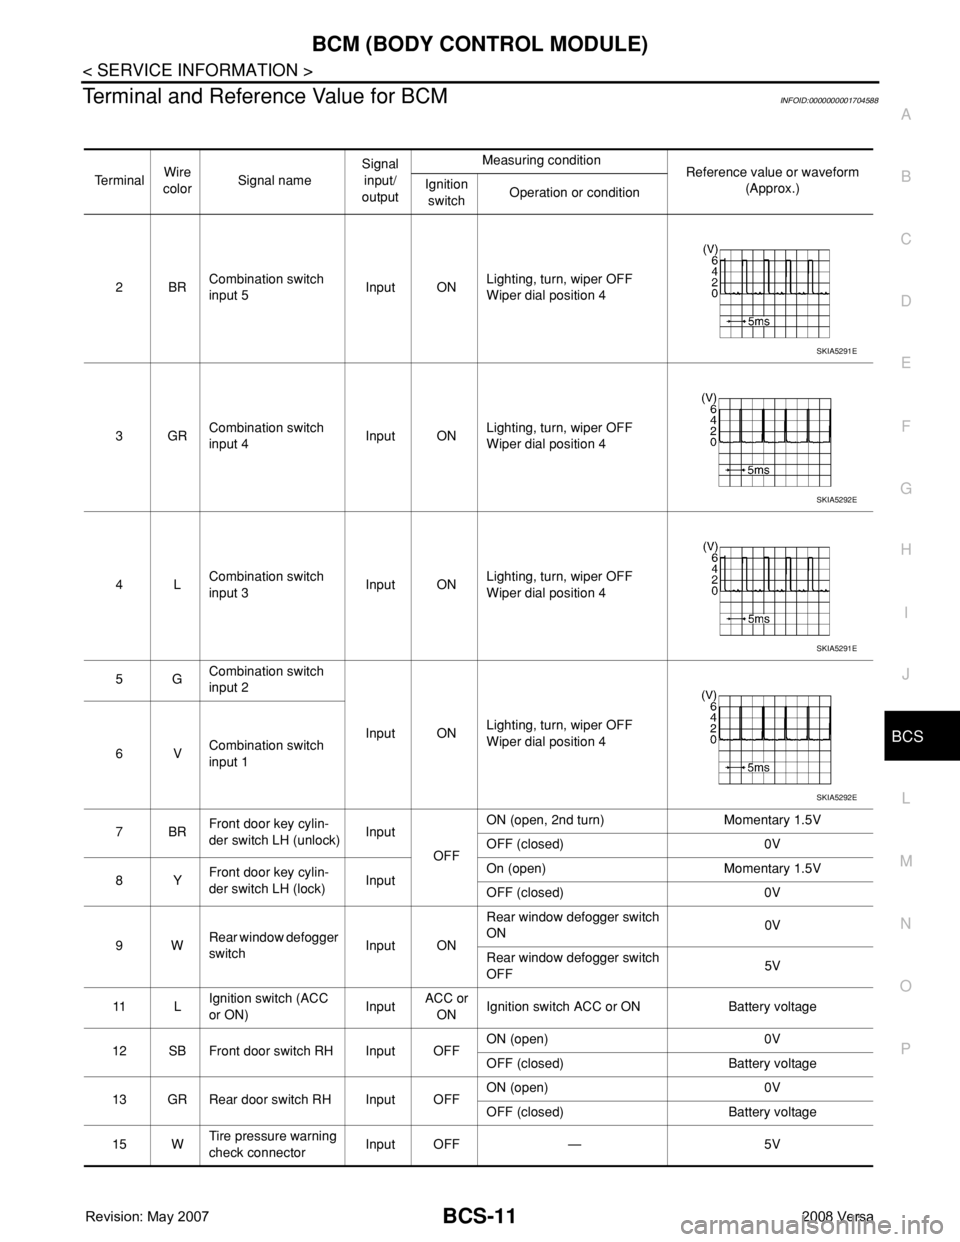
Terminal and Reference Value for BCMINFOID:0000000001704588
Te r m i n a lWire
colorSignal nameSignal
input/
outputMeasuring condition
Reference value or waveform
(Approx.) Ignition
switchOperation or condition
2BRCombination switch
input 5Input ONLighting, turn, wiper OFF
Wiper dial position 4
3GRCombination switch
input 4Input ONLighting, turn, wiper OFF
Wiper dial position 4
4LCombination switch
input 3Input ONLighting, turn, wiper OFF
Wiper dial position 4
5GCombination switch
input 2
Input ONLighting, turn, wiper OFF
Wiper dial position 4
6VCombination switch
input 1
7BRFront door key cylin-
der switch LH (unlock)Input
OFFON (open, 2nd turn) Momentary 1.5V
OFF (closed) 0V
8YFront door key cylin-
der switch LH (lock)InputOn (open) Momentary 1.5V
OFF (closed) 0V
9WRear window defogger
switchInput ONRear window defogger switch
ON0V
Rear window defogger switch
OFF5V
11 LIgnition switch (ACC
or ON)InputACC or
ONIgnition switch ACC or ON Battery voltage
12 SB Front door switch RH Input OFFON (open) 0V
OFF (closed) Battery voltage
13 GR Rear door switch RH Input OFFON (open) 0V
OFF (closed) Battery voltage
15 WTire pressure warning
check connectorInput OFF — 5V
SKIA5291E
SKIA5292E
SKIA5291E
SKIA5292E