Page 3828 of 5121
WIND DEFLECTOR
RF-97
< ON-VEHICLE REPAIR >
C
D
E
F
G
H
I
J
L
MA
B
RF
N
O
P
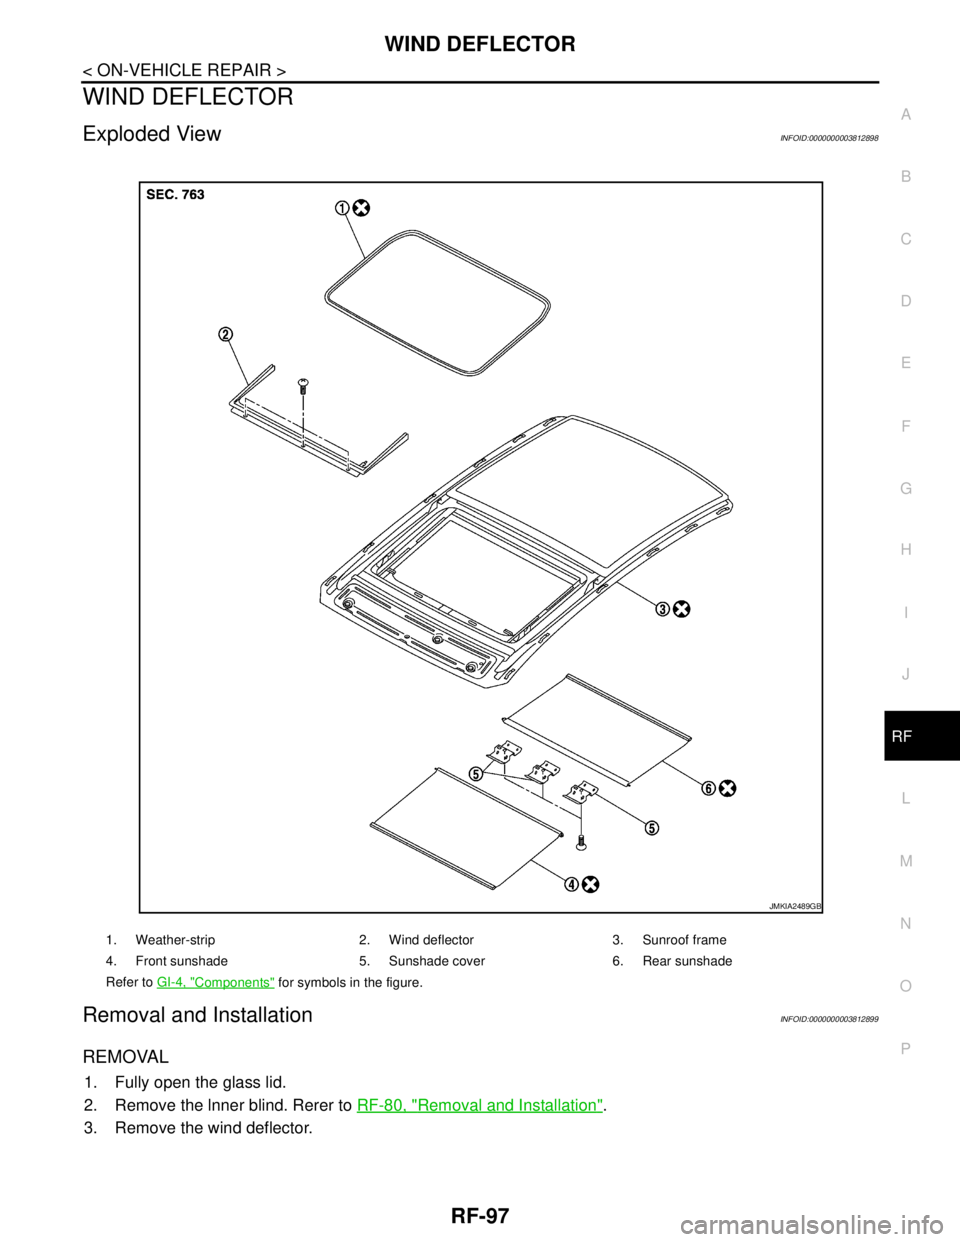
WIND DEFLECTOR
Exploded ViewINFOID:0000000003812898
Removal and InstallationINFOID:0000000003812899
REMOVAL
1. Fully open the glass lid.
2. Remove the lnner blind. Rerer to RF-80, "
Removal and Installation".
3. Remove the wind deflector.
1. Weather-strip 2. Wind deflector 3. Sunroof frame
4. Front sunshade 5. Sunshade cover 6. Rear sunshade
Refer to GI-4, "
Components" for symbols in the figure.
JMKIA2489GB
Page 3830 of 5121
SUNSHADE
RF-99
< ON-VEHICLE REPAIR >
C
D
E
F
G
H
I
J
L
MA
B
RF
N
O
P
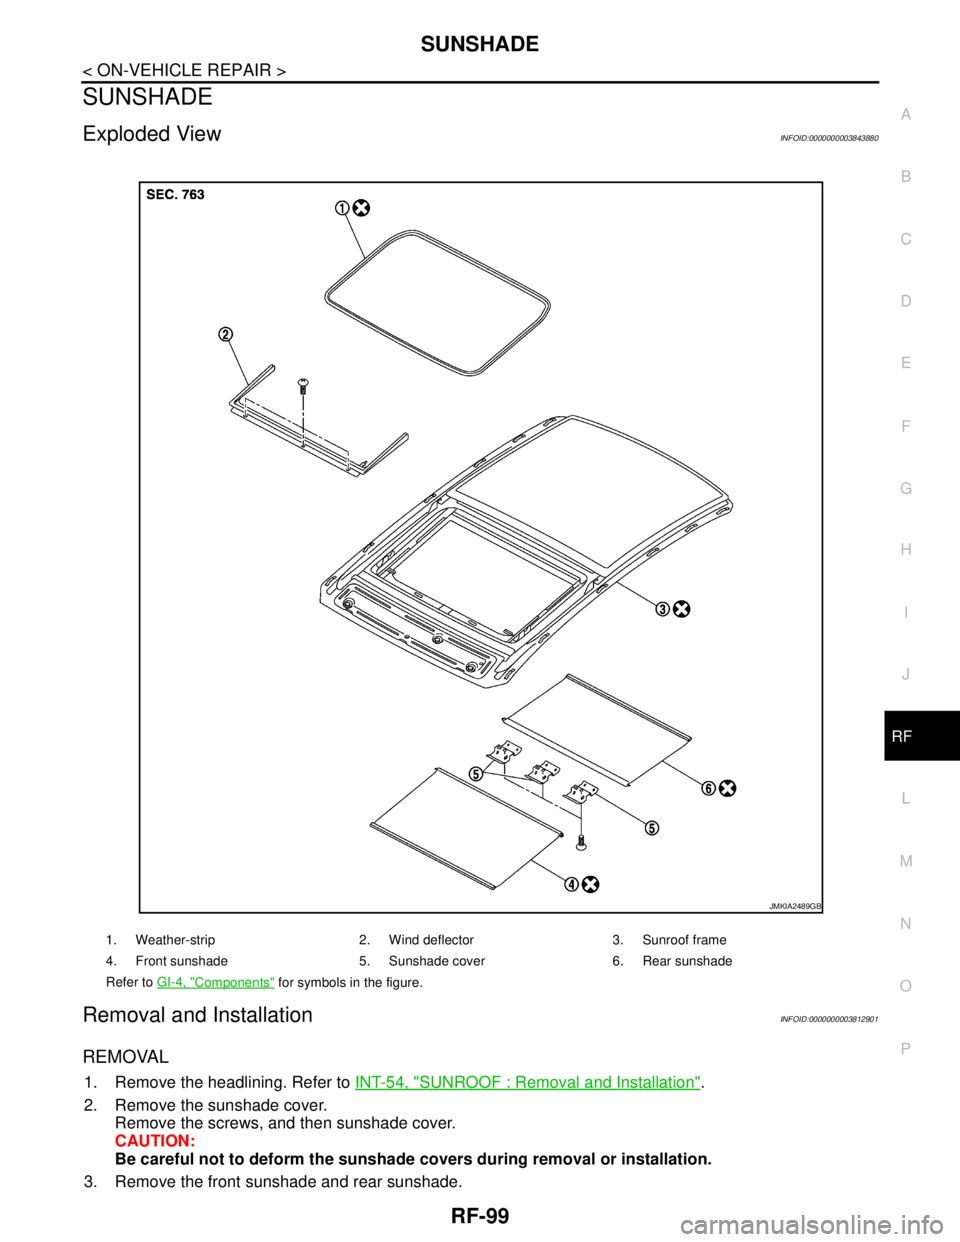
SUNSHADE
Exploded ViewINFOID:0000000003843880
Removal and InstallationINFOID:0000000003812901
REMOVAL
1. Remove the headlining. Refer to INT-54, "SUNROOF : Removal and Installation".
2. Remove the sunshade cover.
Remove the screws, and then sunshade cover.
CAUTION:
Be careful not to deform the sunshade covers during removal or installation.
3. Remove the front sunshade and rear sunshade.
1. Weather-strip 2. Wind deflector 3. Sunroof frame
4. Front sunshade 5. Sunshade cover 6. Rear sunshade
Refer to GI-4, "
Components" for symbols in the figure.
JMKIA2489GB
Page 3832 of 5121
SUNROOF SWITCH
RF-101
< ON-VEHICLE REPAIR >
C
D
E
F
G
H
I
J
L
MA
B
RF
N
O
P
SUNROOF SWITCH
Exploded ViewINFOID:0000000003812902
Refer to INT-53, "SUNROOF : Exploded View".
Removal and InstallationINFOID:0000000003812903
Removal
Remove the sunroof switch. Refer to INT-54, "SUNROOF : Removal and Installation".
Installation
Install in the reverse order of removal.
Page 3946 of 5121
![NISSAN TEANA 2008 Service Manual SE-82
< SYMPTOM DIAGNOSIS >[WITH VENTILATION SEAT]
SQUEAK AND RATTLE TROUBLE DIAGNOSES
Inspection Procedure
INFOID:0000000003940144
Refer to Table of Contents for specific component removal and instal](/manual-img/5/57391/w960_57391-3945.png "NISSAN TEANA 2008 Service Manual SE-82
< SYMPTOM DIAGNOSIS >[WITH VENTILATION SEAT]
SQUEAK AND RATTLE TROUBLE DIAGNOSES
Inspection Procedure
INFOID:0000000003940144
Refer to Table of Contents for specific component removal and instal")
SE-82
< SYMPTOM DIAGNOSIS >[WITH VENTILATION SEAT]
SQUEAK AND RATTLE TROUBLE DIAGNOSES
Inspection Procedure
INFOID:0000000003940144
Refer to Table of Contents for specific component removal and installation information.
INSTRUMENT PANEL
Most incidents are caused by contact and movement between:
1. Cluster lid A and instrument panel
2. Acrylic lens and combination meter housing
3. Instrument panel to front pillar garnish
4. Instrument panel to windshield
5. Instrument panel mounting pins
6. Wiring harnesses behind the combination meter
7. A/C defroster duct and duct joint
These incidents can usually be located by tapping or moving the components to duplicate the noise or by
pressing on the components while driving to stop the noise. Most of these incidents can be repaired by apply-
ing felt cloth tape or silicon spray (in hard to reach areas). Urethane pads can be used to insulate wiring har-
ness.
CAUTION:
Never use silicone spray to isolate a squeak or rattle. If the area is saturated with silicone, the recheck
of repair becomes impossible.
CENTER CONSOLE
Components to pay attention to include:
1. Shifter assembly cover to finisher
2. A/C control unit and cluster lid C
3. Wiring harnesses behind audio and A/C control unit
The instrument panel repair and isolation procedures also apply to the center console.
DOORS
Pay attention to the following:
1. Finisher and inner panel making a slapping noise
2. Inside handle escutcheon to door finisher
3. Wiring harnesses tapping
4. Door striker out of alignment causing a popping noise on starts and stops
Tapping or moving the components or pressing on them while driving to duplicate the conditions can isolate
many of these incidents. The areas can usually be insulated with felt cloth tape or insulator foam blocks to
repair the noise.
TRUNK
Trunk noises are often caused by a loose jack or loose items put into the trunk by the customer.
In addition look for the following:
1. Trunk lid dumpers out of adjustment
2. Trunk lid striker out of adjustment
3. Trunk lid torsion bars knocking together
4. A loose license plate or bracket
Most of these incidents can be repaired by adjusting, securing or insulating the item(s) or component(s) caus-
ing the noise.
SUNROOF/HEADLINING
Noises in the sunroof/headlining area can often be traced to one of the following:
1. Sunroof lid, rail, linkage or seals making a rattle or light knocking noise
2. Sunvisor shaft shaking in the holder
3. Front or rear windshield touching headlining and squeaking
Again, pressing on the components to stop the noise while duplicating the conditions can isolate most of these
incidents. Repairs usually consist of insulating with felt cloth tape.
Page 3987 of 5121
![NISSAN TEANA 2008 Service Manual SQUEAK AND RATTLE TROUBLE DIAGNOSES
SE-123
< SYMPTOM DIAGNOSIS >[WITHOUT VENTILATION SEAT]
C
D
E
F
G
H
I
K
L
MA
B
SE
N
O
P
Confirm that the cause of a noise is repaired by test driving the vehicle. Op](/manual-img/5/57391/w960_57391-3986.png "NISSAN TEANA 2008 Service Manual SQUEAK AND RATTLE TROUBLE DIAGNOSES
SE-123
< SYMPTOM DIAGNOSIS >[WITHOUT VENTILATION SEAT]
C
D
E
F
G
H
I
K
L
MA
B
SE
N
O
P
Confirm that the cause of a noise is repaired by test driving the vehicle. Op")
SQUEAK AND RATTLE TROUBLE DIAGNOSES
SE-123
< SYMPTOM DIAGNOSIS >[WITHOUT VENTILATION SEAT]
C
D
E
F
G
H
I
K
L
MA
B
SE
N
O
P
Confirm that the cause of a noise is repaired by test driving the vehicle. Operate the vehicle under the same
conditions as when the noise originally occurred. Refer to the notes on the Diagnostic Worksheet.
Inspection ProcedureINFOID:0000000003940141
Refer to Table of Contents for specific component removal and installation information.
INSTRUMENT PANEL
Most incidents are caused by contact and movement between:
1. Cluster lid A and instrument panel
2. Acrylic lens and combination meter housing
3. Instrument panel to front pillar garnish
4. Instrument panel to windshield
5. Instrument panel mounting pins
6. Wiring harnesses behind the combination meter
7. A/C defroster duct and duct joint
These incidents can usually be located by tapping or moving the components to duplicate the noise or by
pressing on the components while driving to stop the noise. Most of these incidents can be repaired by apply-
ing felt cloth tape or silicon spray (in hard to reach areas). Urethane pads can be used to insulate wiring har-
ness.
CAUTION:
Never use silicone spray to isolate a squeak or rattle. If the area is saturated with silicone, the recheck
of repair becomes impossible.
CENTER CONSOLE
Components to pay attention to include:
1. Shifter assembly cover to finisher
2. A/C control unit and cluster lid C
3. Wiring harnesses behind audio and A/C control unit
The instrument panel repair and isolation procedures also apply to the center console.
DOORS
Pay attention to the following:
1. Finisher and inner panel making a slapping noise
2. Inside handle escutcheon to door finisher
3. Wiring harnesses tapping
4. Door striker out of alignment causing a popping noise on starts and stops
Tapping or moving the components or pressing on them while driving to duplicate the conditions can isolate
many of these incidents. The areas can usually be insulated with felt cloth tape or insulator foam blocks to
repair the noise.
TRUNK
Trunk noises are often caused by a loose jack or loose items put into the trunk by the customer.
In addition look for the following:
1. Trunk lid dumpers out of adjustment
2. Trunk lid striker out of adjustment
3. Trunk lid torsion bars knocking together
4. A loose license plate or bracket
Most of these incidents can be repaired by adjusting, securing or insulating the item(s) or component(s) caus-
ing the noise.
SUNROOF/HEADLINING
Noises in the sunroof/headlining area can often be traced to one of the following:
1. Sunroof lid, rail, linkage or seals making a rattle or light knocking noise
2. Sunvisor shaft shaking in the holder
3. Front or rear windshield touching headlining and squeaking
Page 4228 of 5121
SR-14
< ON-VEHICLE REPAIR >
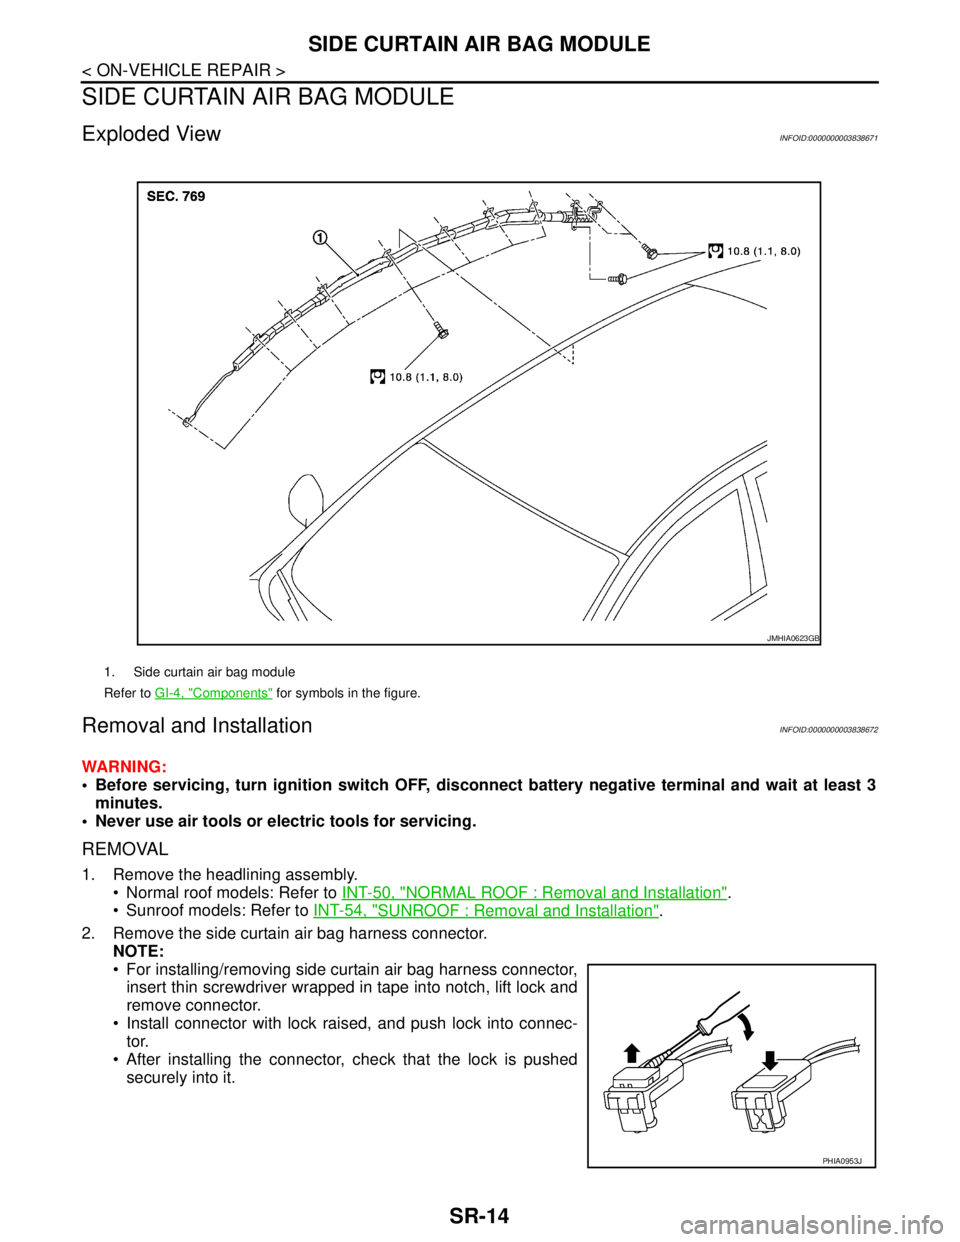
SIDE CURTAIN AIR BAG MODULE
SIDE CURTAIN AIR BAG MODULE
Exploded ViewINFOID:0000000003838671
Removal and InstallationINFOID:0000000003838672
WARNING:
Before servicing, turn ignition switch OFF, disconnect battery negative terminal and wait at least 3
minutes.
Never use air tools or electric tools for servicing.
REMOVAL
1. Remove the headlining assembly.
Normal roof models: Refer to INT-50, "
NORMAL ROOF : Removal and Installation".
Sunroof models: Refer to INT-54, "
SUNROOF : Removal and Installation".
2. Remove the side curtain air bag harness connector.
NOTE:
For installing/removing side curtain air bag harness connector,
insert thin screwdriver wrapped in tape into notch, lift lock and
remove connector.
Install connector with lock raised, and push lock into connec-
tor.
After installing the connector, check that the lock is pushed
securely into it.
1. Side curtain air bag module
Refer to GI-4, "
Components" for symbols in the figure.
JMHIA0623GB
PHIA0953J