2008 NISSAN PATHFINDER seats
[x] Cancel search: seatsPage 3 of 36

TAB LE O F C O NTE NTS
Remote Keyless Entry System . . . . . . . . . . . . . . . . . . 2
Intelligent Key System. . . . . . . . . . . . . . . . . . . . . . . 2
Windshield Wiper/Washer Switch . . . . . . . . . . . . . . . . 3
Headlight and Turn Signal Control . . . . . . . . . . . . . . . . 3
Steering Wheel Switches for Audio Control . . . . . . . . . . . 4
Cruise Control . . . . . . . . . . . . . . . . . . . . . . . . . . . 5
Automatic Climate Control . . . . . . . . . . . . . . . . . . . . 5
Rear Climate Control Dials . . . . . . . . . . . . . . . . . . . . 6
FM/AM/XM® Radio with CD Changer . . . . . . . . . . . . . . 7
Music Box Hard-Disk Drive Audio System . . . . . . . . . . . . 8
CompactFlash™ (CF) Player Operation . . . . . . . . . . . . . 9
Control Panel Display with Navigation System . . . . . . . . . . 9
Rearview Monitor (Navigation System Only) . . . . . . . . . . . 10
Clock/Set Adjustment . . . . . . . . . . . . . . . . . . . . . . . 10
Trip Computer . . . . . . . . . . . . . . . . . . . . . . . . . . . 11
Instrument Brightness Control/Trip Change Button . . . . . . . 11
Automatic Driver Positioner . . . . . . . . . . . . . . . . . . . . 11
Pedal Position Adjustment . . . . . . . . . . . . . . . . . . . . 12
Manual Shift Mode . . . . . . . . . . . . . . . . . . . . . . . . 12
Four-Wheel Drive (4WD) Shift Switch . . . . . . . . . . . . . . 13
Hill Descent Control Switch . . . . . . . . . . . . . . . . . . . 13
Front-Passenger Air Bag Status Light . . . . . . . . . . . . . . 14
Tire Pressure Monitoring System (TPMS) . . . . . . . . . . . . 14
Seat Belt Warning Light and Chime . . . . . . . . . . . . . . . 14
Child Safety Rear Door Lock . . . . . . . . . . . . . . . . . . . 14
Vehicle Dynamic Control (VDC) System Off Switch . . . . . . . 15
Heated Steering Wheel Switch . . . . . . . . . . . . . . . . . . 15
Sunroof Controls . . . . . . . . . . . . . . . . . . . . . . . . . 15
Liftgate . . . . . . . . . . . . . . . . . . . . . . . . . . . . . . . 16
Front Seat Adjustments . . . . . . . . . . . . . . . . . . . . . . 16
Folding the 2nd Row Bench Seat . . . . . . . . . . . . . . . . 16
Tip Up for Easy Entry or Exit From the 3rd Row . . . . . . . . . 17
Folding the 3rd Row Seats . . . . . . . . . . . . . . . . . . . . 17
Homelink® Universal Transceiver . . . . . . . . . . . . . . . . . 17
Bluetooth® Hands-Free Phone System . . . . . . . . . . . . . . 18
N ISSAN
Mobile Entertainment System . . . . . . . . . . . . . 21
Remote Audio System Controls . . . . . . . . . . . . . . . . . 22
NISSAN Voice Recognition System . . . . . . . . . . . . . . . 24
Navigation System . . . . . . . . . . . . . . . . . . . . . . . . . 26
Page 18 of 36

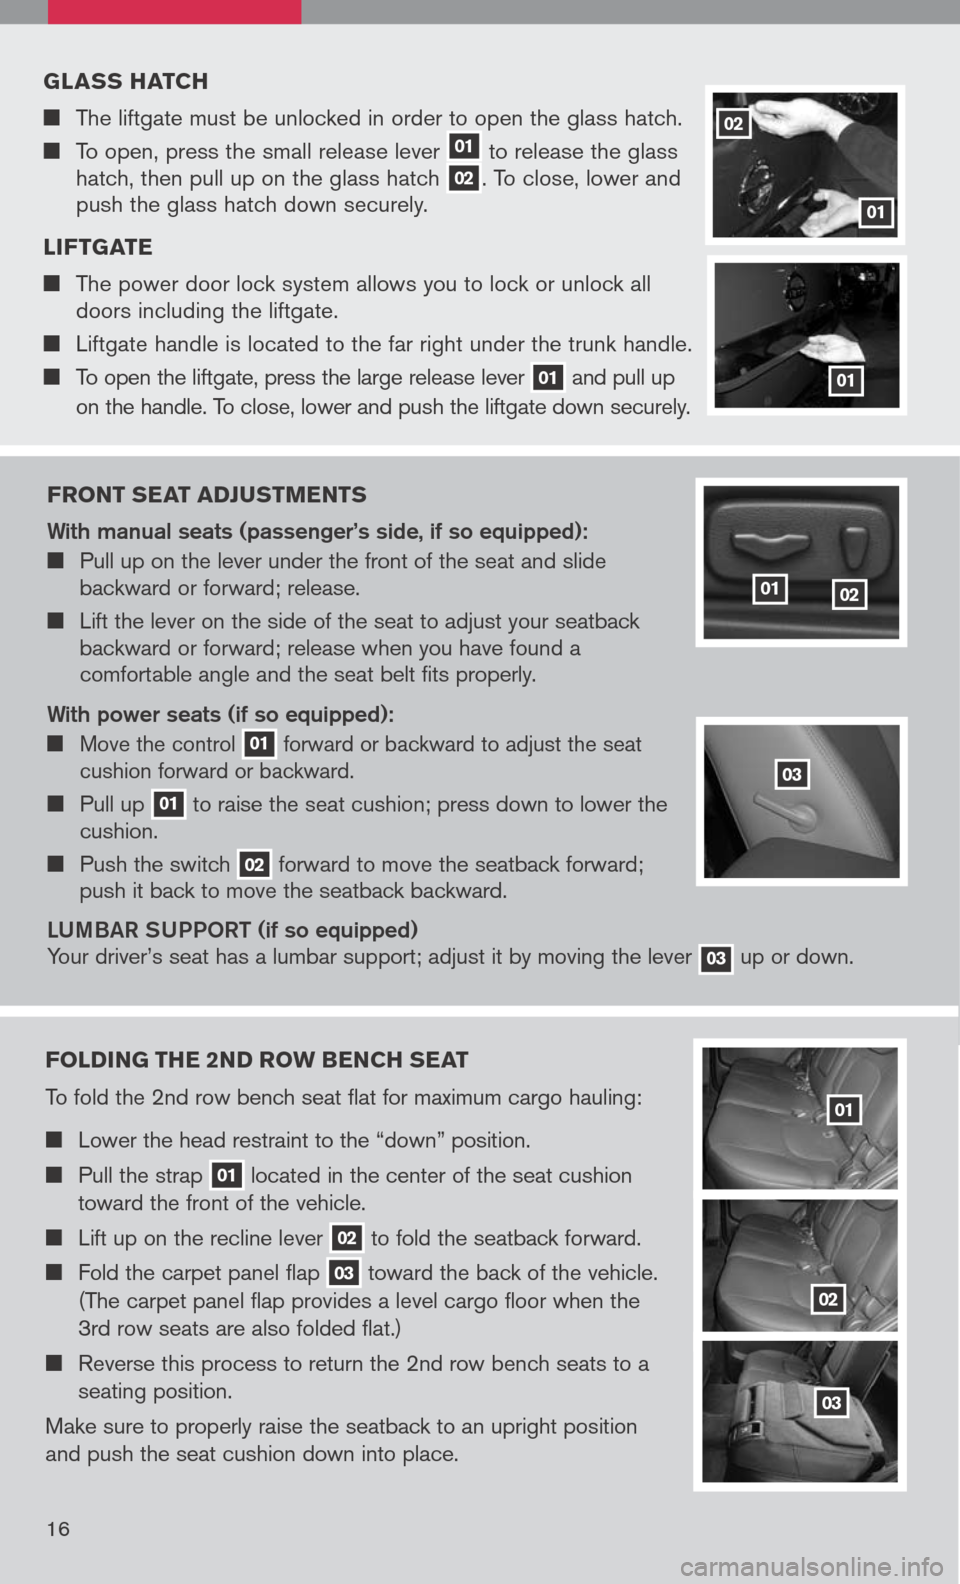
Front seat ad Just Ments
With manual seats (passenger’s side, if so equipped):
Pull up on the lever under the front of the seat and slide backward or forward; release.
Lift the lever on the side of the seat to adjust your seatback backward or forward; release when you have found a comfortable angle and the seat belt fits properly.
With power seats (if so equipped):
Move the control 01 forward or backward to adjust the seat cushion forward or backward.
Pull up 01 to raise the seat cushion; press down to lower the cushion.
Push the switch 02 forward to move the seatback forward; push it back to move the seatback backward.
LU mBaR SUPPOR t (if so equipped)
Your driver’s seat has a lumbar support; adjust it by moving the lever 03 up or down.
0102
g lass hatch
The liftgate must be unlocked in order to open the glass hatch.
To open, press the small release lever 01 to release the glass hatch, then pull up on the glass hatch 02. To close, lower and push the glass hatch down securely.
l iF tgate
The power door lock system allows you to lock or unlock all doors including the liftgate.
Liftgate handle is located to the far right under the trunk handle.
To open the liftgate, press the large release lever 01 and pull up
on the handle. To close, lower and push the liftgate down securely.
01
02
01
Folding the 2nd ro W bench seat
To fold the 2nd row bench seat flat for maximum cargo hauling:
Lower the head restraint to the “down” position.
Pull the strap 01 located in the center of the seat cushion
toward the front of the vehicle.
Lift up on the recline lever 02 to fold the seatback forward.
Fold the carpet panel flap 03 toward the back of the vehicle.
(The carpet panel flap provides a level cargo floor when the
3rd row seats are also folded flat.)
Reverse this process to return the 2nd row bench seats to a
seating position.
Make sure to properly raise the seatback to an upright position
and push the seat cushion down into place.
01
02
03
03
16
Page 19 of 36

hoMelink® universal transceiver (if so equipped)
SYS tem OPeR ati Ng ti PS
Garage doors, electrical gates, entry doors, etc. will be activated during programming. To avoid injury, make sure that people and objects are clear of all doors or gates during programming. Your vehicle’s engine should be turned off while programming the HomeLink® Transceiver. Refer to your Owner’s Manual for complete details.
To program your HomeLink® Transceiver to operate a garage door, gate, or entry door
opener, home or office lighting, you need to be at the same location as the device.
NO te: g arage door openers (manufactured after 1996) have “rolling code
protection”. to program a garage door opener equipped with “rolling code
protection”, you will need to use a ladder to get up to the garage door opener
motor to be able to access the “smart or learn” program button.
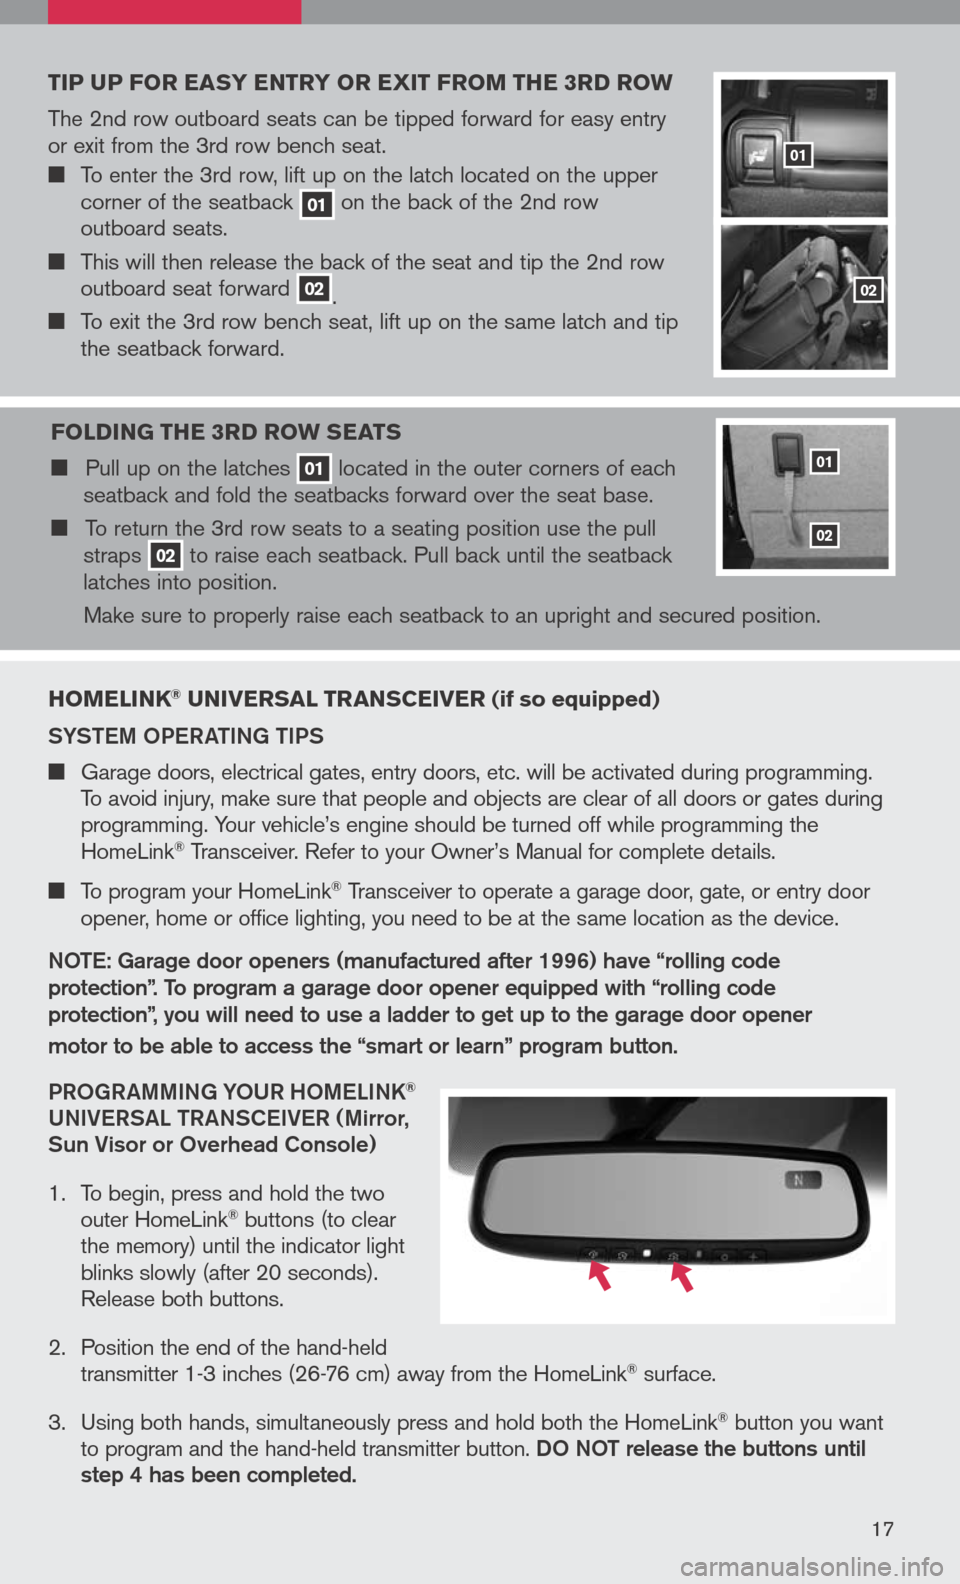
PRO gRammi Ng YOUR hO me LiNK
®
UNi Ve RS aL tR aNSC eiVe R ( mirror,
Sun Visor or Overhead Console)
1. To begin, press and hold the two
outer HomeLink® buttons (to clear the memory) until the indicator light blinks slowly (after 20 seconds). Release both buttons.
2. Position the end of the hand-held
transmitter 1-3 inches (26-76 cm) away from the HomeLink® surface.
3. Using both hands, simultaneously press and hold both the HomeLink
® button you want to program and the hand-held transmitter button. DO NOt release the buttons until step 4 has been completed.
17
tip up For easy entry or exit Fro M the 3rd ro W
The 2nd row outboard seats can be tipped forward for easy entry or exit from the 3rd row bench seat.
To enter the 3rd row, lift up on the latch located on the upper corner of the seatback 01 on the back of the 2nd row outboard seats.
This will then release the back of the seat and tip the 2nd row outboard seat forward 02. To exit the 3rd row bench seat, lift up on the same latch and tip the seatback forward.
F olding the 3rd ro W seats
Pull up on the latches 01 located in the outer corners of each seatback and fold the seatbacks forward over the seat base.
To return the 3rd row seats to a seating position use the pull straps 02 to raise each seatback. Pull back until the seatback latches into position.
Make sure to properly raise each seatback to an upright and secured position.
01
02
01
02
Page 24 of 36

22
SK iP (rewind) key - Touch the SKIP key to skip the chapter(s) of the disc backward. The chapters will go back the number of times the SKIP key is touched. Touch and hold the SKIP key for more than 1.5 seconds to rewind the disc. When the SKIP key is released, the disc will be played normally. To skip the chapter(s) backward, it is also possible to press the button on the keypad of the remote controller.
For additional information, see “NISSAN Mobile Entertainment System (MES) (if so equipped)” in the Owner’s Manual.
PLaYiNg a DigitaL Vi DeO DiSC
The DVD player plays DVD videos, video CDs and audio CDs. To play a DVD, begin by turning the ignition to the ACC or ON position. Insert the disc into the slot. The disc is automatically drawn in. The player can be operated by using the control panel buttons or the remote control. The DVD player can be operated by pressing the DiSC/a UX button. If you press the ReaR/ C tRL button quickly, you will toggle between rear audio control on and off. Press the DiSC/a UX button to toggle between the CD, AUX and DVD operation.
PLaYiNg a COm Pa C t Di SC
The DVD player plays DVD videos, video CDs and audio CDs. To play a CD, begin by turning the ignition to the ACC or ON position. Insert the disc into the slot. The disc is automatically drawn in. The player can be operated by using the control panel buttons or the remote control.
USiNg the aUX iL iaRY iNPUt Ja CKS
Auxiliary input jacks are used to plug in compatible devices, such as video games and portable video players. The jacks are located on the DVD player and are color-coded for identification. Refer to the section titled DVD Controls for a description.
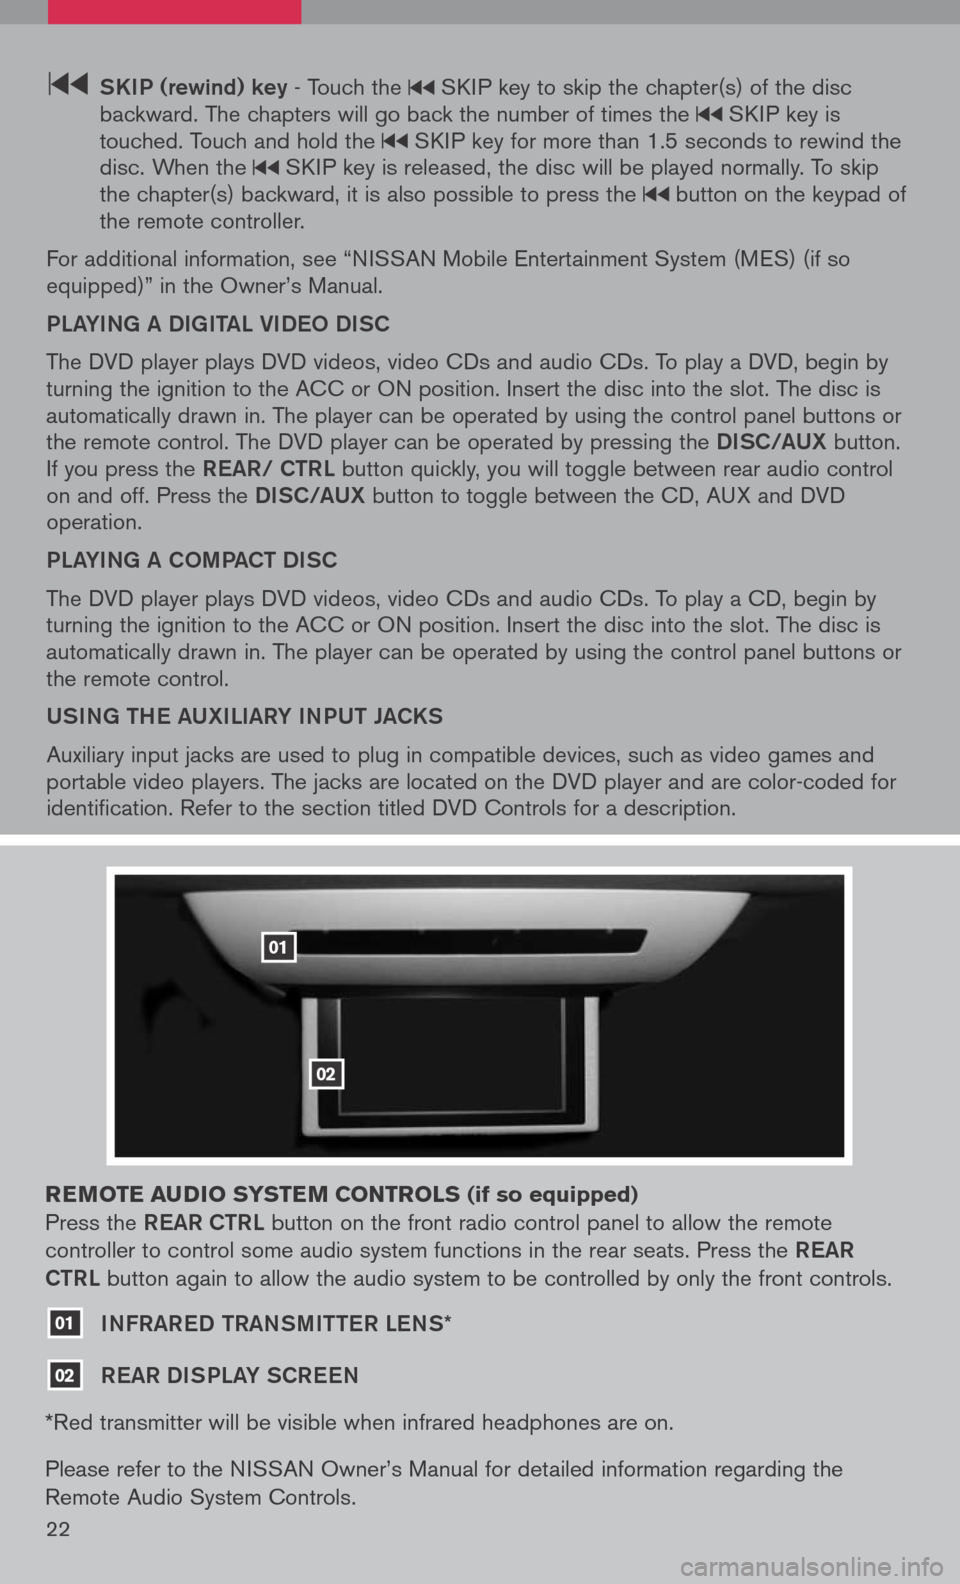
reM ote audio syste M controls (if so equipped)
Press the ReaR C tRL button on the front radio control panel to allow the remote
controller to control some audio system functions in the rear seats. Press the ReaR
C tRL
button again to allow the audio system to be controlled by only the front controls.
01 iNFRaR eD tRaNS mitteR LeNS*
02 ReaR Di SPLaY SCR eeN
*Red transmitter will be visible when infrared headphones are on.
Please refer to the NISSAN Owner’s Manual for detailed information regarding the
Remote Audio System Controls.
01
02