2008 NISSAN LATIO battery
[x] Cancel search: batteryPage 2724 of 2771

WT-16
< SERVICE INFORMATION >
TROUBLE DIAGNOSES
NOTE:
Before performing the self-diagnosis, be sure to register the ID or else the actual malfunction location may be different from that dis-
played on CONSULT-III.
Data Monitor Mode
NOTE:
Before performing the self-diagnosis, be sure to register the ID, or the actual malfunction location may be different from that displayed on
CONSULT-III.
Flash Code/Symptom ChartINFOID:0000000001703762
[CODE- ERR] - FL [C1720]
[CODE- ERR] - FR [C1721]
[CODE- ERR] - RR [C1722]
[CODE- ERR] - RL [C1723]Function code data from FL transmitter is malfunctioning.
Function code data from FR transmitter is malfunctioning.
Function code data from RR transmitter is malfunctioning.
Function code data from RL transmitter is malfunctioning.WT-18
[BATT - VOLT - LOW] - FL [C1724]
[BATT - VOLT - LOW] - FR [C1725]
[BATT - VOLT - LOW] - RR [C1726]
[BATT - VOLT - LOW] - RL [C1727]Battery voltage of FL transmitter drops.
Battery voltage of FR transmitter drops.
Battery voltage of RR transmitter drops.
Battery voltage of RL transmitter drops.WT-18
VHCL_SPEED_SIG_ERR [C1729] Vehicle speed signal is in error.WT-19
Diagnostic item Diagnostic item is detected when ···Reference
page
MONITOR CONDITION SPECIFICATION
VHCL SPEED Drive vehicle. Vehicle speed (km/h or MPH)
AIR PRESS FL
AIR PRESS FR
AIR PRESS RR
AIR PRESS RL• Drive vehicle for a few minutes.
Tire pressure (kPa or psi) or
• Ignition switch ON and activation tool
is transmitting activation signals.
ID REGST FL1
ID REGST FR1
ID REGST RR1
ID REGST RL1
Ignition switch ONRegistration ID: DONE
No registration ID: YET
WARNING LAMPLow tire pressure warning lamp on: ON
Low tire pressure warning lamp off: OFF
BUZZERBuzzer in combination meter on: ON
Buzzer in combination meter off: OFF
Flash Code or Symptom Malfunction partReference
page
15
16
17
18FL tire pressure drops to 193 kPa (2.0 kg/cm
2 , 28 psi) or less
FR tire pressure drops to 193 kPa (2.0 kg/cm2 , 28 psi) or less
RR tire pressure drops to 193 kPa (2.0 kg/cm2 , 28 psi) or less
RL tire pressure drops to 193 kPa (2.0 kg/cm2 , 28 psi) or less—
21
22
23
24Transmitter no data (FL)
Transmitter no data (FR)
Transmitter no data (RR)
Transmitter no data (RL)WT-18
31
32
33
34Transmitter checksum error (FL)
Transmitter checksum error (FR)
Transmitter checksum error (RR)
Transmitter checksum error (RL)WT-18
35
36
37
38Transmitter pressure data error (FL)
Transmitter pressure data error (FR)
Transmitter pressure data error (RR)
Transmitter pressure data error (RL)WT-19
Page 2725 of 2771

TROUBLE DIAGNOSES
WT-17
< SERVICE INFORMATION >
C
D
F
G
H
I
J
K
L
MA
B
WT
N
O
P
41
42
43
44Transmitter function code error (FL)
Transmitter function code error (FR)
Transmitter function code error (RR)
Transmitter function code error (RL)WT-18
45
46
47
48Transmitter battery voltage low (FL)
Transmitter battery voltage low (FR)
Transmitter battery voltage low (RR)
Transmitter battery voltage low (RL)WT-18
52 Vehicle speed signalWT-19
Low tire pressure warning lamp does
not come on when ignition switch is
turned on.• Fuse or combination meter
• BCM connector or circuit
•BCM WT-20
Low tire pressure warning lamp stays
on when ignition switch is turned on.• Combination meter
• BCM connector or circuit
•BCMWT-20
Low tire pressure warning lamp flashes
when ignition switch is turned on.• BCM harness connector or circuit
•BCM
• Transmitter's mode off
• ID registration not completed yetWT-21
Hazard warning lamps flash when igni-
tion switch is turned on.• BCM harness connector or circuit
•BCMWT-22
ID registration cannot be completed.• Transmitter
• Remote keyless entry receiver harness connector or circuit
• Remote keyless entry receiver
• BCM harness connector or circuit
•BCMWT-22
Flash Code or Symptom Malfunction partReference
page
Page 2728 of 2771
WT-20
< SERVICE INFORMATION >
TROUBLE DIAGNOSIS FOR SYMPTOMS
TROUBLE DIAGNOSIS FOR SYMPTOMS
Low Tire Pressure Warning Lamp Does Not Come On When Ignition Switch Is Turned
On
INFOID:0000000001703767
DIAGNOSTIC PROCEDURE
1.SELF-DIAGNOSTIC RESULT CHECK
Using CONSULT-III, check display contents in self-diagnostic results.
Is "CAN COMM CIRCUIT" displayed in the self-diagnosis display items?
YES >> Malfunction in CAN communication system. GO TO LAN-12, "CAN Diagnosis with CONSULT-
III".
NO >> GO TO 2.
2.CHECK COMBINATION METER
Check combination meter operation. Refer to DI-11, "
Self-Diagnosis Mode of Combination Meter".
Inspection results OK?
OK >> GO TO 3.
NG >> Replace combination meter. Refer to IP-11, "
Removal and Installation".
3.CHECK LOW TIRE PRESSURE WARNING LAMP
Disconnect BCM harness connector.
Does the low tire pressure warning lamp activate?
YES >> Replace BCM. Refer to BCS-18, "Removal and Installation of BCM".
NO >> Check combination meter operation. Refer to DI-11, "
Self-Diagnosis Mode of Combination
Meter".
Low Tire Pressure Warning Lamp Stays On When Ignition Switch Is Turned On
INFOID:0000000001703768
DIAGNOSTIC PROCEDURE
1.CHECK BCM CONNECTORS
1. Turn ignition switch OFF.
2. Disconnect BCM harness connectors M18 and M20.
3. Check terminals for damage or loose connections.
Inspection results OK?
OK >> GO TO 2.
NG >> Repair or replace damaged parts.
2.CHECK BCM POWER SUPPLY CIRCUIT (BAT)
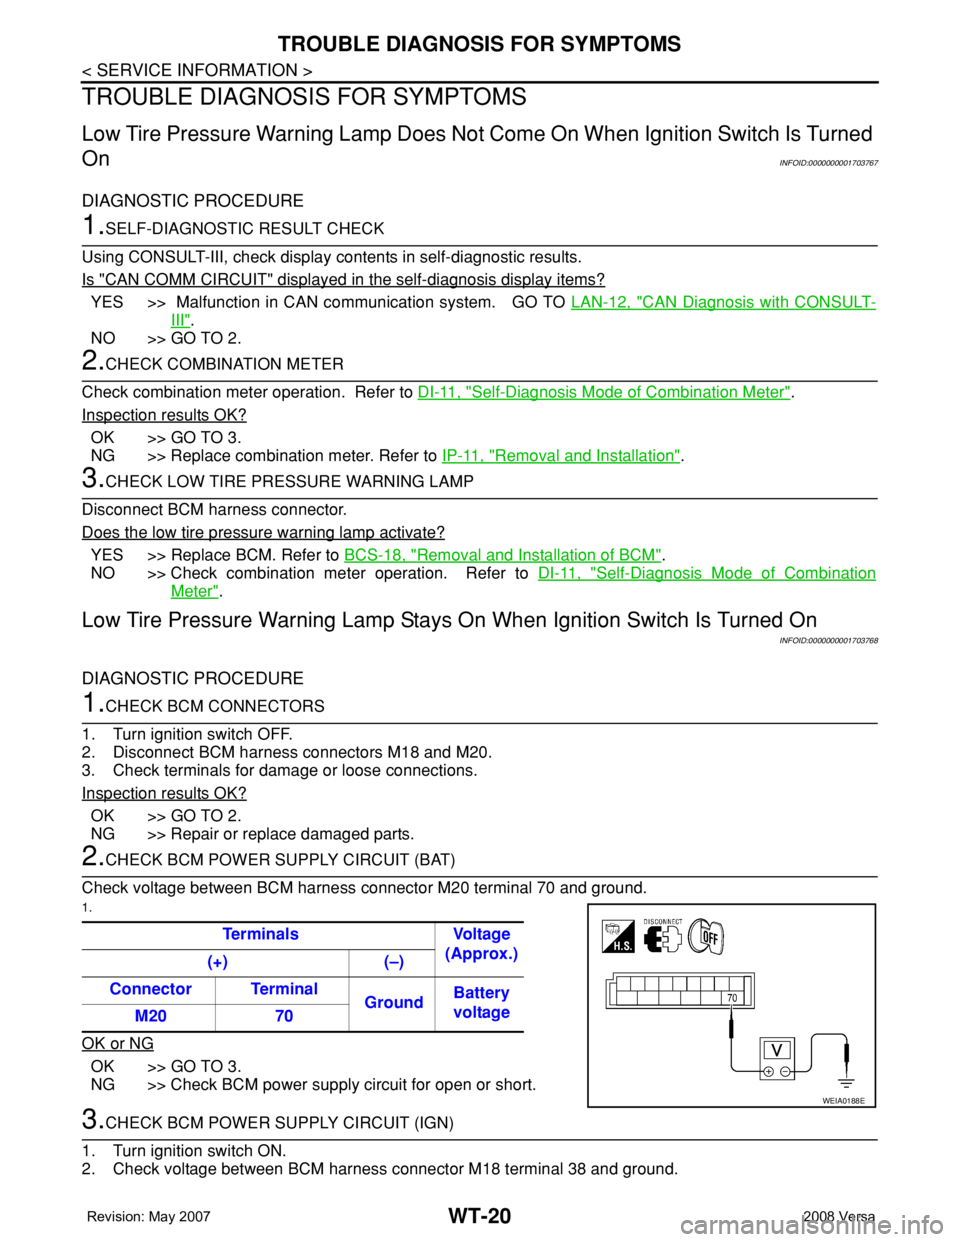
Check voltage between BCM harness connector M20 terminal 70 and ground.
1.
OK or NG
OK >> GO TO 3.
NG >> Check BCM power supply circuit for open or short.
3.CHECK BCM POWER SUPPLY CIRCUIT (IGN)
1. Turn ignition switch ON.
2. Check voltage between BCM harness connector M18 terminal 38 and ground.Terminals Voltage
(Approx.)
(+) (–)
Connector Terminal
GroundBattery
voltage
M20 70
WEIA0188E
Page 2729 of 2771
TROUBLE DIAGNOSIS FOR SYMPTOMS
WT-21
< SERVICE INFORMATION >
C
D
F
G
H
I
J
K
L
MA
B
WT
N
O
P
OK or NG
OK >> GO TO 4.
NG >> Check BCM power supply circuit for open or short.
4.CHECK BCM GROUND CIRCUIT
1. Turn ignition switch OFF.
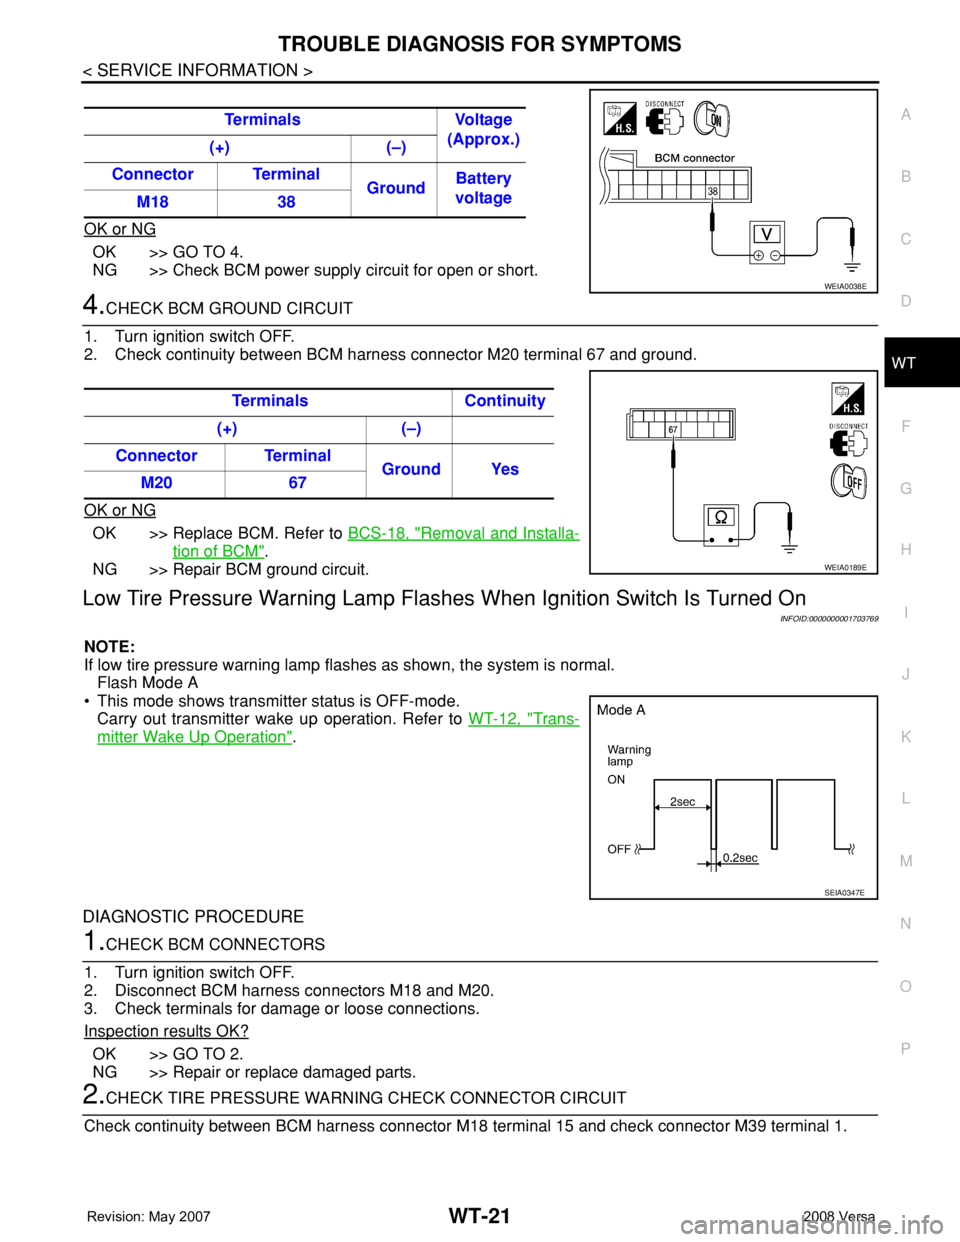
2. Check continuity between BCM harness connector M20 terminal 67 and ground.
OK or NG
OK >> Replace BCM. Refer to BCS-18, "Removal and Installa-
tion of BCM".
NG >> Repair BCM ground circuit.
Low Tire Pressure Warning Lamp Flashes When Ignition Switch Is Turned On
INFOID:0000000001703769
NOTE:
If low tire pressure warning lamp flashes as shown, the system is normal.
Flash Mode A
• This mode shows transmitter status is OFF-mode.
Carry out transmitter wake up operation. Refer to WT-12, "
Trans-
mitter Wake Up Operation".
DIAGNOSTIC PROCEDURE
1.CHECK BCM CONNECTORS
1. Turn ignition switch OFF.
2. Disconnect BCM harness connectors M18 and M20.
3. Check terminals for damage or loose connections.
Inspection results OK?
OK >> GO TO 2.
NG >> Repair or replace damaged parts.
2.CHECK TIRE PRESSURE WARNING CHECK CONNECTOR CIRCUIT
Check continuity between BCM harness connector M18 terminal 15 and check connector M39 terminal 1. Terminals Voltage
(Approx.)
(+) (–)
Connector Terminal
GroundBattery
voltage
M18 38
WEIA0038E
Terminals Continuity
(+) (–)
Connector Terminal
Ground Yes
M20 67
WEIA0189E
SEIA0347E
Page 2736 of 2771
FRONT WIPER AND WASHER SYSTEM
WW-3
< SERVICE INFORMATION >
C
D
E
F
G
H
I
J
L
MA
B
WW
N
O
P
FRONT WIPER AND WASHER SYSTEM
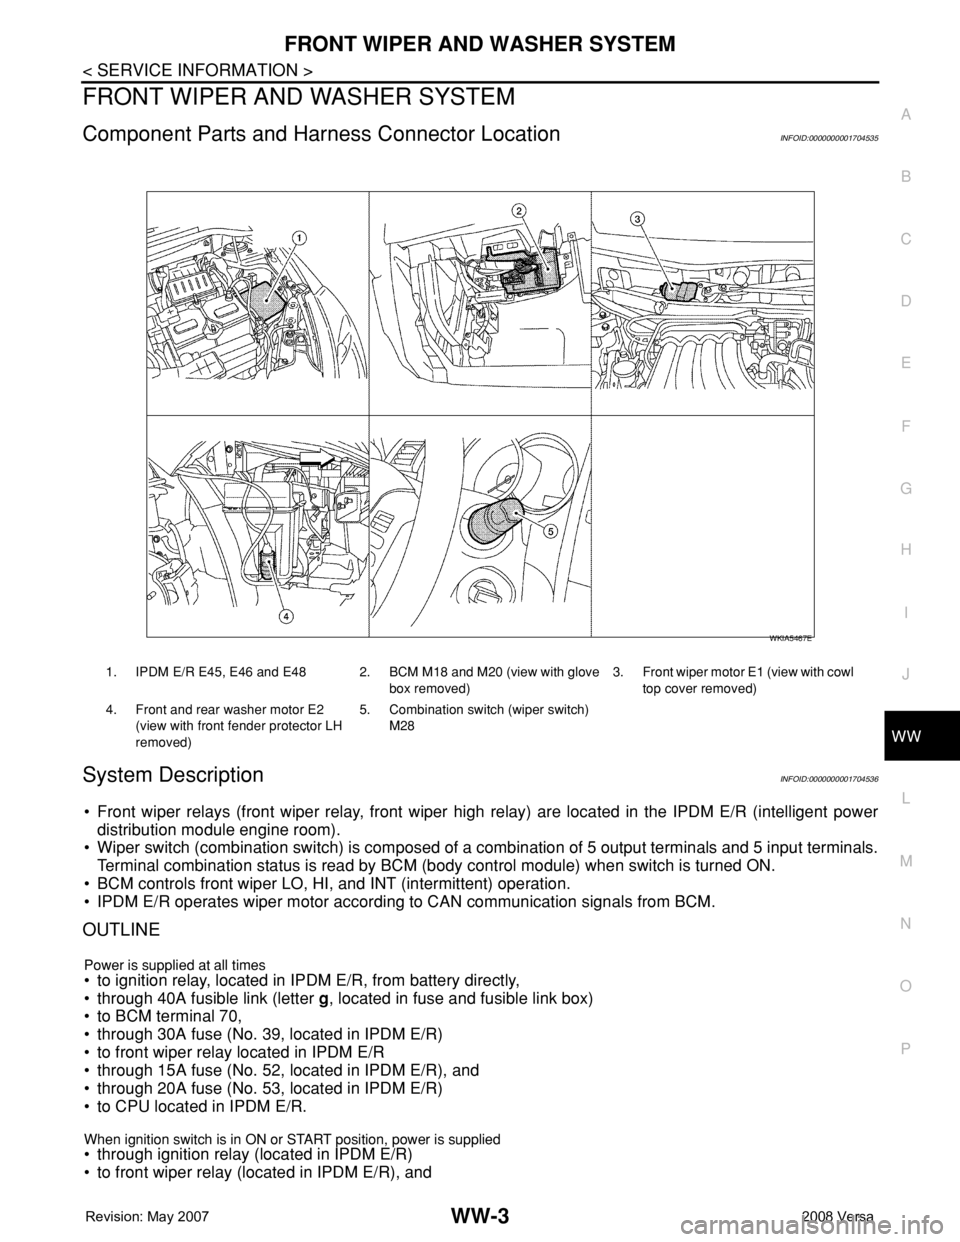
Component Parts and Harness Connector LocationINFOID:0000000001704535
System DescriptionINFOID:0000000001704536
• Front wiper relays (front wiper relay, front wiper high relay) are located in the IPDM E/R (intelligent power
distribution module engine room).
• Wiper switch (combination switch) is composed of a combination of 5 output terminals and 5 input terminals.
Terminal combination status is read by BCM (body control module) when switch is turned ON.
• BCM controls front wiper LO, HI, and INT (intermittent) operation.
• IPDM E/R operates wiper motor according to CAN communication signals from BCM.
OUTLINE
Power is supplied at all times• to ignition relay, located in IPDM E/R, from battery directly,
• through 40A fusible link (letter g, located in fuse and fusible link box)
• to BCM terminal 70,
• through 30A fuse (No. 39, located in IPDM E/R)
• to front wiper relay located in IPDM E/R
• through 15A fuse (No. 52, located in IPDM E/R), and
• through 20A fuse (No. 53, located in IPDM E/R)
• to CPU located in IPDM E/R.
When ignition switch is in ON or START position, power is supplied • through ignition relay (located in IPDM E/R)
• to front wiper relay (located in IPDM E/R), and
1. IPDM E/R E45, E46 and E48 2. BCM M18 and M20 (view with glove
box removed)3. Front wiper motor E1 (view with cowl
top cover removed)
4. Front and rear washer motor E2
(view with front fender protector LH
removed)5. Combination switch (wiper switch)
M28
WKIA5467E
Page 2746 of 2771
FRONT WIPER AND WASHER SYSTEM
WW-13
< SERVICE INFORMATION >
C
D
E
F
G
H
I
J
L
MA
B
WW
N
O
P
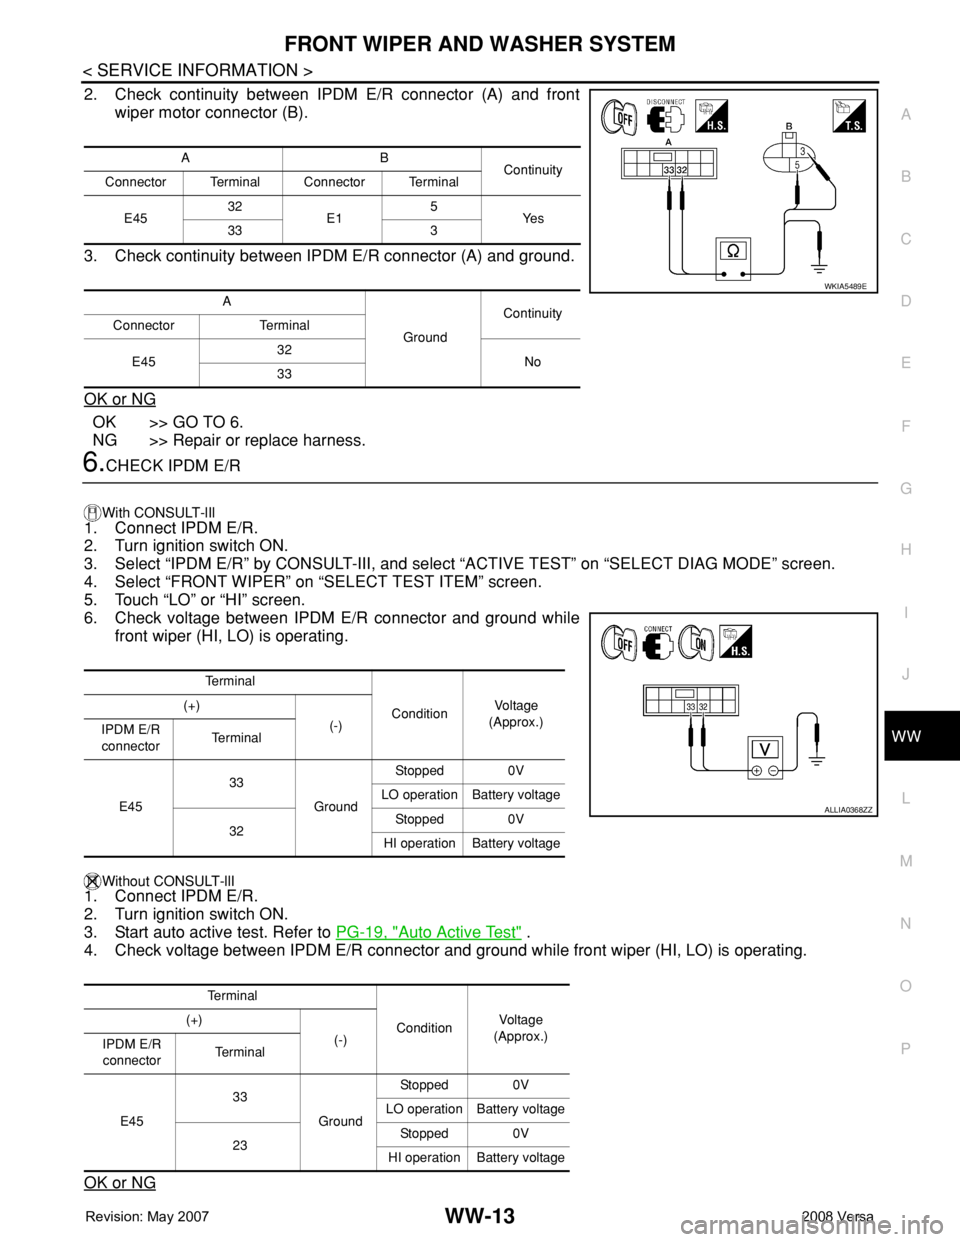
2. Check continuity between IPDM E/R connector (A) and front
wiper motor connector (B).
3. Check continuity between IPDM E/R connector (A) and ground.
OK or NG
OK >> GO TO 6.
NG >> Repair or replace harness.
6.CHECK IPDM E/R
With CONSULT-lIl
1. Connect IPDM E/R.
2. Turn ignition switch ON.
3. Select “IPDM E/R” by CONSULT-III, and select “ACTIVE TEST” on “SELECT DIAG MODE” screen.
4. Select “FRONT WIPER” on “SELECT TEST ITEM” screen.
5. Touch “LO” or “HI” screen.
6. Check voltage between IPDM E/R connector and ground while
front wiper (HI, LO) is operating.
Without CONSULT-llI1. Connect IPDM E/R.
2. Turn ignition switch ON.
3. Start auto active test. Refer to PG-19, "
Auto Active Test" .
4. Check voltage between IPDM E/R connector and ground while front wiper (HI, LO) is operating.
OK or NG
AB
Continuity
Connector Terminal Connector Terminal
E4532
E15
Ye s
33 3
A
GroundContinuity
Connector Terminal
E4532
No
33
WKIA5489E
Te r m i n a l
ConditionVo l ta g e
(Approx.) (+)
(-)
IPDM E/R
connectorTe r m i n a l
E4533
GroundStopped 0V
LO operation Battery voltage
32Stopped 0V
HI operation Battery voltage
Te r m i n a l
ConditionVol tag e
(Approx.) (+)
(-)
IPDM E/R
connectorTe r m i n a l
E4533
GroundStopped 0V
LO operation Battery voltage
23Stopped 0V
HI operation Battery voltage
ALLIA0368ZZ
Page 2747 of 2771
WW-14
< SERVICE INFORMATION >
FRONT WIPER AND WASHER SYSTEM
OK >> Replace front wiper motor. Refer to WW-19, "Removal and Installation of Front Wiper Drive
Assembly" .
NG >> Replace IPDM E/R. Refer to PG-26, "
Removal and Installation of IPDM E/R" .
Front Wiper Does Not Return to Stop Position (After Front Wiper Operate for 10 Sec-
onds, They Stop for 20 Seconds, and After Repeating the Operation Five Times, They
Become Inoperative)
INFOID:0000000001704547
CAUTION:
• When auto-stop signal has not varied for 10 seconds or longer while IPDM E/R is operating front wip-
ers, IPDM E/R considers that front wipers are locked, and stops wiper output. That causes this symp-
tom.
• This status can be checked by “DATA MONITOR” of “IPDM E/R” on which “WIPER PROT” item
shows “BLOCK”.
1.CHECK FRONT WIPER STOP SIGNAL
With CONSULT-lIl
Select “IPDM E/R” on CONSULT-III. With “DATA MONITOR”, make sure that “WIP AUTO STOP” turns “ACT
P” - “STOP P” linked with wiper operation.
Without CONSULT-llI
GO TO 2.
OK or NG
OK >> Replace IPDM E/R. Refer to PG-26, "Removal and Installation of IPDM E/R" .
NG >> GO TO 2.
2.CHECK IPDM E/R
1. Turn ignition switch ON.
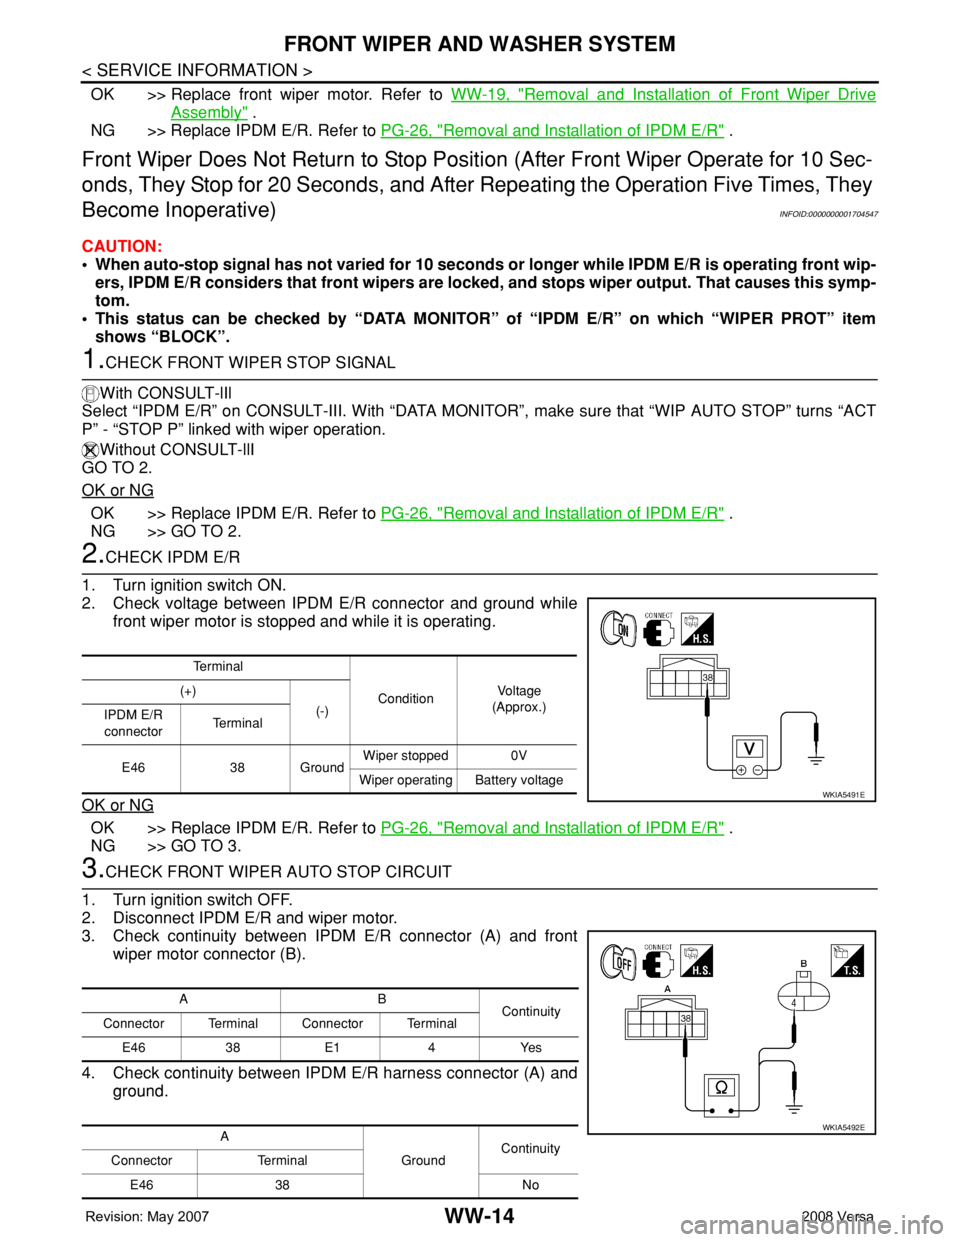
2. Check voltage between IPDM E/R connector and ground while
front wiper motor is stopped and while it is operating.
OK or NG
OK >> Replace IPDM E/R. Refer to PG-26, "Removal and Installation of IPDM E/R" .
NG >> GO TO 3.
3.CHECK FRONT WIPER AUTO STOP CIRCUIT
1. Turn ignition switch OFF.
2. Disconnect IPDM E/R and wiper motor.
3. Check continuity between IPDM E/R connector (A) and front
wiper motor connector (B).
4. Check continuity between IPDM E/R harness connector (A) and
ground.
Te r m i n a l
ConditionVo l ta g e
(Approx.) (+)
(-)
IPDM E/R
connectorTe r m i n a l
E46 38 GroundWiper stopped 0V
Wiper operating Battery voltage
WKIA5491E
AB
Continuity
Connector Terminal Connector Terminal
E46 38 E1 4 Yes
A
GroundContinuity
Connector Terminal
E46 38 No
WKIA5492E
Page 2748 of 2771
FRONT WIPER AND WASHER SYSTEM
WW-15
< SERVICE INFORMATION >
C
D
E
F
G
H
I
J
L
MA
B
WW
N
O
P
OK or NG
OK >> Replace front wiper motor. Refer to WW-19, "Removal and Installation of Front Wiper Drive
Assembly" .
NG >> Repair or replace harness.
Only Front Wiper Low Does Not OperateINFOID:0000000001704548
1.ACTIVE TEST
With CONSULT-lIl
1. Select “IPDM E/R” on CONSULT-III, and select “ACTIVE TEST” on “SELECT DIAG MODE” screen.
2. Select “FRONT WIPER” on “SELECT TEST ITEM” screen.
3. Touch “LO” screen.
Without CONSULT-lIl
Start auto active test. Refer to PG-19, "
Auto Active Test" .
Does front wiper operate normally?
YES >> Refer to LT-63, "Combination Switch Inspection" .
NO >> GO TO 2.
2.CHECK FRONT WIPER MOTOR CIRCUIT
1. Turn ignition switch OFF.
2. Disconnect IPDM E/R and front wiper motor.
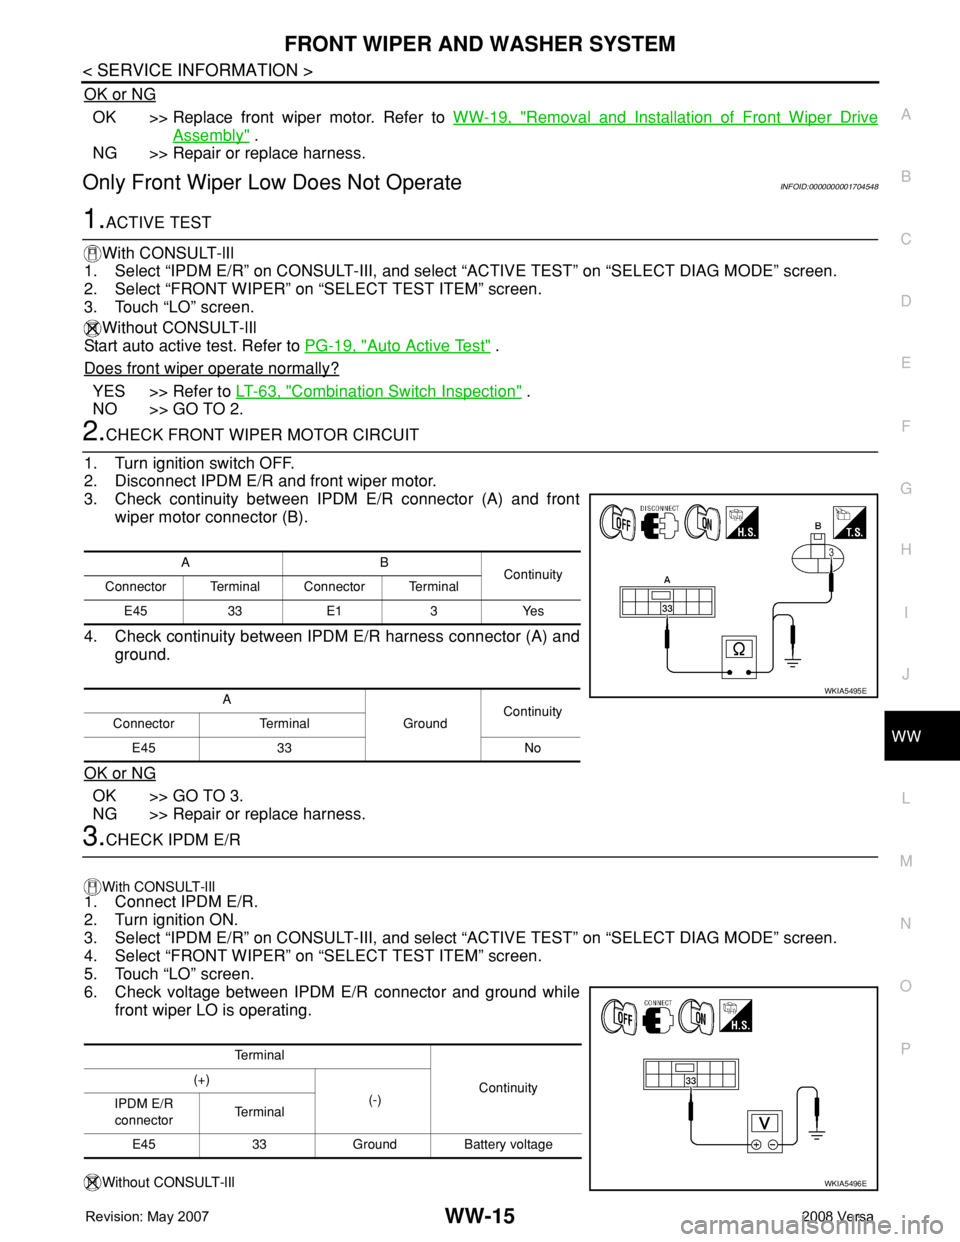
3. Check continuity between IPDM E/R connector (A) and front
wiper motor connector (B).
4. Check continuity between IPDM E/R harness connector (A) and
ground.
OK or NG
OK >> GO TO 3.
NG >> Repair or replace harness.
3.CHECK IPDM E/R
With CONSULT-lIl
1. Connect IPDM E/R.
2. Turn ignition ON.
3. Select “IPDM E/R” on CONSULT-III, and select “ACTIVE TEST” on “SELECT DIAG MODE” screen.
4. Select “FRONT WIPER” on “SELECT TEST ITEM” screen.
5. Touch “LO” screen.
6. Check voltage between IPDM E/R connector and ground while
front wiper LO is operating.
Without CONSULT-lIl
AB
Continuity
Connector Terminal Connector Terminal
E45 33 E1 3 Yes
A
GroundContinuity
Connector Terminal
E45 33 No
WKIA5495E
Te r m i n a l
Continuity (+)
(-)
IPDM E/R
connectorTe r m i n a l
E45 33 Ground Battery voltage
WKIA5496E