Page 2222 of 2771
REAR COMBINATION LAMP
LT-85
< SERVICE INFORMATION >
C
D
E
F
G
H
I
J
L
MA
B
LT
N
O
P
REAR COMBINATION LAMP
ComponentINFOID:0000000001704462
Hatchback
Bulb ReplacementINFOID:0000000001704463
HATCHBACK
1. Remove the rear combination lamp. Refer to LT-86, "Removal and Installation".
2. Turn bulb socket counterclockwise and unlock it.
3. Remove bulb.
4. Installation is in the reverse order of removal.
SEDAN
1. Remove trunk side finisher. Refer to EI-53, "Removal and Installation".
2. Turn bulb socket counterclockwise and unlock it.
3. Remove the stop/tail lamp bulb (1), turn signal lamp bulb (2),
and the back-up lamp bulb (3).
4. Installation is in the reverse order of removal.
LKIA0760E
1. Rear combination lamp harness 2. Turn signal lamp bulb 3. Back-up lamp bulb
4. Stop/tail lamp bulb 5. Rear combination lamp housing as-
sembly6. Bumper stay
A. Grommet B. Nut C. Clip
D. Nuts E. Clip
PKIC1034E
Page 2223 of 2771

LT-86
< SERVICE INFORMATION >
REAR COMBINATION LAMP
Removal and Installation
INFOID:0000000001704464
HATCHBACK
Removal
1. Remove rear combination lamp nuts.
2. Pull the rear combination lamp toward rear of the vehicle and remove from the vehicle.
3. Disconnect rear combination lamp connector, and remove rear combination lamp.
Installation
Installation is in the reverse order of removal.
SEDAN
Removal
1. Remove trunk side finisher. Refer to EI-51, "Removal and Installation".
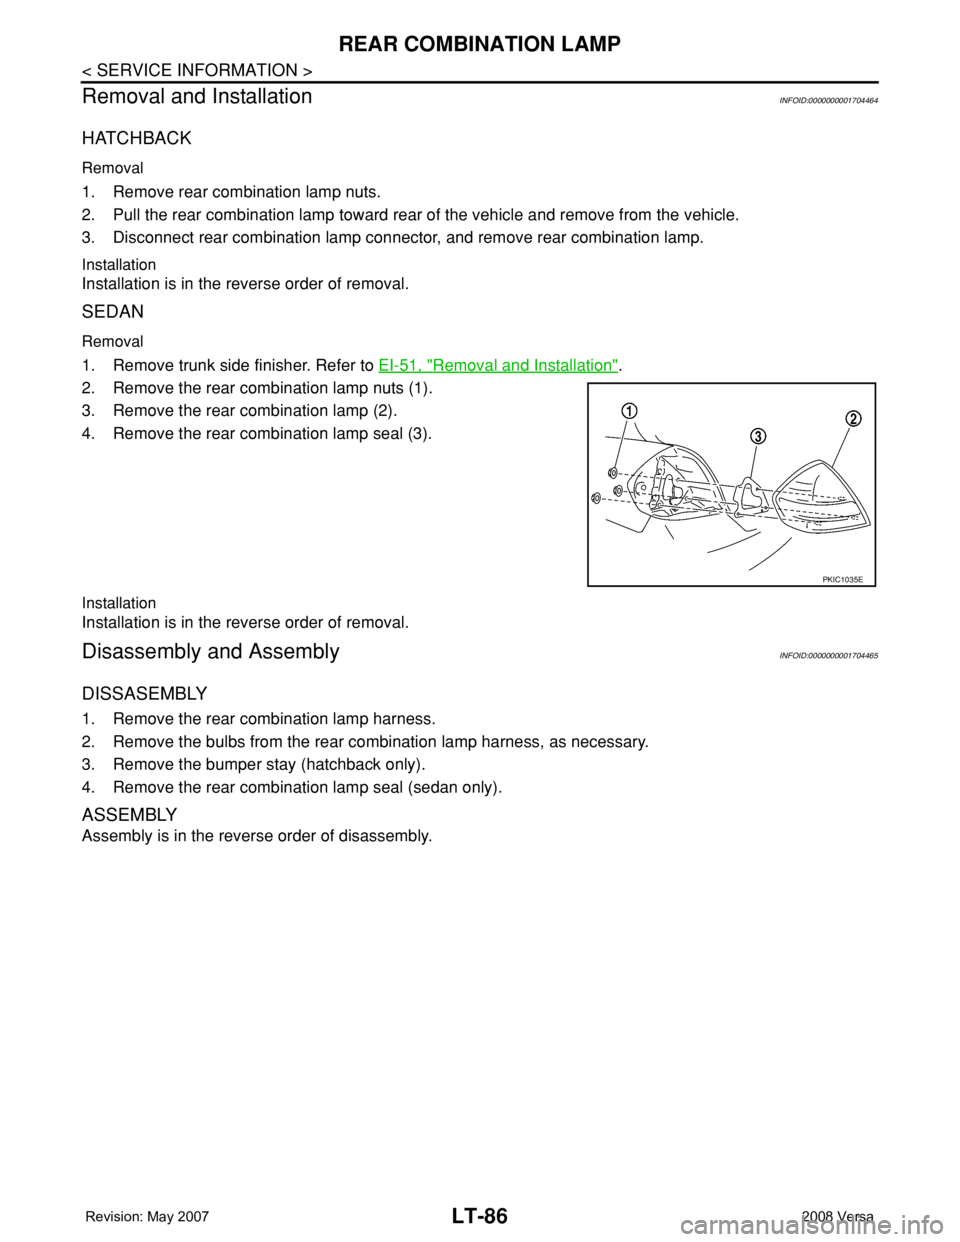
2. Remove the rear combination lamp nuts (1).
3. Remove the rear combination lamp (2).
4. Remove the rear combination lamp seal (3).
Installation
Installation is in the reverse order of removal.
Disassembly and AssemblyINFOID:0000000001704465
DISSASEMBLY
1. Remove the rear combination lamp harness.
2. Remove the bulbs from the rear combination lamp harness, as necessary.
3. Remove the bumper stay (hatchback only).
4. Remove the rear combination lamp seal (sedan only).
ASSEMBLY
Assembly is in the reverse order of disassembly.
PKIC1035E
Page 2224 of 2771
INTERIOR LAMP
LT-87
< SERVICE INFORMATION >
C
D
E
F
G
H
I
J
L
MA
B
LT
N
O
P
INTERIOR LAMP
Map LampINFOID:0000000001704466
BULB REPLACEMENT
1. Remove the map lamp lens (1).
2. Remove the bulb from lamp.
NOTE:
Pull bulb end from Y-shaped connector first to remove.
3. Installation is in the reverse order of removal.
• Install the map lamp lens (1) so the round lens is positioned to
the front of the vehicle as shown. There is a tab on the lens to
prevent incorrect installation of the lens.
REMOVAL AND INSTALLATION
Removal
1. Insert a suitable tool and disengage the pawl (A) fittings the map
lamp (1).
2. Disconnect map lamp connector and remove map lamp (1).
Installation
Installation is in the reverse order of removal.
DISASSEMBLY AND ASSEMBLY
Disassembly
1. Remove screw (A).
2. Remove sunroof switch (1).
Assembly
Assembly is in the reverse order of disassembly.
Luggage Compartment LampINFOID:0000000001704467
BULB REPLACEMENT
LKIA0773E
PKIC1038E
PKIC1039E
Page 2225 of 2771
LT-88
< SERVICE INFORMATION >
INTERIOR LAMP
1. Remove luggage compartment lamp cover.
2. Press tab A and remove the bulb.
3. Installation is in the reverse order of removal.
REMOVAL AND INSTALLATION
Removal
1. Remove luggage compartment lamp from the luggage side finisher LH.
2. Disconnect luggage compartment lamp connector.
Installation
Installation is in the reverse order of removal.
1. Luggage compartment lamp bulb cover 2. Luggage compartment lamp A. Tab A
LKIA0761E
Page 2238 of 2771

INTERIOR ROOM LAMP
LT-101
< SERVICE INFORMATION >
C
D
E
F
G
H
I
J
L
MA
B
LT
N
O
P
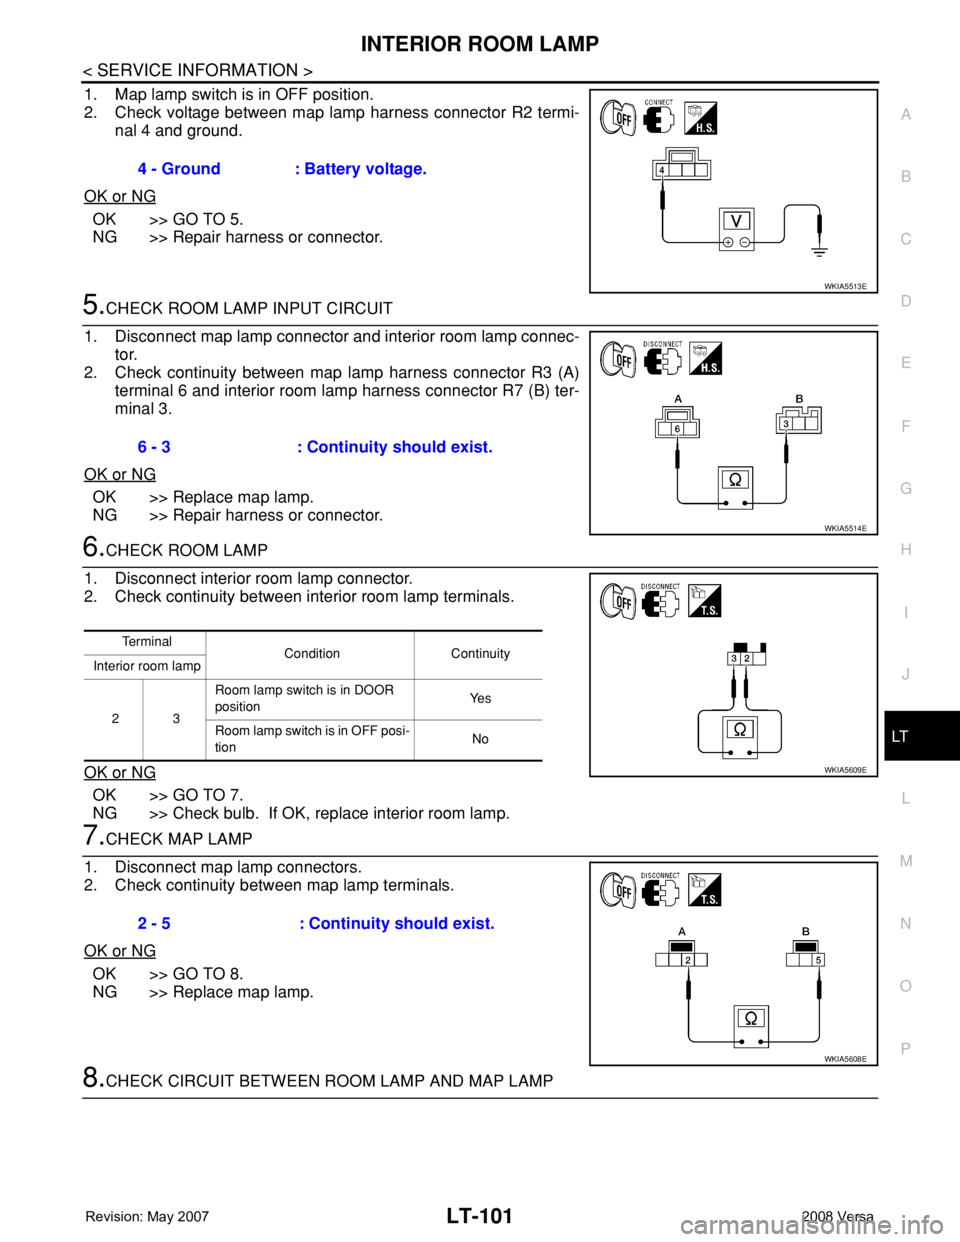
1. Map lamp switch is in OFF position.
2. Check voltage between map lamp harness connector R2 termi-
nal 4 and ground.
OK or NG
OK >> GO TO 5.
NG >> Repair harness or connector.
5.CHECK ROOM LAMP INPUT CIRCUIT
1. Disconnect map lamp connector and interior room lamp connec-
tor.
2. Check continuity between map lamp harness connector R3 (A)
terminal 6 and interior room lamp harness connector R7 (B) ter-
minal 3.
OK or NG
OK >> Replace map lamp.
NG >> Repair harness or connector.
6.CHECK ROOM LAMP
1. Disconnect interior room lamp connector.
2. Check continuity between interior room lamp terminals.
OK or NG
OK >> GO TO 7.
NG >> Check bulb. If OK, replace interior room lamp.
7.CHECK MAP LAMP
1. Disconnect map lamp connectors.
2. Check continuity between map lamp terminals.
OK or NG
OK >> GO TO 8.
NG >> Replace map lamp.
8.CHECK CIRCUIT BETWEEN ROOM LAMP AND MAP LAMP 4 - Ground : Battery voltage.
WKIA5513E
6 - 3 : Continuity should exist.
WKIA5514E
Te r m i n a l
Condition Continuity
Interior room lamp
23Room lamp switch is in DOOR
positionYe s
Room lamp switch is in OFF posi-
tionNo
WKIA5609E
2 - 5 : Continuity should exist.
WKIA5608E
Page 2240 of 2771

INTERIOR ROOM LAMP
LT-103
< SERVICE INFORMATION >
C
D
E
F
G
H
I
J
L
MA
B
LT
N
O
P
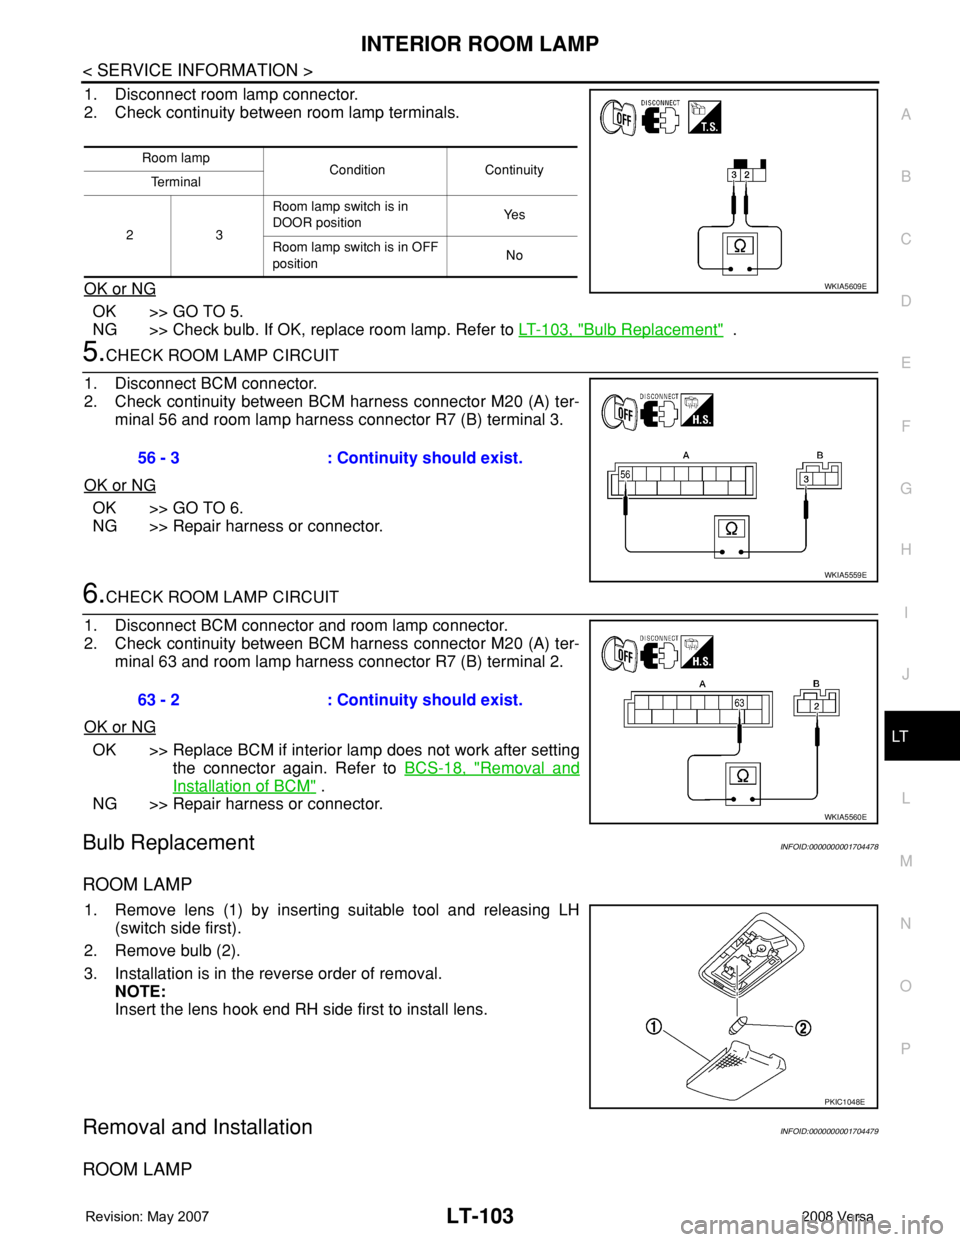
1. Disconnect room lamp connector.
2. Check continuity between room lamp terminals.
OK or NG
OK >> GO TO 5.
NG >> Check bulb. If OK, replace room lamp. Refer to LT-103, "
Bulb Replacement" .
5.CHECK ROOM LAMP CIRCUIT
1. Disconnect BCM connector.
2. Check continuity between BCM harness connector M20 (A) ter-
minal 56 and room lamp harness connector R7 (B) terminal 3.
OK or NG
OK >> GO TO 6.
NG >> Repair harness or connector.
6.CHECK ROOM LAMP CIRCUIT
1. Disconnect BCM connector and room lamp connector.
2. Check continuity between BCM harness connector M20 (A) ter-
minal 63 and room lamp harness connector R7 (B) terminal 2.
OK or NG
OK >> Replace BCM if interior lamp does not work after setting
the connector again. Refer to BCS-18, "
Removal and
Installation of BCM" .
NG >> Repair harness or connector.
Bulb ReplacementINFOID:0000000001704478
ROOM LAMP
1. Remove lens (1) by inserting suitable tool and releasing LH
(switch side first).
2. Remove bulb (2).
3. Installation is in the reverse order of removal.
NOTE:
Insert the lens hook end RH side first to install lens.
Removal and InstallationINFOID:0000000001704479
ROOM LAMP
Room lamp
Condition Continuity
Te r m i n a l
23 Room lamp switch is in
DOOR positionYe s
Room lamp switch is in OFF
positionNo
WKIA5609E
56 - 3 : Continuity should exist.
WKIA5559E
63 - 2 : Continuity should exist.
WKIA5560E
PKIC1048E
Page 2248 of 2771
ILLUMINATION
LT-111
< SERVICE INFORMATION >
C
D
E
F
G
H
I
J
L
MA
B
LT
N
O
P
Bulb ReplacementINFOID:0000000001704484
GLOVE BOX LAMP
1. Remove glove box assembly. Refer to IP-10 .
ALLWA0130GB
Page 2249 of 2771
LT-112
< SERVICE INFORMATION >
ILLUMINATION
2. Turn bulb socket (1) counterclockwise and remove it.
3. Remove bulb (2).
PKIC1053E