Page 2295 of 2771
NOISE, VIBRATION AND HARSHNESS (NVH) TROUBLESHOOTING
MT-7
< SERVICE INFORMATION >
D
E
F
G
H
I
J
K
L
MA
B
MT
N
O
P
NOISE, VIBRATION AND HARSHNESS (NVH) TROUBLESHOOTING
NVH Troubleshooting ChartINFOID:0000000001703132
Use the chart below to help you find the cause of the symptom. The numbers indicate the order of the inspec-
tion. If necessary, repair or replace these parts.
Reference pageMA-21MT-17MT-17MT-13MT-17MT-17
SUSPECTED PARTS
(Possible cause)
OIL (Oil level is low.)
OIL (Wrong oil.)
OIL (Oil level is high.)
GASKET (Damaged)
OIL SEAL (Worn or damaged)
O-RING (Worn or damaged)
SHIFT CONTROL LINKAGE (Worn)
SHIFT FORK (Worn)
GEAR (Worn or damaged)
BEARING (Worn or damaged)
BAULK RING (Worn or damaged)
INSERT SPRING (Damaged)
SymptomsNoise 1 2 3 3
Oil leakage 31222
Hard to shift or will not shift 1 1 2 3 3
Jumps out of gear 1 3 3
Page 2296 of 2771
MT-8
< SERVICE INFORMATION >
DESCRIPTION
DESCRIPTION
Cross-Sectional ViewINFOID:0000000001703133
TRIPLE-CONE SYNCHRONIZER
1. Clutch housing 2. CSC (Concentric Slave Cylinder) 3. Reverse idler shaft
4. Reverse input gear 5. Reverse output gear 6. 2nd input gear
7. 3rd input gear 8. 3rd-4th synchronizer assembly 9. 4th input gear
10. 5th input gear 11. 5th-6th synchronizer assembly 12. 6th input gear
13. Transaxle case 14. 6th main gear 15. 5th main gear
16. 4th main gear 17. 3rd main gear 18. 2nd main gear
19. 1st-2nd synchronizer assembly 20. 1st main gear 21. Differential assembly
22. Final gear 23. Mainshaft 24. Input shaft
SCIA7618E
Page 2297 of 2771
DESCRIPTION
MT-9
< SERVICE INFORMATION >
D
E
F
G
H
I
J
K
L
MA
B
MT
N
O
P
Triple-cone synchronizer is used for the 1st and the 2nd gears to
reduce operating force of the shift lever.
• 1st main gear (1)
• 1st-2nd coupling sleeve (2)
• Insert key (3)
• Outer baulk ring (4)
• 2nd main gear (5)
• Synchronizer cone (6)
• Inner baulk ring (7)
• 1st-2nd synchronizer hub (8)
REVERSE GEAR NOISE PREVENTION FUNCTION (SYNCHRONIZING METHOD)
Reverse gear assembly consists of reverse input gear, return spring,
reverse baulk ring and reverse output gear. When the shift lever is
shifted to the reverse position, the construction allows smooth shift
operation by stopping the reverse idler shaft rotation by frictional
force of synchronizer.
• Reverse fork rod (1)
• Reverse output gear (2)
• Return spring (3)
• Reverse baulk ring (4)
• Reverse input gear (5)
SCIA7636E
SCIA7621E
Page 2298 of 2771

MT-10
< SERVICE INFORMATION >
M/T OIL
M/T OIL
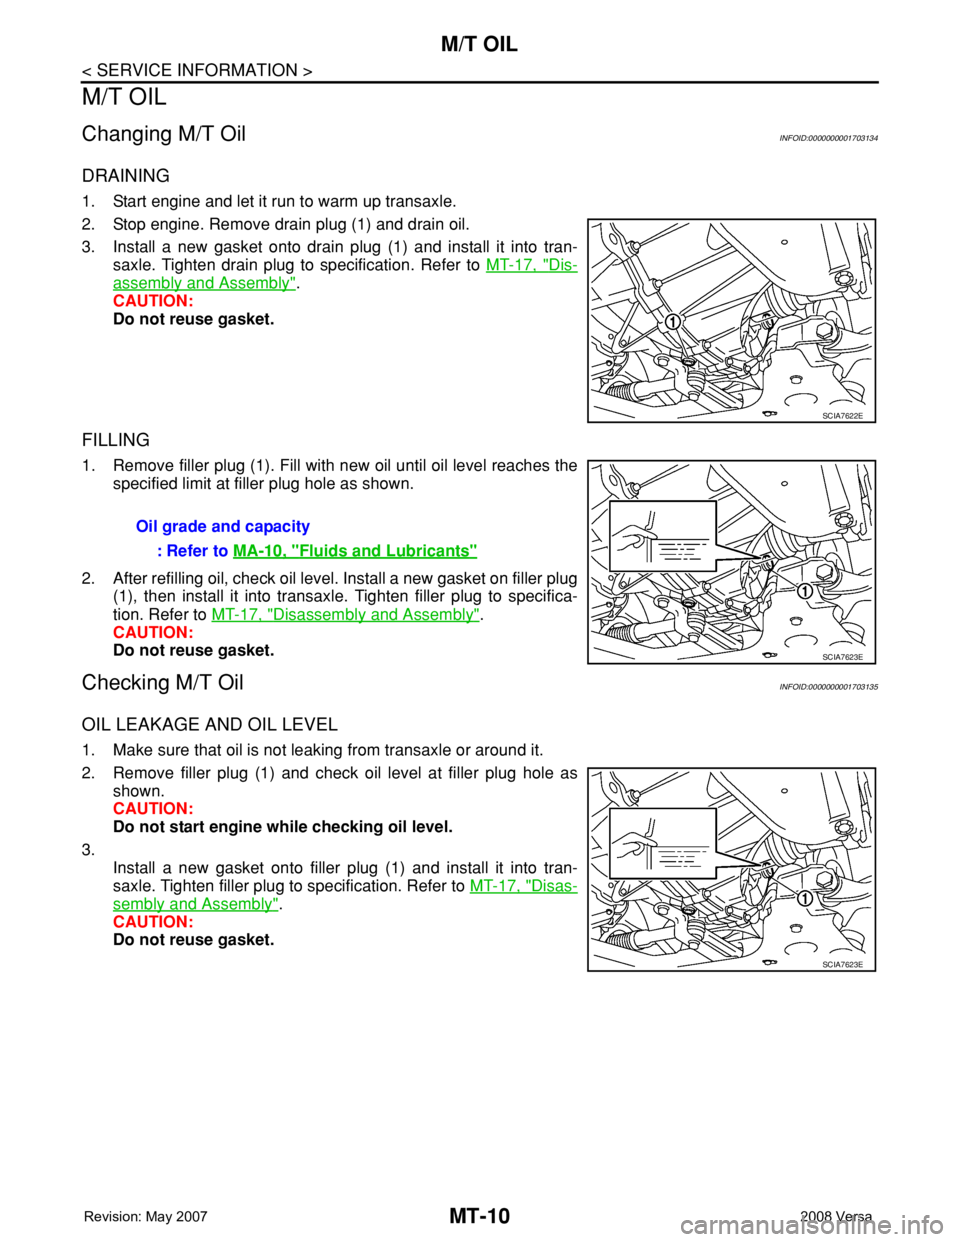
Changing M/T OilINFOID:0000000001703134
DRAINING
1. Start engine and let it run to warm up transaxle.
2. Stop engine. Remove drain plug (1) and drain oil.
3. Install a new gasket onto drain plug (1) and install it into tran-
saxle. Tighten drain plug to specification. Refer to MT-17, "
Dis-
assembly and Assembly".
CAUTION:
Do not reuse gasket.
FILLING
1. Remove filler plug (1). Fill with new oil until oil level reaches the
specified limit at filler plug hole as shown.
2. After refilling oil, check oil level. Install a new gasket on filler plug
(1), then install it into transaxle. Tighten filler plug to specifica-
tion. Refer to MT-17, "
Disassembly and Assembly".
CAUTION:
Do not reuse gasket.
Checking M/T OilINFOID:0000000001703135
OIL LEAKAGE AND OIL LEVEL
1. Make sure that oil is not leaking from transaxle or around it.
2. Remove filler plug (1) and check oil level at filler plug hole as
shown.
CAUTION:
Do not start engine while checking oil level.
3.
Install a new gasket onto filler plug (1) and install it into tran-
saxle. Tighten filler plug to specification. Refer to MT-17, "
Disas-
sembly and Assembly".
CAUTION:
Do not reuse gasket.
SCIA7622E
Oil grade and capacity
: Refer to MA-10, "
Fluids and Lubricants"
SCIA7623E
SCIA7623E
Page 2299 of 2771
SIDE OIL SEAL
MT-11
< SERVICE INFORMATION >
D
E
F
G
H
I
J
K
L
MA
B
MT
N
O
P
SIDE OIL SEAL
Removal and InstallationINFOID:0000000001703136
REMOVAL
1. Remove front drive shafts from transaxle assembly. Refer to FA X - 8 , "Removal and Installation (Left
Side)".
2. Remove differential side oil seal (1) using a suitable tool.
CAUTION:
Be careful not to damage transaxle case and clutch hous-
ing.
INSTALLATION
1. Install differential side oil seal (1) to clutch housing and transaxle
case using Tool (A).
2. Installation is in the reverse order of removal. Check oil level
after installation. Refer to MA-21, "
Checking M/T Oil".
CAUTION:
Do not reuse oil seal.
SCIA7625E
Tool number A: ST38100300 (J-25523)
SCIA7626E
Page 2300 of 2771
MT-12
< SERVICE INFORMATION >
POSITION SWITCH
POSITION SWITCH
CheckingINFOID:0000000001703137
NOTE:
For removal and installation of the switches, refer to MT-17, "
Disassembly and Assembly"
BACK-UP LAMP SWITCH
• Check continuity between terminals 1 and 2.
PARK/NEUTRAL POSITION SWITCH
• Check continuity between terminals 2 and 3.
Gear position Continuity
Reverse Yes
Except reverse No
PCIB1781E
Gear position Continuity
Neutral Yes
Except neutral No
Page 2301 of 2771
CONTROL LINKAGE
MT-13
< SERVICE INFORMATION >
D
E
F
G
H
I
J
K
L
MA
B
MT
N
O
P
CONTROL LINKAGE
Component of Control Device and CableINFOID:0000000001703138
Removal and InstallationINFOID:0000000001703139
REMOVAL
1. Remove battery. Refer to SC-6, "Removal and Installation".
2. Remove air duct (Inlet), air duct and air cleaner case. Refer to EM-16, "
Removal and Installation".
3. Remove shift cable from shift lever.
4. Remove select cable according to the following.
a. Move stopper (1) to the unlocked position.
1. Control lever knob 2. Control lever 3. Control device assembly
4. Select cable 5. Shift cable 6. Lock plate
7. Clutch housing 8. Cable bracket 9. Tapping bolt
10. Cable support bracket 11. Adapter plate
WCIA0626E
SCIA7842E
Page 2302 of 2771

MT-14
< SERVICE INFORMATION >
CONTROL LINKAGE
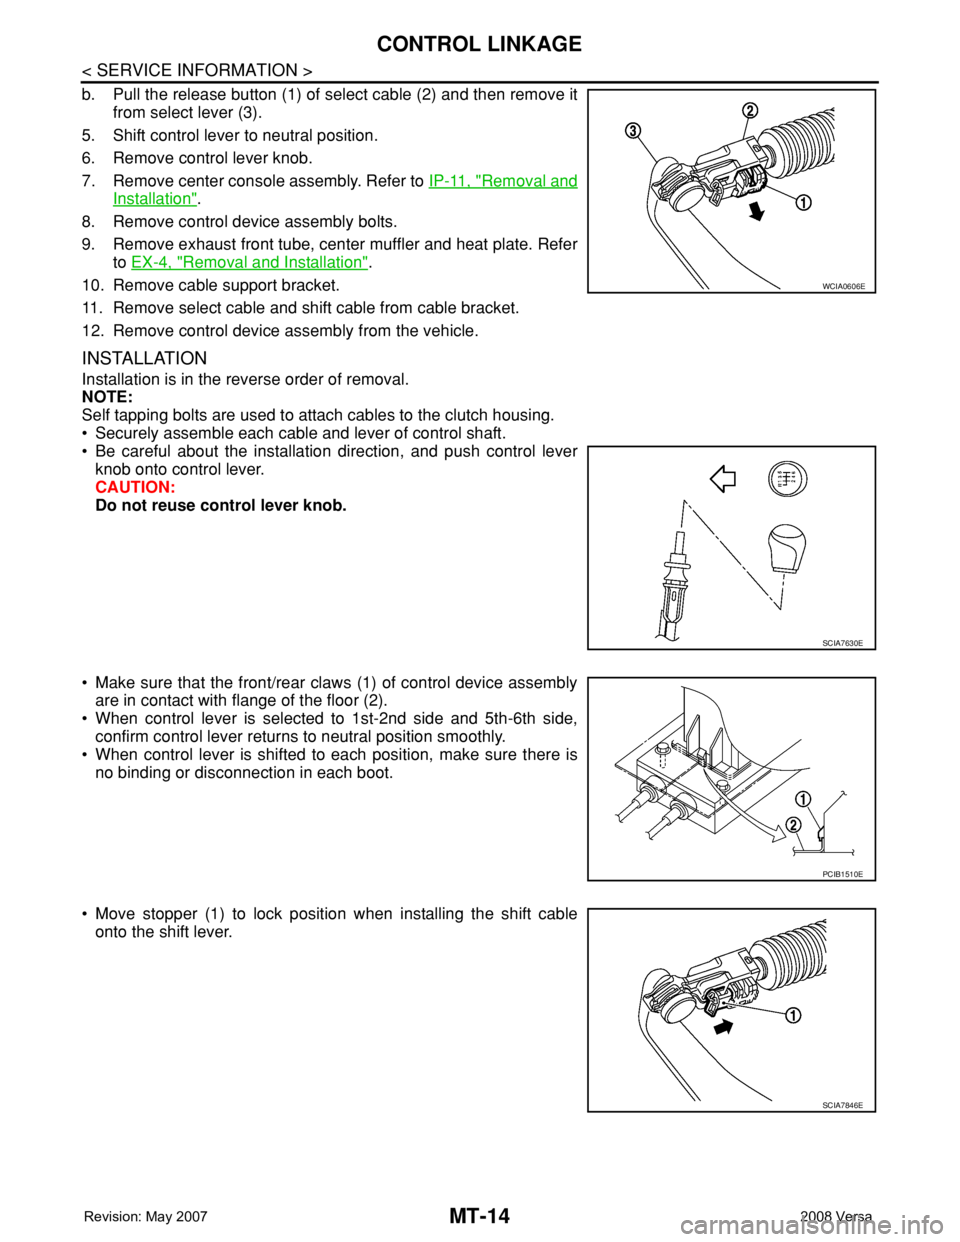
b. Pull the release button (1) of select cable (2) and then remove it
from select lever (3).
5. Shift control lever to neutral position.
6. Remove control lever knob.
7. Remove center console assembly. Refer to IP-11, "
Removal and
Installation".
8. Remove control device assembly bolts.
9. Remove exhaust front tube, center muffler and heat plate. Refer
to EX-4, "
Removal and Installation".
10. Remove cable support bracket.
11. Remove select cable and shift cable from cable bracket.
12. Remove control device assembly from the vehicle.
INSTALLATION
Installation is in the reverse order of removal.
NOTE:
Self tapping bolts are used to attach cables to the clutch housing.
• Securely assemble each cable and lever of control shaft.
• Be careful about the installation direction, and push control lever
knob onto control lever.
CAUTION:
Do not reuse control lever knob.
• Make sure that the front/rear claws (1) of control device assembly
are in contact with flange of the floor (2).
• When control lever is selected to 1st-2nd side and 5th-6th side,
confirm control lever returns to neutral position smoothly.
• When control lever is shifted to each position, make sure there is
no binding or disconnection in each boot.
• Move stopper (1) to lock position when installing the shift cable
onto the shift lever.
WCIA0606E
SCIA7630E
PCIB1510E
SCIA7846E