Page 382 of 2771

AUDIO
AV-23
< SERVICE INFORMATION >
C
D
E
F
G
H
I
J
L
MA
B
AV
N
O
P
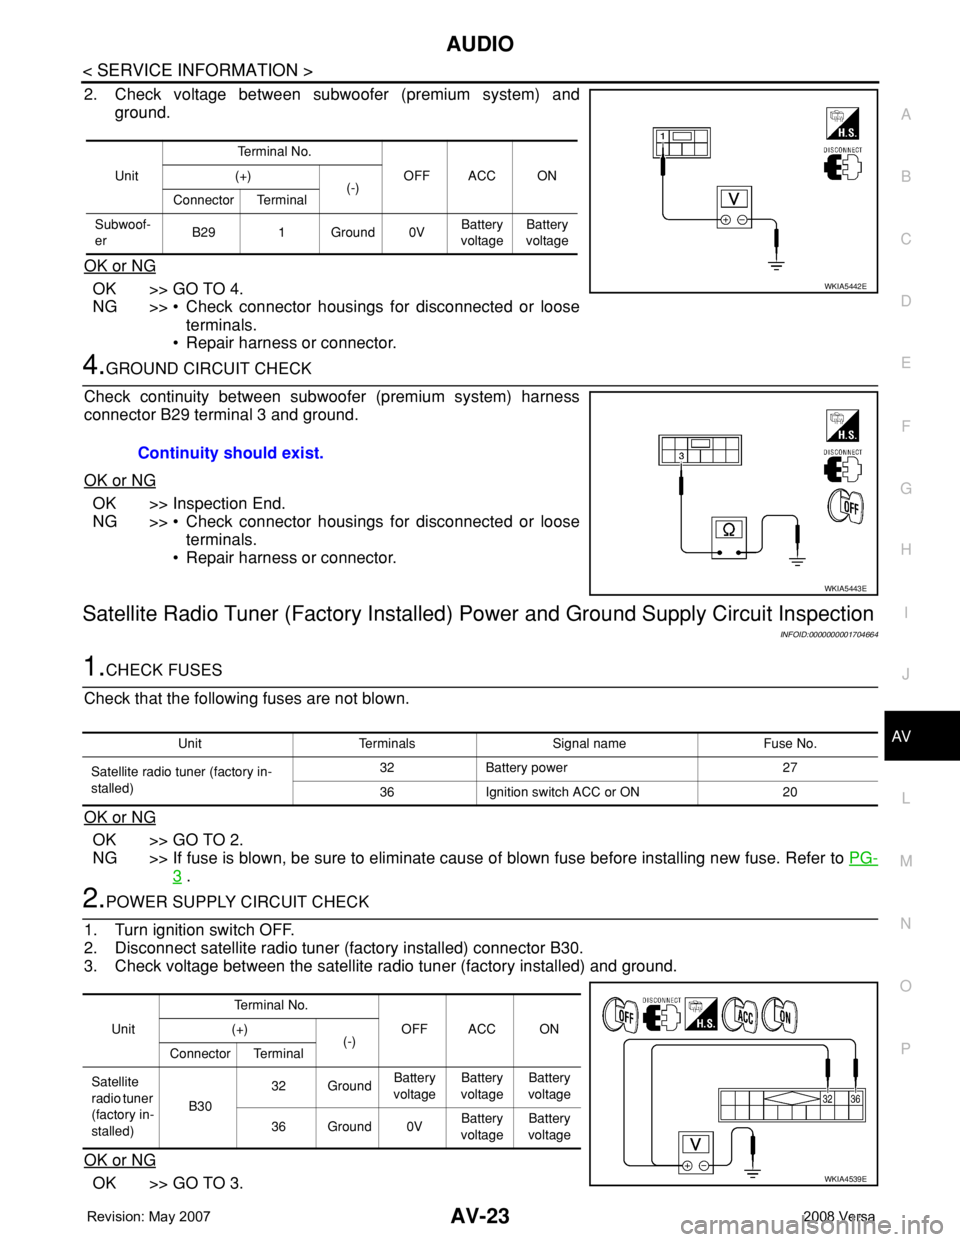
2. Check voltage between subwoofer (premium system) and
ground.
OK or NG
OK >> GO TO 4.
NG >> • Check connector housings for disconnected or loose
terminals.
• Repair harness or connector.
4.GROUND CIRCUIT CHECK
Check continuity between subwoofer (premium system) harness
connector B29 terminal 3 and ground.
OK or NG
OK >> Inspection End.
NG >> • Check connector housings for disconnected or loose
terminals.
• Repair harness or connector.
Satellite Radio Tuner (Factory Installed) Power and Ground Supply Circuit Inspection
INFOID:0000000001704664
1.CHECK FUSES
Check that the following fuses are not blown.
OK or NG
OK >> GO TO 2.
NG >> If fuse is blown, be sure to eliminate cause of blown fuse before installing new fuse. Refer to PG-
3 .
2.POWER SUPPLY CIRCUIT CHECK
1. Turn ignition switch OFF.
2. Disconnect satellite radio tuner (factory installed) connector B30.
3. Check voltage between the satellite radio tuner (factory installed) and ground.
OK or NG
OK >> GO TO 3.
UnitTe r m i n a l N o .
OFF ACC ON (+)
(-)
Connector Terminal
Subwoof-
erB29 1 Ground 0VBattery
voltageBattery
voltage
WKIA5442E
Continuity should exist.
WKIA5443E
Unit Terminals Signal name Fuse No.
Satellite radio tuner (factory in-
stalled)32 Battery power 27
36 Ignition switch ACC or ON 20
UnitTerminal No.
OFF ACC ON (+)
(-)
Connector Terminal
Satellite
radio tuner
(factory in-
stalled)B3032 GroundBattery
voltageBattery
voltageBattery
voltage
36 Ground 0VBattery
voltageBattery
voltage
WKIA4539E
Page 383 of 2771

AV-24
< SERVICE INFORMATION >
AUDIO
NG >> • Check connector housings for disconnected or loose terminals.
• Repair harness or connector.
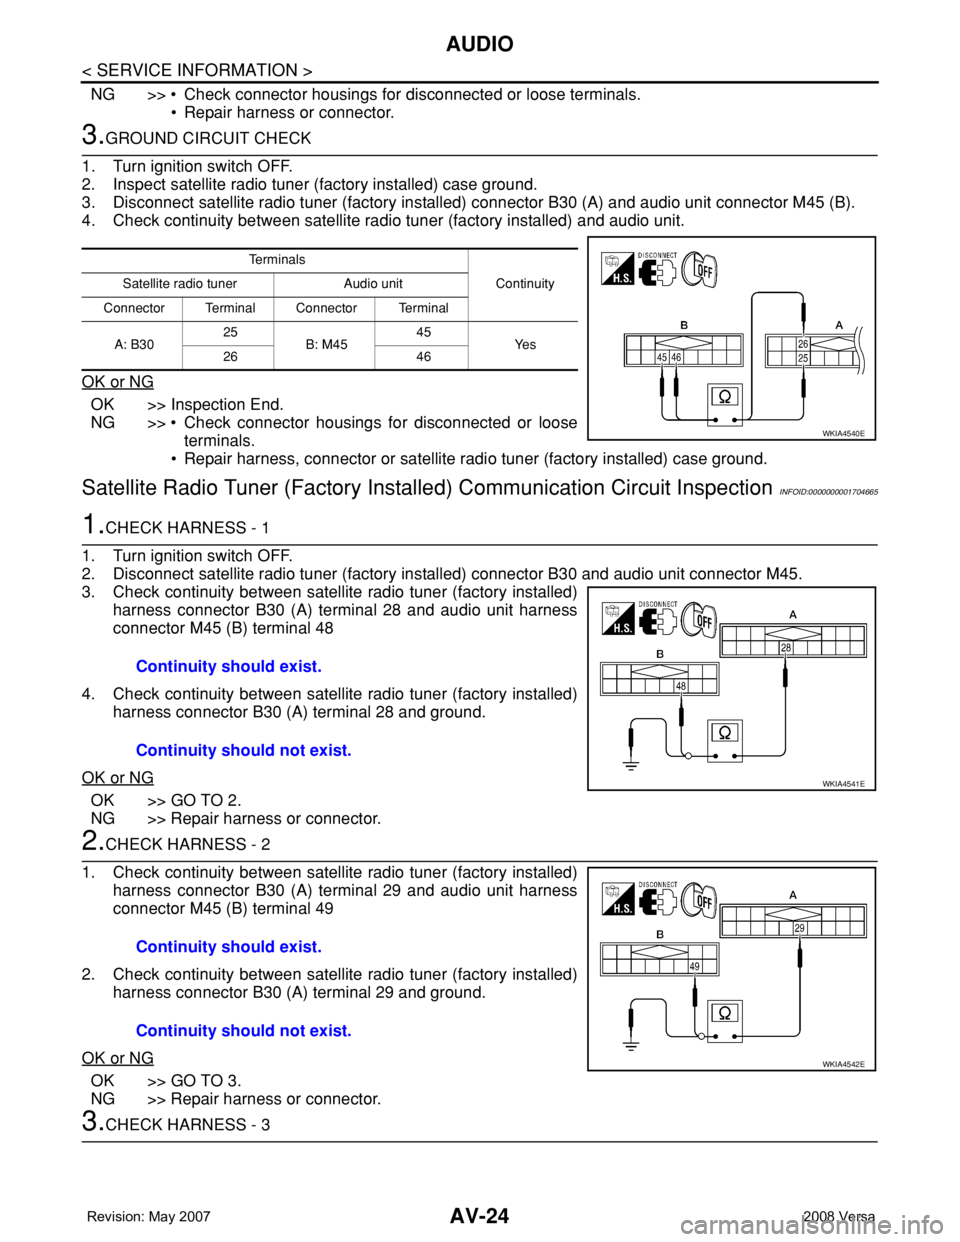
3.GROUND CIRCUIT CHECK
1. Turn ignition switch OFF.
2. Inspect satellite radio tuner (factory installed) case ground.
3. Disconnect satellite radio tuner (factory installed) connector B30 (A) and audio unit connector M45 (B).
4. Check continuity between satellite radio tuner (factory installed) and audio unit.
OK or NG
OK >> Inspection End.
NG >> • Check connector housings for disconnected or loose
terminals.
• Repair harness, connector or satellite radio tuner (factory installed) case ground.
Satellite Radio Tuner (Factory Installed) Communication Circuit InspectionINFOID:0000000001704665
1.CHECK HARNESS - 1
1. Turn ignition switch OFF.
2. Disconnect satellite radio tuner (factory installed) connector B30 and audio unit connector M45.
3. Check continuity between satellite radio tuner (factory installed)
harness connector B30 (A) terminal 28 and audio unit harness
connector M45 (B) terminal 48
4. Check continuity between satellite radio tuner (factory installed)
harness connector B30 (A) terminal 28 and ground.
OK or NG
OK >> GO TO 2.
NG >> Repair harness or connector.
2.CHECK HARNESS - 2
1. Check continuity between satellite radio tuner (factory installed)
harness connector B30 (A) terminal 29 and audio unit harness
connector M45 (B) terminal 49
2. Check continuity between satellite radio tuner (factory installed)
harness connector B30 (A) terminal 29 and ground.
OK or NG
OK >> GO TO 3.
NG >> Repair harness or connector.
3.CHECK HARNESS - 3
Te r m i n a l s
Continuity Satellite radio tuner Audio unit
Connector Terminal Connector Terminal
A: B3025
B: M4545
Ye s
26 46
WKIA4540E
Continuity should exist.
Continuity should not exist.
WKIA4541E
Continuity should exist.
Continuity should not exist.
WKIA4542E
Page 384 of 2771

AUDIO
AV-25
< SERVICE INFORMATION >
C
D
E
F
G
H
I
J
L
MA
B
AV
N
O
P
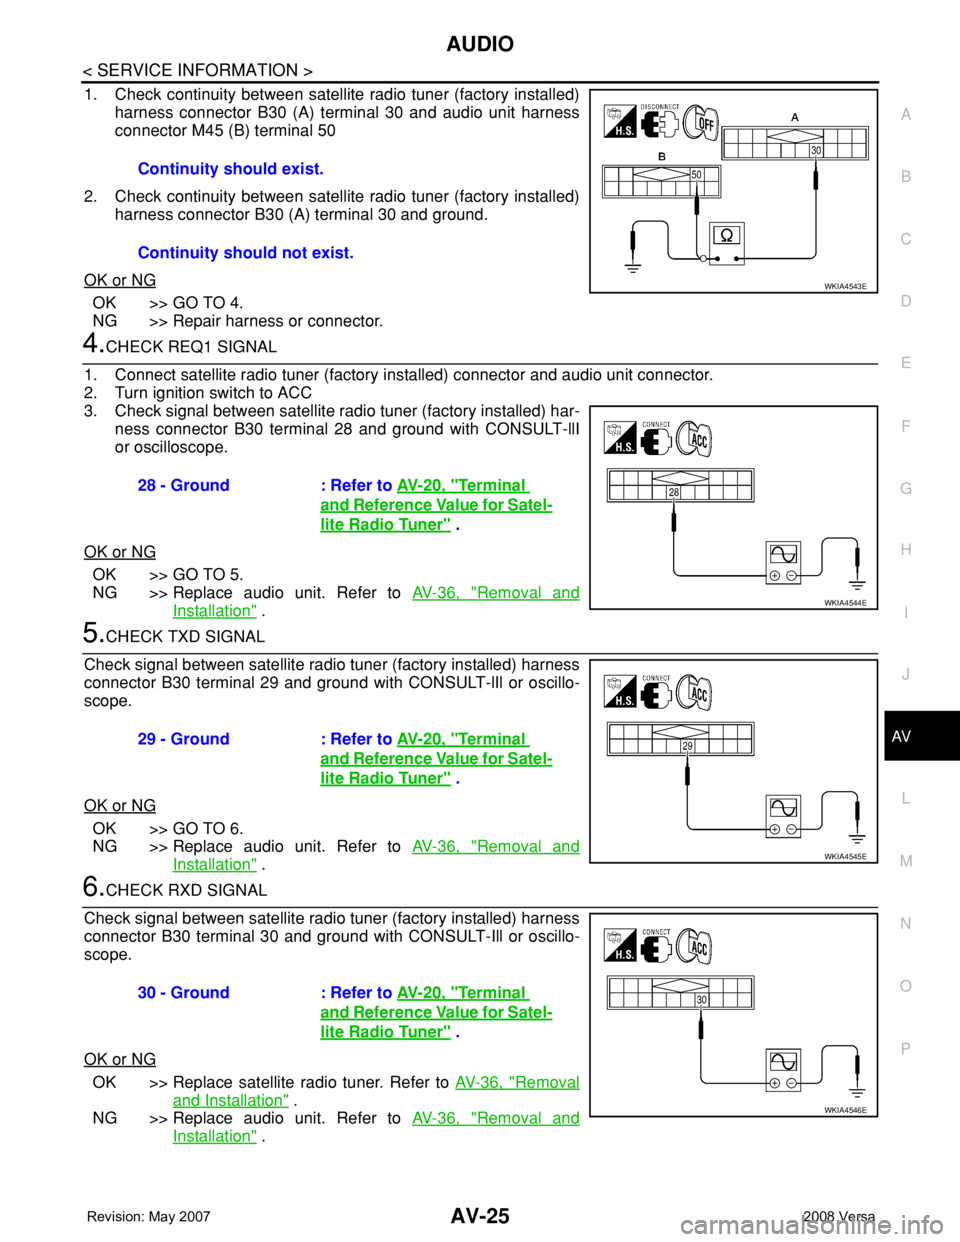
1. Check continuity between satellite radio tuner (factory installed)
harness connector B30 (A) terminal 30 and audio unit harness
connector M45 (B) terminal 50
2. Check continuity between satellite radio tuner (factory installed)
harness connector B30 (A) terminal 30 and ground.
OK or NG
OK >> GO TO 4.
NG >> Repair harness or connector.
4.CHECK REQ1 SIGNAL
1. Connect satellite radio tuner (factory installed) connector and audio unit connector.
2. Turn ignition switch to ACC
3. Check signal between satellite radio tuner (factory installed) har-
ness connector B30 terminal 28 and ground with CONSULT-llI
or oscilloscope.
OK or NG
OK >> GO TO 5.
NG >> Replace audio unit. Refer to AV-36, "
Removal and
Installation" .
5.CHECK TXD SIGNAL
Check signal between satellite radio tuner (factory installed) harness
connector B30 terminal 29 and ground with CONSULT-lIl or oscillo-
scope.
OK or NG
OK >> GO TO 6.
NG >> Replace audio unit. Refer to AV-36, "
Removal and
Installation" .
6.CHECK RXD SIGNAL
Check signal between satellite radio tuner (factory installed) harness
connector B30 terminal 30 and ground with CONSULT-Ill or oscillo-
scope.
OK or NG
OK >> Replace satellite radio tuner. Refer to AV-36, "Removal
and Installation" .
NG >> Replace audio unit. Refer to AV-36, "
Removal and
Installation" . Continuity should exist.
Continuity should not exist.
WKIA4543E
28 - Ground : Refer to AV-20, "Terminal
and Reference Value for Satel-
lite Radio Tuner" .
WKIA4544E
29 - Ground : Refer to AV-20, "Terminal
and Reference Value for Satel-
lite Radio Tuner" .
WKIA4545E
30 - Ground : Refer to AV-20, "Terminal
and Reference Value for Satel-
lite Radio Tuner" .
WKIA4546E
Page 385 of 2771

AV-26
< SERVICE INFORMATION >
AUDIO
Satellite Radio Tuner (Factory Installed) Left Channel Audio Signal Circuit Inspection
INFOID:0000000001704666
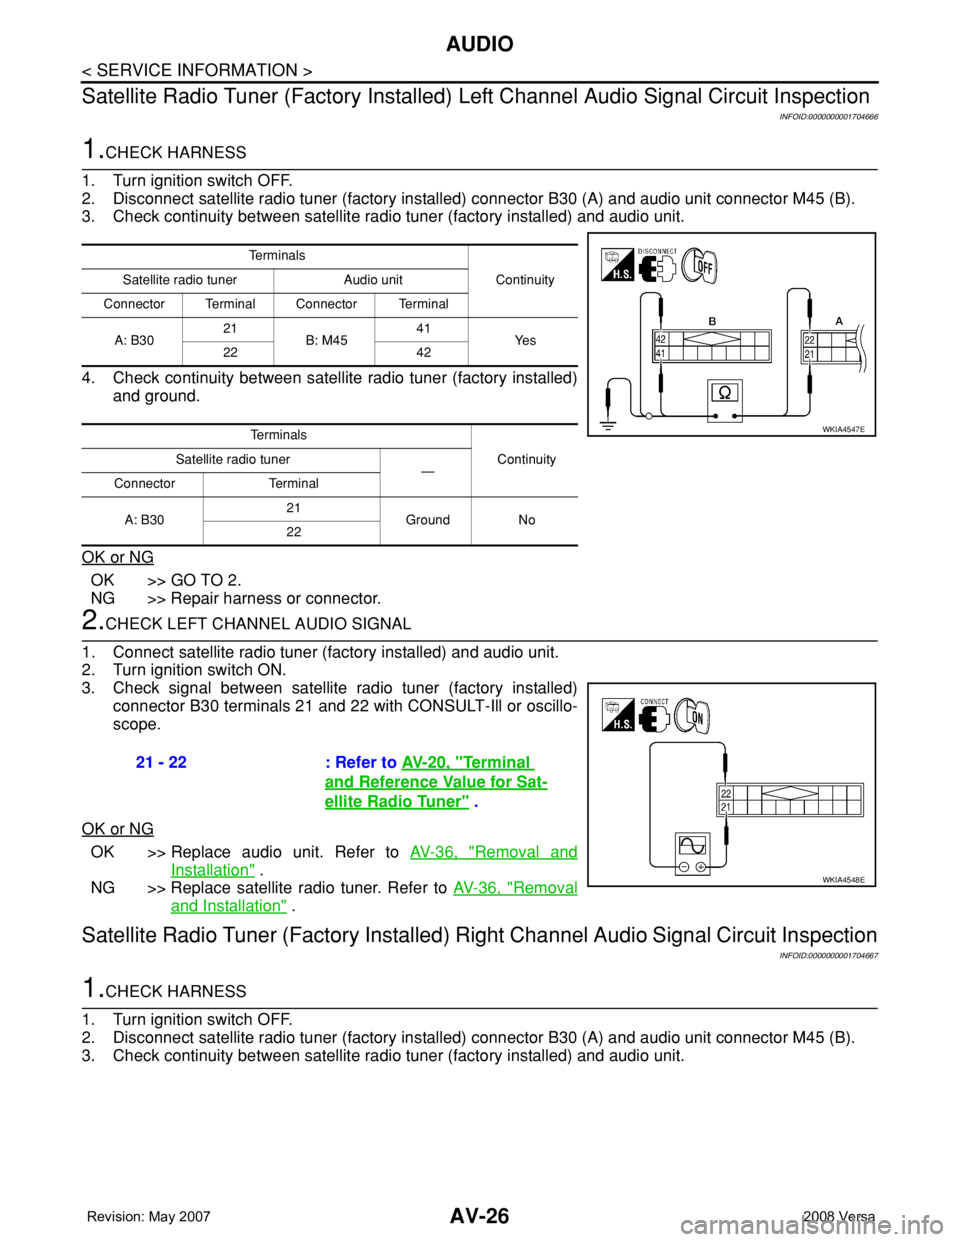
1.CHECK HARNESS
1. Turn ignition switch OFF.
2. Disconnect satellite radio tuner (factory installed) connector B30 (A) and audio unit connector M45 (B).
3. Check continuity between satellite radio tuner (factory installed) and audio unit.
4. Check continuity between satellite radio tuner (factory installed)
and ground.
OK or NG
OK >> GO TO 2.
NG >> Repair harness or connector.
2.CHECK LEFT CHANNEL AUDIO SIGNAL
1. Connect satellite radio tuner (factory installed) and audio unit.
2. Turn ignition switch ON.
3. Check signal between satellite radio tuner (factory installed)
connector B30 terminals 21 and 22 with CONSULT-Ill or oscillo-
scope.
OK or NG
OK >> Replace audio unit. Refer to AV-36, "Removal and
Installation" .
NG >> Replace satellite radio tuner. Refer to AV-36, "
Removal
and Installation" .
Satellite Radio Tuner (Factory Installed) Right Channel Audio Signal Circuit Inspection
INFOID:0000000001704667
1.CHECK HARNESS
1. Turn ignition switch OFF.
2. Disconnect satellite radio tuner (factory installed) connector B30 (A) and audio unit connector M45 (B).
3. Check continuity between satellite radio tuner (factory installed) and audio unit.
Te r m i n a l s
Continuity Satellite radio tuner Audio unit
Connector Terminal Connector Terminal
A: B3021
B: M4541
Ye s
22 42
Te r m i n a l s
Continuity Satellite radio tuner
—
Connector Terminal
A: B3021
Ground No
22
WKIA4547E
21 - 22 : Refer to AV-20, "Terminal
and Reference Value for Sat-
ellite Radio Tuner" .
WKIA4548E
Page 386 of 2771

AUDIO
AV-27
< SERVICE INFORMATION >
C
D
E
F
G
H
I
J
L
MA
B
AV
N
O
P
4. Check continuity between satellite radio tuner (factory installed)
and ground.
OK or NG
OK >> GO TO 2.
NG >> Repair harness or connector.
2.CHECK RIGHT CHANNEL AUDIO SIGNAL
1. Connect satellite radio tuner (factory installed) and audio unit.
2. Turn ignition switch ON.
3. Check signal between satellite radio tuner (factory installed)
connector B30 terminals 23 and 24 with CONSULT-lIl or oscillo-
scope.
OK or NG
OK >> Replace audio unit. Refer to AV-36, "Removal and
Installation" .
NG >> Replace satellite radio tuner. Refer to AV-36, "
Removal
and Installation" .
Steering Switch Check (With Bluetooth)INFOID:0000000001704668
1.CHECK HARNESS
1. Turn ignition switch OFF.
2. Disconnect Bluetooth control unit connector and spiral cable connector M30.
3. Check continuity between Bluetooth control unit (A) connector B121 terminals 12, 14, and 13 and spiral
cable (B) connector M30 terminals 24, 31, and 32.
4. Check continuity between Bluetooth control unit and ground.
Te r m i n a l s
Continuity Satellite radio tuner Audio unit
Connector Terminal Connector Terminal
A: B3023
B: M4543
Ye s
24 44
Te r m i n a l s
Continuity Satellite radio tuner
—
Connector Terminal
A: B3023
Ground No
24
WKIA4549E
23 - 24 : Refer to AV-20, "Terminal
and Reference Value for Sat-
ellite Radio Tuner" .
WKIA4550E
Te r m i n a l s
Continuity AB
Connector Terminal Connector Terminal
B12112
M3024
Ye s 13 32
14 31
WKIA5348E
Page 396 of 2771
AUDIO
AV-37
< SERVICE INFORMATION >
C
D
E
F
G
H
I
J
L
MA
B
AV
N
O
P
Installation is in the reverse order of removal.
TWEETER
Removal
1. Remove the front pillar garnish. Refer to EI-37.
2. Remove the tweeter screw (A), disconnect the connector and
remove the tweeter (1).
Installation
Installation is in the reverse order of removal.
SATELLITE RADIO TUNER
Hatchback
SKIB4730E
LKIA0767E
1. Bracket (upper) 2. Satellite radio tuner 3. Bracket (lower)
A. Screws B. Connector C. Satellite radio tuner bolts
⇒Front
Page 397 of 2771
AV-38
< SERVICE INFORMATION >
AUDIO
Sedan
Removal
1. For hatchback, remove the luggage side lower finisher (LH) (hatchback only). Refer to EI-51.
2. For sedan, remove the trunk side finisher (LH). Refer to EI-53, "
Removal and Installation".
3. For hatchback remove the subwoofer. Refer to "SUBWOOFER".
4. Remove the satellite radio tuner bolts.
5. Disconnect the connectors and remove the satellite radio tuner.
6. If necessary, remove the upper bracket (2) and the lower
bracket (1).
Installation
Installation is in the reverse order of removal.
SATELLITE RADIO ANTENNA
Removal
1. Lower the headlining. Refer to EI-45.
LKIA0935E
1. Bracket (upper) 2. Satellite radio tuner 3. Bracket (lower)
A. Satellite radio tuner connector B. Satellite radio tuner feeder harness
connectorC. Satellite radio tuner bolts
⇒Front
LKIA0768E
Page 398 of 2771
AUDIO
AV-39
< SERVICE INFORMATION >
C
D
E
F
G
H
I
J
L
MA
B
AV
N
O
P
2. Disconnect the satellite radio antenna connectors.
3. Detach the satellite radio antenna feeder harness clips.
4. Remove the satellite radio antenna nut and remove the satellite
radio antenna from the roof.
Installation
Installation is in the reverse order of removal.
STEERING WHEEL AUDIO CONTROL SWITCHES
Removal
1. Remove the steering wheel. Refer to PS-7, "Removal and Installation".
2. Remove the steering wheel finisher cover.
3. Remove the screws and the steering wheel audio control switches.
Installation
Installation is in the reverse order of removal.
SUBWOOFER
LKIA0679E
1. Steering wheel finisher cover 2. Steering wheel 3. Steering wheel audio control switch-
es
A. Screws
LKIA0769E