Page 737 of 2771

BR-6
< SERVICE INFORMATION >
BRAKE PEDAL
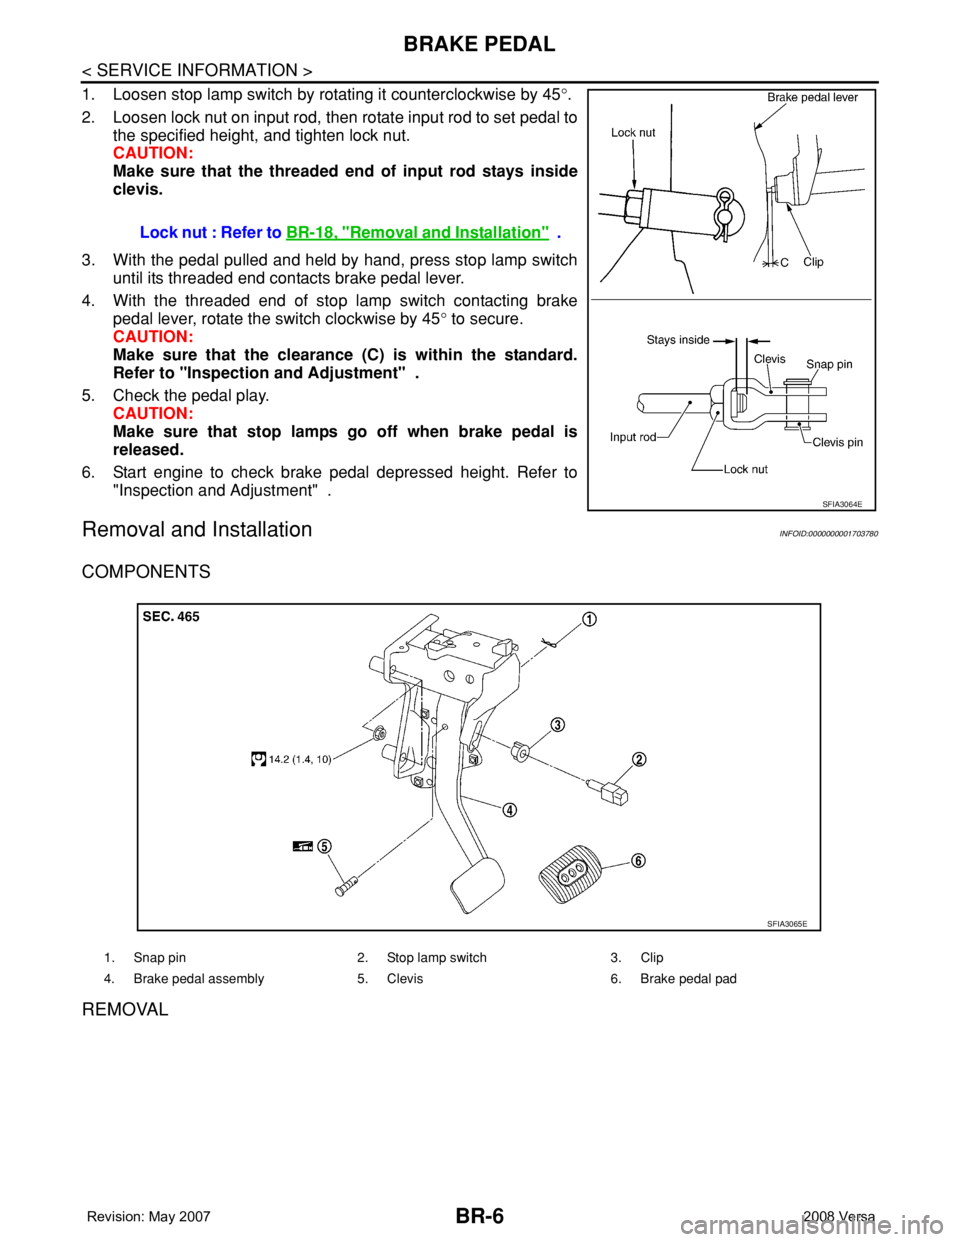
1. Loosen stop lamp switch by rotating it counterclockwise by 45°.
2. Loosen lock nut on input rod, then rotate input rod to set pedal to
the specified height, and tighten lock nut.
CAUTION:
Make sure that the threaded end of input rod stays inside
clevis.
3. With the pedal pulled and held by hand, press stop lamp switch
until its threaded end contacts brake pedal lever.
4. With the threaded end of stop lamp switch contacting brake
pedal lever, rotate the switch clockwise by 45° to secure.
CAUTION:
Make sure that the clearance (C) is within the standard.
Refer to "Inspection and Adjustment" .
5. Check the pedal play.
CAUTION:
Make sure that stop lamps go off when brake pedal is
released.
6. Start engine to check brake pedal depressed height. Refer to
"Inspection and Adjustment" .
Removal and InstallationINFOID:0000000001703780
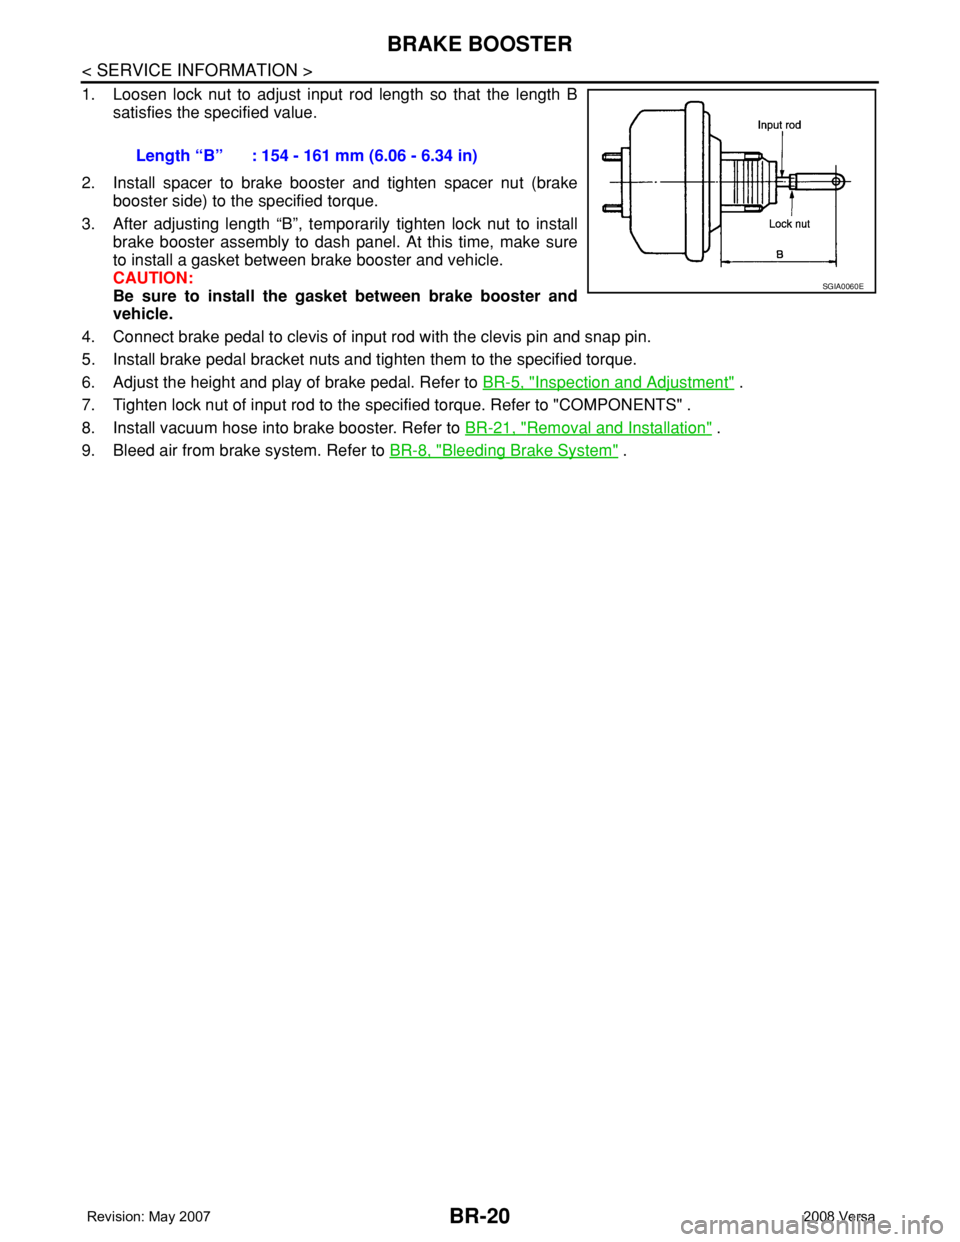
COMPONENTS
REMOVAL
Lock nut : Refer to BR-18, "Removal and Installation" .
SFIA3064E
1. Snap pin 2. Stop lamp switch 3. Clip
4. Brake pedal assembly 5. Clevis 6. Brake pedal pad
SFIA3065E
Page 751 of 2771

BR-20
< SERVICE INFORMATION >
BRAKE BOOSTER
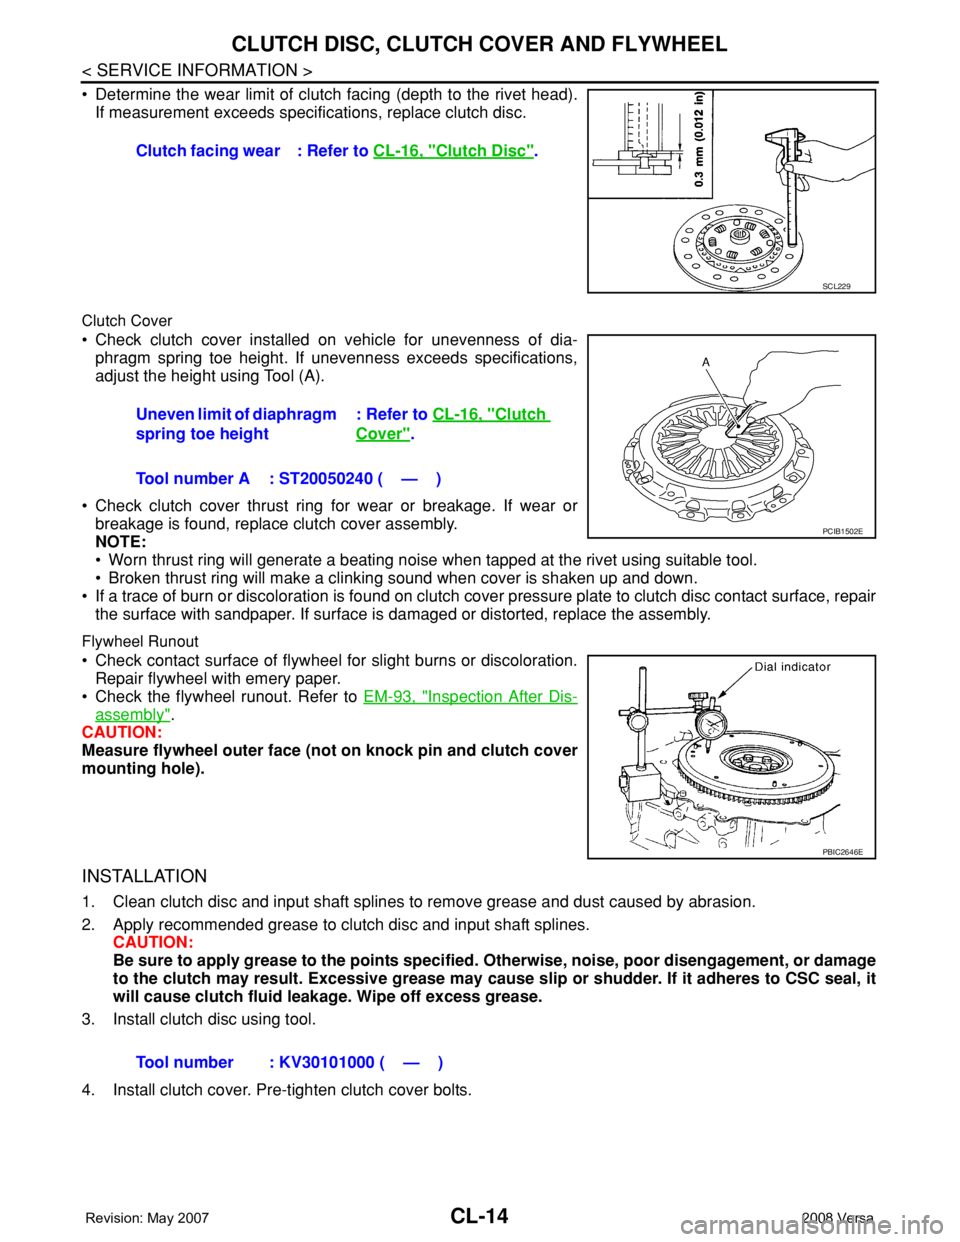
1. Loosen lock nut to adjust input rod length so that the length B
satisfies the specified value.
2. Install spacer to brake booster and tighten spacer nut (brake
booster side) to the specified torque.
3. After adjusting length “B”, temporarily tighten lock nut to install
brake booster assembly to dash panel. At this time, make sure
to install a gasket between brake booster and vehicle.
CAUTION:
Be sure to install the gasket between brake booster and
vehicle.
4. Connect brake pedal to clevis of input rod with the clevis pin and snap pin.
5. Install brake pedal bracket nuts and tighten them to the specified torque.
6. Adjust the height and play of brake pedal. Refer to BR-5, "
Inspection and Adjustment" .
7. Tighten lock nut of input rod to the specified torque. Refer to "COMPONENTS" .
8. Install vacuum hose into brake booster. Refer to BR-21, "
Removal and Installation" .
9. Bleed air from brake system. Refer to BR-8, "
Bleeding Brake System" . Length “B” : 154 - 161 mm (6.06 - 6.34 in)
SGIA0060E
Page 764 of 2771

SERVICE DATA AND SPECIFICATIONS (SDS)
BR-33
< SERVICE INFORMATION >
C
D
E
G
H
I
J
K
L
MA
B
BR
N
O
P
SERVICE DATA AND SPECIFICATIONS (SDS)
General SpecificationINFOID:0000000001703806
Brake PedalINFOID:0000000001703807
Unit: mm (in)
Check ValveINFOID:0000000001703808
Brake BoosterINFOID:0000000001703809
Vacuum type
Front Disc BrakeINFOID:0000000001703810
Unit: mm (in)
Front brake Brake model CLZ25VA
Cylinder bore diameter 57.2 mm (2.252 in)
Pad
Length × width × thickness125.6 mm × 46.0 mm × 9.5 mm
(4.945 in × 1.811 in × 0.374 in)
Rotor outer diameter × thickness 280 mm × 24.0 mm (11.02 in × 0.945 in)
Rear brake Brake model LT20D
Cylinder bore diameter 15.87 mm (0.625 in)
Lining
Length × width × thickness194.1 mm × 30.0 mm × 4.0 mm
(7.642 in × 1.181 in × 0.157 in)
Drum outer diameter 228.6 mm (9.000 in)
Master cylinder Cylinder bore diameter 22.22 mm (0.875 in)
Control valve Valve model Electric brake force distribution
Brake booster Booster model C255
Diaphragm diameter 255 mm (10.04 in)
Recommended brake fluid Refer to MA-10
.
Brake pedal free height (from dash panel top surface)A/T, CVT model 172.4 - 182.4 (6.79 - 7.18)
M/T model 162.3 - 172.3 (6.39 - 6.78)
Brake pedal depressed height
[under a force of 490 N (50 kg-f, 110 lb-f) with the engine running]A/T, CVT model 98 (3.86) or more
M/T model 90 (3.54) or more
Clearance between brake pedal lever and the threaded end of stop lamp switch 0.74 - 1.96 (0.0291 - 0.0772)
Pedal play3 - 11 (0.12 - 0.43)
Vacuum leakage
[at vacuum of – 66.7 kPa (– 500 mmHg, – 19.69 inHg]Within 1.3 kPa (10 mmHg, 0.39 inHg) of vacuum for 15 seconds
Vacuum leakage
[at vacuum of – 66.7 kPa (– 500 mmHg, –19.69 inHg)]Within 3.3 kPa (25 mmHg, 0.98 inHg) of vacuum for 15 seconds
Input rod installation standard dimension 154 - 161 mm (6.06 - 6.34 in)
Brake modelCLZ25VA
Brake padStandard thickness (new) 9.5 (0.374)
Repair limit thickness 2.0 (0.079)
Page 815 of 2771

CL-14
< SERVICE INFORMATION >
CLUTCH DISC, CLUTCH COVER AND FLYWHEEL
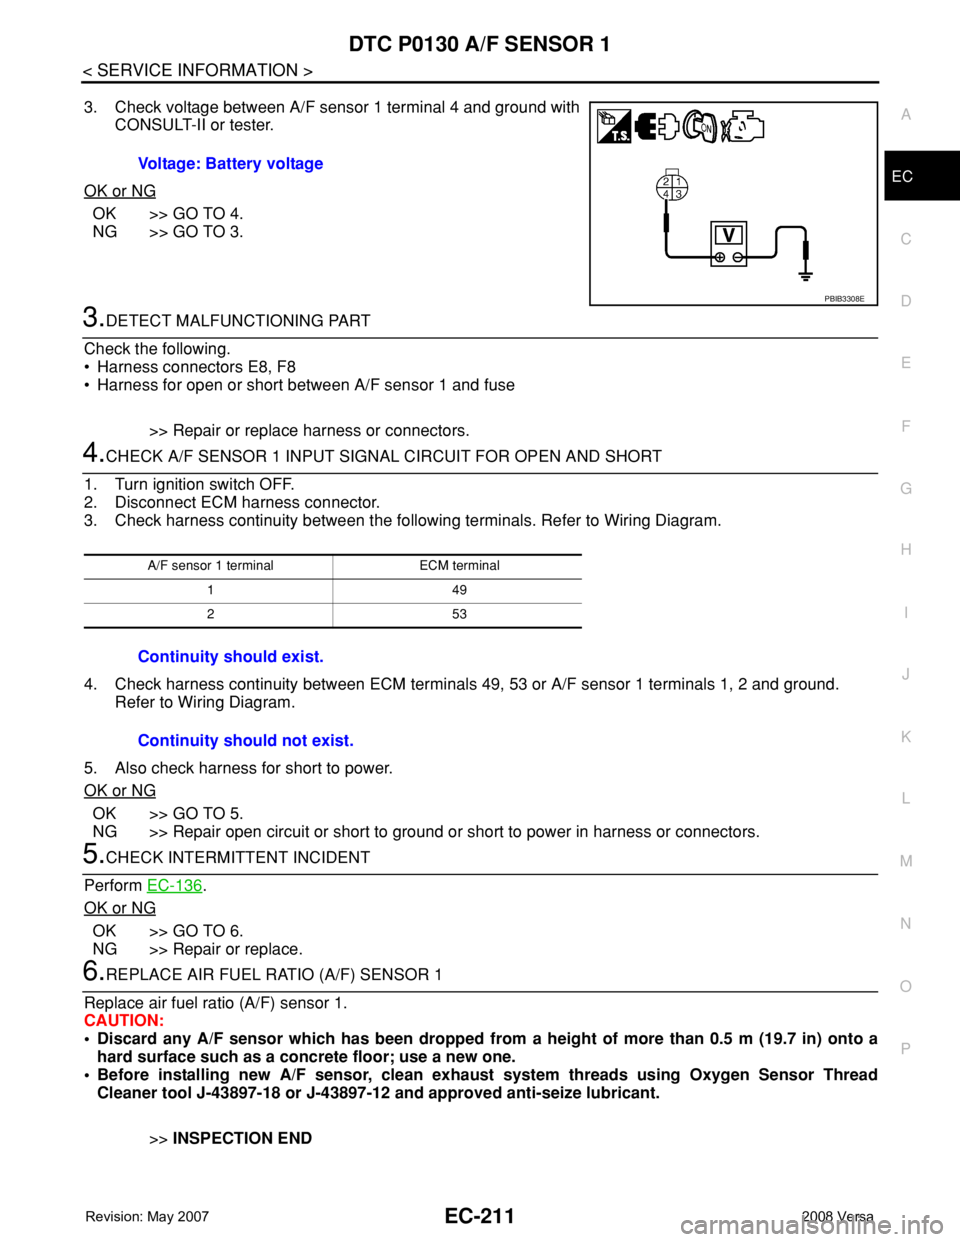
• Determine the wear limit of clutch facing (depth to the rivet head).
If measurement exceeds specifications, replace clutch disc.
Clutch Cover
• Check clutch cover installed on vehicle for unevenness of dia-
phragm spring toe height. If unevenness exceeds specifications,
adjust the height using Tool (A).
• Check clutch cover thrust ring for wear or breakage. If wear or
breakage is found, replace clutch cover assembly.
NOTE:
• Worn thrust ring will generate a beating noise when tapped at the rivet using suitable tool.
• Broken thrust ring will make a clinking sound when cover is shaken up and down.
• If a trace of burn or discoloration is found on clutch cover pressure plate to clutch disc contact surface, repair
the surface with sandpaper. If surface is damaged or distorted, replace the assembly.
Flywheel Runout
• Check contact surface of flywheel for slight burns or discoloration.
Repair flywheel with emery paper.
• Check the flywheel runout. Refer to EM-93, "
Inspection After Dis-
assembly".
CAUTION:
Measure flywheel outer face (not on knock pin and clutch cover
mounting hole).
INSTALLATION
1. Clean clutch disc and input shaft splines to remove grease and dust caused by abrasion.
2. Apply recommended grease to clutch disc and input shaft splines.
CAUTION:
Be sure to apply grease to the points specified. Otherwise, noise, poor disengagement, or damage
to the clutch may result. Excessive grease may cause slip or shudder. If it adheres to CSC seal, it
will cause clutch fluid leakage. Wipe off excess grease.
3. Install clutch disc using tool.
4. Install clutch cover. Pre-tighten clutch cover bolts.Clutch facing wear : Refer to CL-16, "
Clutch Disc".
SCL229
Uneven limit of diaphragm
spring toe height: Refer to CL-16, "Clutch
Cover".
Tool number A : ST20050240 ( — )
PCIB1502E
PBIC2646E
Tool number : KV30101000 ( — )
Page 817 of 2771

CL-16
< SERVICE INFORMATION >
SERVICE DATA AND SPECIFICATIONS (SDS)
SERVICE DATA AND SPECIFICATIONS (SDS)
Clutch Control SystemINFOID:0000000001703124
Clutch PedalINFOID:0000000001703125
Clutch DiscINFOID:0000000001703126
Clutch CoverINFOID:0000000001703127
Type of clutch controlHydraulic
Clearance ″A″ between clutch pedal and ASCD switch threaded
end while clutch pedal is fully released (if equipped). 0.74 - 1.96 mm (0.0291 - 0.0772 in)
Clearance ″C″ between clutch pedal and clutch interlock switch
threaded end while clutch pedal is fully depressed.0.74 - 1.96 mm (0.0291 - 0.0772 in)
Model225
Facing size (outer dia. × inner dia. × thickness) 225 mm × 160 mm × 3.2 mm (8.86 in × 6.30 in × 0.126 in)
Thickness of disc assembly with load 7.2 - 7.6 mm (0.283 - 0.299 in) with 5,394 N (550 kg, 1,213 lb)
Runout limit/diameter of the area to be measured 1.0 mm (0.039 in) / 215 mm (8.46 in) dia.
Maximum spline backlash (at outer edge of disc) 1.0 mm (0.039 in)
Wear limit of facing (depth to the rivet head) 0.3 mm (0.012 in)
Set-load5,394 N (550 kg, 1,213 lb)
Diaphragm spring lever height 20 - 22 mm (0.79 - 0.87 in)
Uneven limit of diaphragm spring toe height 0.7 mm (0.028 in) or less
Page 1229 of 2771
DTC P0031, P0032 A/F SENSOR 1 HEATER
EC-155
< SERVICE INFORMATION >
C
D
E
F
G
H
I
J
K
L
MA
EC
N
P O
1. Check resistance between A/F sensor 1 terminals as follows.
2. If NG, replace air fuel ratio (A/F) sensor 1.
CAUTION:
• Discard any A/F sensor which has been dropped from a
height of more than 0.5 m (19.7 in) onto a hard surface such
as a concrete floor; use a new one.
• Before installing new A/F sensor, clean exhaust system
threads using Heated Oxygen Sensor Thread Cleaner tool J-
43897-18 or J-43897-12 and approved anti-seize lubricant.
Removal and InstallationINFOID:0000000001702631
AIR FUEL RATIO SENSOR HEATER
Refer to EM-21.
Terminal No. Resistance
3 and 4 1.8 - 2.44 Ω [at 25°C (77°F)]
3 and 1, 2
∞ Ω
(Continuity should not exist)
4 and 1, 2
PBIB3309E
Page 1235 of 2771
DTC P0037, P0038 HO2S2 HEATER
EC-161
< SERVICE INFORMATION >
C
D
E
F
G
H
I
J
K
L
MA
EC
N
P O
1. Check resistance between HO2S2 terminals as follows.
2. If NG, replace heated oxygen sensor 2.
CAUTION:
• Discard any heated oxygen sensor which has been dropped
from a height of more than 0.5 m (19.7 in) onto a hard surface
such as a concrete floor; use a new one.
• Before installing new oxygen sensor, clean exhaust system
threads using Oxygen Sensor Thread Cleaner tool J-43897-18
or J-43897-12 and approved anti-seize lubricant.
Removal and InstallationINFOID:0000000001702639
HEATED OXYGEN SENSOR 2
Refer to EM-21.
Terminal No. Resistance
2 and 3 3.4 - 4.4 Ω [at 25°C (77°F)]
1 and 2, 3, 4
∞ Ω
(Continuity should not exist)
4 and 1, 2, 3
PBIB3310E
Page 1285 of 2771

DTC P0130 A/F SENSOR 1
EC-211
< SERVICE INFORMATION >
C
D
E
F
G
H
I
J
K
L
MA
EC
N
P O
3. Check voltage between A/F sensor 1 terminal 4 and ground with
CONSULT-II or tester.
OK or NG
OK >> GO TO 4.
NG >> GO TO 3.
3.DETECT MALFUNCTIONING PART
Check the following.
• Harness connectors E8, F8
• Harness for open or short between A/F sensor 1 and fuse
>> Repair or replace harness or connectors.
4.CHECK A/F SENSOR 1 INPUT SIGNAL CIRCUIT FOR OPEN AND SHORT
1. Turn ignition switch OFF.
2. Disconnect ECM harness connector.
3. Check harness continuity between the following terminals. Refer to Wiring Diagram.
4. Check harness continuity between ECM terminals 49, 53 or A/F sensor 1 terminals 1, 2 and ground.
Refer to Wiring Diagram.
5. Also check harness for short to power.
OK or NG
OK >> GO TO 5.
NG >> Repair open circuit or short to ground or short to power in harness or connectors.
5.CHECK INTERMITTENT INCIDENT
Perform EC-136
.
OK or NG
OK >> GO TO 6.
NG >> Repair or replace.
6.REPLACE AIR FUEL RATIO (A/F) SENSOR 1
Replace air fuel ratio (A/F) sensor 1.
CAUTION:
• Discard any A/F sensor which has been dropped from a height of more than 0.5 m (19.7 in) onto a
hard surface such as a concrete floor; use a new one.
• Before installing new A/F sensor, clean exhaust system threads using Oxygen Sensor Thread
Cleaner tool J-43897-18 or J-43897-12 and approved anti-seize lubricant.
>>INSPECTION END Voltage: Battery voltage
PBIB3308E
A/F sensor 1 terminal ECM terminal
149
253
Continuity should exist.
Continuity should not exist.