2008 NISSAN LATIO dimensions
[x] Cancel search: dimensionsPage 1705 of 2771
EM-28
< SERVICE INFORMATION >
OIL PAN
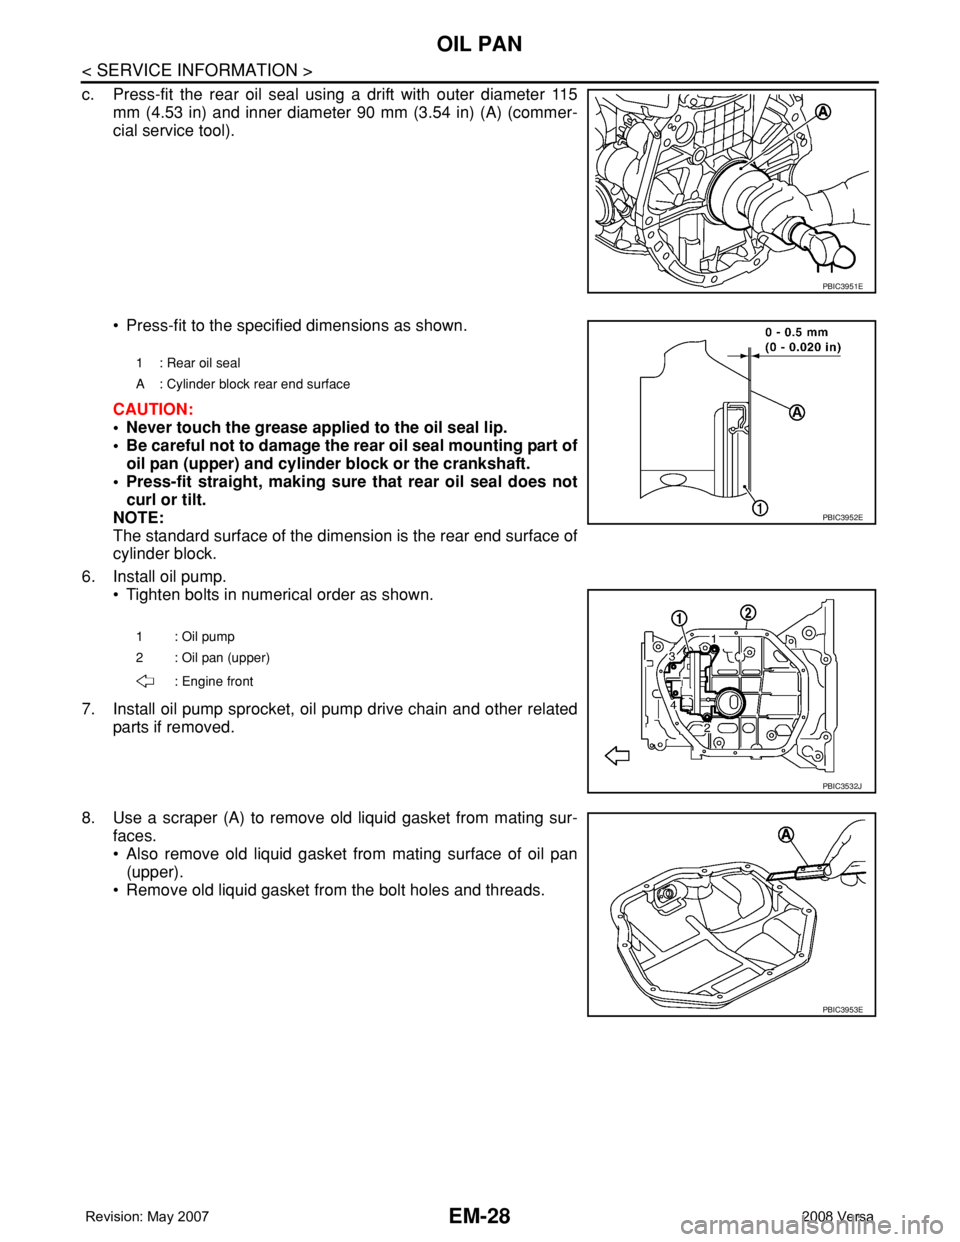
c. Press-fit the rear oil seal using a drift with outer diameter 115
mm (4.53 in) and inner diameter 90 mm (3.54 in) (A) (commer-
cial service tool).
• Press-fit to the specified dimensions as shown.
CAUTION:
• Never touch the grease applied to the oil seal lip.
• Be careful not to damage the rear oil seal mounting part of
oil pan (upper) and cylinder block or the crankshaft.
• Press-fit straight, making sure that rear oil seal does not
curl or tilt.
NOTE:
The standard surface of the dimension is the rear end surface of
cylinder block.
6. Install oil pump.
• Tighten bolts in numerical order as shown.
7. Install oil pump sprocket, oil pump drive chain and other related
parts if removed.
8. Use a scraper (A) to remove old liquid gasket from mating sur-
faces.
• Also remove old liquid gasket from mating surface of oil pan
(upper).
• Remove old liquid gasket from the bolt holes and threads.
PBIC3951E
1 : Rear oil seal
A : Cylinder block rear end surface
1 : Oil pump
2 : Oil pan (upper)
: Engine front
PBIC3952E
PBIC3532J
PBIC3953E
Page 1744 of 2771
CYLINDER HEAD
EM-67
< SERVICE INFORMATION >
C
D
E
F
G
H
I
J
K
L
MA
EM
N
P O
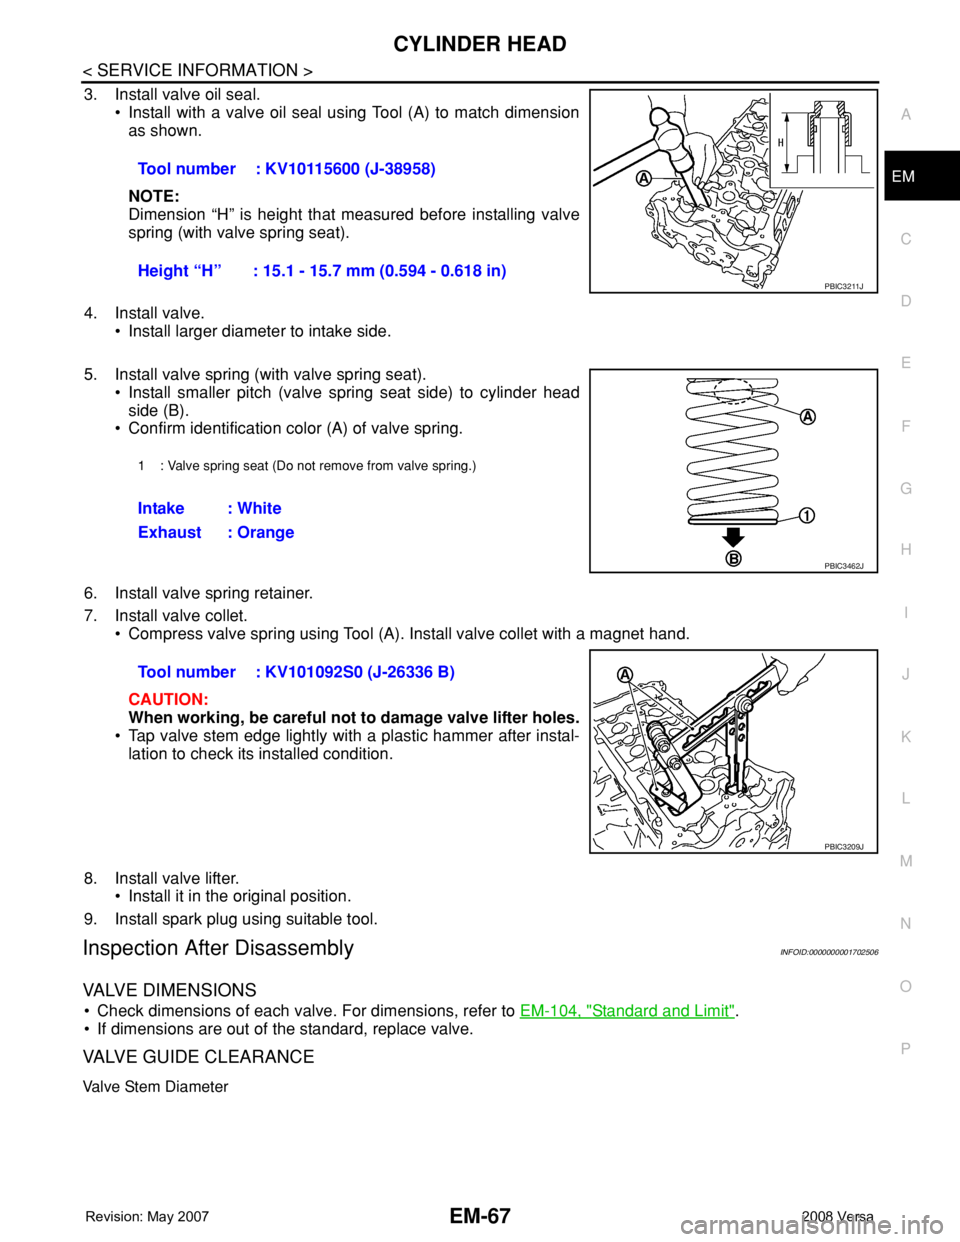
3. Install valve oil seal.
• Install with a valve oil seal using Tool (A) to match dimension
as shown.
NOTE:
Dimension “H” is height that measured before installing valve
spring (with valve spring seat).
4. Install valve.
• Install larger diameter to intake side.
5. Install valve spring (with valve spring seat).
• Install smaller pitch (valve spring seat side) to cylinder head
side (B).
• Confirm identification color (A) of valve spring.
6. Install valve spring retainer.
7. Install valve collet.
• Compress valve spring using Tool (A). Install valve collet with a magnet hand.
CAUTION:
When working, be careful not to damage valve lifter holes.
• Tap valve stem edge lightly with a plastic hammer after instal-
lation to check its installed condition.
8. Install valve lifter.
• Install it in the original position.
9. Install spark plug using suitable tool.
Inspection After DisassemblyINFOID:0000000001702506
VALVE DIMENSIONS
• Check dimensions of each valve. For dimensions, refer to EM-104, "Standard and Limit".
• If dimensions are out of the standard, replace valve.
VALVE GUIDE CLEARANCE
Valve Stem Diameter
Tool number : KV10115600 (J-38958)
Height “H” : 15.1 - 15.7 mm (0.594 - 0.618 in)
PBIC3211J
1 : Valve spring seat (Do not remove from valve spring.)
Intake : White
Exhaust : Orange
PBIC3462J
Tool number : KV101092S0 (J-26336 B)
PBIC3209J
Page 1746 of 2771
CYLINDER HEAD
EM-69
< SERVICE INFORMATION >
C
D
E
F
G
H
I
J
K
L
MA
EM
N
P O
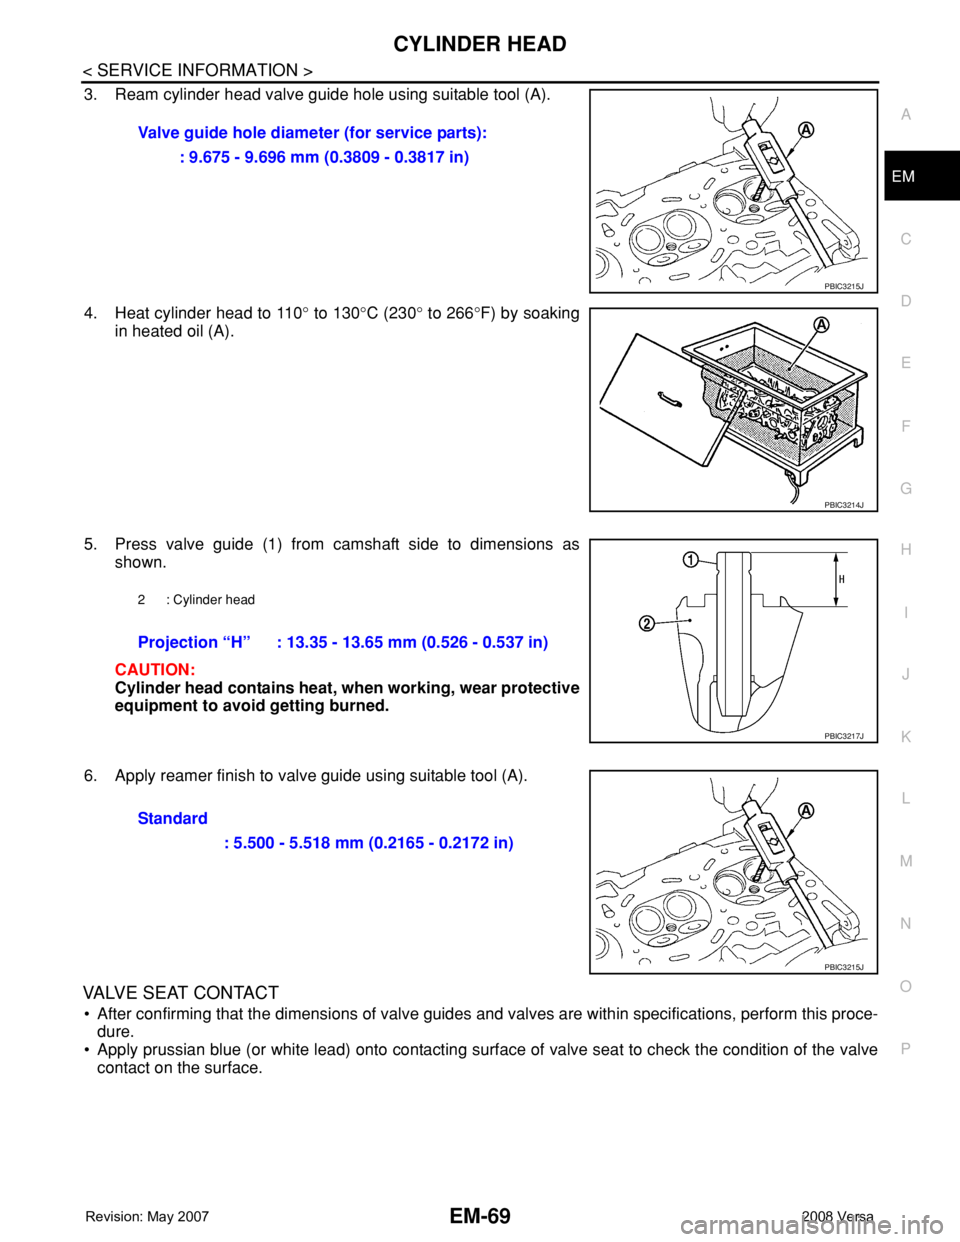
3. Ream cylinder head valve guide hole using suitable tool (A).
4. Heat cylinder head to 110° to 130°C (230° to 266°F) by soaking
in heated oil (A).
5. Press valve guide (1) from camshaft side to dimensions as
shown.
CAUTION:
Cylinder head contains heat, when working, wear protective
equipment to avoid getting burned.
6. Apply reamer finish to valve guide using suitable tool (A).
VALVE SEAT CONTACT
• After confirming that the dimensions of valve guides and valves are within specifications, perform this proce-
dure.
• Apply prussian blue (or white lead) onto contacting surface of valve seat to check the condition of the valve
contact on the surface.Valve guide hole diameter (for service parts):
: 9.675 - 9.696 mm (0.3809 - 0.3817 in)
PBIC3215J
PBIC3214J
2 : Cylinder head
Projection “H” : 13.35 - 13.65 mm (0.526 - 0.537 in)
PBIC3217J
Standard
: 5.500 - 5.518 mm (0.2165 - 0.2172 in)
PBIC3215J
Page 1747 of 2771
EM-70
< SERVICE INFORMATION >
CYLINDER HEAD
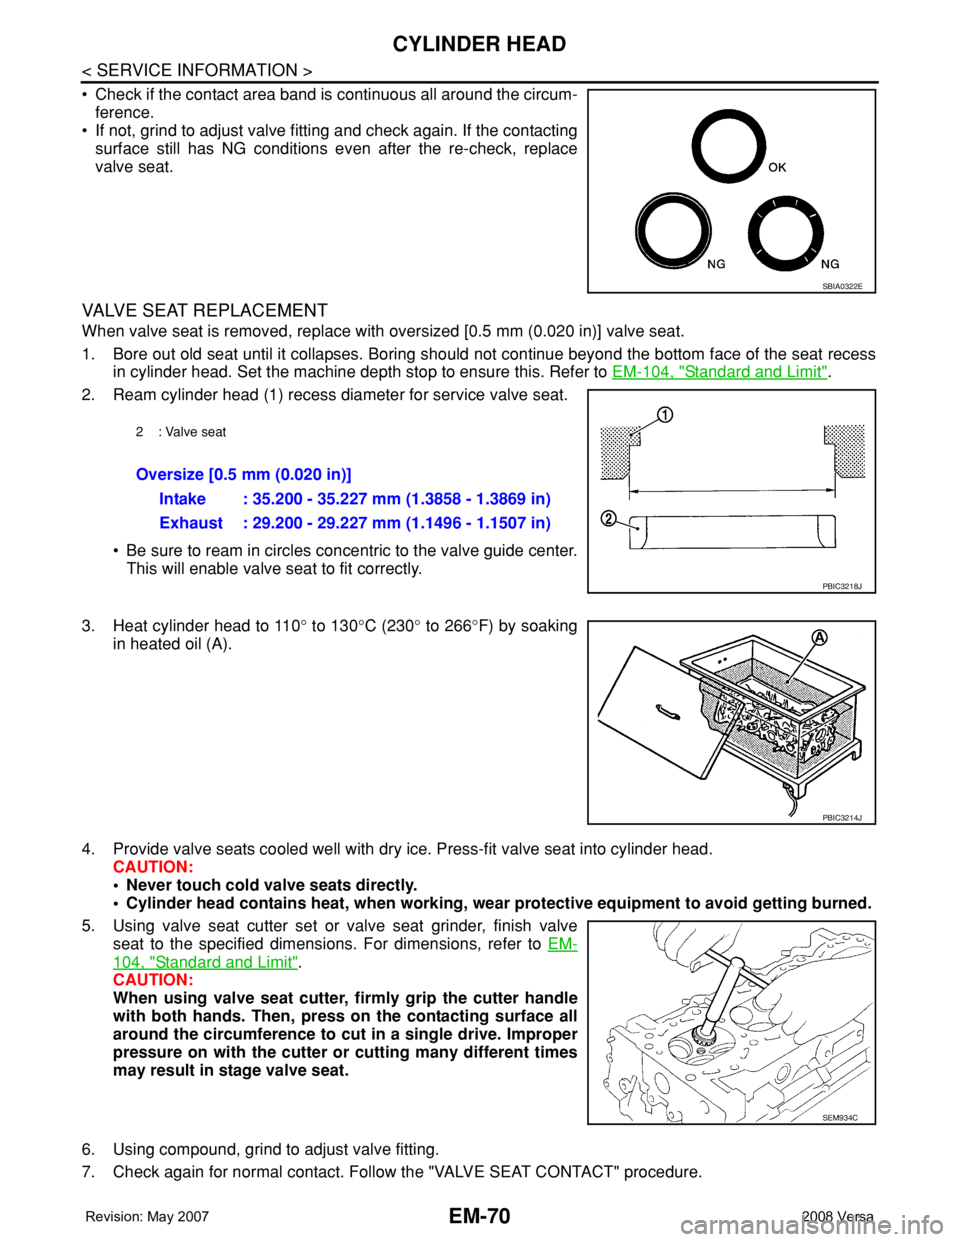
• Check if the contact area band is continuous all around the circum-
ference.
• If not, grind to adjust valve fitting and check again. If the contacting
surface still has NG conditions even after the re-check, replace
valve seat.
VALVE SEAT REPLACEMENT
When valve seat is removed, replace with oversized [0.5 mm (0.020 in)] valve seat.
1. Bore out old seat until it collapses. Boring should not continue beyond the bottom face of the seat recess
in cylinder head. Set the machine depth stop to ensure this. Refer to EM-104, "
Standard and Limit".
2. Ream cylinder head (1) recess diameter for service valve seat.
• Be sure to ream in circles concentric to the valve guide center.
This will enable valve seat to fit correctly.
3. Heat cylinder head to 110° to 130°C (230° to 266°F) by soaking
in heated oil (A).
4. Provide valve seats cooled well with dry ice. Press-fit valve seat into cylinder head.
CAUTION:
• Never touch cold valve seats directly.
• Cylinder head contains heat, when working, wear protective equipment to avoid getting burned.
5. Using valve seat cutter set or valve seat grinder, finish valve
seat to the specified dimensions. For dimensions, refer to EM-
104, "Standard and Limit".
CAUTION:
When using valve seat cutter, firmly grip the cutter handle
with both hands. Then, press on the contacting surface all
around the circumference to cut in a single drive. Improper
pressure on with the cutter or cutting many different times
may result in stage valve seat.
6. Using compound, grind to adjust valve fitting.
7. Check again for normal contact. Follow the "VALVE SEAT CONTACT" procedure.
SBIA0322E
2: Valve seat
Oversize [0.5 mm (0.020 in)]
Intake : 35.200 - 35.227 mm (1.3858 - 1.3869 in)
Exhaust : 29.200 - 29.227 mm (1.1496 - 1.1507 in)
PBIC3218J
PBIC3214J
SEM934C
Page 1748 of 2771
CYLINDER HEAD
EM-71
< SERVICE INFORMATION >
C
D
E
F
G
H
I
J
K
L
MA
EM
N
P O
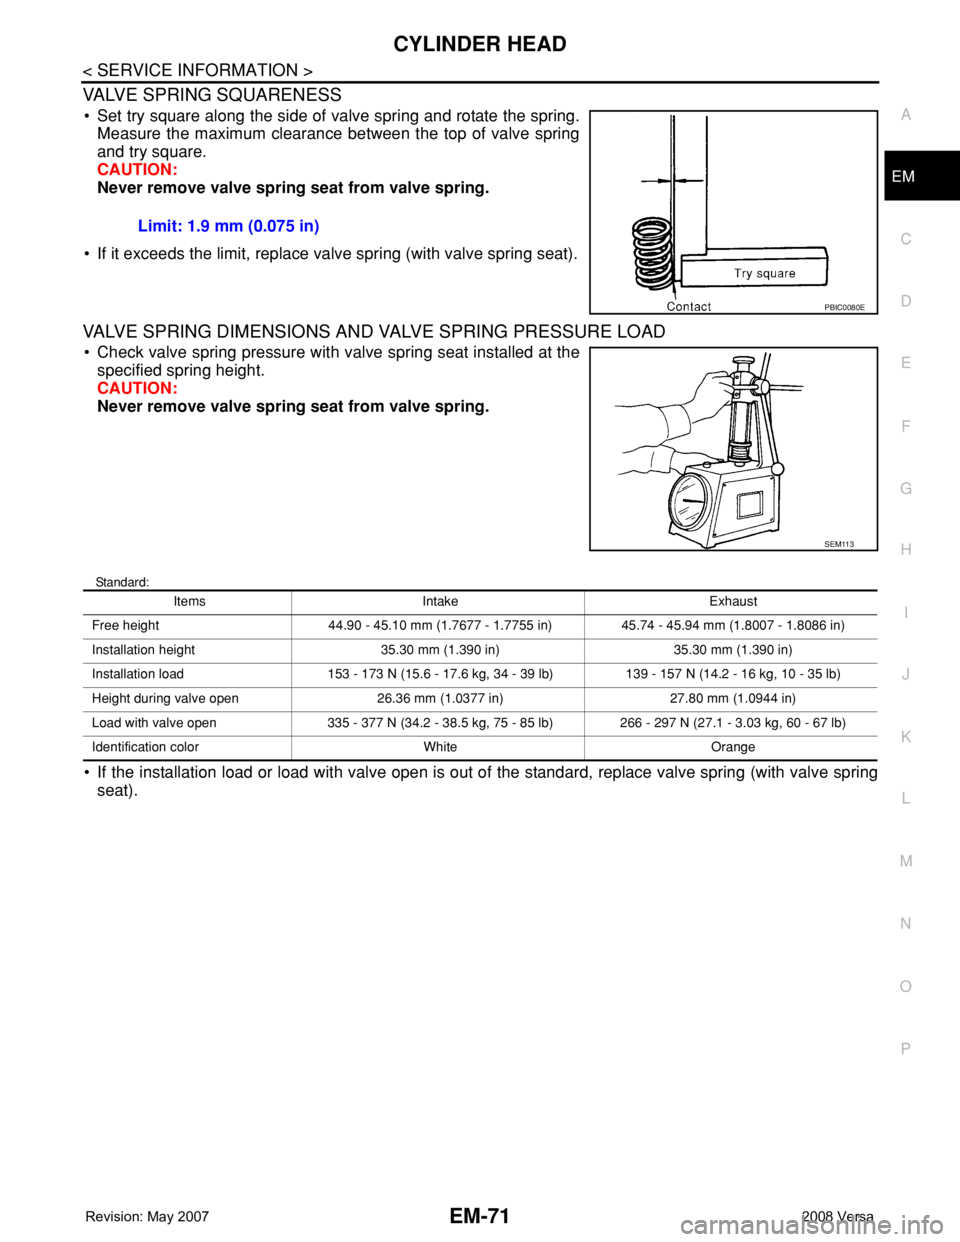
VALVE SPRING SQUARENESS
• Set try square along the side of valve spring and rotate the spring.
Measure the maximum clearance between the top of valve spring
and try square.
CAUTION:
Never remove valve spring seat from valve spring.
• If it exceeds the limit, replace valve spring (with valve spring seat).
VALVE SPRING DIMENSIONS AND VALVE SPRING PRESSURE LOAD
• Check valve spring pressure with valve spring seat installed at the
specified spring height.
CAUTION:
Never remove valve spring seat from valve spring.
Standard:
• If the installation load or load with valve open is out of the standard, replace valve spring (with valve spring
seat).Limit: 1.9 mm (0.075 in)
PBIC0080E
SEM113
Items Intake Exhaust
Free height 44.90 - 45.10 mm (1.7677 - 1.7755 in) 45.74 - 45.94 mm (1.8007 - 1.8086 in)
Installation height 35.30 mm (1.390 in) 35.30 mm (1.390 in)
Installation load 153 - 173 N (15.6 - 17.6 kg, 34 - 39 lb) 139 - 157 N (14.2 - 16 kg, 10 - 35 lb)
Height during valve open 26.36 mm (1.0377 in) 27.80 mm (1.0944 in)
Load with valve open 335 - 377 N (34.2 - 38.5 kg, 75 - 85 lb) 266 - 297 N (27.1 - 3.03 kg, 60 - 67 lb)
Identification color White Orange
Page 1764 of 2771
CYLINDER BLOCK
EM-87
< SERVICE INFORMATION >
C
D
E
F
G
H
I
J
K
L
MA
EM
N
P O
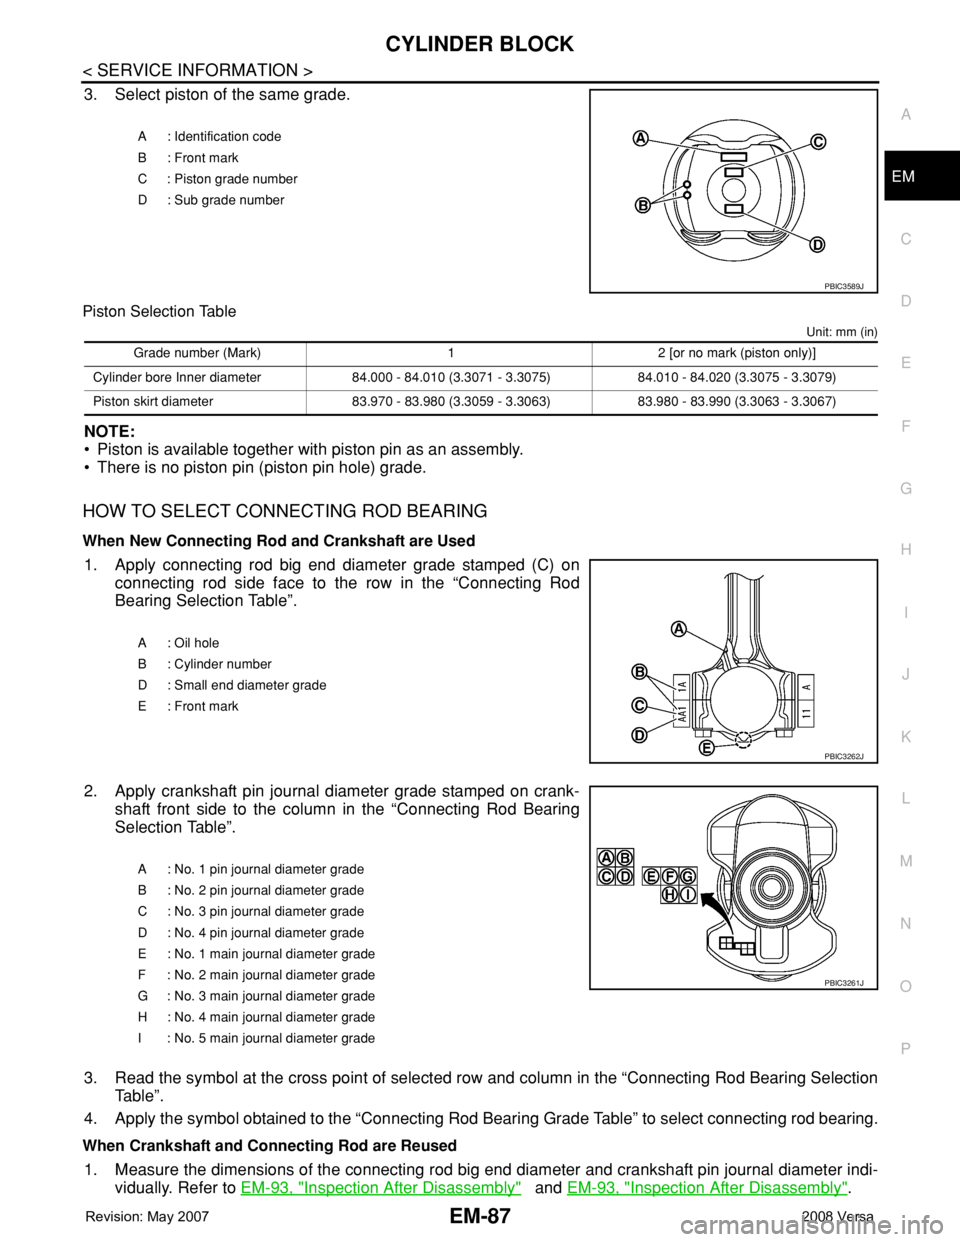
3. Select piston of the same grade.
Piston Selection Table
Unit: mm (in)
NOTE:
• Piston is available together with piston pin as an assembly.
• There is no piston pin (piston pin hole) grade.
HOW TO SELECT CONNECTING ROD BEARING
When New Connecting Rod and Crankshaft are Used
1. Apply connecting rod big end diameter grade stamped (C) on
connecting rod side face to the row in the “Connecting Rod
Bearing Selection Table”.
2. Apply crankshaft pin journal diameter grade stamped on crank-
shaft front side to the column in the “Connecting Rod Bearing
Selection Table”.
3. Read the symbol at the cross point of selected row and column in the “Connecting Rod Bearing Selection
Table”.
4. Apply the symbol obtained to the “Connecting Rod Bearing Grade Table” to select connecting rod bearing.
When Crankshaft and Connecting Rod are Reused
1. Measure the dimensions of the connecting rod big end diameter and crankshaft pin journal diameter indi-
vidually. Refer to EM-93, "
Inspection After Disassembly" and EM-93, "Inspection After Disassembly".
A : Identification code
B : Front mark
C : Piston grade number
D : Sub grade number
PBIC3589J
Grade number (Mark) 1 2 [or no mark (piston only)]
Cylinder bore Inner diameter 84.000 - 84.010 (3.3071 - 3.3075) 84.010 - 84.020 (3.3075 - 3.3079)
Piston skirt diameter 83.970 - 83.980 (3.3059 - 3.3063) 83.980 - 83.990 (3.3063 - 3.3067)
A : Oil hole
B : Cylinder number
D : Small end diameter grade
E : Front mark
PBIC3262J
A : No. 1 pin journal diameter grade
B : No. 2 pin journal diameter grade
C : No. 3 pin journal diameter grade
D : No. 4 pin journal diameter grade
E : No. 1 main journal diameter grade
F : No. 2 main journal diameter grade
G : No. 3 main journal diameter grade
H : No. 4 main journal diameter grade
I : No. 5 main journal diameter grade
PBIC3261J
Page 1767 of 2771
EM-90
< SERVICE INFORMATION >
CYLINDER BLOCK
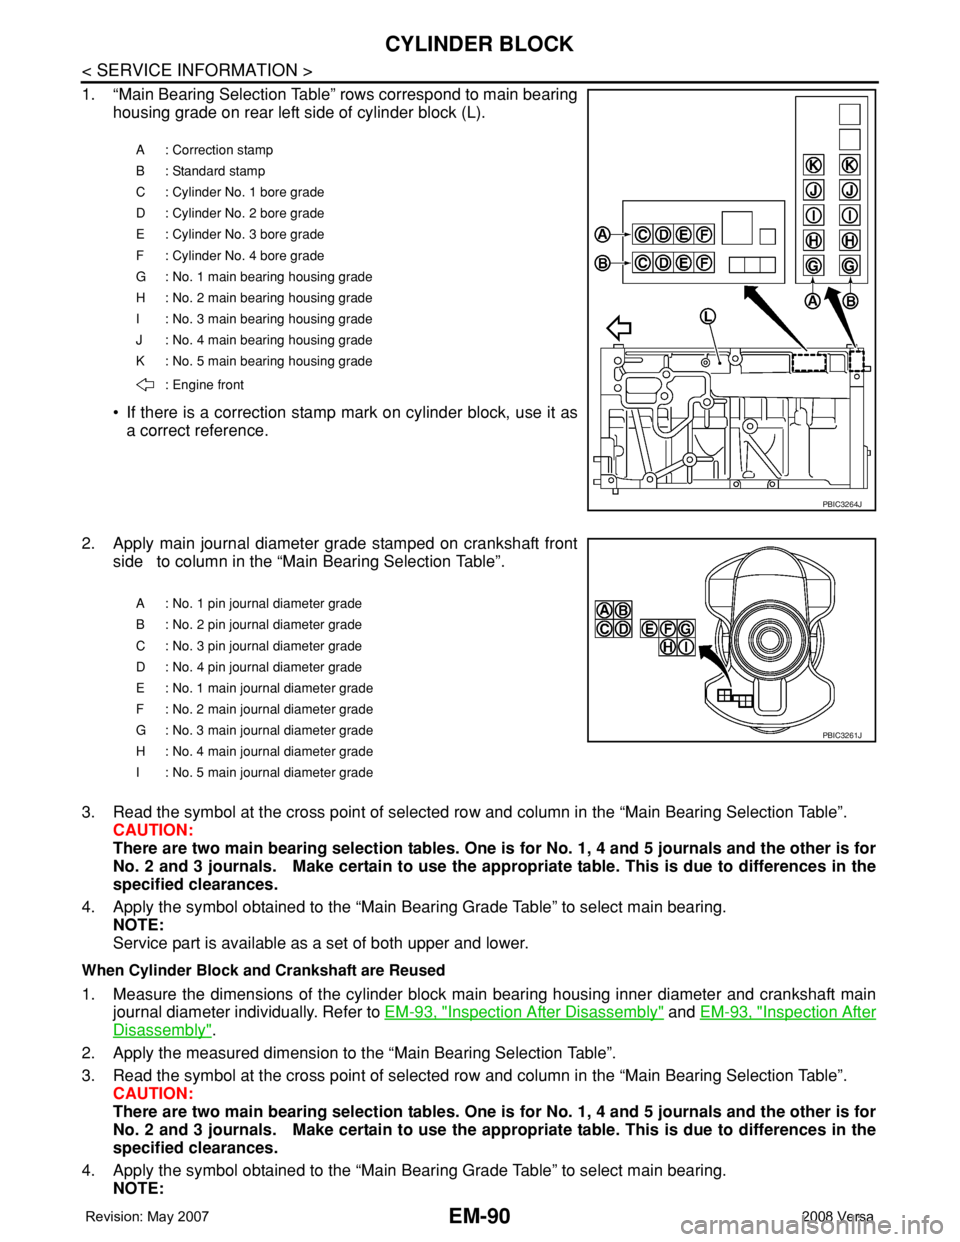
1. “Main Bearing Selection Table” rows correspond to main bearing
housing grade on rear left side of cylinder block (L).
• If there is a correction stamp mark on cylinder block, use it as
a correct reference.
2. Apply main journal diameter grade stamped on crankshaft front
side to column in the “Main Bearing Selection Table”.
3. Read the symbol at the cross point of selected row and column in the “Main Bearing Selection Table”.
CAUTION:
There are two main bearing selection tables. One is for No. 1, 4 and 5 journals and the other is for
No. 2 and 3 journals. Make certain to use the appropriate table. This is due to differences in the
specified clearances.
4. Apply the symbol obtained to the “Main Bearing Grade Table” to select main bearing.
NOTE:
Service part is available as a set of both upper and lower.
When Cylinder Block and Crankshaft are Reused
1. Measure the dimensions of the cylinder block main bearing housing inner diameter and crankshaft main
journal diameter individually. Refer to EM-93, "
Inspection After Disassembly" and EM-93, "Inspection After
Disassembly".
2. Apply the measured dimension to the “Main Bearing Selection Table”.
3. Read the symbol at the cross point of selected row and column in the “Main Bearing Selection Table”.
CAUTION:
There are two main bearing selection tables. One is for No. 1, 4 and 5 journals and the other is for
No. 2 and 3 journals. Make certain to use the appropriate table. This is due to differences in the
specified clearances.
4. Apply the symbol obtained to the “Main Bearing Grade Table” to select main bearing.
NOTE:
A : Correction stamp
B : Standard stamp
C : Cylinder No. 1 bore grade
D : Cylinder No. 2 bore grade
E : Cylinder No. 3 bore grade
F : Cylinder No. 4 bore grade
G : No. 1 main bearing housing grade
H : No. 2 main bearing housing grade
I : No. 3 main bearing housing grade
J : No. 4 main bearing housing grade
K : No. 5 main bearing housing grade
: Engine front
PBIC3264J
A : No. 1 pin journal diameter grade
B : No. 2 pin journal diameter grade
C : No. 3 pin journal diameter grade
D : No. 4 pin journal diameter grade
E : No. 1 main journal diameter grade
F : No. 2 main journal diameter grade
G : No. 3 main journal diameter grade
H : No. 4 main journal diameter grade
I : No. 5 main journal diameter grade
PBIC3261J
Page 1776 of 2771
CYLINDER BLOCK
EM-99
< SERVICE INFORMATION >
C
D
E
F
G
H
I
J
K
L
MA
EM
N
P O
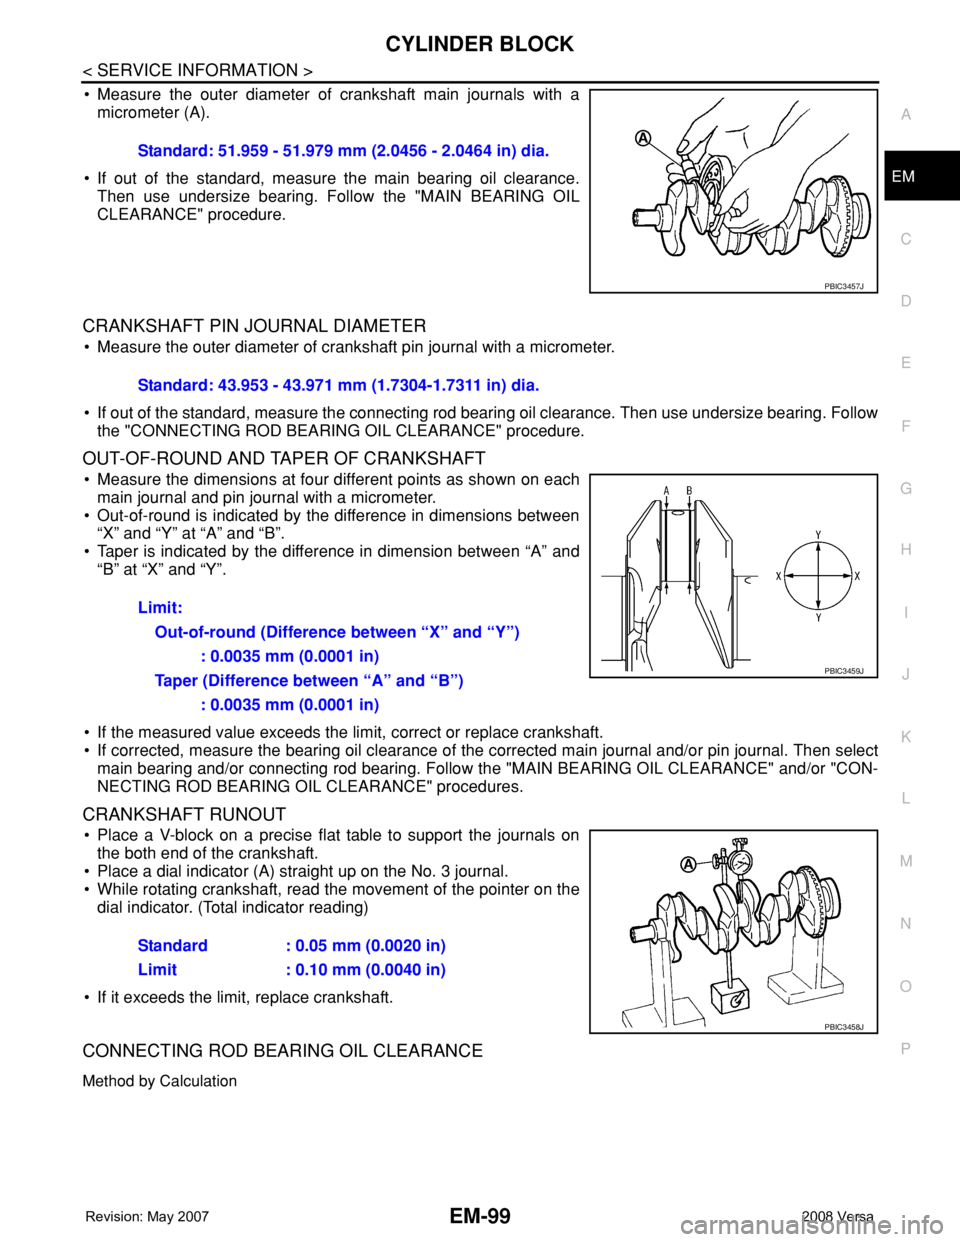
• Measure the outer diameter of crankshaft main journals with a
micrometer (A).
• If out of the standard, measure the main bearing oil clearance.
Then use undersize bearing. Follow the "MAIN BEARING OIL
CLEARANCE" procedure.
CRANKSHAFT PIN JOURNAL DIAMETER
• Measure the outer diameter of crankshaft pin journal with a micrometer.
• If out of the standard, measure the connecting rod bearing oil clearance. Then use undersize bearing. Follow
the "CONNECTING ROD BEARING OIL CLEARANCE" procedure.
OUT-OF-ROUND AND TAPER OF CRANKSHAFT
• Measure the dimensions at four different points as shown on each
main journal and pin journal with a micrometer.
• Out-of-round is indicated by the difference in dimensions between
“X” and “Y” at “A” and “B”.
• Taper is indicated by the difference in dimension between “A” and
“B” at “X” and “Y”.
• If the measured value exceeds the limit, correct or replace crankshaft.
• If corrected, measure the bearing oil clearance of the corrected main journal and/or pin journal. Then select
main bearing and/or connecting rod bearing. Follow the "MAIN BEARING OIL CLEARANCE" and/or "CON-
NECTING ROD BEARING OIL CLEARANCE" procedures.
CRANKSHAFT RUNOUT
• Place a V-block on a precise flat table to support the journals on
the both end of the crankshaft.
• Place a dial indicator (A) straight up on the No. 3 journal.
• While rotating crankshaft, read the movement of the pointer on the
dial indicator. (Total indicator reading)
• If it exceeds the limit, replace crankshaft.
CONNECTING ROD BEARING OIL CLEARANCE
Method by Calculation
Standard: 51.959 - 51.979 mm (2.0456 - 2.0464 in) dia.
PBIC3457J
Standard: 43.953 - 43.971 mm (1.7304-1.7311 in) dia.
Limit:
Out-of-round (Difference between “X” and “Y”)
: 0.0035 mm (0.0001 in)
Taper (Difference between “A” and “B”)
: 0.0035 mm (0.0001 in)
PBIC3459J
Standard : 0.05 mm (0.0020 in)
Limit : 0.10 mm (0.0040 in)
PBIC3458J