2008 MINI COOPER CONVERTIBLE wheel
[x] Cancel search: wheelPage 118 of 176

116
NEW WHEELS AND TIRESThe correct wheels and tires
The manufacturer of your MINI rec-
ommends mounting only wheels and
tires that it has specifically approved for
use on your particular model. Although
other wheels and tires may theoretically
have the same dimensions, variations in
factors such as manufacturing tolerances
can result in contact between tire and
bodywork, ultimately leading to serious
accidents. The manufacturer of your MINI
cannot evaluate non-approved wheels and
tires to determine if they are suited for use,
and therefore cannot ensure the operating
safety of the vehicle if they are mounted.<
Your MINI Dealer will be glad to inform you
about the correct wheel and tire combina-
tion for your vehicle.
The correct wheel and tire combination is
also important for various systems that
would otherwise be impaired, e.g. ABS or
DSC.
To maintain good handling and vehicle
response, use only tires of a single brand
and tread configuration. In the event of tire
damage, remount the previous wheel and
tire combination as soon as possible.
Wheels with Tire Pressure Monitor
TPM electronicsWhen mounting new tires or changing over
from summer to winter tires, or vice versa,
only use wheels with TPM electronics; oth-
erwise the Tire Pressure Monitor may not
be able to detect a puncture, refer to
page76. Your MINI Dealer will be glad to
advise you.Run-Flat TiresFor your own safety, use Run-Flat Tires
when mounting new tires or replacing
summer tires with winter tires or vice
versa. Keep in mind that no spare wheel is
available in the event of a flat. Your MINI
Dealer will be glad to advise you.
For safety reasons, the manufacturer
of your MINI recommends having
Run-Flat Tires replaced, not repaired, if they
are damaged.<
Tire designationFor each tire size, the manufacturer of your
MINI recommends certain tire brands. You
can recognize these by the clearly visible
designation on the tire's sidewall.
When used properly these tires meet the
highest standards regarding safety and
handling characteristics.
Page 119 of 176

117
OVERVIEW REPAIRSOPERATIONCONTROLS DATA INDEX
NEW WHEELS AND TIRES SNOW CHAINS
*
Special characteristics of winter tires
The manufacturer of your MINI recom-
mends winter tires for driving in adverse
winter road conditions. While all-season
tires with the M+S designation provide bet-
ter winter traction than summer tires, they
generally do not achieve the full perfor-
mance of winter tires.
Observe speed ratings:
Never exceed the maximum speed
for which the winter tires are rated.
tect the tires against contact with oil,
grease and fuel. Do not exceed the tire
inflation pressure specified on the tire side-
wall.
Only certain types of snow chains have
been tested by the manufacturer of your
MINI, classified as road-safe and recom-
mended. Contact your MINI Dealer for
more details. Their use is only permitted in
pairs on the front wheels on winter tires of
the following types:
>175/65 R 15 M+S
>175/60 R 16 M+S.
When fitting, comply with the manufac-
turer's instructions. With chains, do not
exceed a speed of 30 mph / 50 km/h.
Do not initialize the Flat Tire Monitor
after attaching snow chains to the
tires.
When driving with snow chains, it can be
helpful to switch off the ASC or DSC for a
brief period, refer to page72.<
Page 129 of 176

127
OVERVIEW REPAIRSOPERATIONCONTROLS DATA INDEX
CARING FOR YOUR VEHICLEdamage caused by undesired wiper activa-
tion.
entering a car wash or a garage with
elevator ramp, remove the rod antenna.
To do so, grip the rod antenna at the base
and unscrew it from the antenna foot by
turning it to the left.<
Headlamps
When cleaning the headlamps,
please note: do not rub the head-
lamps dry and do not use any abrasive or
caustic cleaning products. Remove dirt and
contamination, such as insects, by soaking
with shampoo and then rinsing with plenty
of water. Always use a deicer spray to
remove accumulated ice and snow; never
use a scraper.<
Vehicle paintwork Regular care contributes greatly to driving
safety and value retention.
Environmental influences varying from one
region to the next can affect the vehicle
paintwork. Please base the frequency and
scope of car care on these various influ-
ences.Care of upholsteryDepressions that come about on the uphol-
stery material of the seats in daily use can
be brushed out using a slightly damp brush
against the grain.
The fact that velour lays down is not a qual-
ity defect, but rather is inevitable in the
case of home textiles or clothing materials.
In the case of strong sunlight and longer
parking periods, cover the seats or all win-
dows to prevent discoloration.
Care of special parts>Light-alloy wheels
*:
Use wheel cleaner especially during the
winter months, but do not use any
aggressive, acidic, strong alkali or rough
cleansers or steam jets above 1407/
606. Observe the manufacturer's
instructions
>Chrome parts
* such as the bonnet grille,
door handles, and similar parts:
Particularly if they were exposed to road
salt, clean these parts carefully with
plenty of water and shampoo additive, if
necessary. For additional treatment, use
chrome polish
>Rubber components:
Treat only with water or rubber care
products.
Do not use silicon sprays or other
silicon-containing care products,
otherwise noise and damage could
occur.<
>Plastic parts, artificial leather surfaces,
headliner, lamp lenses, cover glass over
display elements as well as matt-black
die-cast parts:
Clean these parts with water and plastic
care products, if necessary. Do not
dampen seats and the headliner.
Never use solvents such as lacquer thin-
Page 139 of 176

137
OVERVIEW REPAIRSOPERATION CONTROLS DATA INDEX
REPAIRING A FLAT TIRE SPACE-SAVER SPARE TIRE
*
Safety measures in the event of a
flat:
Park the vehicle as far away from flowing
traffic as possible, and switch on the haz-
ard warning flashers.
Turn the steering wheel to the straight-
ahead wheel position and engage the
steering lock. Engage the parking brake and
shift into 1st or reverse gear – selector lever
in P.
All passengers should be outside the vehi-
cle and well away from your immediate
working area – behind a guardrail, for
instance.
If a portable hazard warning lamp is avail-
able, set it up on the roadside at an appro-
priate distance from the rear of the vehicle.
Comply with all safety guidelines and regu-
lations.<
In the event of a flat tire, different proce-
dures should be followed depending on the
equipment included in your vehicle:
>Vehicles with Run-Flat Tires, refer to
page115
>Vehicles with a space-saver spare tire,
refer to the following section
>Vehicles with MINI Mobility System,
refer to page141.
To change a space-saver spare tire, proceed
as follows:
>Remove space-saver spare tire, refer to
the section after the next one
>Prepare for tire change, refer to page139
>Jack up the vehicle, refer to page140
>Mount the space-saver spare tire, refer
to page140
>Tighten the lug bolts, refer to page140
>Drive with space-saver spare tire, refer to
page139.
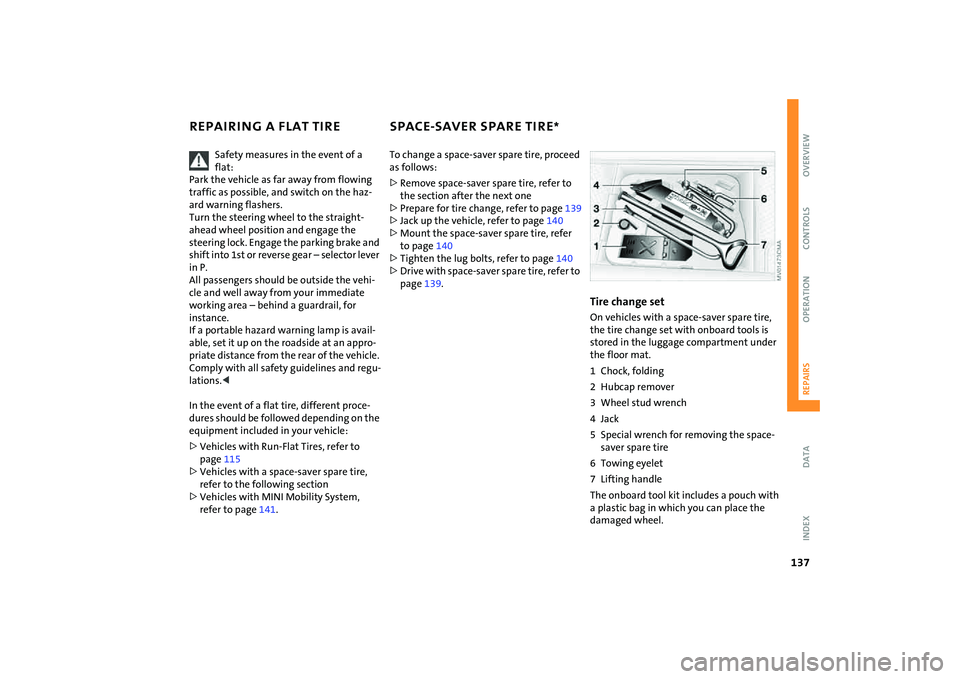
Tire change setOn vehicles with a space-saver spare tire,
the tire change set with onboard tools is
stored in the luggage compartment under
the floor mat.
1 Chock, folding
2 Hubcap remover
3 Wheel stud wrench
4Jack
5 Special wrench for removing the space-
saver spare tire
6 Towing eyelet
7 Lifting handle
The onboard tool kit includes a pouch with
a plastic bag in which you can place the
damaged wheel.
Page 141 of 176

139
OVERVIEW REPAIRSOPERATION CONTROLS DATA INDEX
SPACE-SAVER SPARE TIRE
*
CHANGING TIRES
9. Pull out the space-saver spare tire
towards the rear underneath the vehi-
cle
10. Position the space-saver spare tire with
the valve facing upwards
11. Unscrew the valve extension from the
valve of the space-saver spare tire
12. Unscrew the dust cap from the exten-
sion and place it on the valve of the
space-saver spare tire.
Due to its different dimensions, the
damaged wheel cannot be placed in
the recess for the space-saver spare tire.<
Driving with the space-saver spare tireDrive cautiously. Do not exceed a speed of
50 mph / 80 km/h.
You must expect changes in vehicle han-
dling such as lower track stability during
braking, longer braking distances and
changes in self-steering properties when
close to the handling limit. These effects
are more pronounced when driving with
winter tires.
Only one space-saver spare tire may
be mounted at one time. Reinstall a
wheel and tire of the original size as soon
as possible.<
Check the tire inflation pressure at
the earliest opportunity and correct it
if necessary. Replace the defective tire as
soon as possible and have the new wheel/
tire assembly balanced.<
Additional safety measures in the
event of a tire change:
Change tires only on a flat, solid and non-
slippery surface.
The vehicle or the jack could slip sideways
on soft or slippery support surfaces, such as
snow, ice, flagstones, etc..
Do not use a wooden block or similar object
as a support base for the jack, as this would
prevent it from extending to its full support
height and reduce its load-carrying capac-
ity.
Do not lie under the vehicle or start the
engine when the vehicle is supported by
the jack – risk of fatal injury.<
Preparing for a tire change
Observe the safety precautions
regarding flat tires on page137.<
1. For vehicles with a space-saver spare
tire:
Place the folding chock behind the front
wheel on the other side of the vehicle;
on downward inclines, place it in front of
this wheel. If the wheel is changed on a
surface with a more severe slope, take
additional precautions to secure the
vehicle from rolling
2. Loosen the lug bolts by a half turn.
Page 142 of 176

140
CHANGING TIRESJacking up the vehicle1. Place the jack at the jacking point closest
to the wheel.
The jack base must be perpendicular to
the surface beneath the jacking point
The vehicle jack is designed for
changing wheels only. Do not
attempt to raise another vehicle model
with it or to raise any load of any kind. To
do so could cause accidents and personal
injury.<
2. During jacking up, insert the jack head in
the square recess of the jacking point
3. Jack the vehicle up until the wheel you
are changing is raised from the ground.Mounting a wheel1. Unscrew the lug bolts and remove the
wheel
2. Remove accumulations of mud or dirt
from the mounting surfaces of the
wheel and hub. Clean the lug bolts.
3. Mount the new wheel
4. Screw at least two lug bolts finger-tight
into opposite bolt holes
5. Screw in the remaining bolts
6. Tighten all the lug bolts firmly in a diag-
onal pattern
7. Lower the vehicle
8. Remove the jack.Tightening the lug boltsTighten the lug bolts in a diagonal pattern.
As soon as possible, have the secure
seating of the lug bolts, tightening
torque 103.3 lb ft/140 Nm, checked using a
calibrated torque wrench. Otherwise, a
wheel coming loose can lead to a severe
accident.<
Replace the defective tire as soon as possi-
ble and have the new wheel/tire assembly
balanced.
Page 143 of 176

141
OVERVIEW REPAIRSOPERATION CONTROLS DATA INDEX
MINI MOBILITY SYSTEM
*
MINI Mobility System
The MINI Mobility System is provided to
help you repair a flat tire. With the help of
this system you can apply a liquid sealant
on the inside of the tire, which seals the
damaged area and enables you to continue
to drive.Preparing for tire repair
Before using the MINI Mobility Sys-
tem read the warning and danger
precautions on the equipment.<
If possible, leave objects in which have
been forced into the tire.
Take off the tag regarding speed limits and
stick it onto the steering wheel.
Using the MINI Mobility SystemIn order to repair a flat tire with the MINI
Mobility System, proceed as follows:
>Pump in liquid sealant, refer to page142
>Reinflate the tire, refer to page142
>Distribute liquid sealant, refer to
page143
>Check tire inflation pressure, refer to
page143
>Drive on, refer to page143.
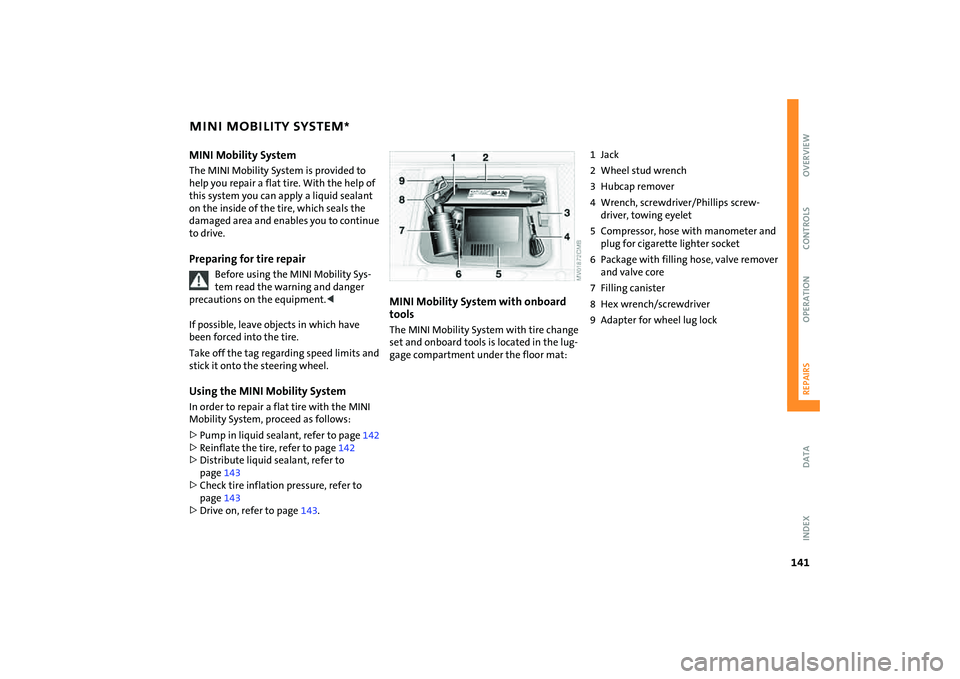
MINI Mobility System with onboard
tools The MINI Mobility System with tire change
set and onboard tools is located in the lug-
gage compartment under the floor mat:
1Jack
2 Wheel stud wrench
3 Hubcap remover
4 Wrench, screwdriver/Phillips screw-
driver, towing eyelet
5 Compressor, hose with manometer and
plug for cigarette lighter socket
6 Package with filling hose, valve remover
and valve core
7 Filling canister
8 Hex wrench/screwdriver
9 Adapter for wheel lug lock
Page 145 of 176

143
OVERVIEW REPAIRSOPERATION CONTROLS DATA INDEX
MINI MOBILITY SYSTEM
*
If an air pressure of 26 psi/180 kPa
cannot be reached, unscrew the
hose 1 and drive back and forth
about 33 ft/10 m so that the liquid seal-
ant is distributed in the tire. Afterwards
repeat the procedure.
If an air pressure of 26 psi/180 kPa is still
not reached, the tire is too badly dam-
aged. Please contact the nearest MINI
Dealer.<
5. Turn off compressor 2
6. Unscrew hose 1 from the tire valve
7. Store the MINI Mobility System back in
the vehicle.
The instructions for using the MINI
Mobility System are also given on the
equipment.<
Distributing liquid sealantImmediately drive for approx. 10 minutes,
so that the liquid sealant is uniformly dis-
tributed.
Do not exceed a speed of 40 mph /
60 km/h.
If possible do not drive at a speed lower
than 10 mph / 20 km/h.<
Checking tire inflation pressure1. After driving for approx. 10 minutes, pull
over at a suitable location
2. Screw hose with manometer back onto
the tire valve
3. Check the tire inflation pressures.
The tire inflation pressure must be
at least 18 psi/130 kPa. If it is not,
do not continue driving.<
If 18 psi/130 kPa are displayed:
4. Ignition key position 1:
switch on compressor 2. Correct the tire
inflation pressure to the specified value,
refer to the tire inflation pressure table
on page109
5. Replace the tire as soon as possible.
The use of the MINI Mobility System
may be ineffective with tire damage
larger than approx. 1/6 in/4 mm. Please
contact the nearest MINI Dealer if the tire
cannot be made drivable with the MINI
Mobility System.<
Driving on
Do not exceed the permitted maxi-
mum speed of 50 mph / 80 km/h;
otherwise an accident could happen.<
Replace the defective tire as soon as
possible and have the new wheel/tire
assembly balanced. Have the MINI Mobility
System refilled.<
Tire change setWhen changing a tire, always observe the
safety measures and the procedure for
changing tires starting on page137.
In case of a flat tire the tire change
set is not needed due to the availabil-
ity of the MINI Mobility System.<