2008 MINI COOPER CONVERTIBLE warning
[x] Cancel search: warningPage 117 of 176

115
OVERVIEW REPAIRSOPERATIONCONTROLS DATA INDEX
RUN-FLAT TIRES
*
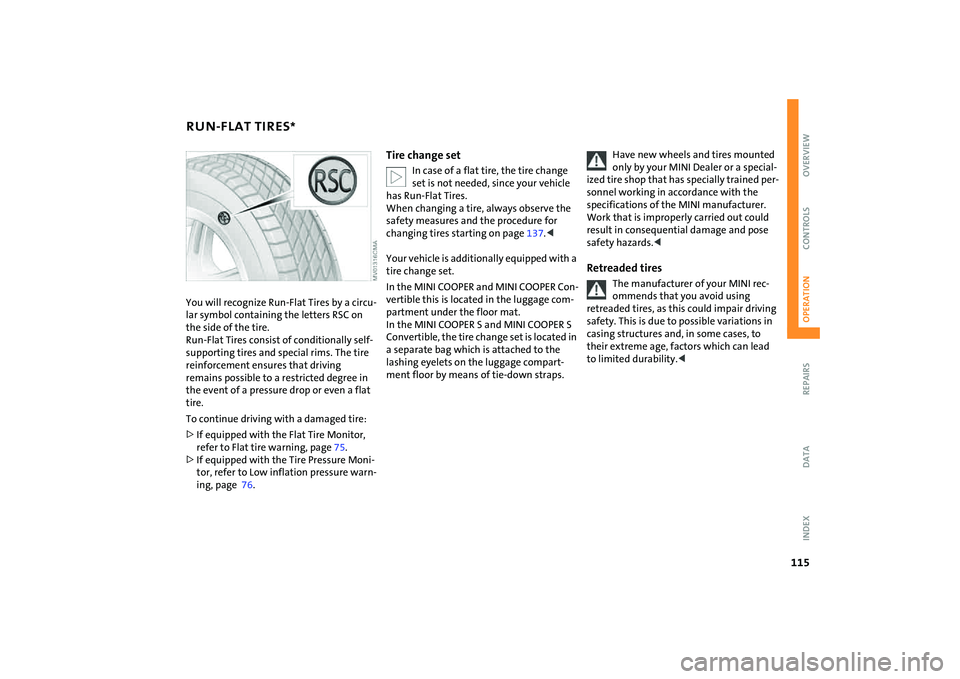
You will recognize Run-Flat Tires by a circu-
lar symbol containing the letters RSC on
the side of the tire.
Run-Flat Tires consist of conditionally self-
supporting tires and special rims. The tire
reinforcement ensures that driving
remains possible to a restricted degree in
the event of a pressure drop or even a flat
tire.
To continue driving with a damaged tire:
>If equipped with the Flat Tire Monitor,
refer to Flat tire warning, page75.
>If equipped with the Tire Pressure Moni-
tor, refer to Low inflation pressure warn-
ing, page 76.
Tire change set
In case of a flat tire, the tire change
set is not needed, since your vehicle
has Run-Flat Tires.
When changing a tire, always observe the
safety measures and the procedure for
changing tires starting on page137.<
Your vehicle is additionally equipped with a
tire change set.
In the MINI COOPER and MINI COOPER Con-
vertible this is located in the luggage com-
partment under the floor mat.
In the MINI COOPER S and MINI COOPER S
Convertible, the tire change set is located in
a separate bag which is attached to the
lashing eyelets on the luggage compart-
ment floor by means of tie-down straps.
Have new wheels and tires mounted
only by your MINI Dealer or a special-
ized tire shop that has specially trained per-
sonnel working in accordance with the
specifications of the MINI manufacturer.
Work that is improperly carried out could
result in consequential damage and pose
safety hazards.<
Retreaded tires
The manufacturer of your MINI rec-
ommends that you avoid using
retreaded tires, as this could impair driving
safety. This is due to possible variations in
casing structures and, in some cases, to
their extreme age, factors which can lead
to limited durability.<
Page 123 of 176

121
OVERVIEW REPAIRSOPERATIONCONTROLS DATA INDEX
ENGINE OILMeasuring the oil level1. With the vehicle's engine at normal
operating temperature, i.e. after unin-
terrupted driving for at least 6 miles/
10 km, park the vehicle on a level surface
2. Switch off the engine
3. Pull the dipstick out after approx.
5 minutes and wipe it off with a lint-free
cloth, paper towel, or similar material
4. Carefully push the dipstick all the way
into the guide tube and pull it out again.
The oil level should be between the two
marks on the dipstick.
As with fuel economy, oil consumption is
directly influenced by your driving style and
vehicle operating conditions.
The oil volume between the two marks
MIN, MAX on the dipstick corresponds to
approx. 1.1 quarts/1 liter.
Do not fill beyond the upper mark on
the dipstick. Excess oil will damage
the engine.
dropped to just above the lower mark
of the dipstick. However, never allow the
level to drop below the lower mark.<
Add oil within the next 30 miles/
50 km, otherwise the engine could be
damaged.<
Always store oil, grease, etc., out of
reach of children. Comply with all
warning labels and information on lubri-
cant containers, otherwise health risks may
result.<
Oil changeHave the oil changed only by a MINI Dealer
or a workshop that has specially trained
personnel working in accordance with the
specifications of the MINI manufacturer.
Page 126 of 176

124
BRAKE SYSTEMBrake fluid level
The warning lamp comes on
although the parking brake is not
engaged:
The brake fluid level in the reservoir is too
low, refer to page16. At the same time,
brake pedal travel may become signifi-
cantly longer.
Have the system checked immediately.
If the brake fluid level is too low and brake
pedal travel has become longer, there may
be a defect in one of the brake system's
hydraulic circuits.
Canadian models display this
warning lamp.
If you continue driving, higher brake
application pressure may be neces-
sary, and there may be a slight pull to one
side. Brake pedal travel may also be longer.
Adapt your driving style accordingly.<
Page 128 of 176

126
SOCKET FOR ONBOARD DIAGNOSTICS OBD CARING FOR YOUR VEHICLEPrimary components of exhaust emissions
can be checked by a device via the OBD
socket.
This socket is located to the left of the
driver's side, on the bottom of the instru-
ment panel underneath a cover.Exhaust emission values
The warning lamp comes on. The
exhaust emissions have deterio-
rated. Have the vehicle checked as
soon as possible.
Canadian models display this
warning lamp.
Under some circumstances, the lamp will
flash. This indicates severe engine misfir-
ing. In this case, you should reduce your
speed and visit your nearest MINI Dealer as
soon as possible. Severe engine misfiring
can quickly lead to serious damage of emis-
sions-related components, especially the
catalytic converter.
If the fuel filler cap is not properly
tightened, the OBD system may con-
clude that fuel vapors are escaping, causing
an indicator to light up. If the filler cap is
then tightened, the indicator should go out
within a few days.<
Suitable car-care products
Use the cleaning and car-care prod-
ucts available at your MINI Dealer.<
Washing your vehicleYou can wash your new MINI or MINI Con-
vertible in automatic car washes from the
beginning. Preference should be for cloth
car washes. If, due to lack of availability,
brush car washes must be used, modern
systems with soft brushes should be given
preference.
When using steam cleaners or high-
pressure cleaners, maintain sufficient
distance to the vehicle and do not exceed a
maximum temperature of 1407/606. If
the jet is too close or the pressure is too
high, this can lead to damage or initial
damage that can develop into more serious
damage. Water that enters vehicle compo-
nents can lead to damage over the long
term.
After washing the vehicle, apply the brakes
briefly to dry them, otherwise water can
reduce braking efficiency over the short
term and the brake rotors can corrode.
Switch the rain sensor off when passing
through an automatic car wash, refer to
page63. Failure to do so could result in
Page 139 of 176

137
OVERVIEW REPAIRSOPERATION CONTROLS DATA INDEX
REPAIRING A FLAT TIRE SPACE-SAVER SPARE TIRE
*
Safety measures in the event of a
flat:
Park the vehicle as far away from flowing
traffic as possible, and switch on the haz-
ard warning flashers.
Turn the steering wheel to the straight-
ahead wheel position and engage the
steering lock. Engage the parking brake and
shift into 1st or reverse gear – selector lever
in P.
All passengers should be outside the vehi-
cle and well away from your immediate
working area – behind a guardrail, for
instance.
If a portable hazard warning lamp is avail-
able, set it up on the roadside at an appro-
priate distance from the rear of the vehicle.
Comply with all safety guidelines and regu-
lations.<
In the event of a flat tire, different proce-
dures should be followed depending on the
equipment included in your vehicle:
>Vehicles with Run-Flat Tires, refer to
page115
>Vehicles with a space-saver spare tire,
refer to the following section
>Vehicles with MINI Mobility System,
refer to page141.
To change a space-saver spare tire, proceed
as follows:
>Remove space-saver spare tire, refer to
the section after the next one
>Prepare for tire change, refer to page139
>Jack up the vehicle, refer to page140
>Mount the space-saver spare tire, refer
to page140
>Tighten the lug bolts, refer to page140
>Drive with space-saver spare tire, refer to
page139.
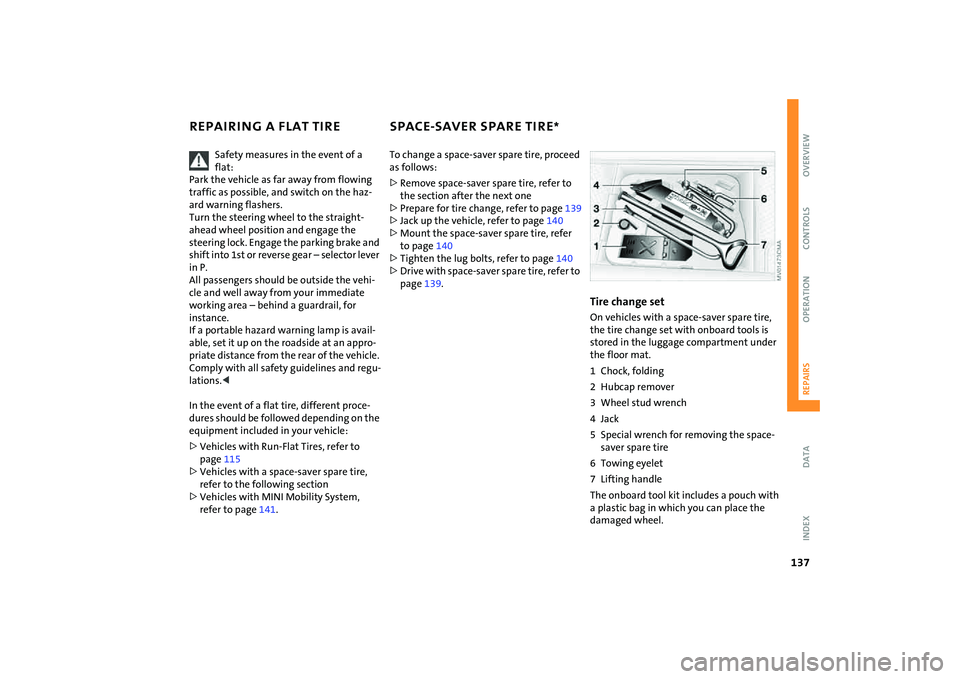
Tire change setOn vehicles with a space-saver spare tire,
the tire change set with onboard tools is
stored in the luggage compartment under
the floor mat.
1 Chock, folding
2 Hubcap remover
3 Wheel stud wrench
4Jack
5 Special wrench for removing the space-
saver spare tire
6 Towing eyelet
7 Lifting handle
The onboard tool kit includes a pouch with
a plastic bag in which you can place the
damaged wheel.
Page 143 of 176

141
OVERVIEW REPAIRSOPERATION CONTROLS DATA INDEX
MINI MOBILITY SYSTEM
*
MINI Mobility System
The MINI Mobility System is provided to
help you repair a flat tire. With the help of
this system you can apply a liquid sealant
on the inside of the tire, which seals the
damaged area and enables you to continue
to drive.Preparing for tire repair
Before using the MINI Mobility Sys-
tem read the warning and danger
precautions on the equipment.<
If possible, leave objects in which have
been forced into the tire.
Take off the tag regarding speed limits and
stick it onto the steering wheel.
Using the MINI Mobility SystemIn order to repair a flat tire with the MINI
Mobility System, proceed as follows:
>Pump in liquid sealant, refer to page142
>Reinflate the tire, refer to page142
>Distribute liquid sealant, refer to
page143
>Check tire inflation pressure, refer to
page143
>Drive on, refer to page143.
MINI Mobility System with onboard
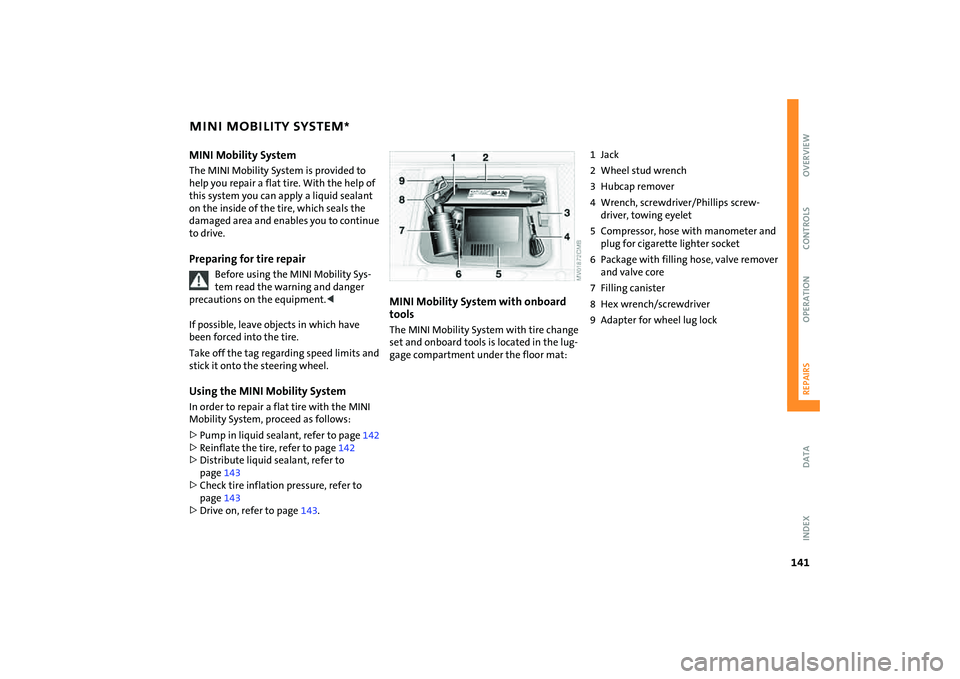
tools The MINI Mobility System with tire change
set and onboard tools is located in the lug-
gage compartment under the floor mat:
1Jack
2 Wheel stud wrench
3 Hubcap remover
4 Wrench, screwdriver/Phillips screw-
driver, towing eyelet
5 Compressor, hose with manometer and
plug for cigarette lighter socket
6 Package with filling hose, valve remover
and valve core
7 Filling canister
8 Hex wrench/screwdriver
9 Adapter for wheel lug lock
Page 150 of 176

148
TOWING AND TOW-STARTINGAccess to the threaded socket The illustration shows by way of example
the MINI COOPER and the MINI COOPER
Convertible.
Pry out the cover in the front or rear
bumper by inserting a screwdriver into the
recess.Being towed
Make sure that the ignition key is in
position 1; otherwise the steering
lock could engage and prevent the vehicle
from being steered. There is no power
assist while the engine is off. Therefore,
you will need to exert more force to brake
and steer the vehicle.<
Turn on the hazard warning flashers, if
required by national regulations. If the
electrical system has failed, clearly identify
the vehicle being towed, e.g. by placing a
sign or a warning triangle in the rear win-
dow.
MINI or MINI Convertible with manual
transmission:
Put the gearshift lever in idle position.
MINI or MINI Convertible featuring auto-
matic transmission with Steptronic:
Only tow vehicles featuring auto-
matic transmission with Steptronic
with a tow truck; otherwise the transmis-
sion can be damaged, refer to page149.<
Overriding the selector lever lock, refer to
page59.Towing methodsIn some countries, it is not permitted to
tow the vehicle with a tow bar or tow rope
on public roads.
Familiarize yourself with the applicable
towing regulations for the country in which
you are driving.
With a tow bar:
The towing vehicle must not be
lighter than the vehicle being towed;
otherwise, vehicle handling can no longer
be controlled.<
The towing eyelets of both vehicles should
be on the same side. If the tow bar can only
be used in a diagonal position, please note
the following:
>Clearance and maneuverability will be
strictly limited in corners
>The inclination of the tow bar produces
lateral force.
Attach the tow bar to the towing eye-
let only. Attaching it to other parts of
the vehicle can result in damage.<
With a tow rope:
When the towing vehicle is driving off,
make sure that the tow rope is taut.
Use nylon ropes or straps for towing
because they prevent sudden jerking
movements. Attach the tow rope to the
towing eyelet only. Attaching it to other
parts of the vehicle can result in damage.<
Page 151 of 176

149
OVERVIEW REPAIRSOPERATION CONTROLS DATA INDEX
TOWING AND TOW-STARTINGWith a tow truck:
Have the MINI or MINI Convertible trans-
ported by a tow truck with a lift sling, or on
a flatbed.
Only tow vehicles featuring auto-
matic transmission with Steptronic
with the front wheels raised or on a special
transport vehicle; otherwise the transmis-
sion can be damaged.
Do not lift the vehicle by the towing eyelet,
nor by parts of the body or chassis. Other-
wise damage could result.<
Tow-starting
Do not tow-start vehicles featuring
automatic transmission with Step-
tronic.
Jump-starting, refer to page146.<
Avoid tow-starting the vehicle whenever
possible. Jump-start the engine instead,
refer to page146. Vehicles with a catalytic
converter should only be tow-started if the
engine is cold. Vehicles with an automatic
transmission cannot be tow-started.
1. Turn on the hazard warning flashers;
comply with national regulations
2. Turn the ignition key to position 2
3. Engage the 3rd gear
4. Have the vehicle towed with the clutch
completely depressed and then slowly
release the clutch. After the engine has
started, immediately depress the clutch
again completely
5. Pull over at a suitable location, remove
the tow bar or tow rope, and turn off the
hazard warning flashers
6. Have the vehicle checked.