2008 MERCEDES-BENZ SLK ROADSTER warning
[x] Cancel search: warningPage 221 of 273
Flat tyre
218 Removin
g
X Make sure that the key is in position 1or
2 in the ignition lock .
X Set the windscreen wipers to position II
( Y page 78) on the combination switch.
X When the wiper arms have reached a ver-
tical position, turn the key to position 0and
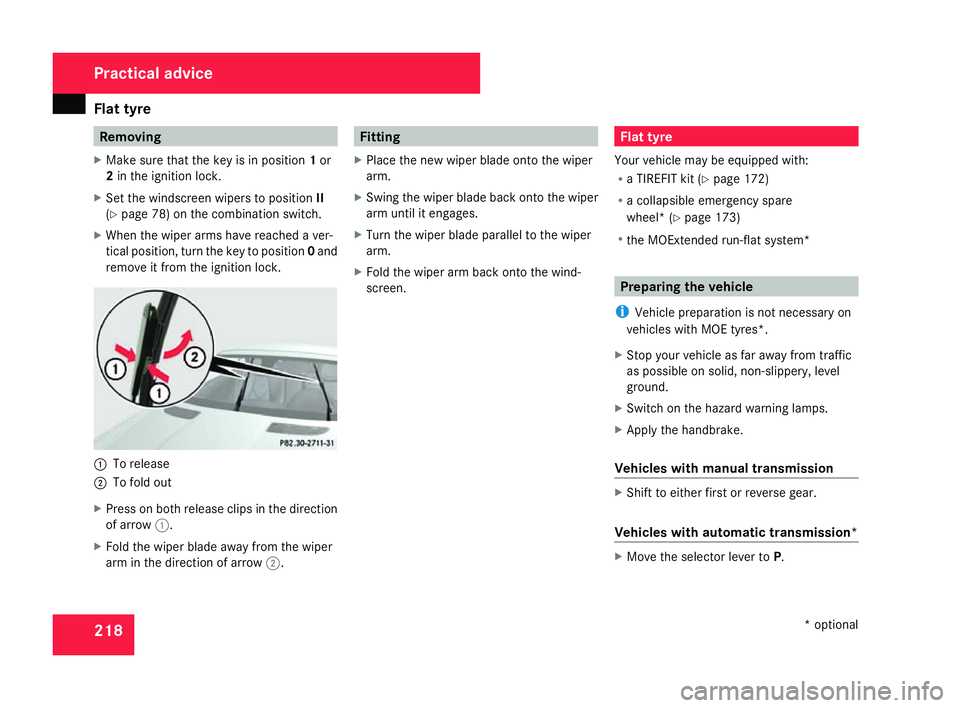
remove it from the ignition lock. 1
To release
2 To fold out
X Press on both release clips in the direction
of arrow 1.
X Fold the wiper blade away from the wipe r
arm in the direction of arrow 2. Fitting
X Place the new wiper blade onto the wiper
arm.
X Swing the wiper blade back onto the wipe r
arm until it engages.
X Turn the wiper blade parallel to the wiper
arm.
X Fold the wiper arm back onto the wind-
screen. Flat tyre
Your vehicle may be equipped with:
R a TIREFIT kit (Y page 172)
R a collapsible emergency spare
wheel* (Y page 173)
R the MOExtended run-flat system* Preparing the vehicle
i Vehicle preparation is not necessary on
vehicles with MOE tyres*.
X Stop your vehicle as far away from traffi c
as possible on solid, non-slippery, level
ground.
X Switch on the hazard warning lamps.
X Apply the handbrake.
Vehicles with manual transmissio n X
Shift to either first or reverse gear .
Vehicles with automatic transmission* X
Move the selector lever to P. Practical advice
* optional
171_AKB; 3; 4, en-GB
vpfaff7,
2007-11-13T10:50:25+01:00 - Seite 218
Page 222 of 273
Flat tyre
219
For all vehicles X
All occupants must get out of the vehicle.
Make sure that they are not endangered as
they do so.
X Make sure that no one is near the danger
area whilst a wheel is being changed. Any-
one who is not directly assisting in the
wheel change should, for example, stand
behind the barrier.
X Switch off the engine.
X Remove the key from the ignition lock.
X Place the warning triangle (Y page 172) or
warning lamps at a suitable distance.
Observe legal requirements. G
Risk of injury
The jack is designed only to raise the vehi-
cle for a short time while a wheel is being
changed .
If you intend to work under the vehicle, it
must be placed on stands.
Make sure that the jack is placed on a firm,
non-slip, level surface. Do not use wooden
blocks or similar as jacking supports. Oth-
erwise, the jack will not be able to achieve
its load-bearing capacity due to the restric-
ted height. Do not start the engine at any time while
the wheel is being changed.
Do not lie under the vehicle when it is being
supported by the jack. If you do not rais
e
the vehicle as described, it could slip off the
jack (e.g. if the engine is started or a door
or the boot lid are opened or closed) and
you could be seriously injured . Using the TIREFIT kit
You can use the TIREFIT kit to seal small
punctures, particularly those in the tyre tread.
You can use TIREFIT in outdoor temperature s
down to -20 °C. G
Risk of accident
In the following situations, your safety is at
particular risk and TIREFIT is unable to pro -
vide breakdown assistance:
R if there are cuts or punctures in the tyre
greater than 4 mm
R if the wheel rim is damaged
R if you have driven at very low tyre pres-
sures or on a flat tyre
Do not drive any further. Consult a qualified
specialist workshop which has the neces- sary specialist knowledge and tools to carr
y
out the work required.
Mercedes-Benz recommends that you use
a Mercedes-Benz Service Centre for this
purpose. In particular, work relevant to
safety or on safety-related systems must be
carried out at a qualified specialist work-
shop.
X Do not remove any foreign objects which
have penetrated the tyre, e.g. screws or
nails .
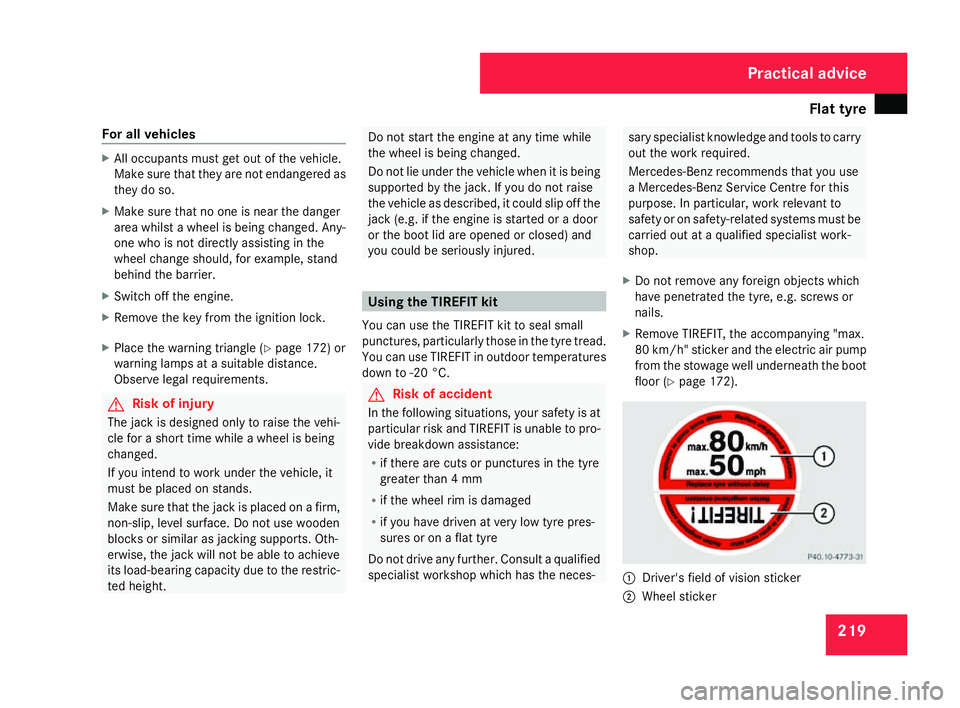
X Remove TIREFIT, the accompanying "max .
80 km/h" sticker and the electric air pum p
from the stowage well underneath the boot
floor (Y page 172). 1
Driver's field of vision sticker
2 Wheel sticker Practical advice
171_AKB; 3; 4, en-GB
vpfaff7
, 2007-11-13T10:50:25+01:00 - Seite 219
Page 225 of 273
Flat tyre
222 G
Risk of accident
If a pressure of 1.8 bar is not achieved afte r
five minutes, the tyre is too badly damaged.
Do not drive any further. Consult a qualified
specialist workshop which has the neces-
sary specialist knowledge and tools to carry
out the work required. Mercedes-Benz rec-
ommends that you use a Mercedes-Benz
Service Centre for this purpose. In particu-
lar, work relevant to safety or on safety-
related systems must be carried out at a
qualified specialist workshop.
If a tyre pressure of 1.8 bar is reached:
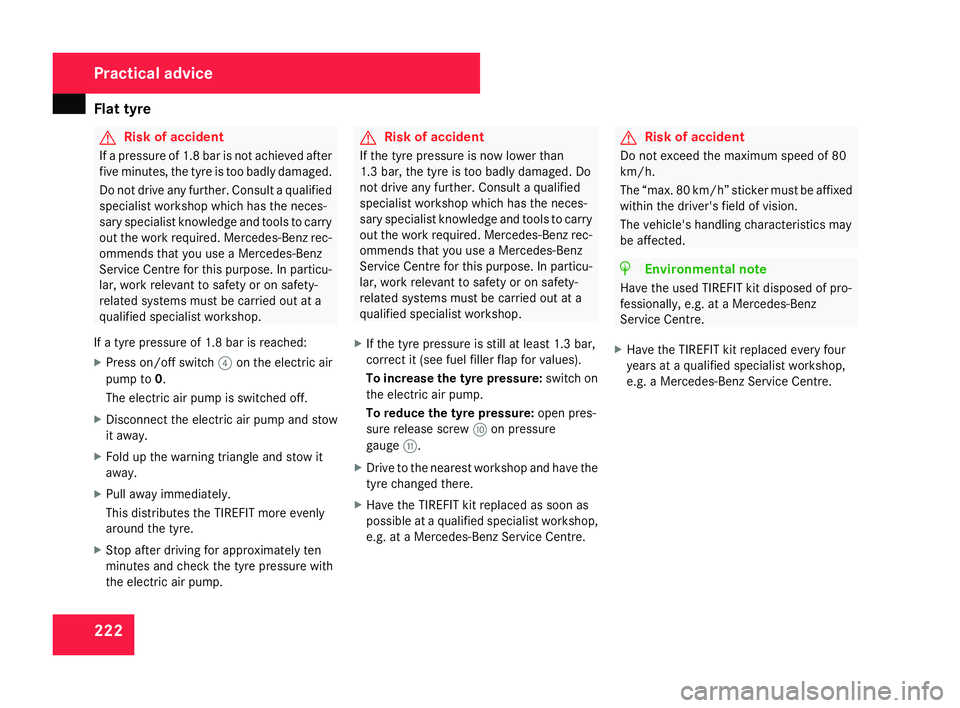
X Press on/off switch 4on the electric air
pump to 0.
The electric air pump is switched off.
X Disconnect the electric air pump and stow
it away .
X Fold up the warning triangle and stow it
away .
X Pull away immediately.
This distributes the TIREFIT more evenly
around the tyre.
X Stop after driving for approximately ten
minutes and check the tyre pressure with
the electric air pump. G
Risk of accident
If the tyre pressure is now lower than
1.3 bar, the tyre is too badly damaged. Do
not drive any further. Consult a qualified
specialist workshop which has the neces -
sary specialist knowledge and tools to carry
out the work required. Mercedes-Benz rec-
ommends that you use a Mercedes-Benz
Service Centre for this purpose. In particu-
lar, work relevant to safety or on safety-
related systems must be carried out at a
qualified specialist workshop.
X If the tyre pressure is still at least 1.3 bar,
correct it (see fuel filler flap for values).
To increase the tyre pressure: switch on
the electric air pump.
To reduce the tyre pressure: open pres-
sure release screw aon pressure
gauge b.
X Drive to the nearest workshop and have the
tyre changed there.
X Have the TIREFIT kit replaced as soon as
possible at a qualified specialist workshop ,
e.g. at a Mercedes-Benz Service Centre. G
Risk of accident
Do not exceed the maximum speed of 80
km/h.
The “max. 80 km/h” sticker must be affixe d
within the driver's field of vision.
The vehicle's handling characteristics may
be affected. H
Environmental not
e
Have the used TIREFIT kit disposed of pro-
fessionally, e.g. at a Mercedes-Benz
Service Centre.
X Have the TIREFIT kit replaced every fou r
years at a qualified specialist workshop ,
e.g. a Mercedes-Benz Service Centre. Practical advice
171_AKB; 3; 4, en-GB
vpfaff7
, 2007-11-13T10:50:25+01:00 - Seite 222
Page 227 of 273
Flat tyre
224 G
Risk of accident
If a pressure of 1.8 bar is not achieved afte r
five minutes, the tyre is too badly damaged.
Do not drive any further. Consult a qualified
specialist workshop which has the neces-
sary specialist knowledge and tools to carry
out the work required. Mercedes-Benz rec-
ommends that you use a Mercedes-Benz
Service Centre for this purpose. In particu-
lar, work relevant to safety or on safety-
related systems must be carried out at a
qualified specialist workshop.
If a tyre pressure of 1.8 bar is reached:
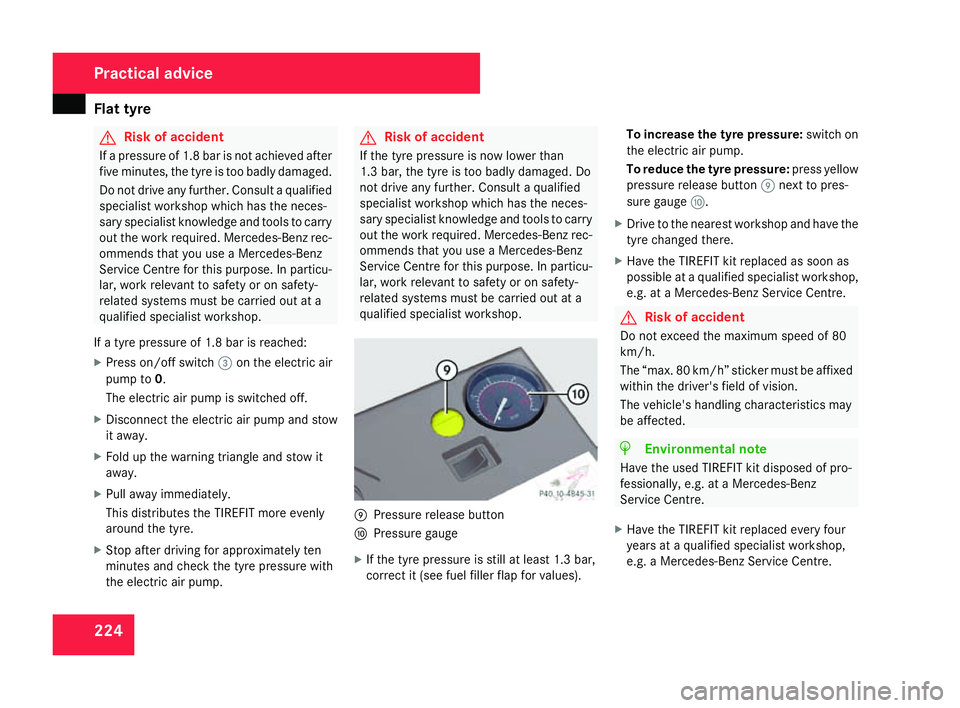
X Press on/off switch 3on the electric air
pump to 0.
The electric air pump is switched off.
X Disconnect the electric air pump and stow
it away .
X Fold up the warning triangle and stow it
away .
X Pull away immediately.
This distributes the TIREFIT more evenly
around the tyre.
X Stop after driving for approximately ten
minutes and check the tyre pressure with
the electric air pump. G
Risk of accident
If the tyre pressure is now lower than
1.3 bar, the tyre is too badly damaged. Do
not drive any further. Consult a qualified
specialist workshop which has the neces -
sary specialist knowledge and tools to carry
out the work required. Mercedes-Benz rec-
ommends that you use a Mercedes-Benz
Service Centre for this purpose. In particu-
lar, work relevant to safety or on safety-
related systems must be carried out at a
qualified specialist workshop. 9
Pressure release button
a Pressure gauge
X If the tyre pressure is still at least 1.3 bar,
correct it (see fuel filler flap for values). To increase the tyre pressure
:switch on
the electric air pump .
To reduce the tyre pressure :press yellow
pressure release button 9next to pres -
sure gauge a.
X Drive to the nearest workshop and have the
tyre changed there .
X Have the TIREFIT kit replaced as soon as
possible at a qualified specialist workshop ,
e.g. at a Mercedes-Benz Service Centre. G
Risk of acciden
t
Do not exceed the maximum speed of 80
km/h .
The “max. 80 km/h” sticker must be affixed
within the driver's field of vision.
The vehicle's handling characteristics may
be affected. H
Environmental note
Have the used TIREFIT kit disposed of pro-
fessionally, e.g. at a Mercedes-Ben z
Service Centre.
X Have the TIREFIT kit replaced every fou r
years at a qualified specialist workshop ,
e.g. a Mercedes-Benz Service Centre. Practical advice
171_AKB; 3; 4, en-GB
vpfaff7,
2007-11-13T10:50:25+01:00 - Seite 224
Page 232 of 273
Flat tyre
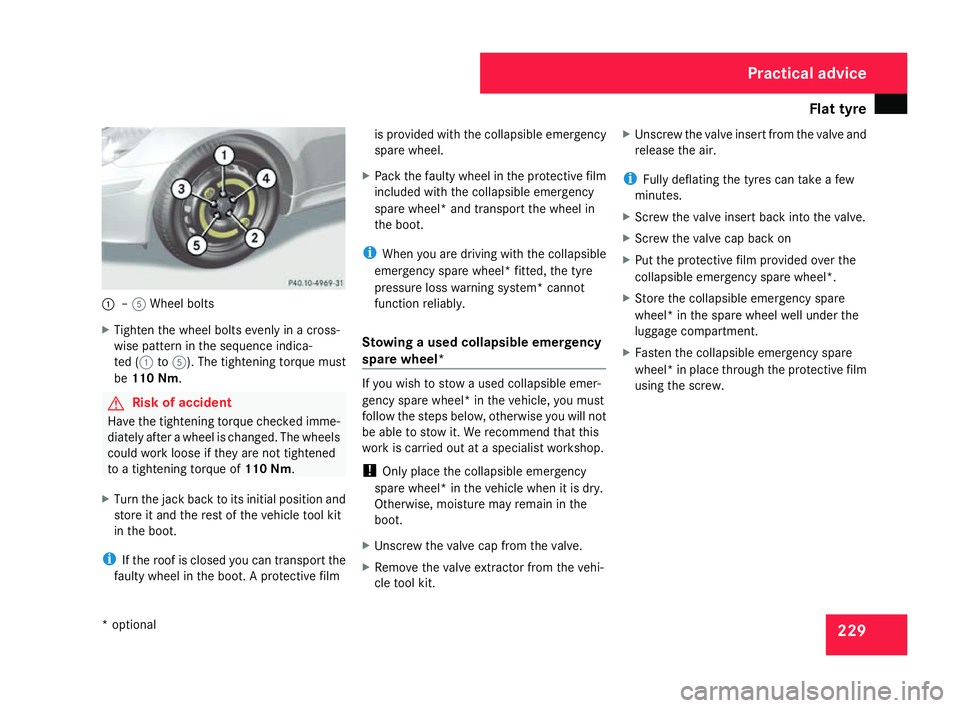
2291
–5 Wheel bolts
X Tighten the wheel bolts evenly in a cross-
wise pattern in the sequence indica-
ted (1 to5 ). The tightening torque must
be 110 Nm. G
Risk of acciden
t
Have the tightening torque checked imme-
diately after a wheel is changed. The wheels
could work loose if they are not tightened
to a tightening torque of 110 Nm.
X Turn the jack back to its initial position and
store it and the rest of the vehicle tool kit
in the boot.
i If the roof is closed you can transport the
faulty wheel in the boot. A protective film is provided with the collapsible emergency
spare wheel.
X Pack the faulty wheel in the protective film
included with the collapsible emergency
spare wheel* and transport the wheel in
the boot .
i When you are driving with the collapsible
emergency spare wheel* fitted, the tyre
pressure loss warning system* cannot
function reliably.
Stowing a used collapsible emergency
spare wheel* If you wish to stow a used collapsible emer-
gency spare wheel* in the vehicle, you must
follow the steps below, otherwise you will not
be able to stow it. We recommend that this
work is carried out at a specialist workshop.
!
Only place the collapsible emergency
spare wheel* in the vehicle when it is dry.
Otherwise, moisture may remain in the
boot.
X Unscrew the valve cap from the valve .
X Remove the valve extractor from the vehi -
cle tool kit. X
Unscrew the valve insert from the valve and
release the air.
i Fully deflating the tyres can take a few
minutes.
X Screw the valve insert back into the valve .
X Screw the valve cap back on
X Put the protective film provided over the
collapsible emergency spare wheel*.
X Store the collapsible emergency spar e
wheel* in the spare wheel well under the
luggage compartment.
X Fasten the collapsible emergency spar e
wheel* in place through the protective film
using the screw. Practical advice
* optional
171_AKB; 3; 4, en-GB
vpfaff7,
2007-11-13T10:50:25+01:00 - Seite 229
Page 250 of 273
Tyres and wheels
24
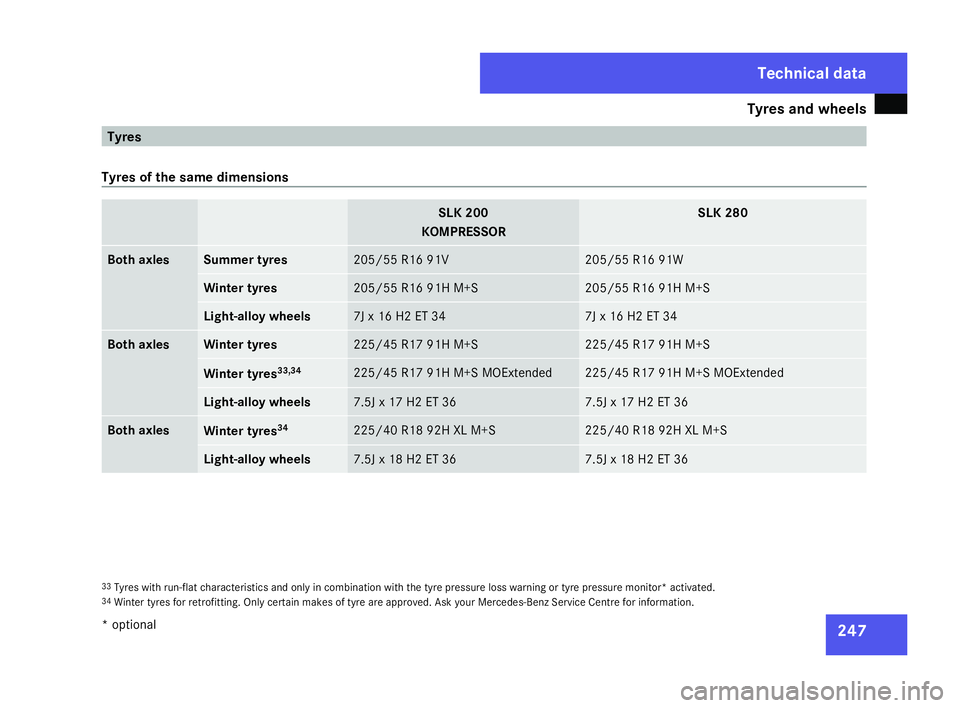
7 Tyre
s
Tyres of the same dimensions SLK 20
0
KOMPRESSOR SLK 280
Both axles Summer tyres 205/55 R16 91
V 205/55 R16 91W
Winter tyres 205/55 R16 91H M+S 205/55 R16 91H M+S
Light-alloy wheels 7J x 16 H2 ET 34 7J x 16 H2 ET 34
Both axle
s Winter tyres 225/45 R17 91H M+S 225/45 R17 91H M+S
Winter tyres
33,34 225/45 R17 91H M+S MOExtended 225/45 R17 91H M+S MOExtended
Light-alloy wheels 7.5J x 17 H2 ET 36 7.5J x 17 H2 ET 36
Both axle
s Winter tyres
34 225/40 R18 92H XL M+S 225/40 R18 92H XL M+S
Light-alloy wheels 7.5J x 18 H2 ET 36 7.5J x 18 H2 ET 36
33
Tyres with run-flat characteristics and only in combination with the tyre pressure loss warning or tyre pressure monitor* activated.
34 Winter tyres for retrofitting. Only certain makes of tyre are approved. Ask your Mercedes-Benz Service Centre for information. Technical data
* optiona l
171_AKB; 3; 4, en-GB
vpfaff7,
2007-11-13T10:50:25+01:00 - Seite 247
Page 251 of 273
Tyres and wheels
24
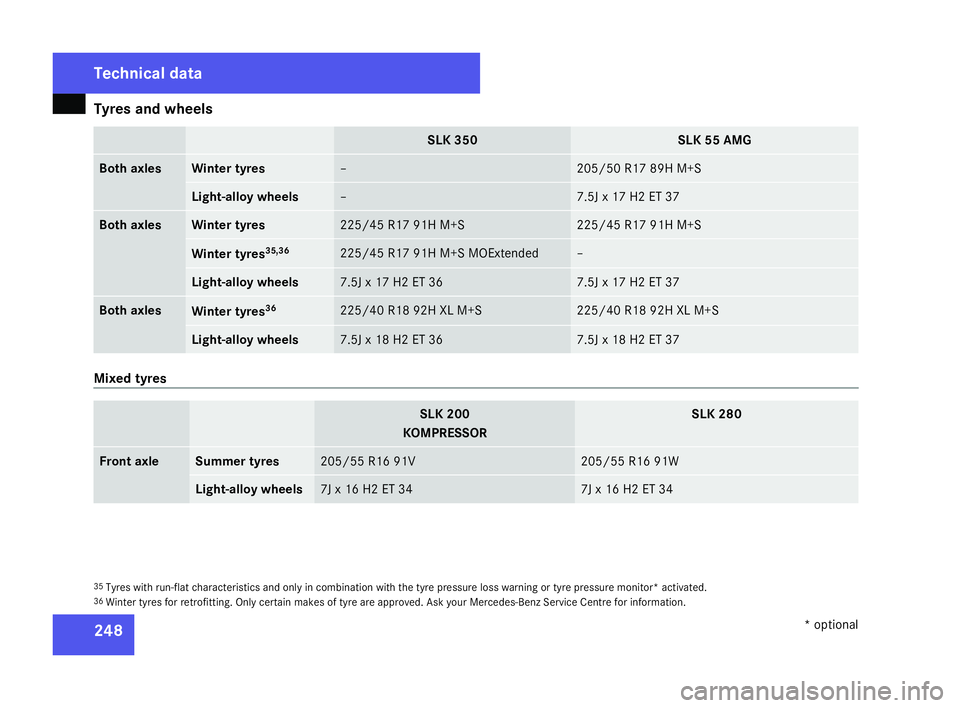
8 SLK 350 SLK 55 AMG
Both axles Winter tyres – 205/50 R17 89H M+S
Light-alloy wheels – 7.5J x 17 H2 ET 37
Both axle
s Winter tyres 225/45 R17 91H M+S 225/45 R17 91H M+S
Winter tyres
35,36 225/45 R17 91H M+S MOExtended –
Light-alloy wheels 7.5J x 17 H2 ET 36 7.5J x 17 H2 ET 37
Both axles
Winter tyres
36 225/40 R18 92H XL M+S 225/40 R18 92H XL M+S
Light-alloy wheels 7.5J x 18 H2 ET 36 7.5J x 18 H2 ET 37
Mixed tyres
SLK 200
KOMPRESSOR SLK 280
Front axle Summer tyres 205/55 R16 91
V 205/55 R16 91W
Light-alloy wheels 7J x 16 H2 ET 34 7J x 16 H2 ET 34
35
Tyres with run-flat characteristics and only in combination with the tyre pressure loss warning or tyre pressure monitor* activated.
36 Winter tyres for retrofitting. Only certain makes of tyre are approved. Ask your Mercedes-Benz Service Centre for information. Technical data
* optional
171_AKB; 3; 4, en-GB
vpfaff7,
2007-11-13T10:50:25+01:00 - Seite 248
Page 252 of 273
Tyres and wheels
24
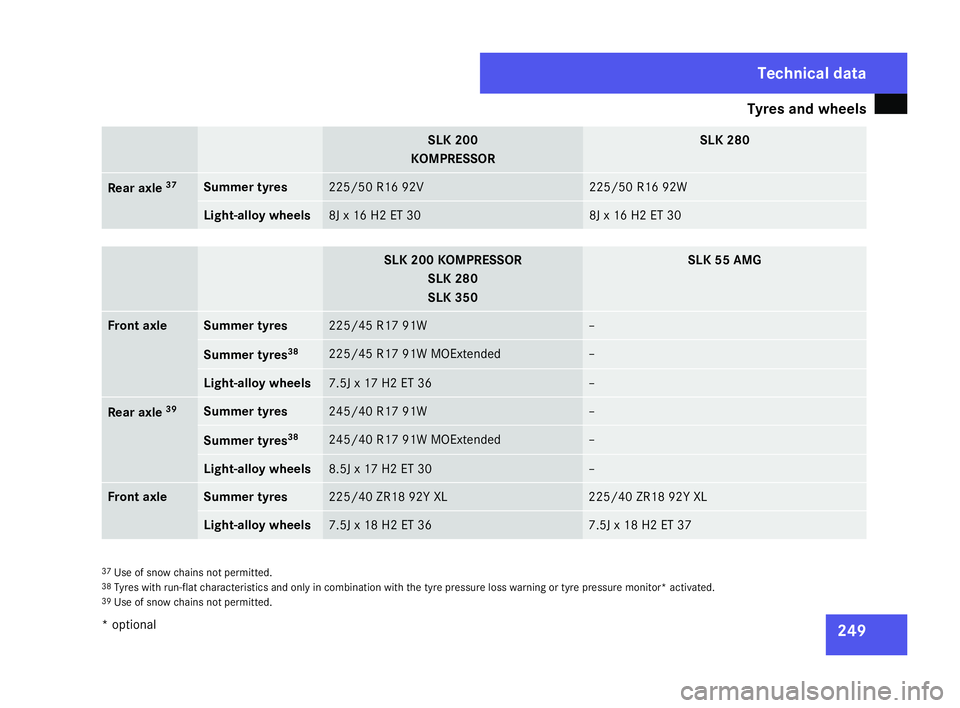
9 SLK 200
KOMPRESSOR SLK 280
Rear axle
37 Summer tyres 225/50 R16 92V 225/50 R16 92W
Light-alloy wheels 8J x 16 H2 ET 30 8J x 16 H2 ET 30
SLK 200 KOMPRESSOR
SLK 280
SLK 350 SLK 55 AMG
Front axle Summer tyres 225/45 R17 91W –
Summer tyres
38 225/45 R17 91W MOExtended –
Light-alloy wheels 7.5J x 17 H2 ET 36 –
Rear axle
39 Summer tyres 245/40 R17 91W –
Summer tyres
38 245/40 R17 91W MOExtended –
Light-alloy wheels 8.5J x 17 H2 ET 30 –
Front axl
e Summer tyres 225/40 ZR18 92Y XL 225/40 ZR18 92Y XL
Light-alloy wheels 7.5J x 18 H2 ET 36 7.5J x 18 H2 ET 37
37
Use of snow chains not permitted.
38 Tyres with run-flat characteristics and only in combination with the tyre pressure loss warning or tyre pressure monitor* activated.
39 Use of snow chains not permitted. Technical data
* optional
171_AKB; 3; 4, en-GB
vpfaff7,
2007-11-13T10:50:25+01:00 - Seite 249