2008 MERCEDES-BENZ SLK ROADSTER warning
[x] Cancel search: warningPage 119 of 273
Driving sys
tems 11
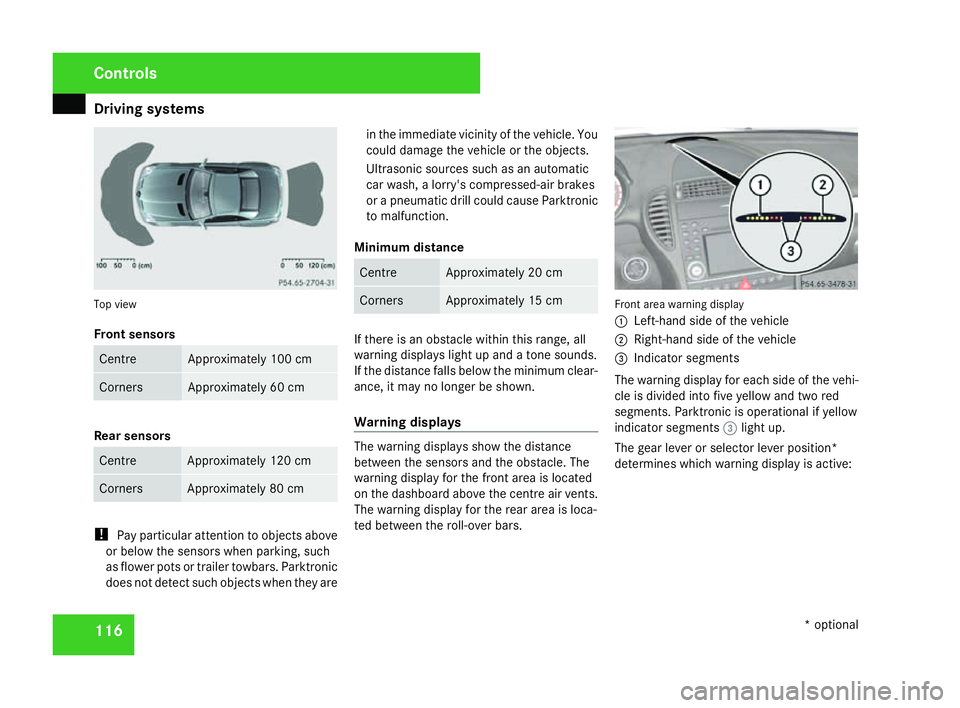
6 Top view
Front sensors
Centre Approximately 100 cm
Corners Approximately 60 cm
Rear sensors
Centre Approximately 120 cm
Corners Approximately 80 cm
!
Pay particular attention to objects above
or below the sensors when parking, such
as flower pots or trailer towbars. Parktronic
does not detect such objects when they are in the immediate vicinity of the vehicle. You
could damage the vehicle or the objects.
Ultrasonic sources such as an automatic
car wash, a lorry's compressed-air brakes
or a pneumatic drill could cause Parktronic
to malfunction.
Minimum distance Centre Approximately 20 cm
Corners Approximately 15 cm
If there is an obstacle within this range, all
warning displays light up and a tone sounds.
If the distance falls below the minimum clear-
ance, it may no longer be shown.
Warning displays
The warning displays show the distance
between the sensors and the obstacle. The
warning display for the front area is located
on the dashboard above the centre air vents.
The warning display for the rear area is loca-
ted between the roll-over bars. Front area warning display
1
Left-hand side of the vehicle
2 Right-hand side of the vehicle
3 Indicator segments
The warning display for each side of the vehi -
cle is divided into five yellow and two red
segments. Parktronic is operational if yellow
indicator segments 3light up.
The gear lever or selector lever position *
determines which warning display is active: Controls
* optional
171_AKB; 3; 4, en-GB
vpfaff7, 2007-11-13T10:50:25+01:00 - Seite 116
Page 120 of 273
Driving sys
tems 11
7
Manual transmission: Gear lever in Warning display
Forwards gear
or
Neutral Front area activated
Reverse gear Rear and front areas
activated
Automatic transmission*:
Selector lever at Warning display
D Front area activate
d R
or N Rear and front area
s
activated P No areas activated
One or more segments light up as the vehicle
approaches an obstacle, depending on the
vehicle's distance from the obstacle.
R
Front area: from the sixth segmen t
onwards, you will hear an intermittent
warning tone; from the seventh segment
onwards, you will hear a continuous warn -ing tone for a maximum of two seconds
.
You have reached the minimum distance.
R Rear area: from the first segment onwards,
you will hear an intermittent warning tone.
The interval gets shorter after each seg -
ment. From the seventh segment you will
hear a continuous warning tone. You have
reached the minimum distance. The per-
manent warning tone immediately stops
when you disengage the reverse gear in
vehicles with manual transmission or set
the automatic transmission* to transmis-
sion range Dor P.
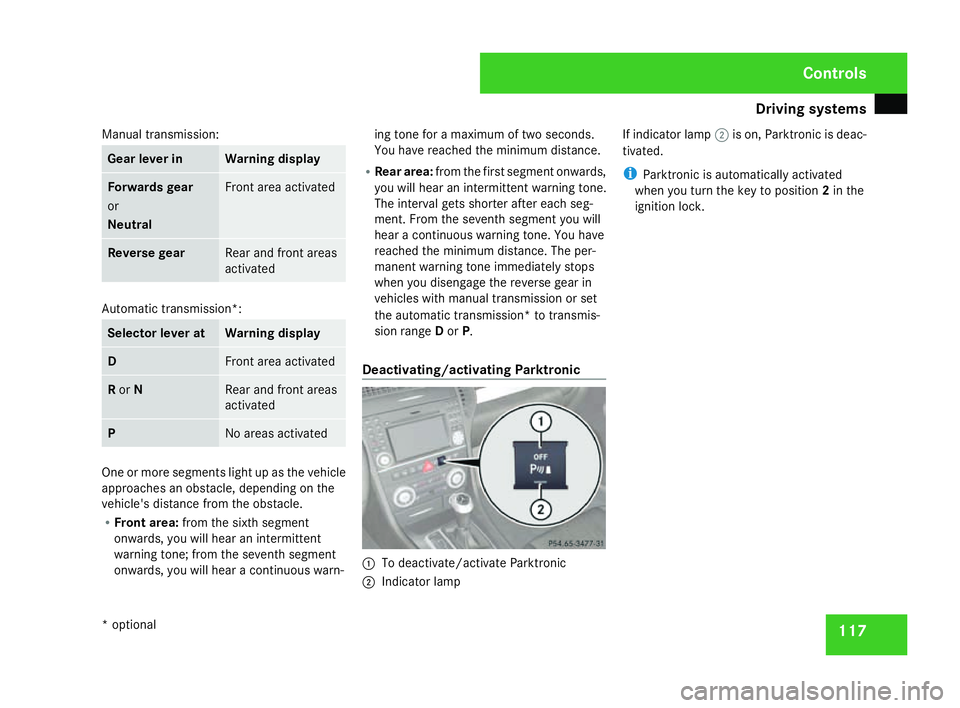
Deactivating/activating Parktronic 1
To deactivate/activate Parktronic
2 Indicator lamp If indicator lamp
2is on, Parktronic is deac-
tivated.
i Parktronic is automatically activated
when you turn the key to position 2in the
ignition lock . Cont
rols
* optional
171_AKB; 3; 4, en-GB
vpfaff7,
2007-11-13T10:50:25+01:00 - Seite 117
Page 135 of 273
Opening/closing the roof
132
i
If you open the side windows manually
after closing using the convenience closing
feature, it will remain in this position when
opened using the convenience opening fea-
ture. Switching the residual heat/auxiliary
ventilation on/off
It is possible to make use of the residual heat
of the engine to continue heating the station-
ary vehicle for up to 30 minutes after the
engine has been switched off. The heating
time depends on the set interior temperature .
i The blower will run at a low speed regard-
less of the airflow setting.
i If you activate the "residual heat" function
at high temperatures, only the ventilation
will be activated. The blower runs at
medium speed. X
Make sure that the key is in position 0in
the ignition lock or that it has been
removed.
X To switch on: press theT22
/9 23
button.
The indicator lamp in the T/9 but-
ton lights up.
X To deactivate: press theT22
/9 23
button.
The indicator lamp in the T/9 but-
ton goes out.
i The auxiliary heating/ventilation is auto-
matically deactivated after about 30
minutes, or when:
R the ignition is switched on
R the battery voltage drops Opening/closing the roo
f
For safety reasons, the roof can only be
opened and closed when the vehicle is sta-
tionary. G
Risk of accident and injury
Always open or close the roof fully before
driving .
If the roof does not open or close fully, the
roof hydraulic system is depressurised and
the roof lowers itself
R after about seven minutes if the ignition
is switched on
R after about 15 seconds if the ignition is
switched off
A warning tone sounds shortly beforehand.
The message Vario-roof lowering
appears in the multi-function display.
Lock the roof again before driving on. Oth-
erwise the unlocked roof could open durin g
the journey and cause you to lose control
of your vehicle. You or other persons could
be injured as a result.
! Never sit on the rear shelf and never store
heavy objects there. You will otherwis e
22 Vehicles with Heatmatic/Thermotronic*.
23 Vehicles with Thermatic*. Controls
* optional
171_AKB; 3; 4, en-GB
vpfaff7,
2007-11-13T10:50:25+01:00 - Seite 132
Page 137 of 273
Opening/closing the roof
134 With the key
G
Risk of injury
When opening or closing the roof, make
sure that nobody is trapped or injured by
moving parts such as the boot lid, the
hinged roof or the roof linkage .
If danger threatens, immediately release
the k orj button on the key. The
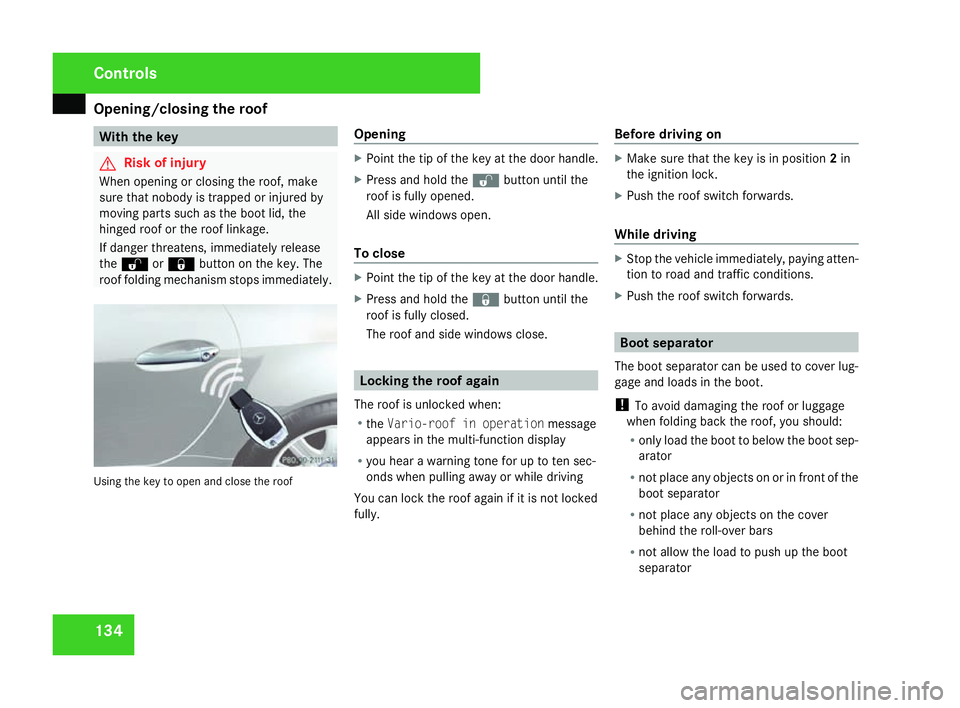
roof folding mechanism stops immediately. Using the key to open and close the roof Opening X
Point the tip of the key at the door handle.
X Press and hold the kbutton until the
roof is fully opened.
All side windows open.
To close X
Point the tip of the key at the door handle.
X Press and hold the jbutton until the
roof is fully closed.
The roof and side windows close. Locking the roof again
The roof is unlocked when:
R the Vario-roof in operatio nmessage
appears in the multi-function displa y
R you hear a warning tone for up to ten sec -
onds when pulling away or while driving
You can lock the roof again if it is not locked
fully. Before driving on X
Make sure that the key is in position 2in
the ignition lock .
X Push the roof switch forwards.
While driving X
Stop the vehicle immediately, paying atten-
tion to road and traffic conditions .
X Push the roof switch forwards. Boot separator
The boot separator can be used to cover lug-
gage and loads in the boot.
! To avoid damaging the roof or luggage
when folding back the roof, you should:
R only load the boot to below the boot sep-
arator
R not place any objects on or in front of the
boot separator
R not place any objects on the cover
behind the roll-over bars
R not allow the load to push up the boot
separator Controls
171_AKB; 3; 4, en-G
B
vpfaff7, 2007-11-13T10:50:25+01:00 - Seite 134
Page 161 of 273
Tyres and wheels
15
8
If the vehicle is to be heavily laden or driven
at high speeds, the tyre pressure must be
adapted according to the specifications given
in the fuel filler flap
(Y page 148).
Use the highest specified tyre pressure for
the spare wheel* . G
Risk of accident
Should the tyre pressure drop repeatedly:
R Check the tyre for foreign bodies.
R Check whether the wheel is losing air or
the valve is leaking .
Tyre pressure that is too low has a negative
effect on the vehicle’s active safety, which
could lead to your causing an accident .
Tyre pressure changes by approximately
0.1 bar for every 10 °C change in ambient
temperature.
If you measure the tyre pressure in enclosed
spaces where the temperature differs from
the outside temperature, you will have to cor-
rect the measured value accordingly.
When the vehicle is driven, the tyre tempera-
ture, and with it the tyre pressure, will
increase depending on the road speed and
the load on the tyres.
Therefore, you should only correct tyre pres-
sures when the tyres are cold. The pressure of warm tyres should only be
corrected if it is too low for the current oper-
ating conditions.
You will find a table of tyre pressures for var-
ious operating conditions on the inside of
your vehicle's fuel filler flap.
Driving with tyre pressure that is too high or
too low can:
R shorten the service life of the tyres
R cause increased tyre damag e
R have a negative effect on handling charac-
teristics (e.g. by causing aquaplaning)
i The tyre pressure values given for low
loads are minimum values which offer you
good ride comfort characteristics.
You can, however, also use the values given
for higher loads. These are permissible and
will not adversely affect the running of the
vehicle.
Also check the tyre pressure of the spare
wheel*. H
Environmental not
e
Check the tyre pressure regularly, and at
least every 14 days. Tyre pressure loss warning system*
G
Risk of accident
The tyre pressure loss warning system doe s
not warn you of an incorrectly set tyre pres-
sure. The table on the inside of the fuel fille r
flap will help you decide whether the tyre
pressures should be corrected.
The tyre pressure loss warning system does
not replace the need to regularly check
your vehicle's tyre pressures, since an even
loss of pressure on several tyres at the
same time cannot be detected by the tyre
pressure loss warning system.
The tyre pressure loss warning system is
not able to warn you of a sudden loss of
pressure, e.g. if the tyre is penetrated by a
foreign object.
In the event of a sudden loss of pressure,
bring the vehicle to a halt by braking care-
fully. Do not make any sudden steering
movements when doing so.
While the vehicle is in motion, the tyre pres-
sure loss warning system monitors the set
tyre pressure using the rotational speed of
the wheels. This enables the system to detect
significant pressure loss in a tyre. If the spee d
of rotation of a wheel changes as a result of
a loss of pressure, a corresponding warning Operation
* optional
171_AKB; 3; 4, en-GB
vpfaff7,
2007-11-13T10:50:25+01:00 - Seite 158
Page 162 of 273
Tyres and wheels
15
9
message will appear in the multi-function dis-
play.
The function of the tyre pressure loss warning
system is limited or delayed if:
R snow chains are fitted to your vehicle's
tyres
R road conditions are wintry
R you are driving on sand or grave l
R you adopt a very sporty driving style (cor -
nering at high speeds or driving with high
rates of acceleration)
R you are driving with a heavy load (in th e
vehicle or on the roof)
Restarting the tyre pressure loss warn-
ing system Restart the tyre pressure loss warning system
if you have :
R changed the tyre pressure
R changed the wheels or tyre s
R fitted new wheels or tyres
X Before restarting, consult the table of tyre
pressures on the inside of the fuel filler fla p
to ensure that the tyre pressure in all fou rtyres is set correctly for the operating con-
ditions concerned
.
X Also observe the notes in the section on
tyre pressures (Y page 157). G
Risk of accident
The tyre pressure loss warning system can
only give reliable warnings if you have set
the correct tyre pressure.
If an incorrect tyre pressure is set, thes e
incorrect values will be monitored.
A tyre with insufficient pressure results in
an instability of the vehicle when driving,
thus increasing the risk of an accident .
X Make sure that the key is in position 2in
the ignition lock .
The standard display appears in the multi-
function display (Y page 95).
X Press korj to select the tyre pres-
sure function:
Run Flat Indicator active
Menu: R-Button æ
X Press the reset button on the left of the
instrument cluster.
The following message appears in the
multi-function display:
Restart Run Flat Indicator ?Yes Cancel
If you wish to confirm the restart:
X Press the æbutton.
The following message appears in the
multi-function display:
Run Flat Indicator restarted
After a teach-in period, the tyre pressure
loss warning system will monitor the set
tyre pressures of all four tyres.
If you wish to cancel the restart:
X Press the çbutton.
or
X Wait until the message
Restart Run Flat Indicator?
Yes Cancel disappears.
The tyre pressure values stored at the last
restart will continue to be monitored. Operation
171_AKB; 3; 4, en-GB
vpfaff7
, 2007-11-13T10:50:25+01:00 - Seite 159
Page 163 of 273
Winter driving
160 Interchanging the wheels
G
Risk of accident
Interchange the front and rear wheels only
if they have the same dimensions: for exam-
ple size, offset, etc.
After every wheel interchange/change,
have the tightening torque checked at a
qualified specialist workshop that has the
necessary specialist knowledge and tools
to carry out the work required. Mercedes-
Benz recommends that you use a
Mercedes-Benz Service Centre for this pur-
pose. In particular, work relevant to safety
or on safety-related systems must be car-
ried out at a qualified specialist workshop.
The wheels could work loose if they are not
tightened to a torque of 110 Nm.
For safety reasons, Mercedes-Benz recom -
mends that you only use wheel bolts of the
correct size which have been approved for
Mercedes-Benz vehicles.
The wheels may be interchanged every 5,000
km to 10,000 km depending on the degree of
tyre wear, provided that the vehicle has the
same size front and rear tyres. Do not reverse
the direction of tyre rotation.
The wear patterns on the front and rear tyres
differ depending on the operating conditions. Interchange the wheels before a clear wear
pattern has formed on the tyres. The fron
t
tyres typically wear more on the shoulders
and the rear tyres in the centre.
Clean the contact surfaces of the wheel and
the brake disc thoroughly every time a whee l
is changed. Check the tyre pressure and, if
necessary, restart the tyre pressure loss
warning system*. Winter driving
Introduction to winter operation
Have your vehicle winterproofed at a qualified
specialist workshop, e.g. at a Mercedes-Ben z
Service Centre, at the onset of winter. Winter tyres
Use winter tyres at temperatures below +7 °
C and on snow or ice-covered roads. Only
then can the effect of the ABS and ES P®
driv-
ing systems be ensured in winter too.
Use winter tyres of the same make and tread
on all wheels to maintain safe handling char-
acteristics. G
Risk of accident
You must replace winter tyres with a trea d
depth of less than 4 mm immediately. They
are no longer suitable for winter use, in par-
ticular because they do not provide suffi-
cient grip. This could cause you to lose
control of your vehicle and cause an acci-
dent .
Always observe the maximum permitted
speed specified for the winter tyres you have
fitted. If you fit winter tyres which have a
lower maximum permitted speed than that of Operation
* optional
171_AKB; 3; 4, en-GB
vpfaff7,
2007-11-13T10:50:25+01:00 - Seite 160
Page 164 of 273
Winter driving
161
the vehicle, affix an appropriate warning sign
in the driver's field of vision. This can be
obtained at a qualified specialist workshop,
e.g. from a Mercedes-Benz Service Centre.
In such circumstances, you should also
restrict the maximum speed of the vehicle
using permanent Speedtronic 24
to the maxi-
mum permissible speed for winter tyres
( Y page 114). G
Risk of accident
If you fit the spare wheel* when driving with
winter tyres, bear in mind that driving sta-
bility will be impaired owing to unstable
cornering characteristics caused by the dif-
ferent tyres. You should therefore adap t
your driving style and drive carefully.
Have the spare wheel* replaced at th e
nearest qualified specialist workshop
which has the necessary specialist knowl-
edge and tools to carry out the work
required. Mercedes-Benz recommends
that you use a Mercedes-Benz Service
Centre for this purpose. In particular, work
relevant to safety or on safety-related sys-
tems must be carried out at a qualified
specialist workshop . Snow chains
For safety reasons, Mercedes-Benz recom-
mends that you only use snow chains which
have been specially approved for your vehicle
by Mercedes-Benz or are of a correspondin g
standard of quality.
! Information about the use of snow chain-
compatible AMG winter tyres is applicable
for AMG tyres. Use of snow chains is only
permissible with these tyres.
If you intend to fit snow chains, please bear
the following points in mind:
R Snow chains cannot be fitted to all wheel /
tyre combinations.
R Snow chains must not be fitted to emer-
gency spare wheels, e.g. a collapsibl e
emergency spare wheel.
R Fit snow chains to both rear wheels. Com-
ply with the manufacturer's installation
instructions.
! If snow chains are fitted to the front
wheels, they may come into contact with
the bodywork and axle components whe n
the vehicle is in motion and damage the
tyre or the vehicle. Do not exceed the maximum permissibl
e
speed of 50 km/h.
i You may wish to deactivate ES P®
when
pulling away with snow chains fitted
( Y page 51). This way you can allow the
wheels to spin in a controlled manner, ach-
ieving an increased driving force (cutting
action). Winter driving
G
Risk of accident
Do not shift down for additional engine
braking on a slippery road surface. Thi s
could cause the drive wheels to lose thei r
grip and the vehicle could skid.
You should drive particularly carefully on slip-
pery road surfaces. Avoid sudden accelera-
tion, steering and braking manoeuvres.
If the vehicle threatens to skid or cannot be
stopped when moving at low speed:
24 Only available for certain countries. Operation
171_AKB; 3; 4, en-GB
vpfaff7,
2007-11-13T10:50:25+01:00 - Seite 161 Z