Page 466 of 569
465 Practical hints
What to do if …
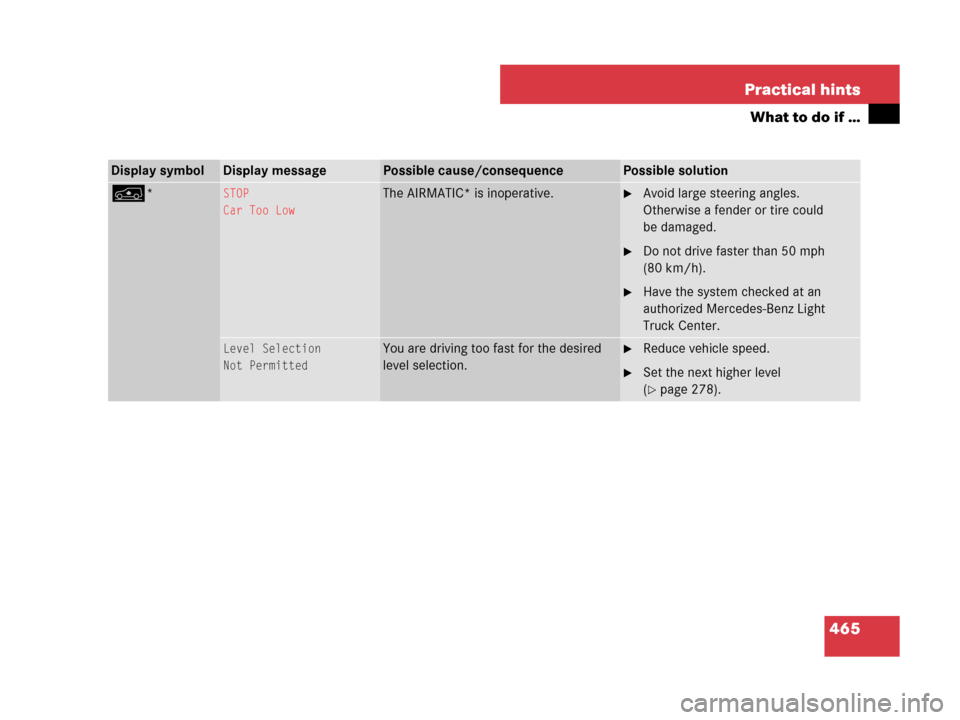
Display symbolDisplay messagePossible cause/consequencePossible solution
n*STOP
Car Too LowThe AIRMATIC* is inoperative.�Avoid large steering angles.
Otherwise a fender or tire could
be damaged.
�Do not drive faster than 50 mph
(80 km/h).
�Have the system checked at an
authorized Mercedes-Benz Light
Truck Center.
Level Selection
Not PermittedYou are driving too fast for the desired
level selection.�Reduce vehicle speed.
�Set the next higher level
(
�page 278).
Page 467 of 569
466 Practical hints
What to do if …
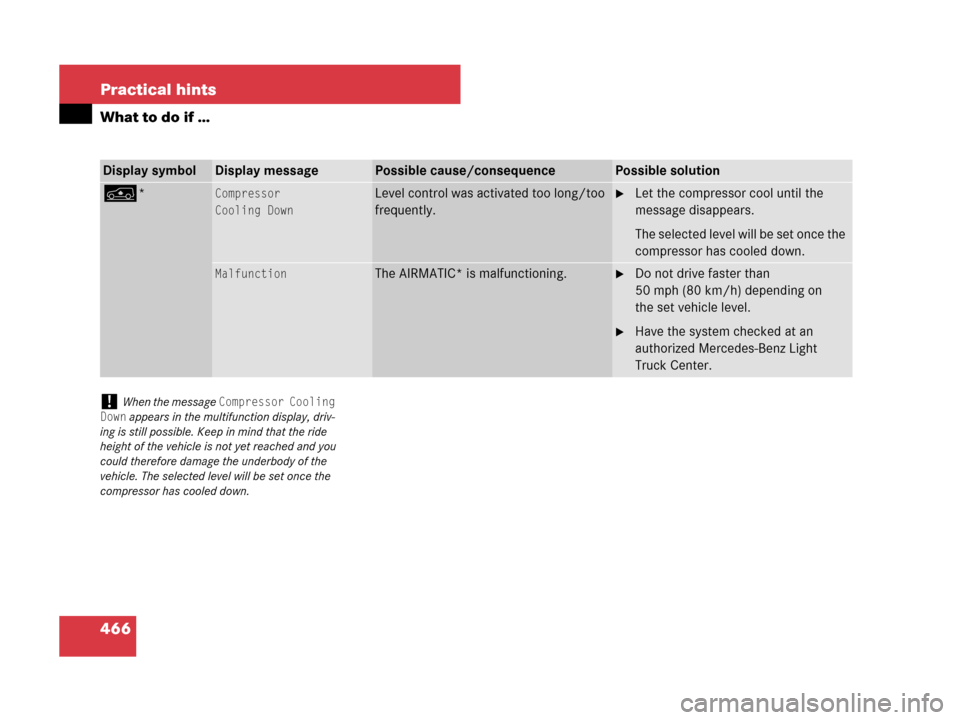
Display symbolDisplay messagePossible cause/consequencePossible solution
n*Compressor
Cooling DownLevel control was activated too long/too
frequently.�Let the compressor cool until the
message disappears.
The selected level will be set once the
compressor has cooled down.
MalfunctionThe AIRMATIC* is malfunctioning.�Do not drive faster than
50 mph (80 km/h) depending on
the set vehicle level.
�Have the system checked at an
authorized Mercedes-Benz Light
Truck Center.
!When the message Compressor Cooling
Down
appears in the multifunction display, driv-
ing is still possible. Keep in mind that the ride
height of the vehicle is not yet reached and you
could therefore damage the underbody of the
vehicle. The selected level will be set once the
compressor has cooled down.
Page 472 of 569

471 Practical hints
Where will I find ...?
Setting up the collapsible wheel chock
The collapsible wheel chock serves to ad-
ditionally secure the vehicle, e.g. while
changing the wheel.
1Tilt the plate upward
2Fold the lower plate outward
3Insert the plate�Tilt both plates upward1.
�Fold the lower plate outward2.
�Guide the tabs of the lower plate all the
way into the openings of base plate3.
For information on where to place wheel
chocks when changing a wheel, see
“Lifting the vehicle” (
�page 493).
Spare wheel
Warning!G
The dimensions of the spare wheel are
different from those of the road wheels. As
a result, the vehicle handling characteristics
change when driving with a spare wheel
mounted. Adapt your driving style accord-
ingly.
The spare wheel is for temporary use only.
When driving with a spare wheel mounted,
ensure proper tire inflation pressure and do
not exceed a vehicle speed of
50 mph (80 km/ h).
Drive to the nearest Mercedes-Benz Light
Truck Center as soon as possible to have the
spare wheel replaced with a regular road
wheel.
Never operate the vehicle with more than
one spare wheel mounted.
Do not switch off the ESP
® with a spare
wheel mounted.
Page 473 of 569
.
Removin")
472 Practical hints
Where will I find ...?
Your vehicle is equipped with a spare
wheel with collapsible tire. The spare
wheel is located underneath the cargo
compartment floor (
�page 467).
Removing the spare wheel
1Retaining screw
2Spare wheel
3Vehicle tool kit storage well casing
�Remove the jack from the vehicle tool
kit (
�page 469).
�Loosen retaining screw 1 by turning it
counterclockwise.
�Turn vehicle tool kit storing well
casing3 by approximately 180°.
The electric air pump (
�page 469)
points towards the rear.
�Remove vehicle tool kit storage well
casing 3.
�Remove spare wheel 2.
Reinstalling the spare wheel after use
There are two guide pins in the spare wheel
well that serve to hold the spare wheel in
place.1Guide pins
1Guide pins
2Spare wheel
iFor information on how to mount the spare
wheel, see “Mounting the spare wheel”
(
�page 493).
iIf retaining screw 1 does not come loose,
turn vehicle tool kit storing well casing 3 slightly
counterclockwise. Retaining screw 1 should
then come loose easily.
Page 478 of 569

477 Practical hints
Resetting activated head restraints
�Resetting activated head restraints
If the active head restraints have been
triggered in a rear-end collision, the active
head restraints must be reset. Otherwise,
the active head restraints cannot offer
any additional protection in the event of
another rear-end collision.
You can tell that the active head restraints
have been activated when they have been
moved forward and cannot be adjusted.
Vehicles without Rear Seat Entertain-
ment Package*1Pull
2Adjust downward
3Press
�Pull the top of the head restraint cush-
ion in direction of arrow 1 as far as it
will go.
�Adjust the head restraint cushion
downward in direction of arrow 2 as
far as it will go.
�Firmly press the top of the active head
restraint cushion towards the head
restraint cover in direction of arrow 3
until it engages.
Warning!G
For safety reasons, have the active head
restraints checked by an authorized
Mercedes-Benz Light Truck Center after a
rear-end collision.
Warning!G
When pushing back the head restraint
cushion, take care that your fingers do not
become caught between the head restraint
cushion and the cover. Failing to do so may
lead to injury.
!Be careful not to damage upholstery.
iFor your convenience, we recommend that
you have this work carried out by an authorized
Mercedes-Benz Light Truck Center.
iPressing the head restraint cushion back
requires high force. If you encounter difficulties
when pushing the head restraint back, please
have the procedure performed at an authorized
Mercedes-Benz Light Truck Center.
��
Page 480 of 569

479 Practical hints
Replacing SmartKey batteries
�Replacing SmartKey batteries
If the batteries in the SmartKey or the
SmartKey with KEYLESS-GO* are
discharged, the vehicle can no longer be
locked or unlocked. It is recommended to
have the batteries replaced at an autho-
rized Mercedes-Benz Light Truck Center.
Batteries contain materials that can harm
the environment if disposed of improperly.
Recycling of batteries is the preferred
method of disposal. Many states require
sellers of batteries to accept old batteries
for recycling.Replacement batteries: Lithium, type
CR 2025 or equivalent.
�Remove the mechanical key from the
SmartKey (
�page 474).
1Mechanical key
2Battery compartment
�Insert mechanical key 1 into opening.
�Press mechanical key 1 in direction of
arrow.
The battery compartment is unlatched.
�Pull battery compartment 2 out of the
SmartKey housing.
3Batteries
4Contact springs
�Pull out batteries3.
�Using a line-free cloth, insert new bat-
teries 3 under contact springs 4 with
the positive terminal (+) side facing up.
�Return battery compartment 2 into
housing until it locks into place.
�Slide mechanical key 1 back into
SmartKey.
�Check the operation of the SmartKey
or SmartKey with KEYLESS-GO*.
Warning!G
Keep the batteries out of reach of children.
If a battery is swallowed, seek medical help
immediately.
iWhen inserting batteries, make sure they
are clean and free of lint.
iWhen replacing batteries, always replace
both batteries. The required replacement
batteries are available at any Mercedes-Benz
Light Truck Center.
Page 481 of 569
480 Practical hints
Replacing bulbs
Bulbs
Safe vehicle operation depends on proper
exterior lighting and signaling. It is there-
fore essential that all bulbs and lamp
assemblies are in good working order at
all times.
Correct headlamp adjustment is extremely
important. Have headlamps checked and
readjusted at regular intervals and when a
bulb has been replaced. Contact an autho-
rized Mercedes-Benz Light Truck Center
for headlamp adjustment.iIf the headlamps or front fog lamps are
fogged up on the inside as a result of high humid-
ity, driving the vehicle a distance with the lights
on should clear up the fogging.iSubstitute bulbs will be brought into use
when the following lamps malfunction:
�Turn signal lamps
�Brake lamps
�Parking lamps
�Tail lamps
Read and observe messages in the multifunction
display (
�page 455).
Page 482 of 569
481 Practical hints
Replacing bulbs
Front lampsRear lamps
LampType
1Parking/standing lampW 5 W
2Turn signal lampPY 21 W
3Additional turn signal
lamp
LED
4Headlamps:
Low beam
H7 (55 W)
Bi-Xenon headlamps*:
Low beam1D2S-35 W
5Headlamps:
High beam/high beam
flasher
H7 (55 W)
Bi-Xenon headlamps*:
High beam/high beam
flasher spot lamp
H7 (55 W)
6Side marker lampWY 5 W
7Front fog lampH7 (55 W)
Corner-illuminating
front fog lamp*
H7 (55 W)
1Vehicles with Bi-Xenon* headlamps: Do not
replace the Bi-Xenon bulbs yourself. Contact an
authorized Mercedes-Benz Light Truck Center.
LampType
LampType
8High-mounted brake
lamp
LED
9Tail, brake, and side
marker lamp
P 21 W
aTurn signal lampPY 21 W
bBackup lampP 21 W
cRear fog lamp (driver’s
side only)
P 21 W
dLicense plate lampsC 5 W


Bi-Xenon headla")