Page 7 of 232

7
Where to find it
Introduction
� Where to find it
This Operator’s Manual is designed to pro-
vide support information for you, the
COMAND operator. Each chapter has its
own guide color to provide fast access to
information.
At a glance
Here you will find an overview of
all COMAND control elements and system
components. If you are operating
COMAND for the first time or if you have
rented or borrowed the vehicle, this is the
chapter you should read first.
Audio
Here you will find all the information on
how to use the radio, CD player (CD,
MP3 CD), CD changer* (CD, MP3 CD) and
AUX operation.
Rear Audio/Video*
Hear you can learn about the rear audio*
functions and the rear seat entertainment*
operation.
Satellite radio*
This chapter provides information on how
to select a station and a program category.
Telephone*
Here you can learn in detail about the
many functions of the telephone, how to
initiate an emergency call and use the pho-
ne book.
Navigation
This chapter provides detailed information
on the following topics:
�Destination input
�Route guidance including detour
�Last destinations and destination
memory
�POIs
�Today’s plan
System
Here you will find all the information about:
�COMAND system settings
�SMS*
�Tele Aid*
Directories
The glossary explains the most important
technical terms.
The table of contents and index directory
will help you quickly locate the information
you need.
Page 35 of 232

35 At a glance
Menu system
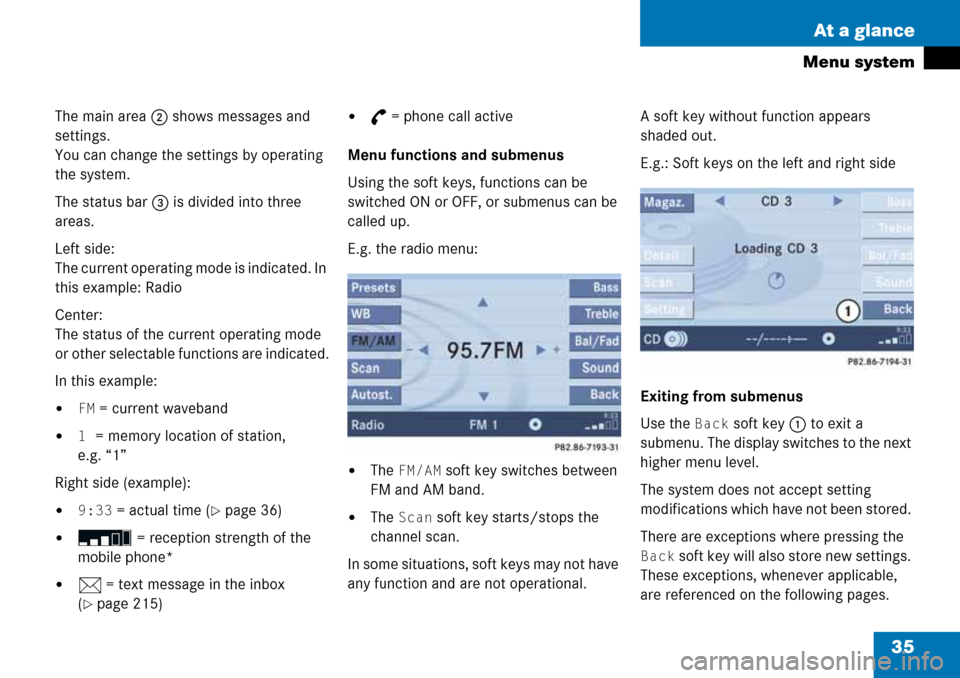
The main area 2 shows messages and
settings.
You can change the settings by operating
the system.
The status bar 3 is divided into three
areas.
Left side:
The current operating mode is indicated. In
this example: Radio
Center:
The status of the current operating mode
or other selectable functions are indicated.
In this example:
�FM = current waveband
�1 = memory location of station,
e.g. “1”
Right side (example):
�9:33 = actual time (�page 36)
� = reception strength of the
mobile phone*
�n = text message in the inbox
(
�page 215)
�G = phone call active
Menu functions and submenus
Using the soft keys, functions can be
switched ON or OFF, or submenus can be
called up.
E.g. the radio menu:
�The FM/AM soft key switches between
FM and AM band.
�The Scan soft key starts/stops the
channel scan.
In some situations, soft keys may not have
any function and are not operational. A soft key without function appears
shaded out.
E.g.: Soft keys on the left and right side
Exiting from submenus
Use the
Back soft key 1 to exit a
submenu. The display switches to the next
higher menu level.
The system does not accept setting
modifications which have not been stored.
There are exceptions where pressing the
Back soft key will also store new settings.
These exceptions, whenever applicable,
are referenced on the following pages.
Page 38 of 232

38 At a glance
Quick reference COMAND
When the audio is playing, the volume
knob will adjust the audio volume, and also
the volume for telephone and navigation.
During a telephone call (talking or ringing),
the volume knob will adjust the telephone
voice and ringer volume.
The volume for the navigation announce-
ments can only be changed while an
announcement is being made.
When you adjust the volume, the system
will automatically store the setting for the
current operating mode.Adjusting the volume�At the COMAND, turn the rotary control
at the e key.
or
�Press J or I on the
multifunction steering wheel.
The volume is turned up or down
depending on the direction of rotation
or the key pressed on the
multifunctional steering wheel.
The system remembers the volume
setting when it is switched off.Automatic volume control
The automatic volume control feature
adjusts the volume depending on:
�vehicle speed (only in vehicles without
premium sound system*)
or
�ambient noise inside the vehicle (only
in vehicles with premium sound
system*)
Volume
i
When the system is switched on again,
the volume may be lower or higher than
at the time when the system was
switched OFF.
This will be the case when the volume
was adjusted to a value outside a
certain range when the system was
switched off.
i
This function is active all the time and
can not be turned on and off.
Page 59 of 232

59 Audio
CD changer* operation
�Wait until the LED in the button 3
flashes green.
This indicates that the CD changer*
requests a CD.
�Insert an audio CD or a MP3 CD into
the CD slot 2 within approx. 15
seconds. Insert the CD face up.
The CD is pulled in. The red LED in the
corresponding magazine compartment
button 3 lights up continuously. The
system starts playing the CD.
The loading procedure is completed.
�Retract the CD changer* (�page 57).Loading all six magazine compartments
1CD changer* release button
2CD slot
3Magazine compartment buttons
Initial situation: all magazine compart-
ments empty.
The CD changer* loads all magazine com-
partments beginning with compartment 1.
�Access the CD changer* (�page 57).
�Press and hold the button 3 of an
empty magazine compartment for
more than 2 seconds.
The LEDs of all magazine compartment
buttons 3 briefly light up green
several times.
�Wait until the LED in the first magazine
compartment button 3 flashes green.This indicates that the CD changer*
requests a CD.
�Insert an audio CD or a MP3 CD into
the CD slot 2 within approx. 15
seconds. Insert the CD face up.
The CD is pulled in. The magazine
compartment is loaded.
The red LED in the corresponding
magazine compartment button 3
lights up continuously.
The CD changer* then requests
insertion of the next CD. The LED in the
corresponding magazine compartment
button 3 flashes green.
�Repeat the last step until all six
magazine compartments are loaded.
The system plays the sixth CD. The
LEDs in all magazine compartment
buttons 3 light up red continuously.
The loading procedure is completed.
�Retract the CD changer* (�page 57).
Page 61 of 232
61 Audio
CD changer* operation
Ejecting all CDs
1CD changer* release button
2CD slot
3Magazine compartment buttons
�Access the CD changer* (�page 57).
�Press and hold the button of a loaded
magazine compartment 3 for more
than 2 seconds.
The button LEDs of all loaded magazine
compartments will briefly flash red,
several times.
The CD changer* ejects the CDs one
after another.
�Within 15 seconds, remove each CD
from the slot 2.The CD will be pulled in again if it is not
removed from the slot within
approx.15 seconds. The system starts
playing the CD again.
The ejection procedure is completed
when all CDs are removed, or when the
procedure is aborted by the CD
changer*.
Retract the CD changer* (
�page 57).
Page 63 of 232
63 Audio
CD operation
� CD operation
Playback locations for audio CDs are:
�the CD drive in the COMAND
�the CD changer*.
CD drive
CD changer*
�In the Audio menu (�page 44), press
the
CD or the CD soft key.
CD changer* main menu
1CD number or name of the CD currently
playing
2Track number or name of the track
currently playing
3CD - CD changer*
CD - CD drive
Actual track number/max. track
number on CD and elapsed playback
time
4Symbol for inserted CD
Switching to CD operation
i
The CD drive is located behind the
display unit (
�page 55).
i
The CD changer* can accommodate up
to 6 audio or MP3 CDs. The CD
changer* is located in the glove box.
If a CD changer* is connected to the
COMAND, the
CD soft key is
available.
i
The Magaz. soft key is only assigned
when the CD changer* is active.
If the CD changer* has already read the
CDs, the Magazine menu will appear
(
�page 66) when you press the
Magaz. soft key.
Page 65 of 232
65 Audio
CD operation
You can select a audio or MP3 CD:
�in the CD list (�page 65)
�with the number keypad (�page 65)
�in the magazine menu (�page 66)
In the CD list
The CD list includes all loaded CDs. Only
one list entry is visible at a time.
The entry is displayed above the track
indication. It shows the number of the CD
currently playing.
�Push the joystick to H or h to
select another CD from the list.
Loading CD is displayed.
After the CD is loaded, playback
begins. With the number keypad
�Press a number key, e.g. 2 to select
the corresponding CD.
Loading CD 2 is displayed.
The CD is changed. The selected CD is
played back.
The message
No CD will
appear if a selected slot is empty.
Selecting a CD (CD changer* only)
i
Selection is only possible if at least two
audio or MP3 CDs have been loaded
into the changer.
i
The number keys 1 - 6 can be used
for direct selection.
Keys
1 - 6 magazine slots 1 to 6
of the CD changer*
Page 66 of 232
66 Audio
CD operation
In the Magazine menu
�Press the Magaz. soft key.
The Magazine menu is displayed.
�Push the joystick to g or G to
select a CD.
�Press E.
or
�Press one of the number keys 1 to
6.
The CD is changed. The message
Loading CD will appear.
You can select a track:
�with g or h (�page 66)
�with the joystick (�page 66)
�with the number keypad (�page 67)
�with CD track scan (�page 67)
With g or h
�Activate the main CD menu
(
�page 63).
Next track
�Press h.
The next track is played.Previous track or start of title (if more
than 10 seconds of playing time has
elapsed)
�Press g.
Playback begins.
Select any desired track
�Press g or h as many times as
necessary.
With the joystick
�Push the joystick to g or G to play
the next or previous track.
i
The name of the CD instead of e.g. CD1
is displayed if the information is
available.
Track select