Page 70 of 232
70 Audio
CD operation
�Repeat track
The system repeats the current track
until you switch the function off.
�Repeat CD (CD changer* only)
The system repeats the current CD
until you switch the function off.View track detail
At any time during playback an expanded
view of a track title can be displayed in the
CD main menu via a separate window.
�Press the Detail soft key.To cancel
�Press the Detail soft key again.
or
The window will automatically disappear in
approx. 5 seconds.
Page 80 of 232

80 Audio
MP3 CD operation
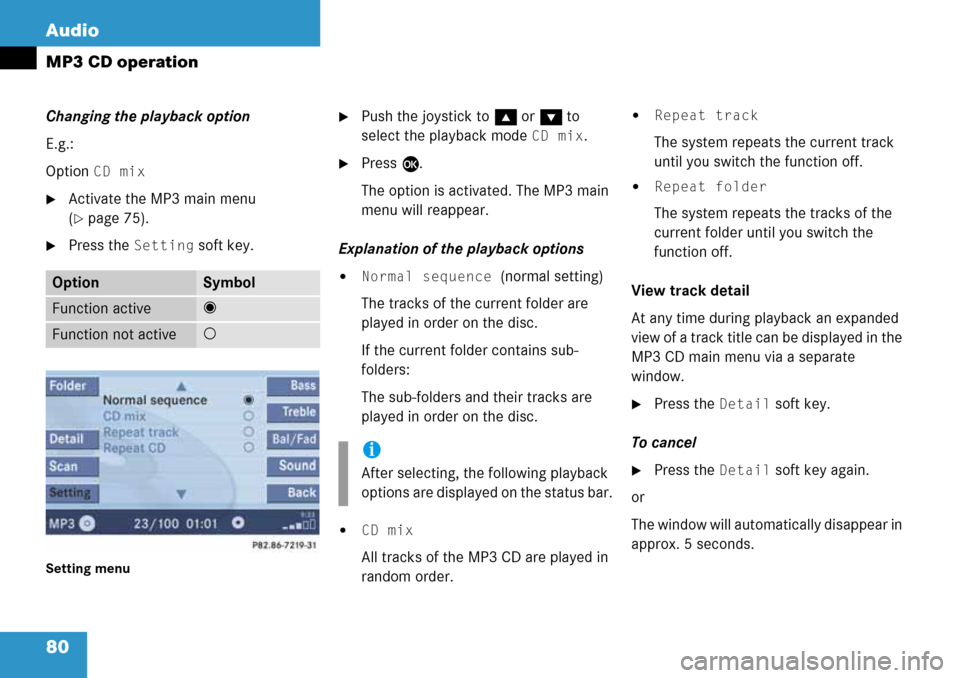
Changing the playback option
E.g.:
Option
CD mix
�Activate the MP3 main menu
(
�page 75).
�Press the Setting soft key.
Setting menu
�Push the joystick to g or G to
select the playback mode
CD mix.
�Press E.
The option is activated. The MP3 main
menu will reappear.
Explanation of the playback options
�Normal sequence (normal setting)
The tracks of the current folder are
played in order on the disc.
If the current folder contains sub-
folders:
The sub-folders and their tracks are
played in order on the disc.
�CD mix
All tracks of the MP3 CD are played in
random order.
�Repeat track
The system repeats the current track
until you switch the function off.
�Repeat folder
The system repeats the tracks of the
current folder until you switch the
function off.
View track detail
At any time during playback an expanded
view of a track title can be displayed in the
MP3 CD main menu via a separate
window.
�Press the Detail soft key.
To cancel
�Press the Detail soft key again.
or
The window will automatically disappear in
approx. 5 seconds.
OptionSymbol
Function active_
Function not active-
i
After selecting, the following playback
options are displayed on the status bar.
Page 95 of 232
95 Rear Audio/Video*
Rear Seat Entertainment (RSE) operation* (except CLK-Class)
With the remote control
�Press ç or æ as often as
necessary to adjust the volume.
A window will appear indicating the
current volume level.
At the monitor
�Press or as often as
necessary to adjust the volume.
A window will appear indicating the
current volume level.Adjusting the brightness
At the monitor
�Press or .
The display brightness changes
gradually.
With the remote control
�Adjust the display brightness in the
System menu (
�page 109).Adjusting the monitor angle
You can tilt the monitor screen upward or
downward.
�Upward: Push gently against the upper
edge 1 of the monitor screen.
�Downward: Push gently against the
lower edge 2 of the monitor screen.
Adjusting the headset volume
i
After connecting the headsets
(
�page 92) you can adjust the volume.
Adjusting the display
Page 106 of 232

106 Rear Audio/Video*
Rear Seat Entertainment (RSE) operation* (except CLK-Class)
Adjusting bass and treble
�Turn the thumb wheel to highlight the
Bass or Treble soft key and press to
select.
A bar will appear at the top of the
screen.
�Press h or H.
The respective setting is changed.
Adjusting brightness, contrast and
color
�Turn the thumb wheel while the soft
keys are displayed (
�page 101) to
highlight the
Brightn., Contr. or
Color soft key and press to select.
A bar will appear at the top of the
screen.
�Press h or H.
The respective setting is changed.Scene/chapter skip
If the movie is divided into chapters or
scenes, you can skip them while the movie
is playing. Some DVDs will not allow this in
certain portions of the movie (e.g. during
screen credits, age restriction and/or pa-
rental advisories).
�Press H or G.
H = Next chapter or scene
G = Previous chapter or scene or
beginning of scene if scene has been
playing for more than 10 seconds.
A window will appear at the top of the
screen indicating the scene number.Fast forward/reverse
�Press and hold H or G during
DVD playback.
H = fast forward
G = fast reverse
�Release the button to stop fast
forward/reverse.
i
Chapter/scene selection may also be
possible in the menu on the DVD
(
�page 103).
Page 116 of 232
116 Satellite radio*
Satellite radio operation
� Satellite radio operation
See “Subscribing to satellite radio” for im-
portant subscription information
(
�page 115).
�Press B to switch to satellite radio
operation.
The message will appear at start up or
when the signal is not available.After the COMAND acquires the
signal, the Satellite radio main menu will
appear. The station last tuned to will begin
to play.
Satellite radio main menu
1Program category
2Station name
3Memory preset selected if available
and channel numberMuting
�Press J while listening to the satel-
lite radio.
The symbol R will appear in the status
bar.
�Press J again to resume listening to
the current station.
The symbol R will have disappeared.
Switching on
i
No Satellite receiver:
The message
No Satellite Radio
will appear in a window.
i
The Sound soft key is available if
COMAND is equipped with a sound
amplifier*.
i
You can display 2 in full:
�Station information (�page 119)
Page 124 of 232

124 Telephone*
Important notes
�Please read the chapter “Telephone”
first before attempting to operate your
telephone.
�Please also read the important notes in
the telephone operating manual.
�Always drive with extreme caution
when you operate the telephone
hands-free.
�For safety reasons, you should not use
the mobile telephone handset to make
a call while driving the vehicle.
�If the signal strength is very weak (dis-
play in the symbol bar of all menus):
Wait until reception improves before
making a call.
�Close the windows and reduce all out-
side noise as much as possible when
you use hands-free operation.
�Also make sure that the air vents are
not pointed in the direction of the
microphones located in the overhead control panel near the rear view mirror.
Adjust air vents and/or reduce blower
speed if necessary.
�A brief disconnection from the cellular
network is not a malfunction, as this
can occur when the network switches
areas. The phone will automatically try
to sign on to a network again.
�If the message Enter Unlock Code
appears, enter the unlock code to en-
able all telephone functions
(
�page 129). If you do not do so, only
the emergency call (911) is available.
GSM mobile phone
�If the message Please enter PIN-
Code
on the mobile phone appears, en-
ter the PIN-code to enable the tele-
phone functions (
�page 129). If you
do not do so, only the emergency (911)
call is available on the mobile phone.In the following situations, it is not possible
or not yet possible to use the telephone:
�The telephone is already unlocked but
is not or not yet registered in the net-
work.
The message
No Serv appears in the
status bar. The telephone will try to
register into an existing network. If the
network is available, the telephone will
be ready for use.
The above message also appears
�if the network is no longer available
due to weak signals
�The message Telephone being ac-
tivated, please wait
appears.
COMAND prepares the telephone for
use. Select other system functions, e.g.
radio, by pressing the corresponding
button or wait until the telephone is ac-
tive.
Page 131 of 232

131 Telephone*
Telephone operation
The telephone is ready for operation
Message
Ready and the reception
strength Ö are shown on the status bar.
Other messages
�ROAMING
The telephone is using a non home type
system
�No Serv
The telephone is not logged into a net-
work
Full screen messages:
Phone not inserted
�Plug the mobile phone into the mobile
phone cradle*. Refer to the separate
mobile phone operator’s manual.
Phone not available
Your vehicle may not have a mobile phone
cradle* installed and/or the telephone
control unit may not be coded properly.
Contact an authorized Mercedes-Benz
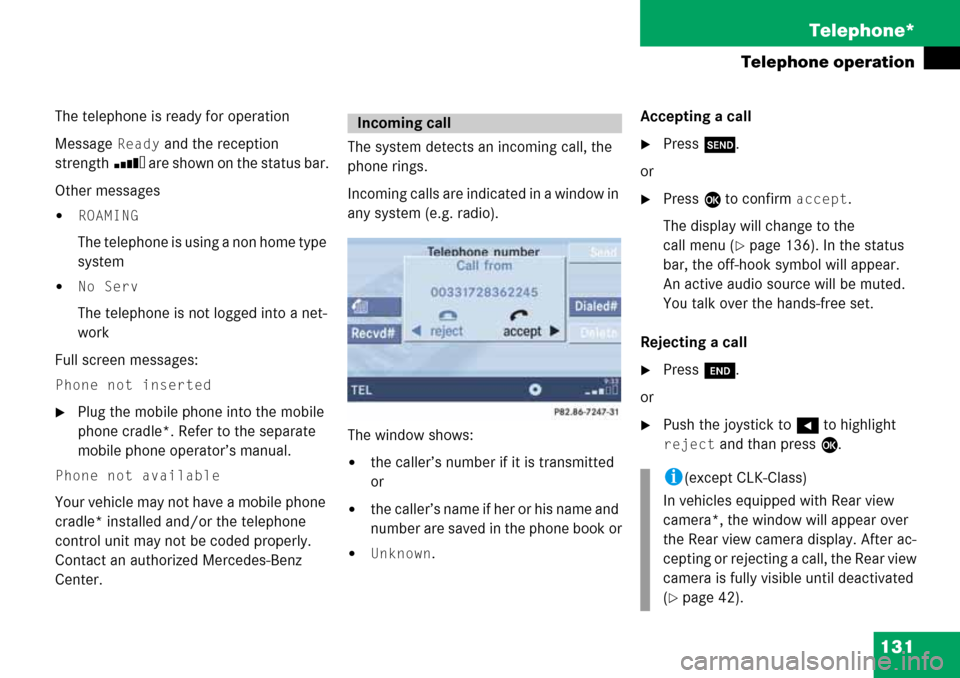
Center. The system detects an incoming call, the
phone rings.
Incoming calls are indicated in a window in
any system (e.g. radio).
The window shows:
�the caller’s number if it is transmitted
or
�the caller’s name if her or his name and
number are saved in the phone book or
�Unknown.Accepting a call
�Press k.
or
�Press E to confirm accept.
The display will change to the
call menu (
�page 136). In the status
bar, the off-hook symbol will appear.
An active audio source will be muted.
You talk over the hands-free set.
Rejecting a call
�Press K.
or
�Push the joystick to H to highlight
reject and than press E.
Incoming call
i(except CLK-Class)
In vehicles equipped with Rear view
camera*, the window will appear over
the Rear view camera display. After ac-
cepting or rejecting a call, the Rear view
camera is fully visible until deactivated
(
�page 42).
Page 190 of 232
190 Navigation*
During route guidance
Trail settings
With this function is active, the COMAND
records a trail every time the vehicle is in
an OFF ROAD area (more than 0.25 miles
away from a digitized road).
The system places trail dots on the screen
until it matches to a digitized road again.
�In the Settings menu (�page 185),
press the
Trail soft key.
The options
On and Off are displayed.
1Percentage of used memoryThe symbol _ indicates the present
setting.
�Move the E joystick in g or G
direction to select the option with the
symbol -.
�Press E.
Depending on the previous setting, the
Trail is switched on or off.
�Press the Back soft key to confirm and
return to the map.
Delete a trail
If there is a trail in memory, you can delete
it.
�Press the Clear soft key.
The message
Are you sure you
want to clear all trails?
will
appear in a window.
�Push the joystick to H to select Yes.
�Press E.
The trail is deleted.
If you don’t want to delete a trail
�Press E to confirm No.