Page 461 of 561
460 Practical hints
Resetting activated head restraints
�Firmly press the active head restraint
cushion backward towards the head
restraint cover in direction of arrow
until it engages.
�Repeat this procedure on the active
head restraint for the second front
seat.
�After resetting the active head
restraints store reset tool1 in the
Mercedes-Benz vehicle literature
pouch.
For information on active head restraints,
see “Active head restraint” (
�page 88).
For information on head restraint adjust-
ment, see “Seats” (
�page 43).
��
Page 462 of 561

461 Practical hints
Replacing SmartKey batteries
�Replacing SmartKey batteries
If the batteries in the SmartKey or the
SmartKey with KEYLESS-GO* are dis-
charged, the vehicle can no longer be
locked or unlocked. It is recommended to
have the batteries replaced at an autho-
rized Mercedes-Benz Light Truck Center.
Batteries contain materials that can harm
the environment if disposed of improperly.
Recycling of batteries is the preferred
method of disposal. Many states require
sellers of batteries to accept old batteries
for recycling.Replacement batteries: Lithium, type
CR 2025 or equivalent.
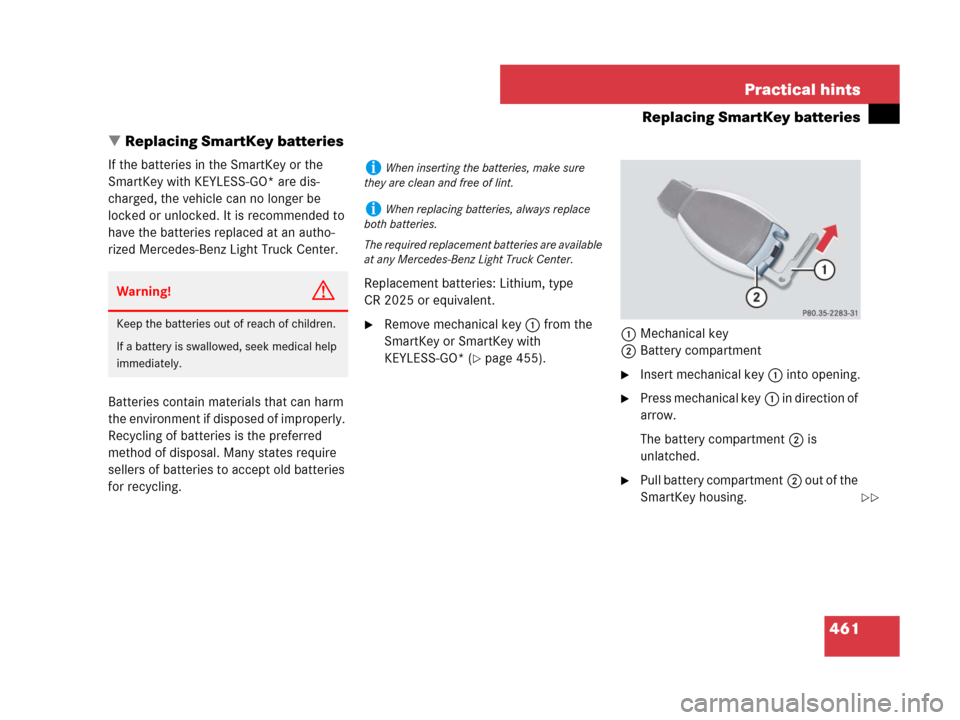
�Remove mechanical key1 from the
SmartKey or SmartKey with
KEYLESS-GO* (
�page 455).1Mechanical key
2Battery compartment
�Insert mechanical key1 into opening.
�Press mechanical key1 in direction of
arrow.
The battery compartment2 is
unlatched.
�Pull battery compartment2 out of the
SmartKey housing.
Warning!G
Keep the batteries out of reach of children.
If a battery is swallowed, seek medical help
immediately.
iWhen inserting the batteries, make sure
they are clean and free of lint.
iWhen replacing batteries, always replace
both batteries.
The required replacement batteries are available
at any Mercedes-Benz Light Truck Center.
��
Page 464 of 561
463 Practical hints
Replacing bulbs
�Replacing bulbs
Bulbs
Safe vehicle operation depends on proper
exterior lighting and signaling. It is there-
fore essential that all bulbs and lamp as-
semblies are in good working order at all
times.
Correct headlamp adjustment is extremely
important. Have headlamps checked and
readjusted at regular intervals and when a
bulb has been replaced. See an authorized
Mercedes-Benz Light Truck Center for
headlamp adjustment.iIf the headlamps or front fog lamps are
fogged up on the inside as a result of high humid-
ity, driving the vehicle a distance with the lights
on should clear up the fogging.iSubstitute bulbs will be brought into use
when the following lamps malfunction:
�Turn signal lamps
�Brake lamps
�Parking lamps
�Tail lamps
Read and observe the messages in the multi-
function display (
�page 438).
Page 467 of 561
466 Practical hints
Replacing bulbs
Replacing bulbs for front lamps
Before you start to replace a bulb for a
front lamp, do the following first:
�Turn the exterior lamp switch to
positionM (
�page 135).
�Open the hood (�page 341).
1Housing cover for low beam halogen
headlamp
2Housing cover for high beam halogen
bulb (high beam and high beam flasher)
3Bulb socket for parking and standing
lamp bulb
4Bulb socket for turn signal lamp bulb
5Bulb socket for side marker lamp bulbLow beam bulb (halogen headlamp)
1Low beam headlamp cover
2Bulb socket for low beam headlamp
Page 469 of 561

468 Practical hints
Replacing bulbs
�Turn cover1 counterclockwise.
�Remove cover1.
�Turn bulb socket2 counterclockwise.
�Pull bulb socket2 out of the
headlamp housing.
�Pull the high beam bulb out of bulb
socket2.
�Insert the new high beam bulb into bulb
socket2.
�Insert bulb socket2 into the
headlamp housing.
�Turn bulb socket2 clockwise until it
engages.
�Place cover1 on the opening in the
headlamp housing.
�Turn cover1 clockwise until it engag-
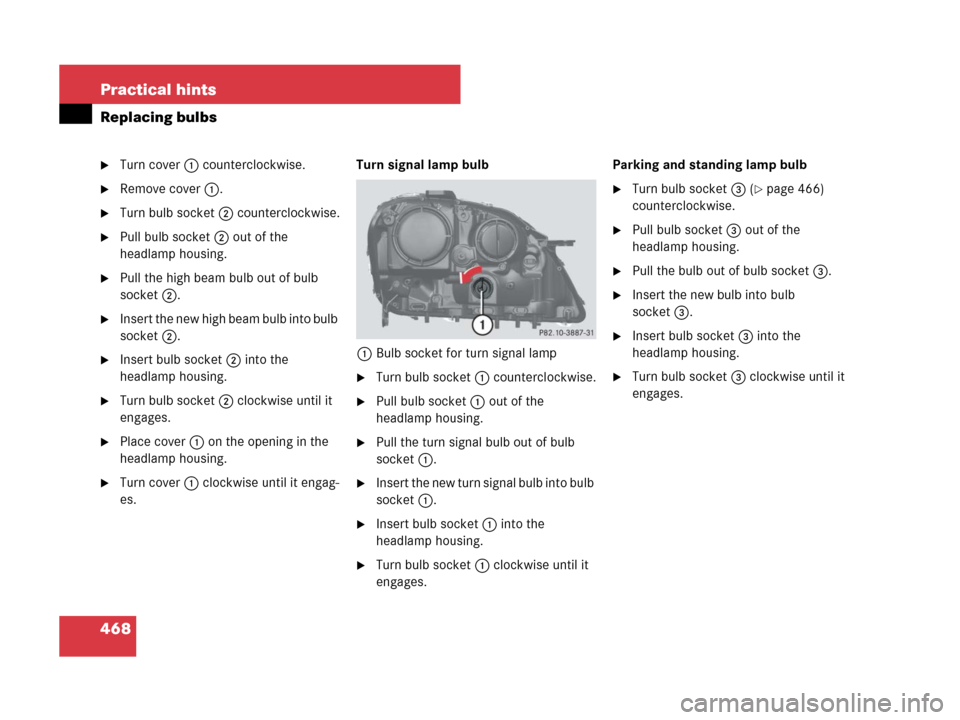
es.Turn signal lamp bulb
1Bulb socket for turn signal lamp
�Turn bulb socket1 counterclockwise.
�Pull bulb socket1 out of the
headlamp housing.
�Pull the turn signal bulb out of bulb
socket1.
�Insert the new turn signal bulb into bulb
socket1.
�Insert bulb socket1 into the
headlamp housing.
�Turn bulb socket1 clockwise until it
engages.Parking and standing lamp bulb
�Turn bulb socket3 (�page 466)
counterclockwise.
�Pull bulb socket3 out of the
headlamp housing.
�Pull the bulb out of bulb socket3.
�Insert the new bulb into bulb
socket3.
�Insert bulb socket3 into the
headlamp housing.
�Turn bulb socket3 clockwise until it
engages.
Page 470 of 561

469 Practical hints
Replacing bulbs
Side marker lamp bulb
�Turn bulb socket5 (�page 466)
counterclockwise.
�Pull bulb socket5 out of the
headlamp housing.
�Pull the side marker bulb out of bulb
socket5.
�Insert the new side marker bulb into
bulb socket5.
�Insert bulb socket5 into the
headlamp housing.
�Turn bulb socket5 clockwise until it
engages.Front fog lamp bulbs
Removing front fog lamp cover:
1Cover
2Front fog lamp or corner-illuminating
front fog lamp*
�Insert a suitable object (e.g. screwdriv-
er) at point indicated by the arrow and
pry out cover1.
Cover1 is released.
�Swing cover1 outwards and take it
off.
Removing front fog lamp cover (Vehicles
with AMG Sport Package* or ML 63 AMG):
1Cover
2Front fog lamp
�Use a suitable object (e.g. hook or a
screwdriver) and place the hook or
screwdriver carefully between lower
end of cover and bumper.
!If not done carefully and properly, damage
to the bumper can result. We therefore recom-
mend that you have this work carried out by an
authorized Mercedes-Benz Light Truck Center.
��
Page 472 of 561
471 Practical hints
Replacing bulbs
Replacing bulbs for rear lamps
Before you start to replace a bulb for a rear
lamp, do the following first:
�Turn the exterior lamp switch to
positionM (
�page 135).
Tail lamp unit
�Open the tailgate (�page 119).Opening the side trim panels
Opening the driver’s side trim panel:
1Cover in left side trim panel
2Lock
�Turn lock1 90° in direction of arrow.
�Fold down cover2.Vehicles without sound system*:
�Remove the storage compartment on
the driver’s side.
1Lock
2Storage compartment
�Insert a suitable object such as a coin
into the slot of lock1.
�Turn lock1 counterclockwise by 90°.
�Remove storage compartment2.
iTo access the bulb socket, you have to
remove the cover in the corresponding side trim
panel of the cargo compartment.
Page 473 of 561
472 Practical hints
Replacing bulbs
Opening the passenger side trim panel:
1Lock
2Cover in right side trim panel
�Insert a suitable object such as a coin
into the slot of lock1.
�Turn lock1 counterclockwise by 90°
in direction of arrow.
�Remove cover2.Replacing bulbs
Example illustration rear lamp passen-
ger-side
1Brake lamp
2Backup lamp
3Rear fog lamp (only driver’s side), tail
lamp, parking and standing lamp
4Side marker lamp
5Turn signal lamp
�Depending on which bulb needs to be
replaced, turn the respective bulb
socket1-5 counterclockwise.
�Press gently onto the respective bulb
and turn counterclockwise out of its
bulb socket.
�Press the new bulb gently into its bulb
socket and turn clockwise until it en-
gages.
�Align the respective bulb
socket1-5 and turn it clockwise.
�Make sure bulb socket is attached
properly.
�Close the respective cover in the cargo
compartment.
�Close the tailgate (�page 119).