2008 MERCEDES-BENZ GLK SUV stop start
[x] Cancel search: stop startPage 79 of 261
X
Pull the light switch out to the second stop.
Yellow indicator lamp Rnext to the light
switch lights up.
X To switch off: press the light switch in as
far as it will go.
The R yellow indicator lamp next to the
light switch goes out. Combination switch (turn signals,
main-beam headlamps and headlamp
flasher) Turn signal lamp
X
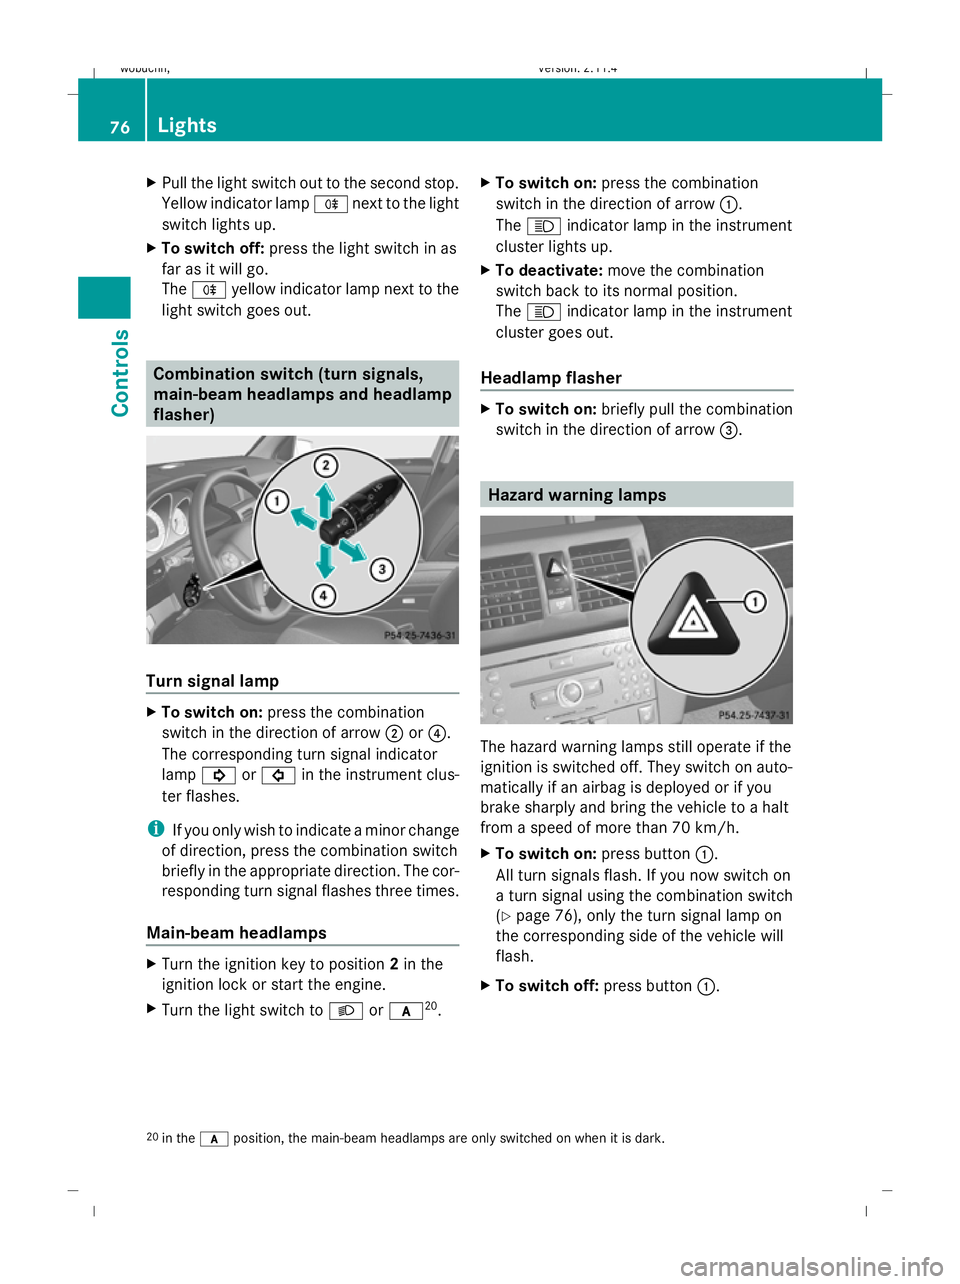
To switch on: press the combination
switch in the direction of arrow ;or?.
The corresponding turn signal indicator
lamp ! or# in the instrument clus-
ter flashes.
i If you only wish to indicate a minor change
of direction, press the combination switch
briefly in the appropriate direction. The cor-
responding turn signal flashes three times.
Main-beam headlamps X
Turn the ignition key to position 2in the
ignition lock or start the engine.
X Turn the light switch to Lorc 20
. X
To switch on: press the combination
switch in the direction of arrow :.
The K indicator lamp in the instrument
cluster lights up.
X To deactivate: move the combination
switch back to its normal position.
The K indicator lamp in the instrument
cluster goes out.
Headlamp flasher X
To switch on: briefly pull the combination
switch in the direction of arrow =. Hazard warning lamps
The hazard warning lamps still operate if the
ignition is switched off. They switch on auto-
matically if an airbag is deployed or if you
brake sharply and bring the vehicle to a halt
from a speed of more than 70 km/h.
X
To switch on: press button:.
All turn signals flash. If you now switch on
a turn signal using the combination switch
(Y page 76), only the turn signal lamp on
the corresponding side of the vehicle will
flash.
X To switch off: press button:.
20 in the cposition, the main-beam headlamps are only switched on when it is dark. 76 LightsControls
X204_AKB; 1; 5, en-GB
wobuchh,
Version: 2.11.4 2008-10-15T13:20:56+02:00 - Seite 76Dateiname: 6515_0671_02_buchblock.pdf; preflight
Page 84 of 261
G
Risk of injury
Do not leave children unsupervised in the
vehicle, even if they are secured in a child
restraint system. The children could:
R be seriously or even fatally injured on parts
of the vehicle
R be seriously or even fatally injured by pro-
longed exposure to extremely high or
extremely low temperatures
If children open a door, they could:
R seriously or even fatally injure other people
R get out of the vehicle, thereby injuring
themselves or be seriously or even fatally
injured by a passing vehicle
Activate the child-proof locks/override fea-
ture if children are travelling in the vehicle.
They could otherwise open doors or side win-
dows while the vehicle is in motion and
thereby injure themselves or others.
i Related topics:
R convenience opening from the outside
(Y page 82) or from the inside
(Y page 126)
R convenience closing from the outside
(Y page 82) or from the inside
(Y page 126)
R disabling the controls in the rear com-
partment (override feature) (Y page 50)
R automatic closing of the side windows
(PRE-SAFE ®
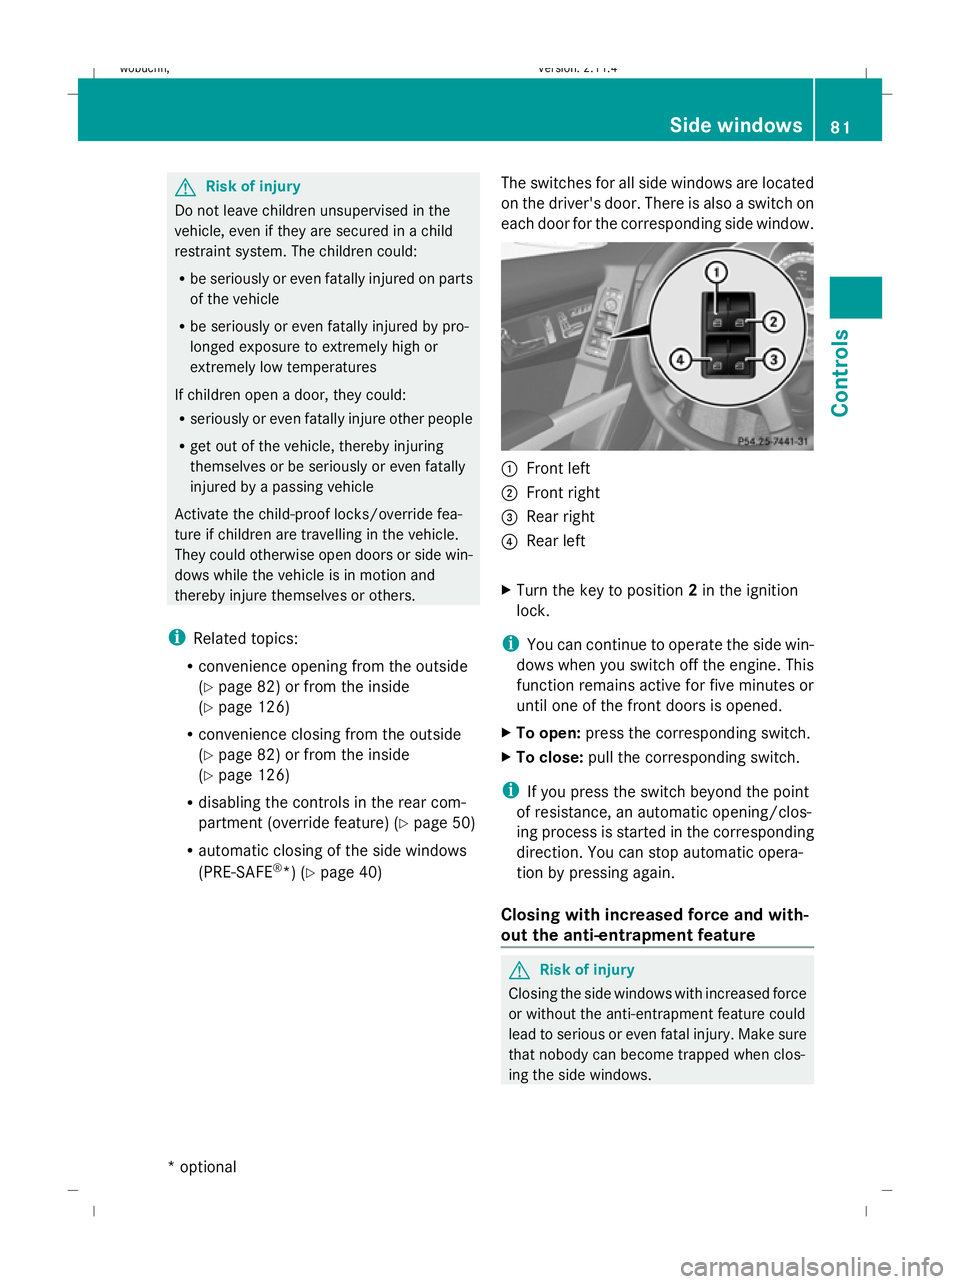
*) (Y page 40) The switches for all side windows are located
on the driver's door. There is also a switch on
each door for the corresponding side window. :
Front left
; Front right
= Rear right
? Rear left
X Turn the key to position 2in the ignition
lock.
i You can continue to operate the side win-
dows when you switch off the engine. This
function remains active for five minutes or
until one of the front doors is opened.
X To open: press the corresponding switch.
X To close: pull the corresponding switch.
i If you press the switch beyond the point
of resistance, an automatic opening/clos-
ing process is started in the corresponding
direction. You can stop automatic opera-
tion by pressing again.
Closing with increased force and with-
out the anti-entrapment feature G
Risk of injury
Closing the side windows with increased force
or without the anti-entrapment feature could
lead to serious or even fatal injury. Make sure
that nobody can become trapped when clos-
ing the side windows. Side windows
81Controls
* optional
X204_AKB; 1; 5, en-GB
wobuchh,
Version: 2.11.4
2008-10-15T13:20:56+02:00 - Seite 81 ZDateiname: 6515_0671_02_buchblock.pdf; preflight
Page 103 of 261
Mobile phone on
PIN*not yet entered
The multi-function display shows the
Please
enter PIN display message.
X Enter the PIN using the mobile phone, Lin-
guatronic*, the audio system or COMAND
APS*.
The mobile phone will search for a network.
During this time, the Telephone No
Service message appears in the multi-
function display.
Mobile phone operational
The multi-function display shows the Tele-
phone ready message or the name of the
GSM network provider.
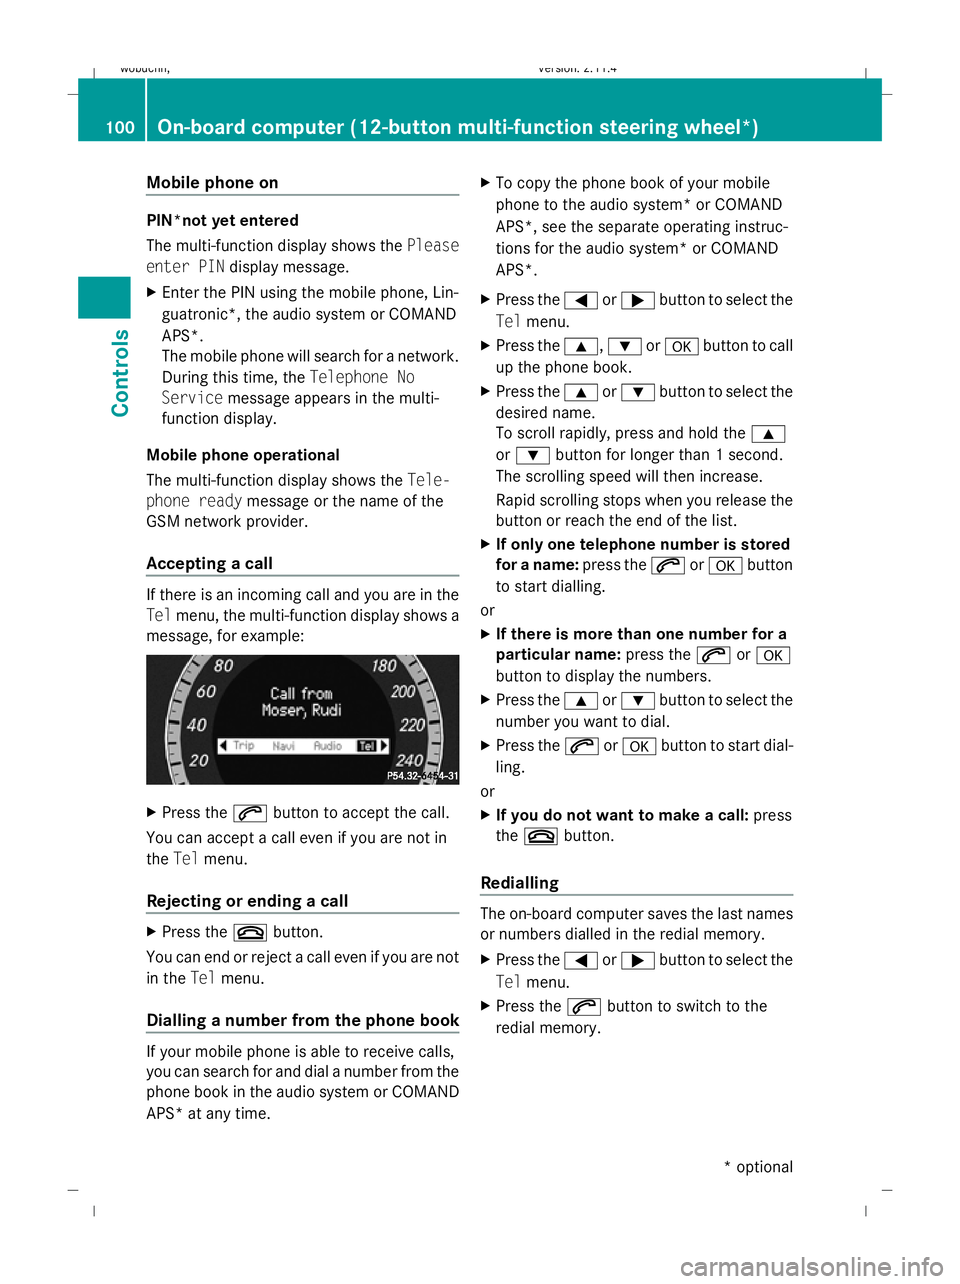
Accepting a call If there is an incoming call and you are in the
Tel menu, the multi-function display shows a
message, for example: X
Press the 6button to accept the call.
You can accept a call even if you are not in
the Tel menu.
Rejecting or ending a call X
Press the ~button.
You can end or reject a call even if you are not
in the Telmenu.
Dialling a number from the phone book If your mobile phone is able to receive calls,
you can search for and dial a number from the
phone book in the audio system or COMAND
APS* at any time. X
To copy the phone book of your mobile
phone to the audio system* or COMAND
APS*, see the separate operating instruc-
tions for the audio system* or COMAND
APS*.
X Press the =or; button to select the
Tel menu.
X Press the 9,:ora button to call
up the phone book.
X Press the 9or: button to select the
desired name.
To scroll rapidly, press and hold the 9
or : button for longer than 1 second.
The scrolling speed will then increase.
Rapid scrolling stops when you release the
button or reach the end of the list.
X If only one telephone number is stored
for a name: press the6ora button
to start dialling.
or
X If there is more than one number for a
particular name: press the6ora
button to display the numbers.
X Press the 9or: button to select the
number you want to dial.
X Press the 6ora button to start dial-
ling.
or
X If you do not want to make a call: press
the ~ button.
Redialling The on-board computer saves the last names
or numbers dialled in the redial memory.
X Press the =or; button to select the
Tel menu.
X Press the 6button to switch to the
redial memory. 100
On-board computer (12-button multi-function steering wheel*)Controls
* optional
X204_AKB; 1; 5, en-GB
wobuchh,
Version: 2.11.4 2008-10-15T13:20:56+02:00 - Seite 100Dateiname: 6515_0671_02_buchblock.pdf; preflight
Page 130 of 261
X
To deactivate: press theTbutton.
The indicator lamp in the Tbutton goes
out.
i The residual heat automatically switches
off after around 30 minutes or if:
R the ignition is switched on
R the battery voltage drops Sliding sunroof
General notes
G
Risk of injury
Make sure that nobody can become trapped
when closing the sliding sunroof. If there is a
risk of entrapment, release the switch and
push it briefly in any direction to stop the slid-
ing sunroof. G
Risk of injury
Children could injure themselves if they oper-
ate the sliding sunroof.
Never leave children unsupervised in the vehi-
cle. Always take the key with you when leaving
the vehicle, even if you are only leaving it for
a short time. G
Risk of injury
The glass in the panorama sunroof could
break in an accident. If you are not wearing a
seat belt, there is a risk that you could be
thrown through the opening in the event of the
vehicle overturning. Therefore, always wear a
seat belt to reduce the risk of injuries.
! Only open the panorama sliding sunroof
if it is free of snow and ice. Otherwise, mal-
functions may occur.
Do not allow anything to protrude from the
sliding sunroof. The seals could otherwise
be damaged.
i When the sliding sunroof is open, apart
from the normal airflow noises resonance
noises may also occur. They are caused by minor pressure fluctuations in the vehicle
interior. Change the position of the sliding
sunroof or open a side window slightly to
reduce or eliminate these noises.
i Related topics:
R convenience opening from the outside
(Y page 82) or from the inside
(Y page 126)
R convenience closing from the outside
(Y page 82) or from the inside
(Y page 126)
R automatic closing of the sliding sunroof
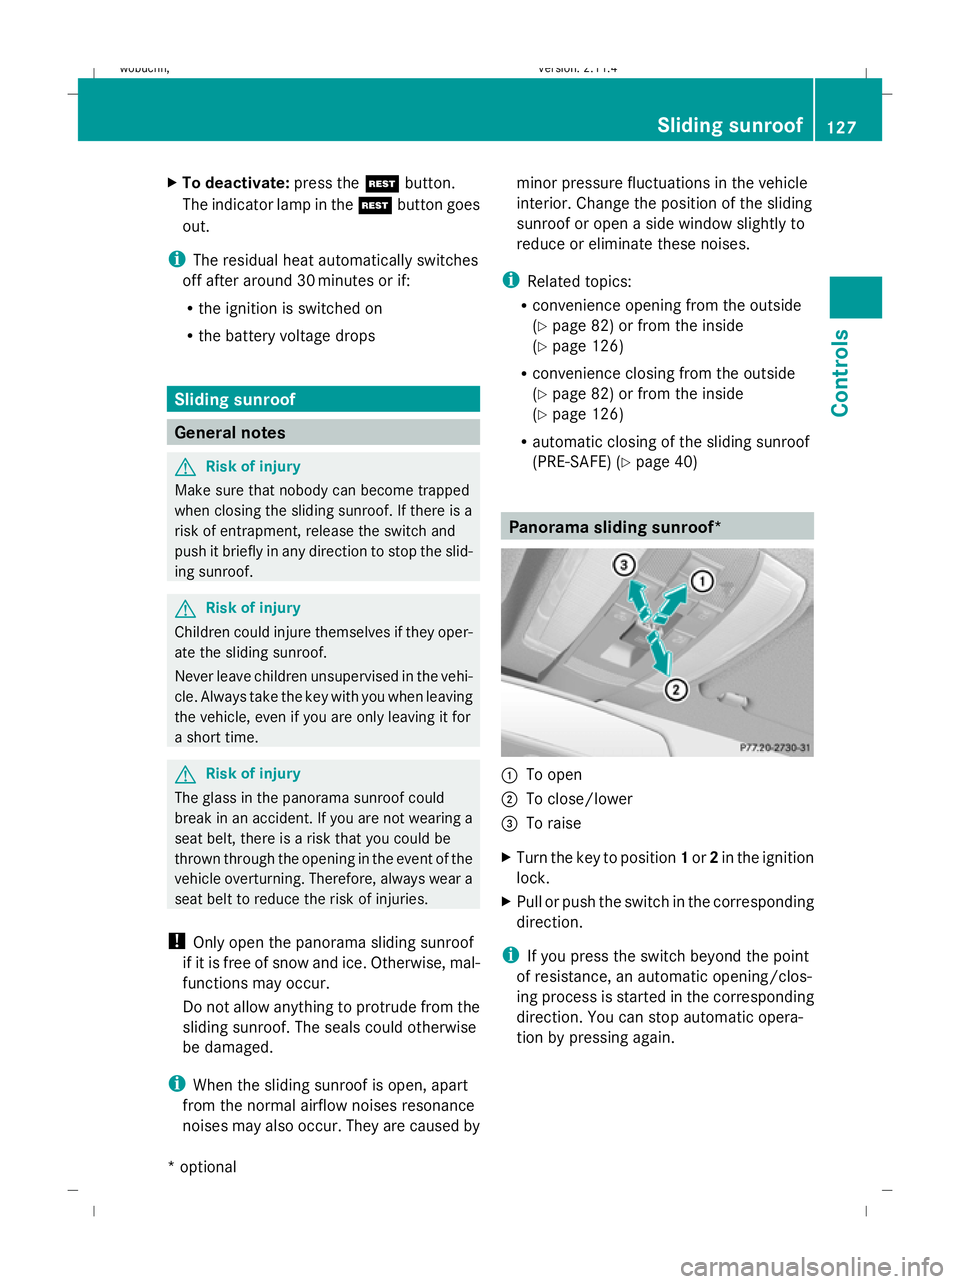
(PRE-SAFE) (Y page 40) Panorama sliding sunroof*
:
To open
; To close/lower
= To raise
X Turn the key to position 1or 2in the ignition
lock.
X Pull or push the switch in the corresponding
direction.
i If you press the switch beyond the point
of resistance, an automatic opening/clos-
ing process is started in the corresponding
direction. You can stop automatic opera-
tion by pressing again. Sliding sunroof
127Controls
* optional
X204_AKB; 1; 5, en-GB
wobuchh
,V ersion: 2.11.4
2008-10-15T13:20:56+02:00 - Seite 127 ZDateiname: 6515_0671_02_buchblock.pdf; preflight
Page 132 of 261
ing process is started in the corresponding
direction. You can stop automatic opera-
tion by pressing again.
Resetting the panorama sliding sunroof
and the roller sunblinds Reset the panorama sliding sunroof and the
roller sunblinds if the panorama sliding sun-
roof or the roller sunblinds do not open
smoothly.
X Turn the key to position 1or 2in the ignition
lock.
X Pull the switch to the point of resistance in
the direction of arrow ;until the roller
sunblinds are fully closed.
X Keep the switch pulled for an additional
second.
X Press the switch to the point of resistance
in the direction of arrow :and hold it until
the roller sunblinds are fully open.
X Press the switch to the point of resistance
in the direction of arrow :and hold it until
the panorama sliding sunroof has opened
about 10 cm.
X Pull the switch repeatedly to the point of
resistance in the direction of arrow ;until
the panorama sliding sunroof is fully
closed.
X Keep the switch pulled for an additional
second.
X Check whether the panorama sliding sun-
roof can be opened fully again
(Y page 127).
X If this is not the case, consult a qualified
specialist workshop. Loading and stowing
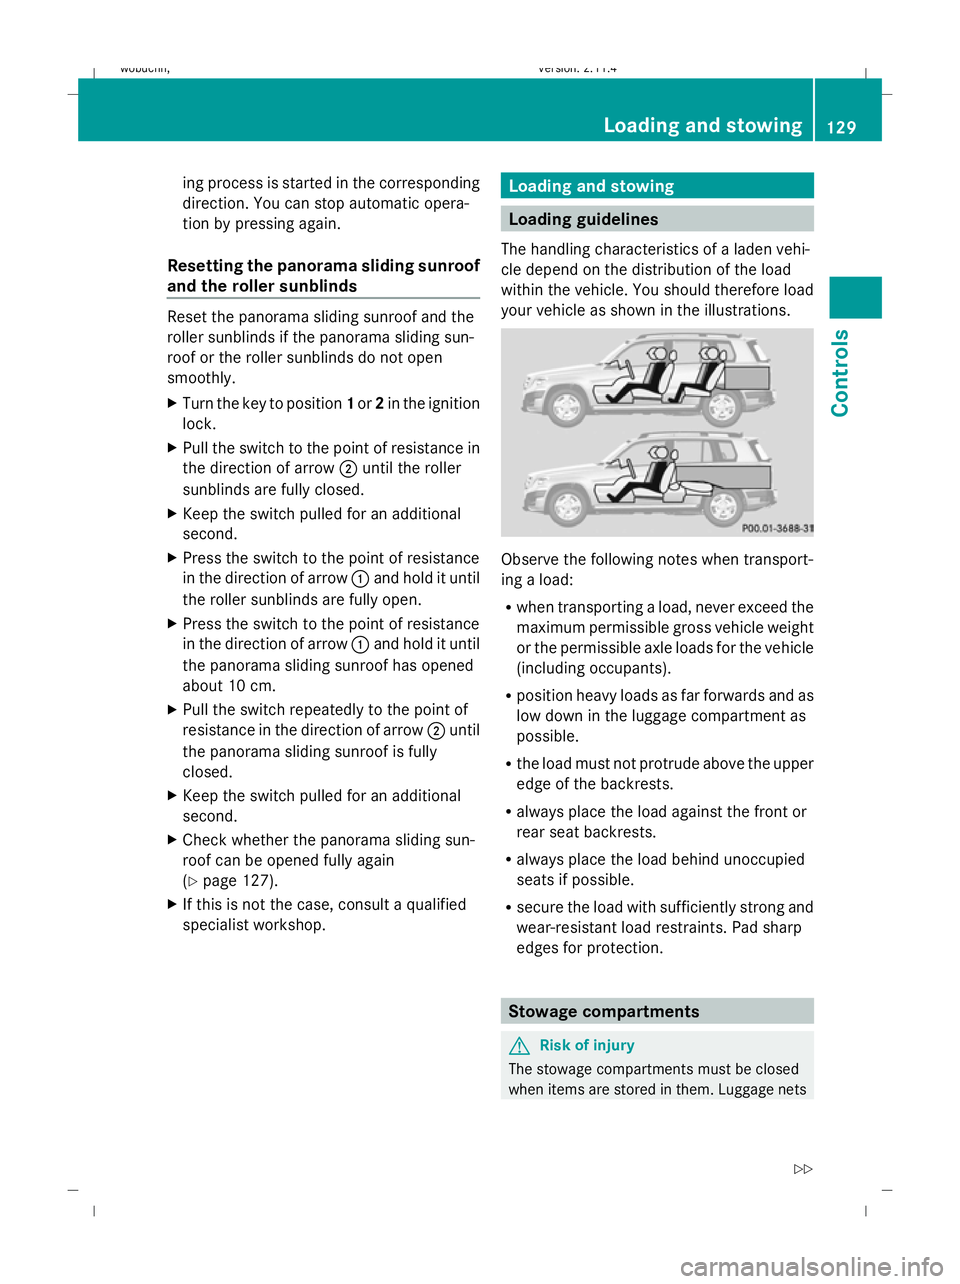
Loading guidelines
The handling characteristics of a laden vehi-
cle depend on the distribution of the load
within the vehicle. You should therefore load
your vehicle as shown in the illustrations. Observe the following notes when transport-
ing a load:
R
when transporting a load, never exceed the
maximum permissible gross vehicle weight
or the permissible axle loads for the vehicle
(including occupants).
R position heavy loads as far forwards and as
low down in the luggage compartment as
possible.
R the load must not protrude above the upper
edge of the backrests.
R always place the load against the front or
rear seat backrests.
R always place the load behind unoccupied
seats if possible.
R secure the load with sufficiently strong and
wear-resistant load restraints. Pad sharp
edges for protection. Stowage compartments
G
Risk of injury
The stowage compartments must be closed
when items are stored in them. Luggage nets Loading and stowing
129Controls
X204_AKB; 1; 5, en-GB
wobuchh, Version: 2.11.4 2008-10-15T13:20:56+02:00 - Seite 129 ZDateiname: 6515_0671_02_buchblock.pdf; preflight
Page 151 of 261
i
If the bonnet can be raised slightly, it is
not properly engaged. Open it again and
close it with a little more force. Engine oil
Depending on driving style, the vehicle con-
sumes up to 0.8 l oil per 1,000 km. The oil
consumption may be higher than this when
the vehicle is new or if you frequently drive at
high engine speeds.
Further information on engine oil
(Y page 246).
Checking the engine oil level When doing so:
R
the vehicle should be parked on level
ground.
R the engine should be switched off for at
least five minutes if the engine is at normal
operating temperature.
R the engine should be switched off for at
least 30 minutes if the engine is not at
operating temperature (i.e. if you only start
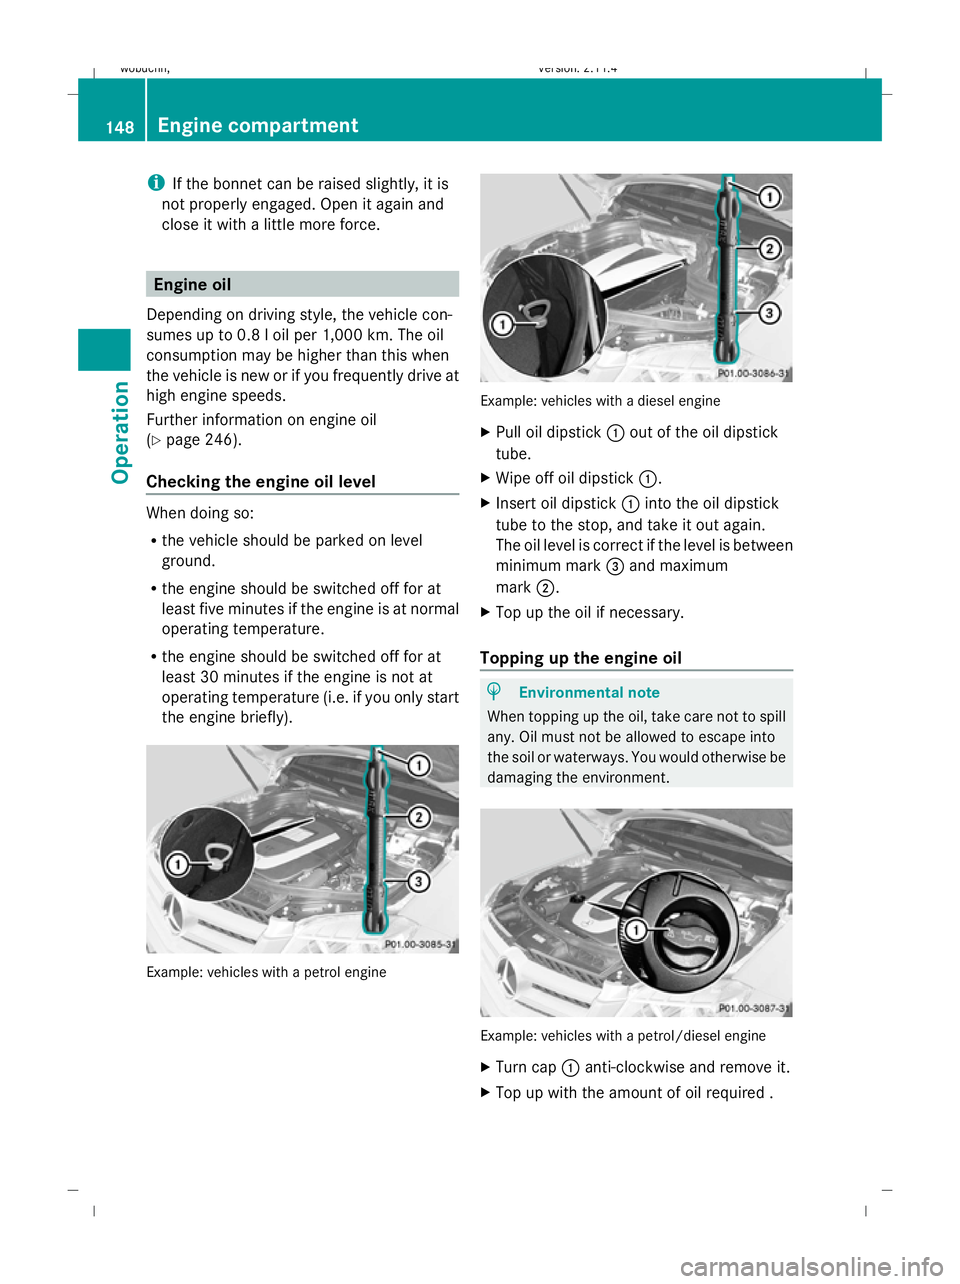
the engine briefly). Example: vehicles with a petrol engine Example: vehicles with a diesel engine
X Pull oil dipstick :out of the oil dipstick
tube.
X Wipe off oil dipstick :.
X Insert oil dipstick :into the oil dipstick
tube to the stop, and take it out again.
The oil level is correct if the level is between
minimum mark =and maximum
mark ;.
X Top up the oil if necessary.
Topping up the engine oil H
Environmental note
When topping up the oil, take care not to spill
any. Oil must not be allowed to escape into
the soil or waterways. You would otherwise be
damaging the environment. Example: vehicles with a petrol/diesel engine
X
Turn cap :anti-clockwise and remove it.
X Top up with the amount of oil required . 148 Engine compartmentOperation
X204_AKB; 1; 5, en-GB
wobuchh,
Version: 2.11.4 2008-10-15T13:20:56+02:00 - Seite 148Dateiname: 6515_0671_02_buchblock.pdf; preflight
Page 163 of 261
angle
;is maximum 25° when the vehicle is
loaded and ready to drive.
Loaded and ready to drive means: a full tank,
all fluids topped up and the driver is in the
vehicle.
R Follow the line of fall when driving on slopes
and steep gradients.
R Before driving on extreme uphill and down-
hill gradients, select the off-road drive pro-
gram*.
R Observe the warnings for off-road driving
(Y page 158).
R Drive slowly.
R Accelerate gently and make sure that the
wheels are gripping.
R Avoid high engine speeds, except when
driving on sandy and muddy routes with
high driving resistance.
R Select a shift range appropriate to the gra-
dient.
R Before tackling steep downhill gradients,
select shift range 1.
i Depress the brake pedal when stopping
on steep uphill gradients. Hill start assist
will aid you when you pull away again
(Y page 84).
Maximum gradient-climbing capability On good road surfaces, 70% of the maximum
gradient-climbing capability is available.
i If the load on the front axle is reduced
when pulling away on a steep uphill slope,
the front wheels have a tendency to spin.
4ETS recognises this and brakes the
wheels accordingly. The rear wheel torque
is increased and it is easier to pull away.
Brow of hill When driving up an uphill gradient, slightly
reduce pressure on the accelerator immedi-
ately before reaching the brow of the hill. Make use of the vehicle’s own impetus to
travel over the brow.
This style of driving prevents:
R
the vehicle from lifting off the ground on the
brow of a hill
R loss of traction
R the vehicle from travelling too quickly down
the other side
Driving downhill R
Drive slowly.
R Do not drive at an angle down steep
inclines. Steer into the line of fall and drive
with the front wheels aligned straight. Oth-
erwise, the vehicle could slip sideways, tip
and overturn.
R Before tackling steep downhill gradients,
select shift range 1.
R Activate DSR. If this is not sufficient, brake
gently. When doing so, make sure that the
vehicle is facing in the direction of the line
of fall.
R Check that the brakes are working normally
after a long downhill stretch.
i Off-road ABS is activated when the off-
road drive program *is selected.
At speeds below 30 km/h, the front wheels
lock cyclically during braking. The digging-
in effect achieved in the process reduces
the stopping distance when driving off-
road. The steerability of the vehicle is con-
siderably reduced when the wheels lock. Driving over obstacles
Observe the following rules when driving over
tree stumps, large stones and other obsta-
cles:
R Select the off-road drive pro-
gram* (Y page 107).
R Avoid high engine speeds. 160 Off-road drivingOperation
* optional
X204_AKB; 1; 5, en-GB
wobuchh,
Version: 2.11.4 2008-10-15T13:20:56+02:00 - Seite 160Dateiname: 6515_0671_02_buchblock.pdf; preflight
Page 183 of 261
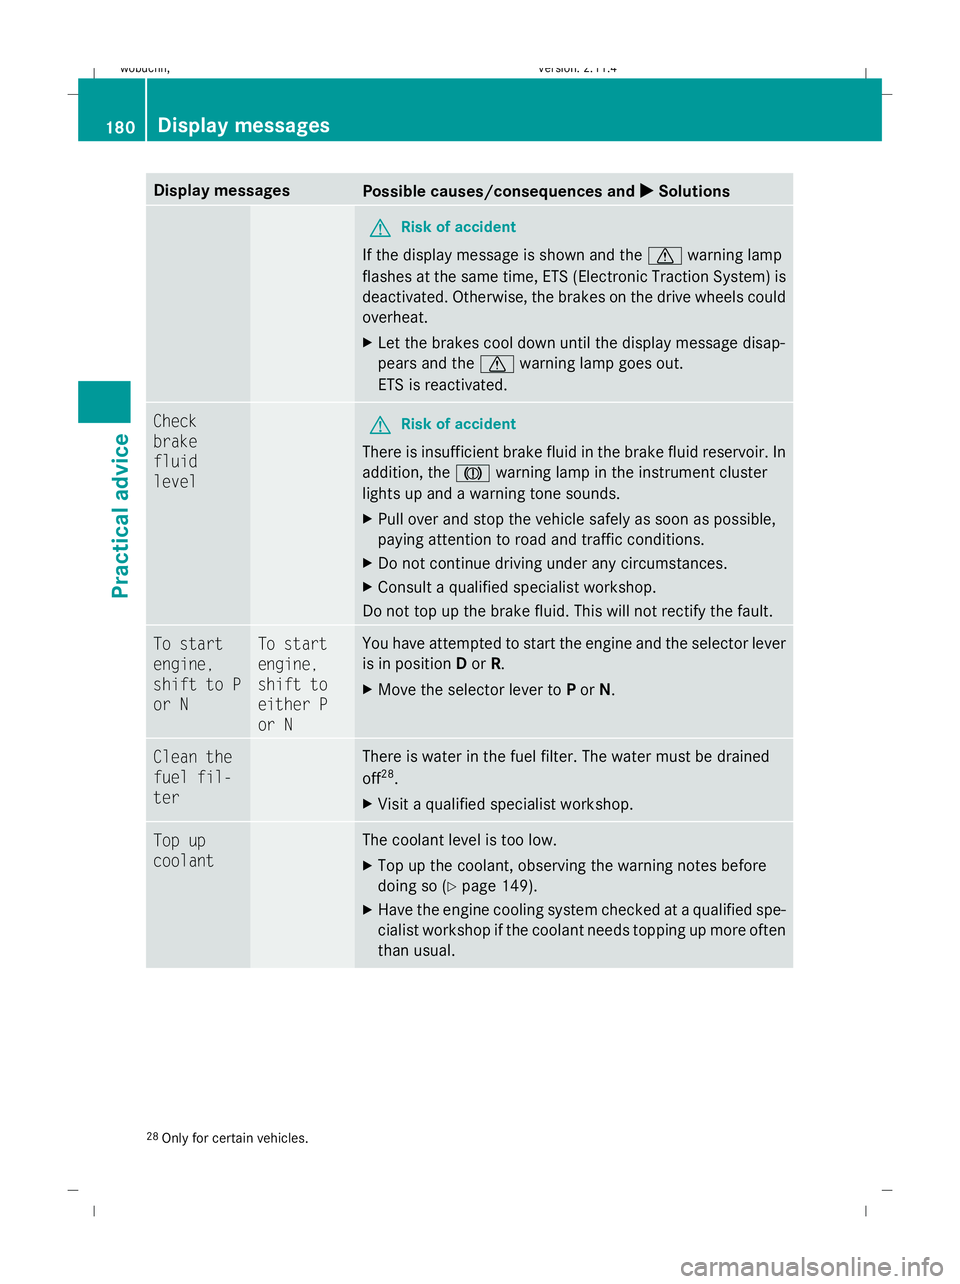
Display messages
Possible causes/consequences and
X
X Solutions G
Risk of accident
If the display message is shown and the dwarning lamp
flashes at the same time, ETS (Electronic Traction System) is
deactivated. Otherwise, the brakes on the drive wheels could
overheat.
X Let the brakes cool down until the display message disap-
pears and the dwarning lamp goes out.
ETS is reactivated. Check
brake
fluid
level
G
Risk of accident
There is insufficient brake fluid in the brake fluid reservoir. In
addition, the Jwarning lamp in the instrument cluster
lights up and a warning tone sounds.
X Pull over and stop the vehicle safely as soon as possible,
paying attention to road and traffic conditions.
X Do not continue driving under any circumstances.
X Consult a qualified specialist workshop.
Do not top up the brake fluid. This will not rectify the fault. To start
engine,
shift to P
or N To start
engine,
shift to
either P
or N You have attempted to start the engine and the selector lever
is in position
Dor R.
X Move the selector lever to Por N. Clean the
fuel fil-
ter There is water in the fuel filter. The water must be drained
off
28
.
X Visit a qualified specialist workshop. Top up
coolant The coolant level is too low.
X
Top up the coolant, observing the warning notes before
doing so (Y page 149).
X Have the engine cooling system checked at a qualified spe-
cialist workshop if the coolant needs topping up more often
than usual. 28
Only for certain vehicles. 180 Display
messagesPractical advice
X204_AKB; 1; 5, en-GB
wobuchh,V ersion: 2.11.4
2008-10-15T13:20:56+02:00 - Seite 180 Dateiname: 6515_0671_02_buchblock.pdf; preflight