Page 374 of 457
.
Lowering and raising brush guard
1 Locking and unlocking handle
2 Quick lock
3 Lock
4 End s")
373
Practical hints
Brush guard
� Brush guard
The brush guard is available on G 55 AMG
(U.S vehicles only).
Lowering and raising brush guard
1 Locking and unlocking handle
2 Quick lock
3 Lock
4 End stop joint Lowering
�While holding brush guard firmly, open
quick lock
2 using locking and unlock-
ing handle 1.
�Gently lower brush guard until it
reaches its fully lowered position.
Raising and securing
�Flip up brush guard until it contacts end
stop joint 4.
Quick lock stop pin 2 must engage
the cross slot recess in lock 3.
�Now turn quick lock 2 so that quick
lock makes contact with end stop
joint 4.
�Lock quick lock 2 on both sides of
brush guard using locking and unlock-
ing handle 1.
Warning!G
The brush guard is designed solely to
enhance the appearance of the vehicle and
help protect grille and headlights from minor
mishaps, either on- or off-road. Since the
safety characteristics are limited in the
event of an accident, brush guards are not
intended to prevent inju ry or damage in the
event of an accident. Also check state and
local regulations on installation and use.
Raise and lower brush guard in an open
space with plenty of room.
To help prevent personal injury when open-
ing or closing the brush guard, use extreme
caution not to trap hands or feet.
The brush guard must be in raised and
locked position while driving.
iOnly lower brush guard to clean headlamps
or to replace bulbs.
!Make sure both quick stop pins 2 are
seated fully in lock 3.
W463.boo Seite 373 Montag, 19 . November 2007 8:41 08
Page 379 of 457
378 Practical hints
Replacing bulbs
Replacing bulbs for front lamps
Before you start to replace a bulb for a
front lamp, do the following first:
�Turn the exterior lamp switch to
position M (
�page 117). Bi-Xenon headlamp
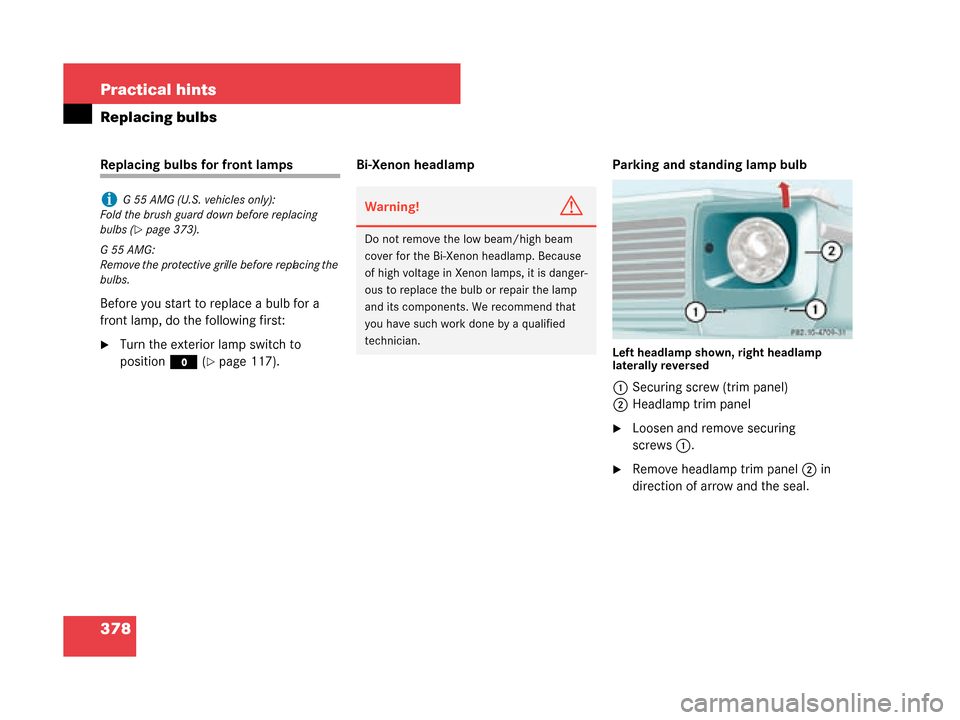
Parking and standing lamp bulbLeft headlamp shown, right headlamp
laterally reversed
1Securing screw (trim panel)
2 Headlamp trim panel
�Loosen and remove securing
screws 1.
�Remove headlamp trim panel 2 in
direction of arrow and the seal.
iG 55 AMG (U.S. vehicles only):
Fold the brush guard down before replacing
bulbs (
�page 373).
G55AMG:
Remove the protective grille before replacing the
bulbs.
Warning!G
Do not remove the low beam/high beam
cover for the Bi-Xenon headlamp. Because
of high voltage in Xeno n lamps, it is danger-
ous to replace the bulb or repair the lamp
and its components. We recommend that
you have such work done by a qualified
technician.
W463.boo Seite 378 Montag, 19 . November 2007 8:41 08
Page 380 of 457
379
Practical hints
Replacing bulbs
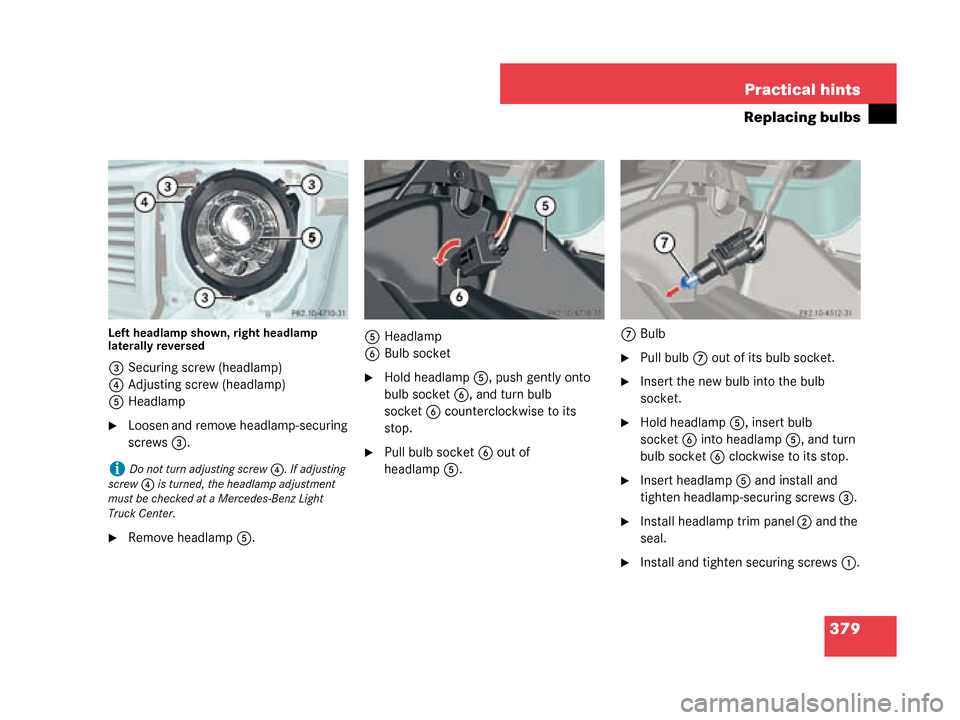
Left headlamp shown, right headlamp
laterally reversed
3
Securing screw (headlamp)
4 Adjusting screw (headlamp)
5 Headlamp
�Loosen and remove headlamp-securing
screws 3.
�Remove headlamp 5. 5
Headlamp
6 Bulb socket
�Hold headlamp 5, push gently onto
bulb socket 6, and turn bulb
socket 6 counterclockwise to its
stop.
�Pull bulb socket 6 out of
headlamp 5. 7
Bulb
�Pull bulb 7 out of its bulb socket.
�Insert the new bulb into the bulb
socket.
�Hold headlamp 5, insert bulb
socket 6 into headlamp 5, and turn
bulb socket 6 clockwise to its stop.
�Insert headlamp 5 and install and
tighten headlamp-securing screws 3.
�Install headlamp trim panel 2 and the
seal.
�Install and tighten securing screws 1.
iDo not turn adjusting screw 4. If adjusting
screw 4 is turned, the headlamp adjustment
must be checked at a Mercedes-Benz Light
Truck Center.
W463.boo Seite 379 Montag, 19 . November 2007 8:41 08
Page 381 of 457
380 Practical hints
Replacing bulbs
Front fog lamp bulb
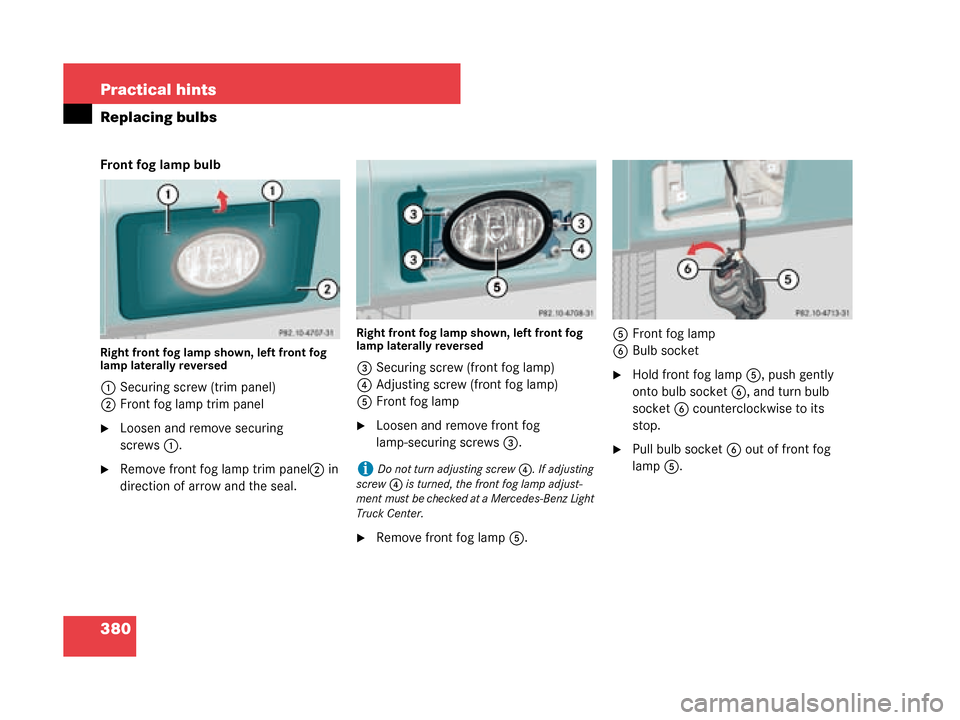
Right front fog lamp shown, left front fog
lamp laterally reversed
1Securing screw (trim panel)
2 Front fog lamp trim panel
�Loosen and remove securing
screws 1.
�Remove front fog lamp trim panel 2 in
direction of arrow and the seal.
Right front fog lamp shown, left front fog
lamp laterally reversed
3 Securing screw (front fog lamp)
4 Adjusting screw (front fog lamp)
5 Front fog lamp
�Loosen and remove front fog
lamp-securing screws 3.
�Remove front fog lamp 5. 5
Front fog lamp
6 Bulb socket
�Hold front fog lamp 5, push gently
onto bulb socket 6, and turn bulb
socket 6 counterclockwise to its
stop.
�Pull bulb socket 6 out of front fog
lamp 5.
iDo not turn adjusting screw 4. If adjusting
screw 4 is turned, the front fog lamp adjust-
ment must be checked at a Mercedes-Benz Light
Truck Center.
W463.boo Seite 380 Montag, 19 . November 2007 8:41 08
Page 382 of 457
381
Practical hints
Replacing bulbs
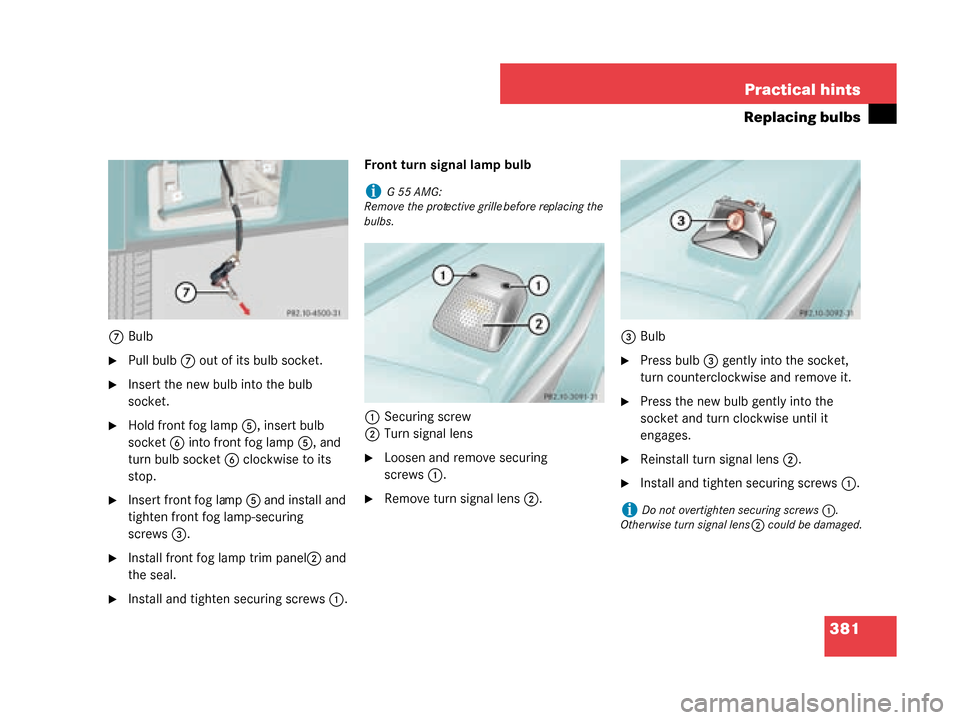
7
Bulb
�Pull bulb 7 out of its bulb socket.
�Insert the new bulb into the bulb
socket.
�Hold front fog lamp 5, insert bulb
socket 6 into front fog lamp 5, and
turn bulb socket 6 clockwise to its
stop.
�Insert front fog lamp 5 and install and
tighten front fog lamp-securing
screws 3.
�Install front fog lamp trim panel 2 and
the seal.
�Install and tight en securing screws 1. Front turn signal lamp bulb
1 Securing screw
2 Turn signal lens
�Loosen and remove securing
screws 1.
�Remove turn signal lens 2. 3
Bulb
�Press bulb 3 gently into the socket,
turn counterclockwise and remove it.
�Press the new bulb gently into the
socket and turn clockwise until it
engages.
�Reinstall turn signal lens 2.
�Install and tighten securing screws 1.
iG55AMG:
Remove the protective grille before replacing the
bulbs.
iDo not overtighten securing screws 1.
Otherwise turn signal lens 2 could be damaged.
W463.boo Seite 381 Montag, 19 . November 2007 8:41 08
Page 383 of 457
382 Practical hints
Replacing bulbs
Side marker lamp bulb
The following description applies to both,
the front and the rear side marker lamps.
Front side marker shown
1Securing screw
2 Side marker lamp housing
�Loosen and remove securing
screws 1.
�Remove side marker lamp housing 2. 2
Side marker lamp housing
3 Dust cover
�Remove dust cover 3.
�Press catch aside and pull out the bulb
socket with the bulb from side marker
lamp housing 2. 4
Bulb
�Press gently onto bulb 4 and turn
counterclockwise out of its bulb
socket.
�Press the new bulb gently into the bulb
socket and turn clockwise until it
engages.
�Insert the bulb socket back into side
marker lamp housing 2.
�Reinstall dust cover 3.
W463.boo Seite 382 Montag, 19 . November 2007 8:41 08
Page 384 of 457

383
Practical hints
Replacing bulbs
�Reinstall side marker lamp housing
2.
�Install and tight en securing screws 1.
Additional turn signal lamps
The additional turn signal lamps in the
exterior rear view mirrors have LEDs.
If a malfunction occurs or LEDs fail to
function, the entire turn signal unit must be
replaced. Have the turn signal unit
replaced at an authorized Mercedes-Benz
Light Truck Center. Locator lighting lamps
The locator lighting lamps in the exterior
rear view mirrors have bulbs.
Have the bulbs replaced at an authorized
Mercedes-Benz Light Truck Center.
Replacing bulbs for rear lamps
Before you start to replace a bulb for a rear
lamp, do the following first:
�Turn the exterior lamp switch to
position
M (
�page 117). Bulbs in tail lamp unit
Left tail lamp lens shown, right tail lamp
lens laterally reversed
1
Securing screw
2 Tail lamp lens
�Loosen and remove securing
screws 1.
�Remove tail lamp lens 2.
iDo not overtighten securing screws 1.
Otherwise side marker lamp housing 2 could
be damaged.
iG55AMG:
Remove the protective grille before replacing the
bulbs.
��
W463.boo Seite 383 Montag, 19 . November 2007 8:41 08
Page 385 of 457

384 Practical hints
Replacing bulbs
Left tail lamp unit shown, right tail lamp
unit laterally reversed
3Turn signal lamp bulb
4 Brake, tail, parking and standing lamp
bulb
5 Tail, parking and standing lamp bulb
�Press gently onto respective
bulb 3,4 , or 5 and turn counter-
clockwise out of its bulb socket.
�Press the new bulb gently into the bulb
socket and turn clockwise until it
engages.
�Reinstall tail lamp lens 2.
�Install and tighten securing screws 1. Rear fog lamp bulb/Backup lamp bulb
The following description applies to both,
the rear fog lamp and the backup lamp.
Rear fog lamp shown
1
Securing screw
2 Lamp lens
�Loosen and remove securing
screws 1.
�Remove lamp lens 2. 3
Bulb
�Press gently onto bulb 3 and turn
counterclockwise out of its bulb
socket.
�Press the new bulb gently into the bulb
socket and turn clockwise until it
engages.
�Reinstall lamp lens 2.
�Install and tight en securing screws 1.
iDo not overtighten securing screws 1.
Otherwise tail lamp lens 2 could be damaged.
iDo not overtighten securing screws 1.
Otherwise lamp lens 2 could be damaged.
��
W463.boo Seite 384 Montag, 19 . November 2007 8:41 08