Page 214 of 457

213
Controls in detail
Loading
Hanging up partition net
1 Partition net
2 Holder
�Hang partition net 1 on holder 2 and
push forward in direction of the arrow. Pulling partition net tight
3 Lift tensioner
4 Tightening belt
5 Belt hook
6 Cargo tie-down ring
Lift tensioner 3 on tightening belt 4
must point in direction of the tailgate.
�Use lift tensioner 3 to set the length
of tightening belt 4 to cargo tie-down
ring 6.
�Hook belt hook 5 into cargo tie-down
ring 6.
�Pull tightening belt 4 by the loose end
until the partition net is pulled tight.
�After driving a short distance, make
sure the partition net is still tight and, if
necessary, pull it tight again.
Loosening partition net
�Loosen tightening belt 4 by pulling lift
tensioner 3 upward.
�Remove belt hook 5 from cargo
tie-down ring 6.
Removing and storing partition net
�Take partition net 1 out of holder 2.
�Roll up partition net and secure it.
�Store partition net behind the rear seat
bench.
W463.boo Seite 213 Montag, 19 . November 2007 8:41 08
Page 216 of 457

215
Controls in detail
Useful features
� Useful features
Storage compartments
Glove box
1 Glove box lid release
2 Glove box lid Opening the glove box
�Pull glove box lid release
1 in
direction of arrow.
Glove box lid 2 opens downward.
Closing the glove box
�Push glove box lid 2 up to close.
Warning!G
To help avoid personal injury during a colli-
sion or sudden maneuver, exercise care
when storing objects in the vehicle. Put
luggage or cargo in the cargo compartment
if possible. Do not pile luggage or cargo
higher than the seat backrests.
Always use partition net* when transporting
cargo. Partition net* cannot secure hard or
heavy objects.
Parcel nets cannot secure hard or heavy
objects.
Keep compartment lids closed. This will help
to prevent stored objects from being thrown
about and injuring vehicle occupants during
�braking
�vehicle maneuvers
�an accident
Warning!G
Do not load items on the roof. It may cause
instability during some maneuvers which
could result in an accident.
iThe glove box is illuminated with SmartKey
in starter switch position 1 or2 when opening
the lid.
W463.boo Seite 215 Montag, 19 . November 2007 8:41 08
Page 222 of 457

221
Controls in detail
Useful features
Opening the ashtray
�Briefly touch at top of cover plate
3.
The ashtray opens automatically.
Removing the ashtray insert
�Secure the vehicle from movement by
setting the parking brake.
�Move the gear selector lever to neutral
position N.
Now you have more room to take out
the ashtray insert.
�Turn off the engine. 4
Sliding button
5 Astray insert
�Push sliding button 4 to the right.
Ashtray insert 5 disengages and
protrudes a short distance.
�Remove ashtray insert 5 from ashtray
frame in direction of the arrow. Reinstalling the ashtray insert
�Push ashtray insert
5 down into the
ashtray frame until it engages.
�Push at top of cover plate 3 to close
the ashtray.
Cover plate 3 engages.
Ashtrays in the rear passenger
compartment
There is located one ashtray on each rear
passenger door.
1 Cover
2 Catch
3 Ashtray insert
Warning!G
Remove ashtray only with vehicle standing
still. Set the parking brake to secure the
vehicle from movement. Move gear selector
lever to neutral position N. With the gear se-
lector lever in neutral position N turn off the
engine.
W463.boo Seite 221 Montag, 19 . November 2007 8:41 08
Page 225 of 457
.
�Flip up cover and insert electrical plug
(cigarette lighter type).Power outlet in c")
224 Controls in detail
Useful features
Power outlet in rear passenger footwell
�Switch on the ignition (�page 39).
�Flip up cover and insert electrical plug
(cigarette lighter type).Power outlet in cargo compartment
�Switch on the ignition (�page 39).
�Flip up cover and insert electrical plug
(cigarette lighter type).
Floormats
NN
Warning!G
Whenever you are using floormats, make
sure there is enough clearance and the
floormats are securely fastened.
Floormats should always be securely fas-
tened using the eyelets and retainer pins.
Before driving off, check that the floormats
are securely in place and adjust them if
necessary. A loose floormat could slip and
hinder proper functioning of the pedals.
Do not place several
floormats on top of
each other as this ma y impair pedal move-
ment.
iTo install or remove the floormat more
easily, move the driver’s seat or front passenger
seat as far to the rear as possible (
�page 42).
W463.boo Seite 224 Montag, 19 . November 2007 8:41 08
Page 253 of 457

252 Operation
Driving instructions
Standing water
To prevent water from entering the
passenger compartment or the engine
compartment if you must drive through
standing water, keep in mind
�the maximum depth of the water may
not exceed 19 in (48 cm)
�you must drive slowlyFor more information, see “Driving through
water” (
�page 257).
Passenger compartment
!Do not drive through flooded areas or water
of unknown depth. Before driving through water,
determine its depth. Never accelerate before
driving into water. The bow wave could force
water into the engine and auxiliary equipment,
thus damaging them.
If you must drive through standing water, drive
slowly to prevent water from entering the
passenger compartment or the engine
compartment. Water in these areas could cause
�damage to electrical components
�wiring of the engine or transmission
or could result
�in water being ingested by the engine
through the air intake, causing severe
internal engine damage.
Any such damage is not covered by the
Mercedes-Benz Limited Warranty.
Warning!G
Always fasten items being carried as
securely as possible.
In an accident, during hard braking or sud-
den maneuvers, loose items will be thrown
around inside the vehi cle, and cause injury
to vehicle occupants unless the items are
securely fastened in the vehicle.
The rear cargo compartm ent is the preferred
place to carry objects. Always use cargo
tie-down rings, and if so equipped, always
use partition net* when transporting cargo.
The partition net* cannot secure hard or
heavy objects. Always fasten items being
carried as securely as possible using the
cargo tie-down rings in the cargo compart-
ment floor and fastening materials.
Do not load items on the roof. It may cause
instability during so me maneuvers which
could result in an acci dent. This vehicle is
not intended to carry items on its roof. Thus
roof rails and roof mounted ski or bike
holders must not be used.
W463.boo Seite 252 Montag, 19 . November 2007 8:41 08
Page 254 of 457

253
Operation
Driving instructions
Off-road driving
Read this chapter carefully before you
begin off-road travel.
Familiarize yourself with the vehicle
characteristics and gear changing before
you attempt any difficult terrain off-road
driving. We recommend that you start out
with easy off-road travel. Special driving features for off-road
driving
The following driving features are available
for specific kind of operation:
�ABS (�page 87)
�ESP® (�page 91)
�4-ETS (�page 90)
�Differential lock (�page 173)
�Transfer case (�page 170)
Off-road driving rules
�Engage the transfer case in position
LOW before driving under off-road
conditions (
�page 170).
�If necessary activate differential locks
(
�page 175).
The ABS, BAS and ESP
® are switched
off automatically when the differential
locks are activated.
�Fasten items being carried as securely
as possible (
�page 208).
Warning!G
Do not load items on the roof. It may cause
instability during so me maneuvers which
could result in an accident.
Drive slowly in unkn own terrain. This will
make it easier to recognize unexpected
obstacles and avoid damage to the vehicle.
To help avoid the vehicle rolling over, never
turn it around on steep inclines. If the vehi-
cle cannot complete the attempted climb,
back it down in reverse gear.
Do not drive along the side of a slope. The
vehicle might otherwise rollover. If in doing
so the vehicle begins to show a tendency to
roll, immediately steer into a line of gravity
(straight up or downhill).
Never let the vehicle roll backwards in idle.
You may lose control of the vehicle if you
use only the brake. For information on
driving downhill, see “Driving downhill”
(
�page 257).
Warning!G
Sand, dirt, mud and other material having
friction property can cause exceptional wear
and tear as well as brake failure.
Have the brakes checked for dirt build-up
and cleaned. There is otherwise a risk that
full braking power may not be available in an
emergency.
W463.boo Seite 253 Montag, 19 . November 2007 8:41 08
Page 270 of 457
.
The hood will lock audibly.
�Check to make sure the hood is fully
closed")
269
Operation
Engine compartment
Closing�Lower hood and let it drop into lock
from a height of approximately 0.7 ft
(20 cm).
The hood will lock audibly.
�Check to make sure the hood is fully
closed.
If you can raise the hood at a point
above the turn signals to the left and
right of the hood, then it is not properly
closed. Open it again and let it drop
with somewhat greater force.
Engine oil
The amount of oil your engine needs will
depend on a number of factors, including
driving style. Higher
oil consumption can
occur when
�the vehicle is new
�the vehicle is driven frequently at
higher engine speeds
Engine oil consumption checks should only
be made after the vehicle break-in period.
Warning!G
When closing the hood, use extreme caution
not to catch hands or fi ngers. Be careful that
you do not close the hood on anyone.
Make sure that the hood is securely
engaged before driving off. Do not continue
driving if the hood can no longer engage
after an accident, for example. The hood
could otherwise come loose while the
vehicle is in motion and endanger you and
others.
!Do not push the hood closed manually, as
this could damage it. !Do not use any special lubricant additives,
as these may damage the drive assemblies.
Using special additives not approved by
Mercedes-Benz may cause damage not covered
by the Mercedes-Benz Limited Warranty.
More information on this subject is available at
any Mercedes-Benz Light Truck Center.
W463.boo Seite 269 Montag, 19 . November 2007 8:41 08
Page 368 of 457
367
Practical hints
Where will I find...?
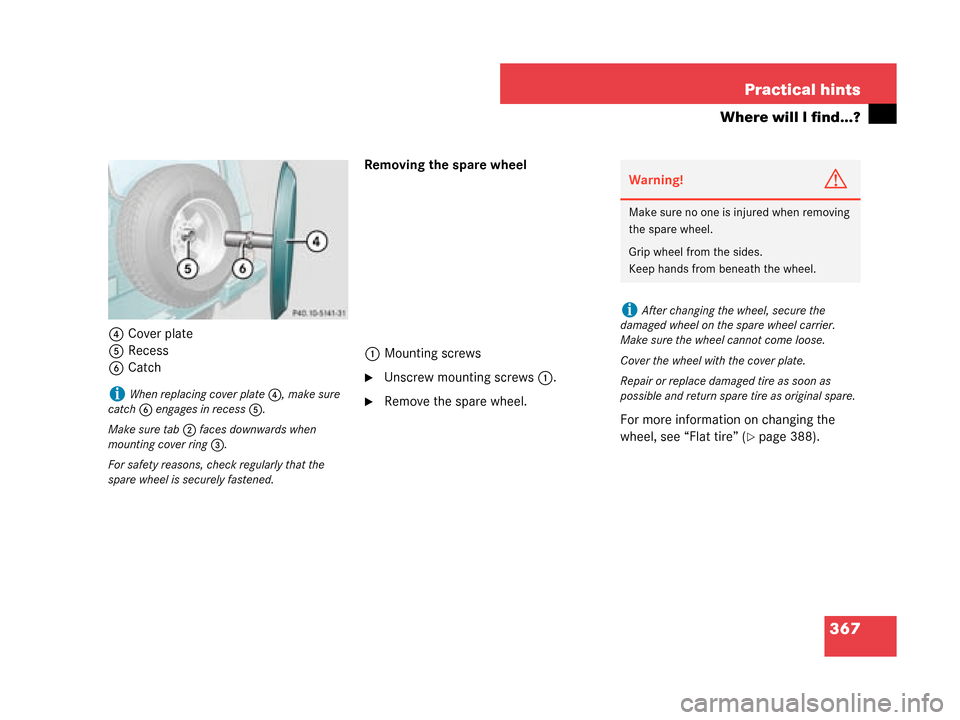
4
Cover plate
5 Recess
6 Catch Removing the spare wheel
1 Mounting screws
�Unscrew mounting screws 1.
�Remove the spare wheel.
For more information on changing the
wheel, see “Flat tire” (
�page 388).
iWhen replacing cover plate4, make sure
catch 6 engages in recess 5.
Make sure tab 2 faces downwards when
mounting cover ring 3.
For safety reasons, ch eck regularly that the
spare wheel is securely fastened.
Warning!G
Make sure no one is injured when removing
the spare wheel.
Grip wheel from the sides.
Keep hands from beneath the wheel.
iAfter changing the wheel, secure the
damaged wheel on the spare wheel carrier.
Make sure the wheel cannot come loose.
Cover the wheel with the cover plate.
Repair or replace damaged tire as soon as
possible and return spare tire as original spare.
W463.boo Seite 367 Montag, 19 . November 2007 8:41 08