2008 MERCEDES-BENZ E-CLASS SALOON ESP
[x] Cancel search: ESPPage 184 of 401
Sliding sunroof
181
!
Only open the sliding/tilting sunroof if it
is free of snow and ice. Otherwise, mal-
functions may occur.
Do not allow anything to protrude from the
sliding/tilting sunroof. The seals could oth-
erwise be damaged.
i Resonance noises can occur in addition
to the usual airflow noises when the slid-
ing/tilting sunroof is open. They are caused
by minor pressure fluctuations in the vehi-
cle interior.
Change the position of the sliding/tilting
sunroof or open a side window slightly to
reduce or eliminate these noises.
i It is also possible to open and close the
sliding/tilting sunroof from the outside
using the "Summer opening" (Y page 109)
and "Convenience closing" (Y page 109)
features respectively.
i If PRE-SAFE ®
has been activated, the slid-
ing/tilting sunroof closes automatically,
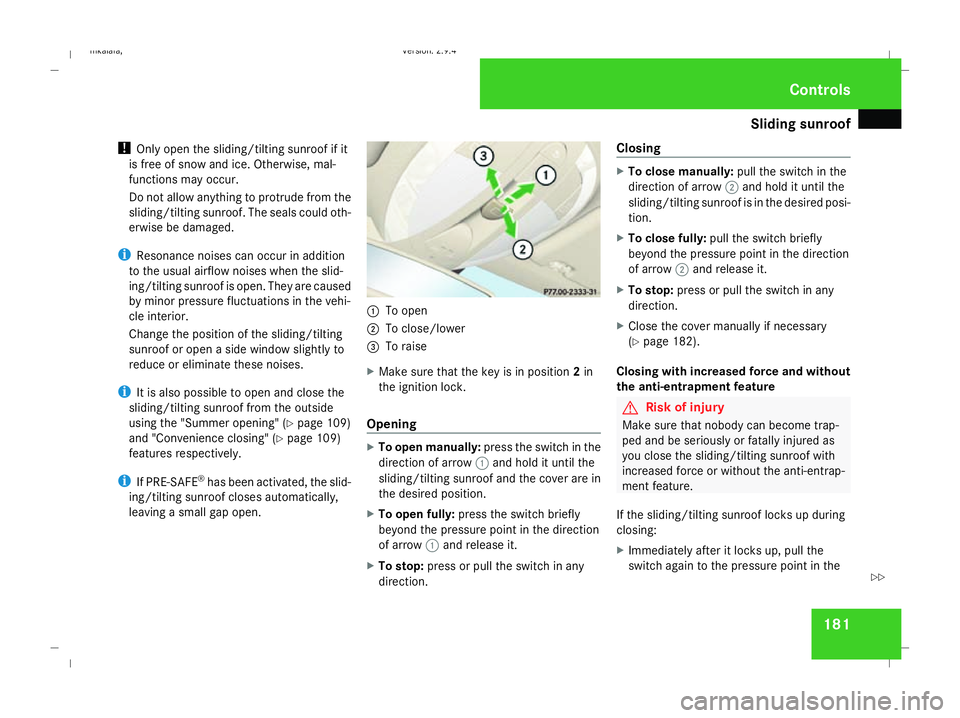
leaving a small gap open. 1
To open
2 To close/lower
3 To raise
X Make sure that the key is in position 2in
the ignition lock.
Opening X
To open manually: press the switch in the
direction of arrow 1and hold it until the
sliding/tilting sunroof and the cover are in
the desired position.
X To open fully: press the switch briefly
beyond the pressure point in the direction
of arrow 1and release it.
X To stop: press or pull the switch in any
direction. Closing X
To close manually: pull the switch in the
direction of arrow 2and hold it until the
sliding/tilting sunroof is in the desired posi-
tion.
X To close fully: pull the switch briefly
beyond the pressure point in the direction
of arrow 2and release it.
X To stop: press or pull the switch in any
direction.
X Close the cover manually if necessary
(Y page 182).
Closing with increased force and without
the anti-entrapment feature G
Risk of injury
Make sure that nobody can become trap-
ped and be seriously or fatally injured as
you close the sliding/tilting sunroof with
increased force or without the anti-entrap-
ment feature.
If the sliding/tilting sunroof locks up during
closing:
X Immediately after it locks up, pull the
switch again to the pressure point in the Controls
211_AKB; 2; 5, en-GB
mkalafa,
Version: 2.9.4
2008-02-29T16:57:07+01:00 - Seite 181 ZDateiname: 6515_3416_02_buchblock.pdf; preflight
Page 186 of 401
Sliding sunroof
183
X
Press the switch in the direction of
arrow 3and hold it until the sliding/tilting
sunroof is fully raised at the rear.
X Keep the switch pressed for an additional
second.
X Make sure that the sliding/tilting sunroof
can be opened or closed fully again
(Y page 181).
X If this is not the case, consult a qualified
specialist workshop. Panorama sliding sunroof with roller
sunblind*
Panorama sliding sunroof G
Risk of injury
Make sure that nobody can become trap-
ped when closing the panorama sliding sun-
roof. If danger threatens, release the switch
and push it briefly in any direction to stop
the panorama sliding sunroof. G
Risk of injury
The glass in the panorama sliding sunroof
could break in an accident. If you are not
wearing a seat belt, there is a risk that you could be thrown through the opening in the
event of the vehicle overturning. Therefore,
always wear a seat belt to reduce the risk
of injuries.
! Only open the panorama sliding sunroof
if it is free of snow and ice. Otherwise, mal-
functions may occur.
Do not allow anything to protrude from the
panorama sliding sunroof. The seals could
otherwise be damaged.
i When the panorama sliding sunroof is
open, resonance noises may occur as well
as the usual airflow noises. They are caused
by minor pressure fluctuations in the vehi-
cle interior. Change the position of the pan-
orama sliding sunroof or open a side
window slightly to reduce or eliminate
these noises.
i It is also possible to open and close the
panorama sliding sunroof from the outside
using the "Summer opening" (Y page 109)
and the "Convenience clos-
ing" (Y page 109) features respectively.
i If PRE-SAFE ®
has been activated, the pan-
orama sliding sunroof closes automatically,
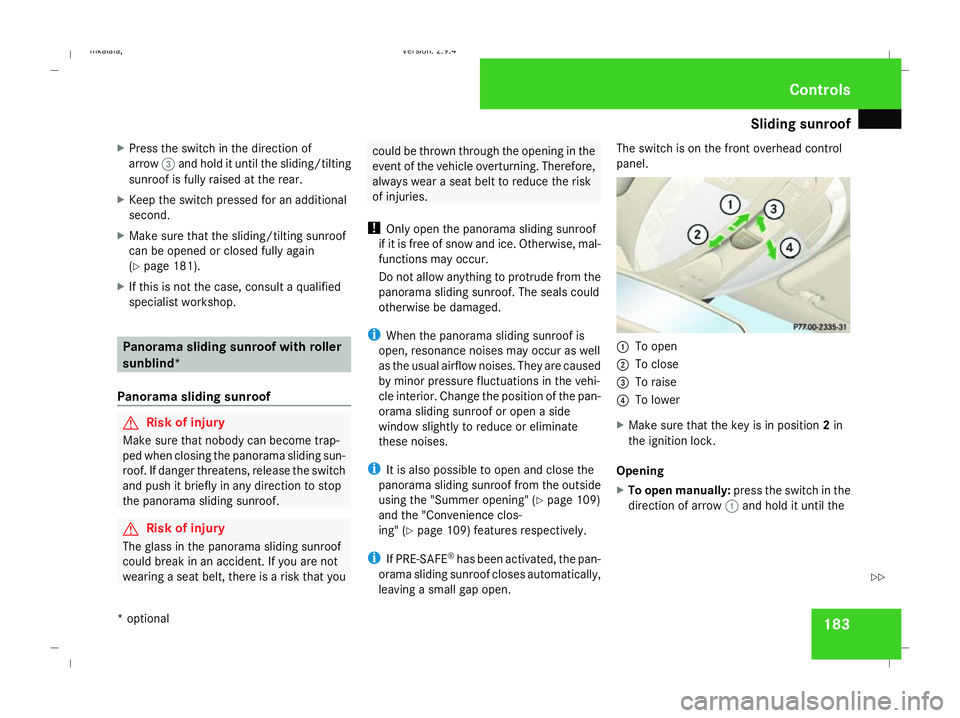
leaving a small gap open. The switch is on the front overhead control
panel.
1
To open
2 To close
3 To raise
4 To lower
X Make sure that the key is in position 2in
the ignition lock.
Opening
X To open manually: press the switch in the
direction of arrow 1and hold it until the Controls
* optional
211_AKB; 2; 5, en-GB
mkalafa,
Version: 2.9.4 2008-02-29T16:57:07+01:00 - Seite 183 ZDateiname: 6515_3416_02_buchblock.pdf; preflight
Page 199 of 401

Loading and stowing
196forward. Otherwise, the backrest uphols-
tery could be damaged. 1
Release
i If the driver's or front-passenger seat has
been adjusted for a tall person, it may be
necessary to move the seats forwards
slightly to fold the backrests forwards.
i Vehicles with memory function*: if one or
both parts of the rear seat backrest are fol-
ded forwards, the respective front seat is
moved forwards slightly to avoid contact
with the backrest and the backrest moves
to a more upright position.
X Pull release 1.
The seat cushion springs upwards slightly. 1
Seat cushion
2 Backrest
X Reach behind seat cushion 1and fold the
seat cushion forwards.
i If a passenger is to travel on the centre
rear seat, it may be necessary to:
R push the centre seat belt buckle inwards
while tilting the right-hand backrest for-
wards
or
R if the right-hand backrest has already
been tilted forwards, fold the middle seat
belt buckle back up.
i You can also remove the seat cushion
(Y page 197). !
Before folding the left-hand backrest for-
wards, make sure that the centre seat belt
buckle is located under the right-hand
backrest. To do this, it may be necessary to
tuck the seat belt buckle under the folded-
down backrest as indicated by the arrows.
Otherwise, the seat belt buckle or the back-
rest could be damaged. Controls
* optional
211_AKB; 2; 5, en-GB
mkalafa,
Version: 2.9.4 2008-02-29T16:57:07+01:00 - Seite 196Dateiname: 6515_3416_02_buchblock.pdf; preflight
Page 200 of 401
Loading and stowing
197X
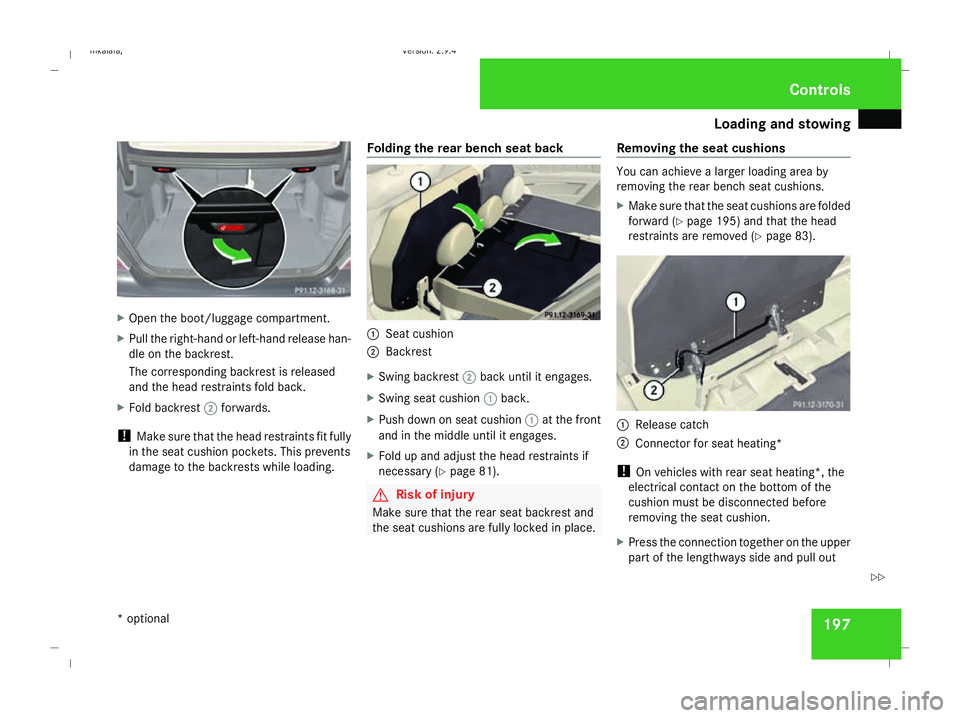
Open the boot/luggage compartment.
X Pull the right-hand or left-hand release han-
dle on the backrest.
The corresponding backrest is released
and the head restraints fold back.
X Fold backrest 2forwards.
! Make sure that the head restraints fit fully
in the seat cushion pockets. This prevents
damage to the backrests while loading. Folding the rear bench seat back 1
Seat cushion
2 Backrest
X Swing backrest 2back until it engages.
X Swing seat cushion 1back.
X Push down on seat cushion 1at the front
and in the middle until it engages.
X Fold up and adjust the head restraints if
necessary (Y page 81). G
Risk of injury
Make sure that the rear seat backrest and
the seat cushions are fully locked in place. Removing the seat cushions You can achieve a larger loading area by
removing the rear bench seat cushions.
X
Make sure that the seat cushions are folded
forward (Y page 195) and that the head
restraints are removed (Y page 83). 1
Release catch
2 Connector for seat heating*
! On vehicles with rear seat heating*, the
electrical contact on the bottom of the
cushion must be disconnected before
removing the seat cushion.
X Press the connection together on the upper
part of the lengthways side and pull out Controls
* optional
211_AKB; 2; 5, en-GB
mkalafa,
Version: 2.9.4 2008-02-29T16:57:07+01:00 - Seite 197 ZDateiname: 6515_3416_02_buchblock.pdf; preflight
Page 201 of 401
Loading and stowing
198seat heating connector
2from the seat
cushion.
i Join the connections for the seat heating,
making sure the connector clicks into
place, when replacing the cushion.
X Pull seat cushion release catch 1and
remove the seat cushion upwards.
! Leave the seat cushion hinge in this posi-
tion. If you fold it back, you could damage
the upholstery. X
Fold the backrest forward. Enlarging the luggage compartment
(Estate)
The left-hand and right-hand rear seats can
be folded down to increase the luggage com-
partment capacity.
If the combined luggage cover and net is fit-
ted with the luggage compartment cover and
safety net, you can only fold the right-hand
backrest forwards on its own or both backr-
ests if you first fold the right-hand backrest
forwards. G
Risk of injury
Do not carry heavy or hard objects inside
the vehicle or in the luggage compartment
unless they are secured.
Otherwise, you and other vehicle occu-
pants could be injured by objects being
thrown around the vehicle in the event of
sharp braking, a sudden change in direction
or an accident.
You must always fold the seat cushions
forward and attach the safety net when
using the luggage compartment enlarge-
ment. G
Risk of poisoning
Always drive with the tailgate closed.
Exhaust fumes could otherwise enter the
vehicle interior.
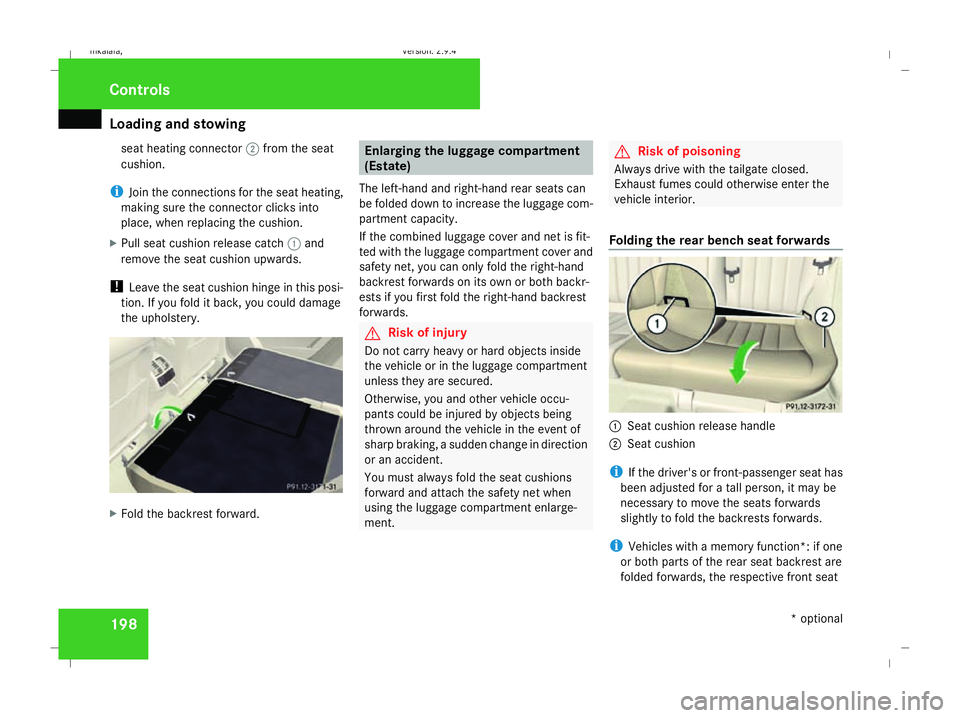
Folding the rear bench seat forwards 1
Seat cushion release handle
2 Seat cushion
i If the driver's or front-passenger seat has
been adjusted for a tall person, it may be
necessary to move the seats forwards
slightly to fold the backrests forwards.
i Vehicles with a memory function*: if one
or both parts of the rear seat backrest are
folded forwards, the respective front seat Controls
* optional
211_AKB; 2; 5, en-GB
mkalafa,
Version: 2.9.4 2008-02-29T16:57:07+01:00 - Seite 198Dateiname: 6515_3416_02_buchblock.pdf; preflight
Page 202 of 401
Loading and stowing
199
is moved forwards slightly to avoid contact
with the backrest and the backrest moves
to a more upright position.
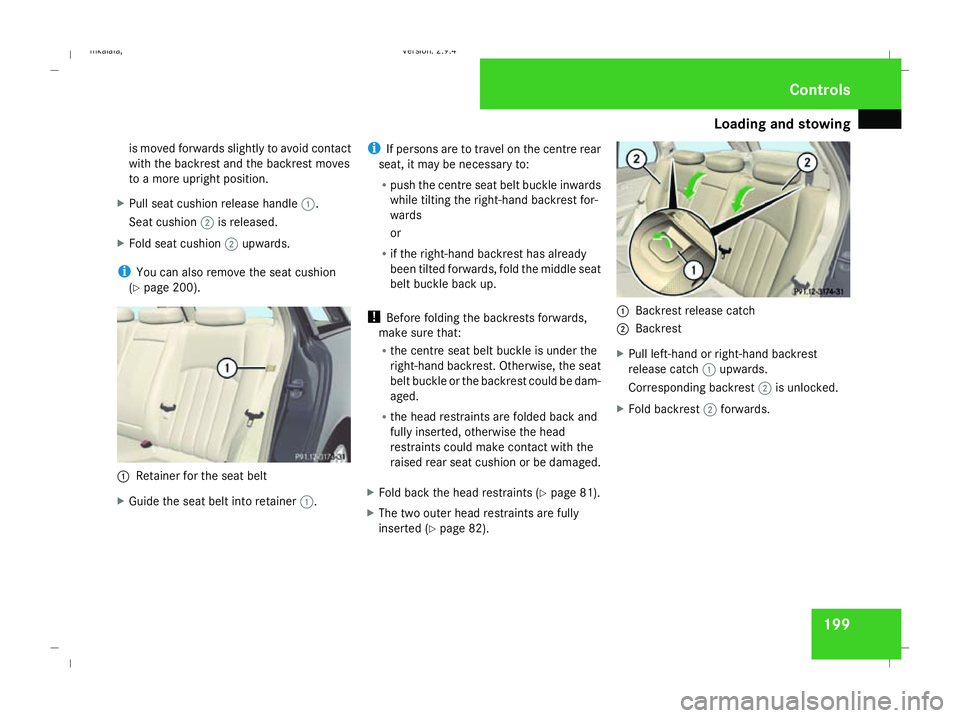
X Pull seat cushion release handle 1.
Seat cushion 2is released.
X Fold seat cushion 2upwards.
i You can also remove the seat cushion
(Y page 200). 1
Retainer for the seat belt
X Guide the seat belt into retainer 1.i
If persons are to travel on the centre rear
seat, it may be necessary to:
R push the centre seat belt buckle inwards
while tilting the right-hand backrest for-
wards
or
R if the right-hand backrest has already
been tilted forwards, fold the middle seat
belt buckle back up.
! Before folding the backrests forwards,
make sure that:
R the centre seat belt buckle is under the
right-hand backrest. Otherwise, the seat
belt buckle or the backrest could be dam-
aged.
R the head restraints are folded back and
fully inserted, otherwise the head
restraints could make contact with the
raised rear seat cushion or be damaged.
X Fold back the head restraints (Y page 81).
X The two outer head restraints are fully
inserted (Y page 82). 1
Backrest release catch
2 Backrest
X Pull left-hand or right-hand backrest
release catch 1upwards.
Corresponding backrest 2is unlocked.
X Fold backrest 2forwards. Controls
211_AKB; 2; 5, en-GB
mkalafa,
Version: 2.9.4 2008-02-29T16:57:07+01:00 - Seite 199 ZDateiname: 6515_3416_02_buchblock.pdf; preflight
Page 223 of 401

Refuelling
220
E 350 CGI !
Refuel using only unleaded premium
grade petrol with a minimum octane num-
ber of 95 RON/85 MON conforming to
European standard EN 228.
You could otherwise impair engine output
or damage the engine.
You will find further information about pet-
rol under "Technical data" in the index.
i In some countries, only petrol of insuffi-
cient quality (high-sulphur fuel) may be
available. This fuel can temporarily produce
unpleasant odours, especially on short
journeys. Refuelling with petrol of sufficient
quality (sulphur-free fuel) will reduce such
odours.
AMG vehicles !
Refuel using only super unleaded petrol
with a minimum octane number of 98
RON/88 MON conforming to European
standard EN 228.
You could otherwise impair engine output
or damage the engine.
You will find further information about pet-
rol under "Technical data" in the index. i
If the recommended fuel is not available
and only as a temporary measure, you may
also use premium unleaded petrol,
95 RON/85 MON. This may reduce per-
formance and increase petrol consump-
tion. You must avoid driving at full throttle.
! In emergencies, only when the recom-
mended fuel is not available, you may also
use standard unleaded petrol, 91 RON/
82.5 MON. However, using this fuel results
in considerably higher petrol consumption
and significantly reduced performance.
Avoid driving at full throttle, and only drive
in drive program C.
If no fuel other than regular petrol fuel 91
RON/82.5 MON or a lower grade is per-
manently available, you should have the
vehicle adapted to run on this fuel by the
local after-sales service. Diesel (EN 590)
! Only use diesel that complies with the
EN 590 European standard.
You could otherwise impair engine output
or damage the engine.
You will find further information about die-
sel under "Fuel" in the index.
! When refuelling vehicles with a diesel par-
ticle filter in countries outside the EU, only
low-sulphur Euro diesel with less than
0.005 percent sulphur content by weight
should be used. In countries in which diesel
with a higher sulphur content is available
(e.g. 0.035 percent by weight), the engine
oil should be renewed at more frequent
intervals. More information about intervals
for changing the engine oil can be obtained
from any Mercedes-Benz Service Centre.
! Using fuel that does not comply with EN
590 can increase wear and damage the
engine and the exhaust system. Do not use
the following:
R Marine diesel
R Heating oil
R Bio-diesel Operation
211_AKB; 2; 5, en-GB
mkalafa
,V ersion: 2.9.4
2008-02-29T16:57:07+01:00 - Seite 220 Dateiname: 6515_3416_02_buchblock.pdf; preflight
Page 230 of 401
Tyres and wheels
227
X
To open: pull cap1upwards by the tab.
X To close: press cap 1onto the filler neck
until it clicks into place. Tyres and wheels
Points to remember
! For safety reasons, Mercedes-Benz rec-
ommends that you only use tyres and
wheels which have been approved by
Mercedes-Benz specifically for your vehi-
cle. These tyres have been specially adap-
ted for use with the control systems, such
as ABS or ESP ®
, and are marked as follows:
R MO = Mercedes-Benz Original
R MOE = Mercedes-Benz Original Extended
(with run-flat characteristics)*
Mercedes-Benz Original Extended tyres*
should only be used on wheels that have
been specifically approved by Mercedes-
Benz.
If you use other tyres and wheels,
Mercedes-Benz cannot accept any respon-
sibility for damage that may result from
this. Further information about tyres,
wheels and approved combinations can be
obtained from any Mercedes-Benz Service
Centre.
If you use tyres other than those tested and
recommended for Mercedes-Benz vehi-
cles, characteristics such as handling, vehi-
cle noise emissions and fuel consumption may be adversely affected. In addition, the
wheels may come into contact with the
body or axle components when heavily loa-
ded or when driving with snow chains. This
could result in damage to the tyres or the
vehicle.
! Retreaded tyres are neither tested nor
recommended by Mercedes-Benz, since
previous damage cannot always be detec-
ted on retreaded tyres. As a result,
Mercedes-Benz cannot guarantee vehicle
safety if retreaded tyres are fitted. Do not
fit used tyres if you have no information
about their previous usage. G
Risk of accident
If wheels or tyres other than those which
have been tested are fitted:
R the brakes or chassis components could
be damaged
R wheel and tyre clearances can no longer
be guaranteed
This could cause an accident.
Modification work on the brake system and
wheels is not permitted, nor is the use of
spacer plates or brake dust shields. This inva-
lidates the General Operating Permit for the
vehicle. Operation
* optional
211_AKB; 2; 5, en-GB
mkalafa
,V ersion: 2.9.4
2008-02-29T16:57:07+01:00 - Seite 227 ZDateiname: 6515_3416_02_buchblock.pdf; preflight