2008 MERCEDES-BENZ E-CLASS SALOON lock
[x] Cancel search: lockPage 196 of 401
Loading and stowing
193
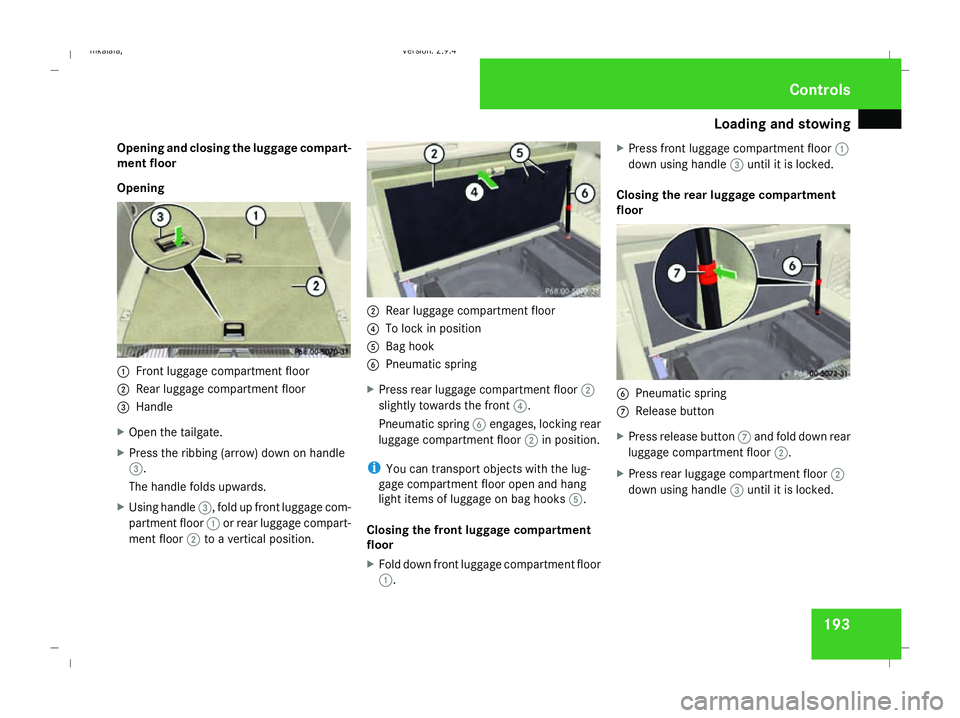
Opening and closing the luggage compart-
ment floor
Opening
1
Front luggage compartment floor
2 Rear luggage compartment floor
3 Handle
X Open the tailgate.
X Press the ribbing (arrow) down on handle
3.
The handle folds upwards.
X Using handle 3, fold up front luggage com-
partment floor 1or rear luggage compart-
ment floor 2to a vertical position. 2
Rear luggage compartment floor
4 To lock in position
5 Bag hook
6 Pneumatic spring
X Press rear luggage compartment floor 2
slightly towards the front 4.
Pneumatic spring 6engages, locking rear
luggage compartment floor 2in position.
i You can transport objects with the lug-
gage compartment floor open and hang
light items of luggage on bag hooks 5.
Closing the front luggage compartment
floor
X Fold down front luggage compartment floor
1. X
Press front luggage compartment floor 1
down using handle 3until it is locked.
Closing the rear luggage compartment
floor 6
Pneumatic spring
7 Release button
X Press release button 7and fold down rear
luggage compartment floor 2.
X Press rear luggage compartment floor 2
down using handle 3until it is locked. Controls
211_AKB; 2; 5, en-GB
mkalafa,
Version: 2.9.4 2008-02-29T16:57:07+01:00 - Seite 193 ZDateiname: 6515_3416_02_buchblock.pdf; preflight
Page 197 of 401
Loading and stowing
194
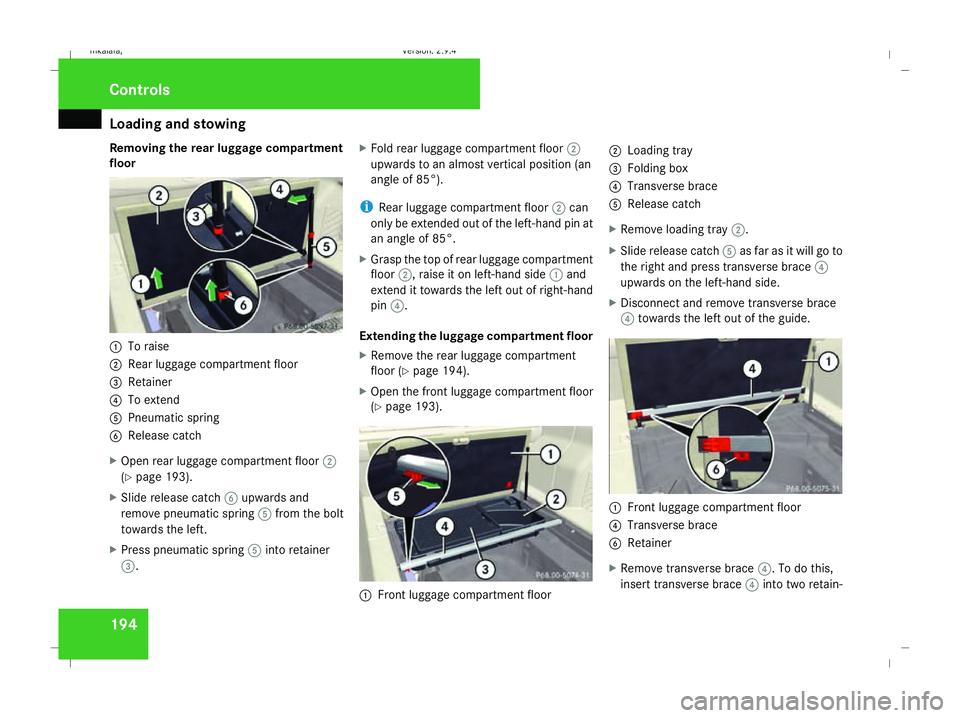
Removing the rear luggage compartment
floor 1
To raise
2 Rear luggage compartment floor
3 Retainer
4 To extend
5 Pneumatic spring
6 Release catch
X Open rear luggage compartment floor 2
(Y page 193).
X Slide release catch 6upwards and
remove pneumatic spring 5from the bolt
towards the left.
X Press pneumatic spring 5into retainer
3. X
Fold rear luggage compartment floor 2
upwards to an almost vertical position (an
angle of 85°).
i Rear luggage compartment floor 2can
only be extended out of the left-hand pin at
an angle of 85°.
X Grasp the top of rear luggage compartment
floor 2, raise it on left-hand side 1and
extend it towards the left out of right-hand
pin 4.
Extending the luggage compartment floor
X Remove the rear luggage compartment
floor (Y page 194).
X Open the front luggage compartment floor
(Y page 193). 1
Front luggage compartment floor 2
Loading tray
3 Folding box
4 Transverse brace
5 Release catch
X Remove loading tray 2.
X Slide release catch 5as far as it will go to
the right and press transverse brace 4
upwards on the left-hand side.
X Disconnect and remove transverse brace
4 towards the left out of the guide. 1
Front luggage compartment floor
4 Transverse brace
6 Retainer
X Remove transverse brace 4. To do this,
insert transverse brace 4into two retain- Controls
211_AKB; 2; 5, en-GB
mkalafa,
Version: 2.9.4 2008-02-29T16:57:07+01:00 - Seite 194Dateiname: 6515_3416_02_buchblock.pdf; preflight
Page 198 of 401
Loading and stowing
195
ers
6on front luggage compartment floor
1.
i You must release both retainers 6to
remove transverse brace 4. To do this,
press the tabs under retainer 6forwards.
i You can insert loading tray 2under
either the rear or the front luggage com-
partment floor.
Vehicles with a folding bench seat* TIREFIT, the vehicle tool kit, etc. are located
in the stowage well.
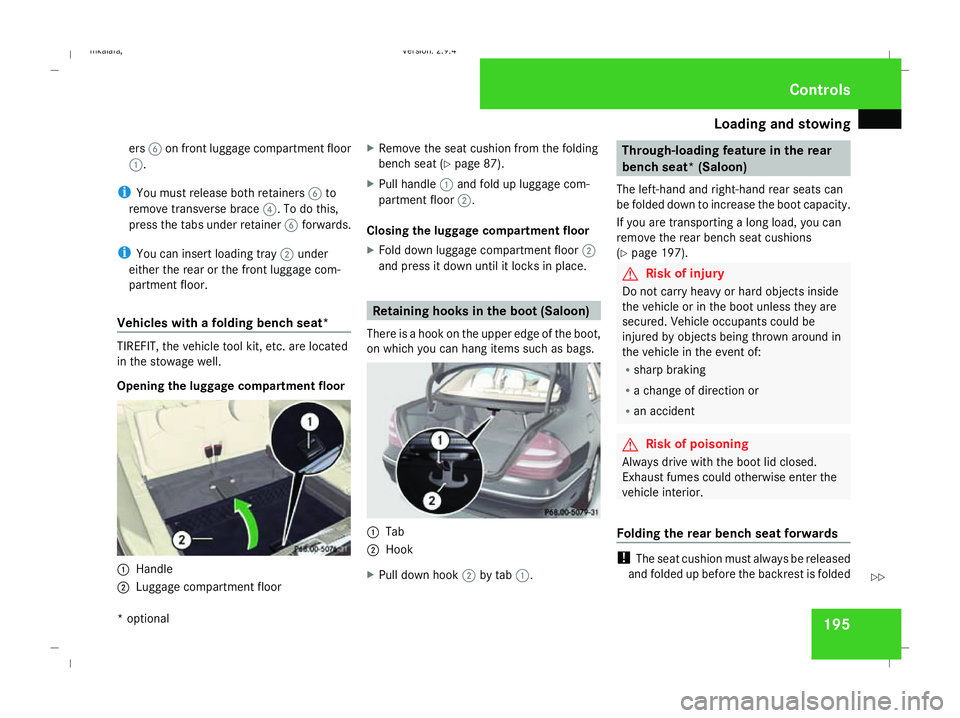
Opening the luggage compartment floor
1
Handle
2 Luggage compartment floor X
Remove the seat cushion from the folding
bench seat (Y page 87).
X Pull handle 1and fold up luggage com-
partment floor 2.
Closing the luggage compartment floor
X Fold down luggage compartment floor 2
and press it down until it locks in place. Retaining hooks in the boot (Saloon)
There is a hook on the upper edge of the boot,
on which you can hang items such as bags. 1
Tab
2 Hook
X Pull down hook 2by tab 1. Through-loading feature in the rear
bench seat* (Saloon)
The left-hand and right-hand rear seats can
be folded down to increase the boot capacity.
If you are transporting a long load, you can
remove the rear bench seat cushions
(Y page 197). G
Risk of injury
Do not carry heavy or hard objects inside
the vehicle or in the boot unless they are
secured. Vehicle occupants could be
injured by objects being thrown around in
the vehicle in the event of:
R sharp braking
R a change of direction or
R an accident G
Risk of poisoning
Always drive with the boot lid closed.
Exhaust fumes could otherwise enter the
vehicle interior.
Folding the rear bench seat forwards !
The seat cushion must always be released
and folded up before the backrest is folded Controls
* optional
211_AKB; 2; 5, en-GB
mkalafa,
Version: 2.9.4 2008-02-29T16:57:07+01:00 - Seite 195 ZDateiname: 6515_3416_02_buchblock.pdf; preflight
Page 199 of 401

Loading and stowing
196forward. Otherwise, the backrest uphols-
tery could be damaged. 1
Release
i If the driver's or front-passenger seat has
been adjusted for a tall person, it may be
necessary to move the seats forwards
slightly to fold the backrests forwards.
i Vehicles with memory function*: if one or
both parts of the rear seat backrest are fol-
ded forwards, the respective front seat is
moved forwards slightly to avoid contact
with the backrest and the backrest moves
to a more upright position.
X Pull release 1.
The seat cushion springs upwards slightly. 1
Seat cushion
2 Backrest
X Reach behind seat cushion 1and fold the
seat cushion forwards.
i If a passenger is to travel on the centre
rear seat, it may be necessary to:
R push the centre seat belt buckle inwards
while tilting the right-hand backrest for-
wards
or
R if the right-hand backrest has already
been tilted forwards, fold the middle seat
belt buckle back up.
i You can also remove the seat cushion
(Y page 197). !
Before folding the left-hand backrest for-
wards, make sure that the centre seat belt
buckle is located under the right-hand
backrest. To do this, it may be necessary to
tuck the seat belt buckle under the folded-
down backrest as indicated by the arrows.
Otherwise, the seat belt buckle or the back-
rest could be damaged. Controls
* optional
211_AKB; 2; 5, en-GB
mkalafa,
Version: 2.9.4 2008-02-29T16:57:07+01:00 - Seite 196Dateiname: 6515_3416_02_buchblock.pdf; preflight
Page 200 of 401
Loading and stowing
197X
Open the boot/luggage compartment.
X Pull the right-hand or left-hand release han-
dle on the backrest.
The corresponding backrest is released
and the head restraints fold back.
X Fold backrest 2forwards.
! Make sure that the head restraints fit fully
in the seat cushion pockets. This prevents
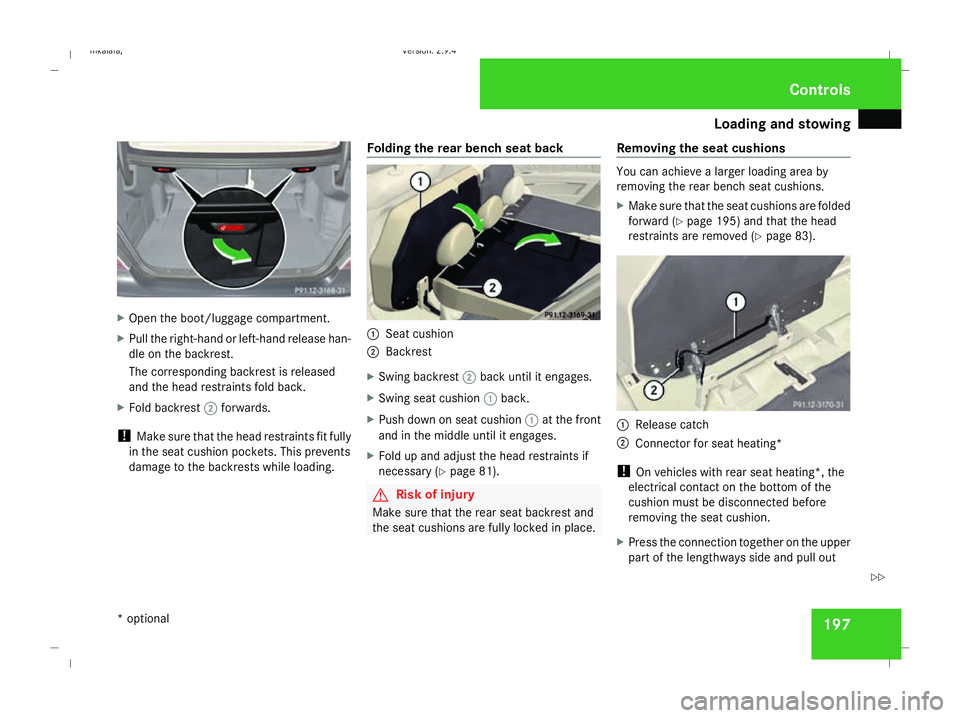
damage to the backrests while loading. Folding the rear bench seat back 1
Seat cushion
2 Backrest
X Swing backrest 2back until it engages.
X Swing seat cushion 1back.
X Push down on seat cushion 1at the front
and in the middle until it engages.
X Fold up and adjust the head restraints if
necessary (Y page 81). G
Risk of injury
Make sure that the rear seat backrest and
the seat cushions are fully locked in place. Removing the seat cushions You can achieve a larger loading area by
removing the rear bench seat cushions.
X
Make sure that the seat cushions are folded
forward (Y page 195) and that the head
restraints are removed (Y page 83). 1
Release catch
2 Connector for seat heating*
! On vehicles with rear seat heating*, the
electrical contact on the bottom of the
cushion must be disconnected before
removing the seat cushion.
X Press the connection together on the upper
part of the lengthways side and pull out Controls
* optional
211_AKB; 2; 5, en-GB
mkalafa,
Version: 2.9.4 2008-02-29T16:57:07+01:00 - Seite 197 ZDateiname: 6515_3416_02_buchblock.pdf; preflight
Page 201 of 401
Loading and stowing
198seat heating connector
2from the seat
cushion.
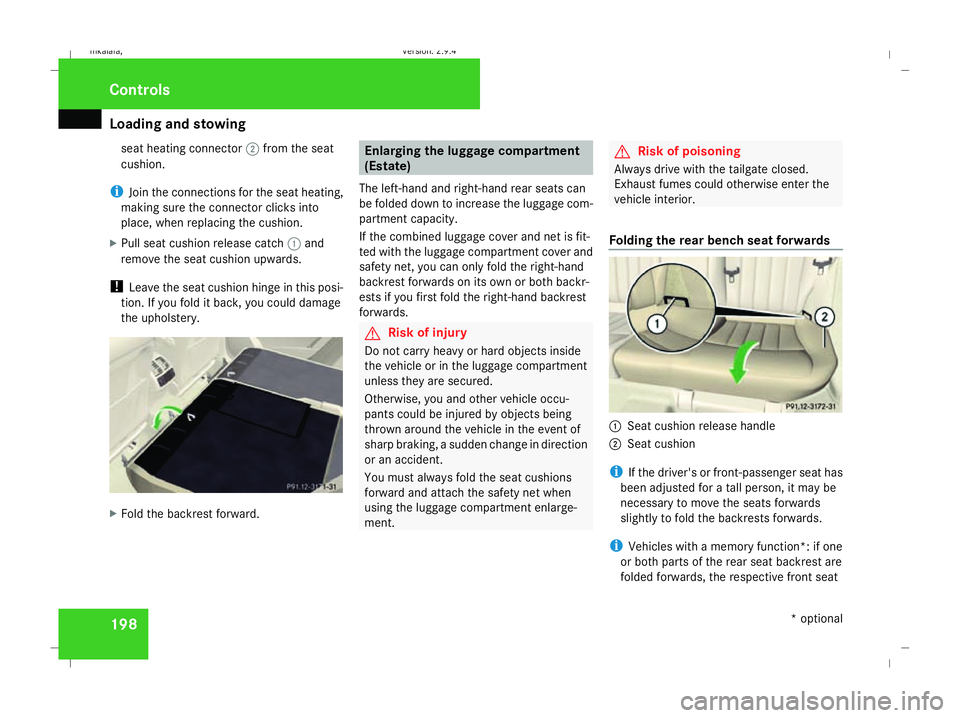
i Join the connections for the seat heating,
making sure the connector clicks into
place, when replacing the cushion.
X Pull seat cushion release catch 1and
remove the seat cushion upwards.
! Leave the seat cushion hinge in this posi-
tion. If you fold it back, you could damage
the upholstery. X
Fold the backrest forward. Enlarging the luggage compartment
(Estate)
The left-hand and right-hand rear seats can
be folded down to increase the luggage com-
partment capacity.
If the combined luggage cover and net is fit-
ted with the luggage compartment cover and
safety net, you can only fold the right-hand
backrest forwards on its own or both backr-
ests if you first fold the right-hand backrest
forwards. G
Risk of injury
Do not carry heavy or hard objects inside
the vehicle or in the luggage compartment
unless they are secured.
Otherwise, you and other vehicle occu-
pants could be injured by objects being
thrown around the vehicle in the event of
sharp braking, a sudden change in direction
or an accident.
You must always fold the seat cushions
forward and attach the safety net when
using the luggage compartment enlarge-
ment. G
Risk of poisoning
Always drive with the tailgate closed.
Exhaust fumes could otherwise enter the
vehicle interior.
Folding the rear bench seat forwards 1
Seat cushion release handle
2 Seat cushion
i If the driver's or front-passenger seat has
been adjusted for a tall person, it may be
necessary to move the seats forwards
slightly to fold the backrests forwards.
i Vehicles with a memory function*: if one
or both parts of the rear seat backrest are
folded forwards, the respective front seat Controls
* optional
211_AKB; 2; 5, en-GB
mkalafa,
Version: 2.9.4 2008-02-29T16:57:07+01:00 - Seite 198Dateiname: 6515_3416_02_buchblock.pdf; preflight
Page 202 of 401
Loading and stowing
199
is moved forwards slightly to avoid contact
with the backrest and the backrest moves
to a more upright position.
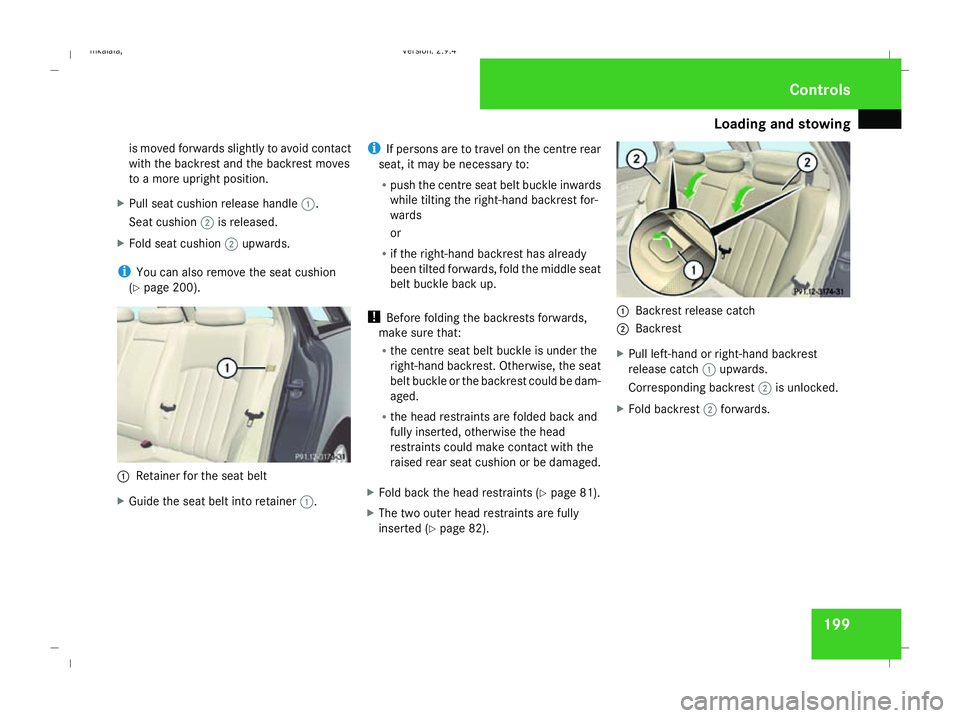
X Pull seat cushion release handle 1.
Seat cushion 2is released.
X Fold seat cushion 2upwards.
i You can also remove the seat cushion
(Y page 200). 1
Retainer for the seat belt
X Guide the seat belt into retainer 1.i
If persons are to travel on the centre rear
seat, it may be necessary to:
R push the centre seat belt buckle inwards
while tilting the right-hand backrest for-
wards
or
R if the right-hand backrest has already
been tilted forwards, fold the middle seat
belt buckle back up.
! Before folding the backrests forwards,
make sure that:
R the centre seat belt buckle is under the
right-hand backrest. Otherwise, the seat
belt buckle or the backrest could be dam-
aged.
R the head restraints are folded back and
fully inserted, otherwise the head
restraints could make contact with the
raised rear seat cushion or be damaged.
X Fold back the head restraints (Y page 81).
X The two outer head restraints are fully
inserted (Y page 82). 1
Backrest release catch
2 Backrest
X Pull left-hand or right-hand backrest
release catch 1upwards.
Corresponding backrest 2is unlocked.
X Fold backrest 2forwards. Controls
211_AKB; 2; 5, en-GB
mkalafa,
Version: 2.9.4 2008-02-29T16:57:07+01:00 - Seite 199 ZDateiname: 6515_3416_02_buchblock.pdf; preflight
Page 203 of 401
Loading and stowing
200
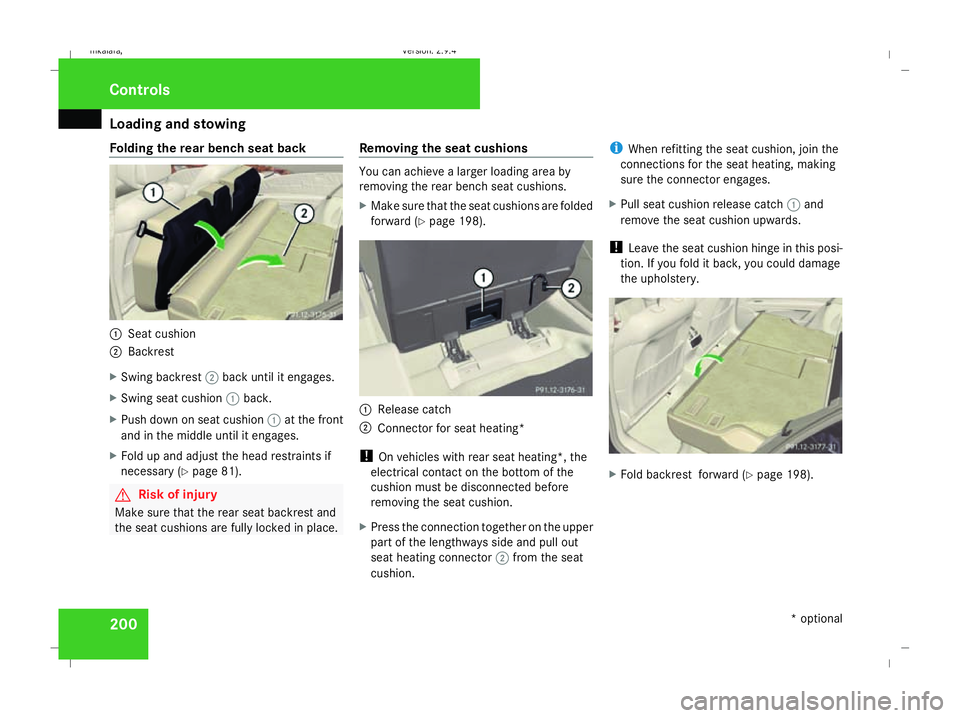
Folding the rear bench seat back
1
Seat cushion
2 Backrest
X Swing backrest 2back until it engages.
X Swing seat cushion 1back.
X Push down on seat cushion 1at the front
and in the middle until it engages.
X Fold up and adjust the head restraints if
necessary (Y page 81). G
Risk of injury
Make sure that the rear seat backrest and
the seat cushions are fully locked in place. Removing the seat cushions You can achieve a larger loading area by
removing the rear bench seat cushions.
X
Make sure that the seat cushions are folded
forward (Y page 198). 1
Release catch
2 Connector for seat heating*
! On vehicles with rear seat heating*, the
electrical contact on the bottom of the
cushion must be disconnected before
removing the seat cushion.
X Press the connection together on the upper
part of the lengthways side and pull out
seat heating connector 2from the seat
cushion. i
When refitting the seat cushion, join the
connections for the seat heating, making
sure the connector engages.
X Pull seat cushion release catch 1and
remove the seat cushion upwards.
! Leave the seat cushion hinge in this posi-
tion. If you fold it back, you could damage
the upholstery. X
Fold backrest forward (Y page 198).Controls
* optional
211_AKB; 2; 5, en-GB
mkalafa,
Version: 2.9.4 2008-02-29T16:57:07+01:00 - Seite 200Dateiname: 6515_3416_02_buchblock.pdf; preflight