2008 MERCEDES-BENZ E-CLASS SALOON lock
[x] Cancel search: lockPage 204 of 401
Loading and stowing
201
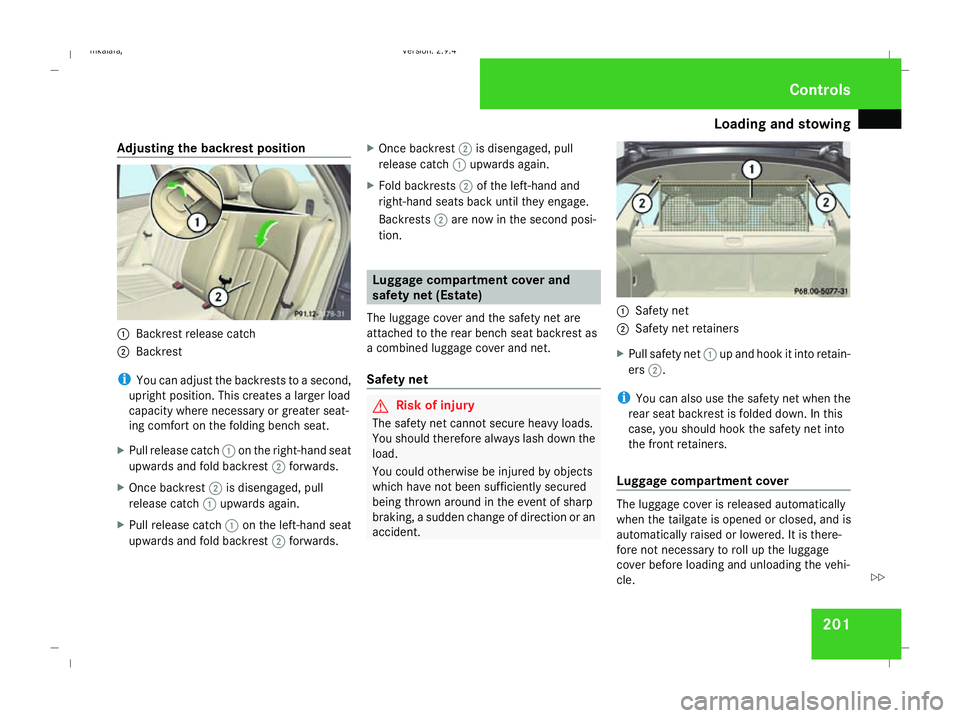
Adjusting the backrest position
1
Backrest release catch
2 Backrest
i You can adjust the backrests to a second,
upright position. This creates a larger load
capacity where necessary or greater seat-
ing comfort on the folding bench seat.
X Pull release catch 1on the right-hand seat
upwards and fold backrest 2forwards.
X Once backrest 2is disengaged, pull
release catch 1upwards again.
X Pull release catch 1on the left-hand seat
upwards and fold backrest 2forwards. X
Once backrest 2is disengaged, pull
release catch 1upwards again.
X Fold backrests 2of the left-hand and
right-hand seats back until they engage.
Backrests 2are now in the second posi-
tion. Luggage compartment cover and
safety net (Estate)
The luggage cover and the safety net are
attached to the rear bench seat backrest as
a combined luggage cover and net.
Safety net G
Risk of injury
The safety net cannot secure heavy loads.
You should therefore always lash down the
load.
You could otherwise be injured by objects
which have not been sufficiently secured
being thrown around in the event of sharp
braking, a sudden change of direction or an
accident. 1
Safety net
2 Safety net retainers
X Pull safety net 1up and hook it into retain-
ers 2.
i You can also use the safety net when the
rear seat backrest is folded down. In this
case, you should hook the safety net into
the front retainers.
Luggage compartment cover The luggage cover is released automatically
when the tailgate is opened or closed, and is
automatically raised or lowered. It is there-
fore not necessary to roll up the luggage
cover before loading and unloading the vehi-
cle. Controls
211_AKB; 2; 5, en-GB
mkalafa,
Version: 2.9.4
2008-02-29T16:57:07+01:00 - Seite 201 ZDateiname: 6515_3416_02_buchblock.pdf; preflight
Page 205 of 401
Loading and stowing
202
!
While loading the vehicle, make sure that
the luggage compartment is not loaded
above the lower edge of the side windows.
Otherwise, the combined luggage cover
and net could be damaged when the tail-
gate is closed.
Do not place objects on the luggage com-
partment cover.
Rolling up the luggage compartment
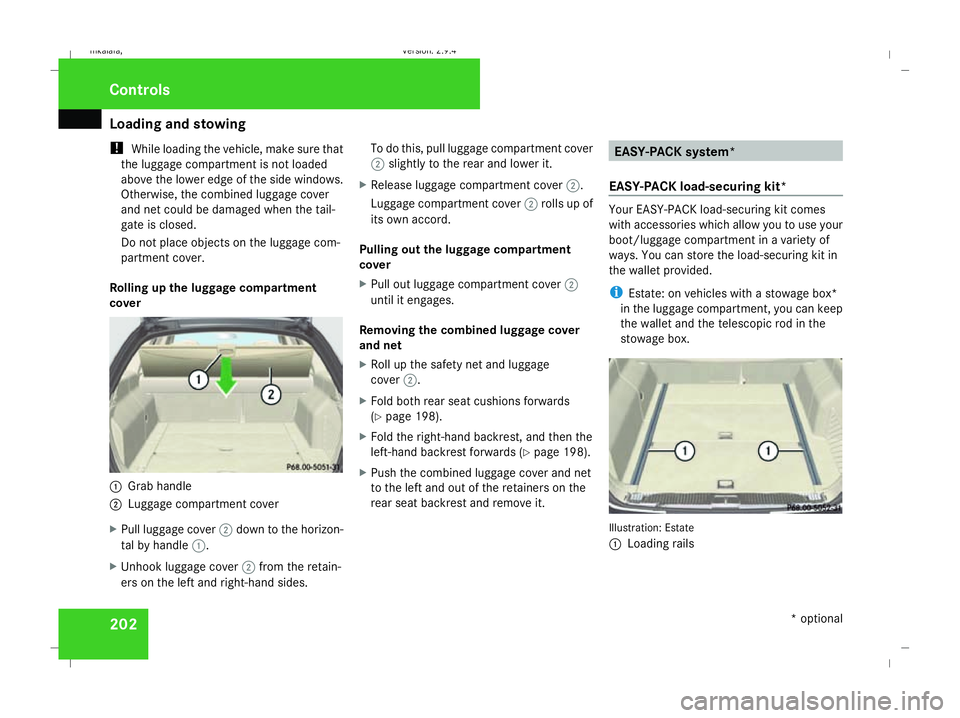
cover 1
Grab handle
2 Luggage compartment cover
X Pull luggage cover 2down to the horizon-
tal by handle 1.
X Unhook luggage cover 2from the retain-
ers on the left and right-hand sides. To do this, pull luggage compartment cover
2
slightly to the rear and lower it.
X Release luggage compartment cover 2.
Luggage compartment cover 2rolls up of
its own accord.
Pulling out the luggage compartment
cover
X Pull out luggage compartment cover 2
until it engages.
Removing the combined luggage cover
and net
X Roll up the safety net and luggage
cover 2.
X Fold both rear seat cushions forwards
(Y page 198).
X Fold the right-hand backrest, and then the
left-hand backrest forwards (Y page 198).
X Push the combined luggage cover and net
to the left and out of the retainers on the
rear seat backrest and remove it. EASY-PACK system*
EASY-PACK load-securing kit* Your EASY-PACK load-securing kit comes
with accessories which allow you to use your
boot/luggage compartment in a variety of
ways. You can store the load-securing kit in
the wallet provided.
i
Estate: on vehicles with a stowage box*
in the luggage compartment, you can keep
the wallet and the telescopic rod in the
stowage box. Illustration: Estate
1
Loading rails Controls
* optional
211_AKB; 2; 5, en-GB
mkalafa,
Version: 2.9.4 2008-02-29T16:57:07+01:00 - Seite 202Dateiname: 6515_3416_02_buchblock.pdf; preflight
Page 206 of 401
Loading and stowing
203
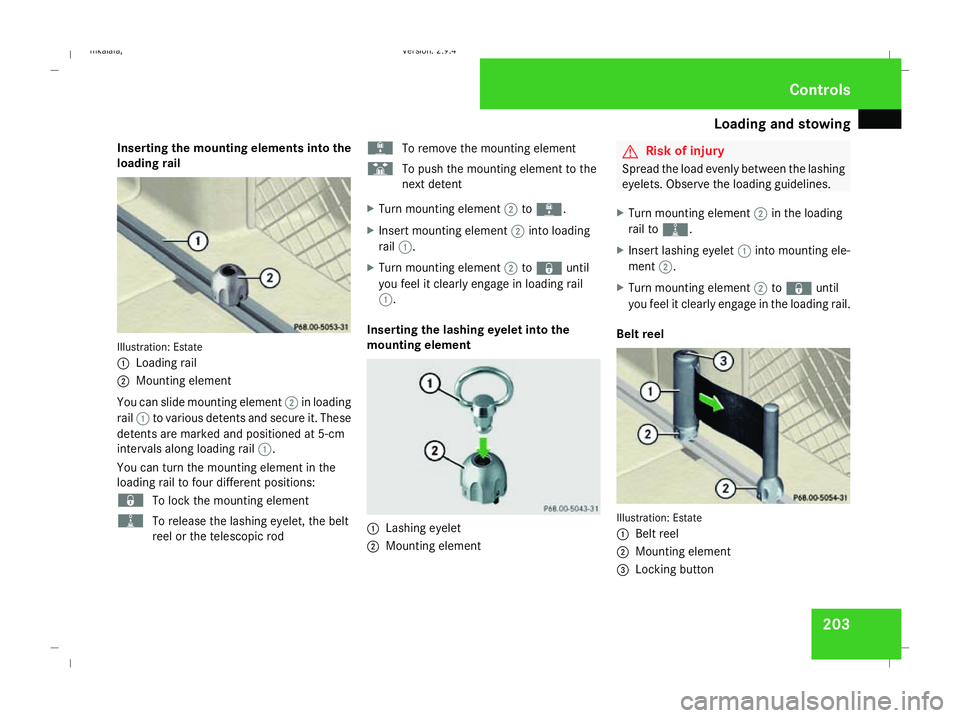
Inserting the mounting elements into the
loading rail Illustration: Estate
1
Loading rail
2 Mounting element
You can slide mounting element 2in loading
rail 1to various detents and secure it. These
detents are marked and positioned at 5-cm
intervals along loading rail 1.
You can turn the mounting element in the
loading rail to four different positions:
‹ To lock the mounting element
N To release the lashing eyelet, the belt
reel or the telescopic rod L
To remove the mounting element
S To push the mounting element to the
next detent
X Turn mounting element 2toL.
X Insert mounting element 2into loading
rail 1.
X Turn mounting element 2to‹ until
you feel it clearly engage in loading rail
1.
Inserting the lashing eyelet into the
mounting element 1
Lashing eyelet
2 Mounting element G
Risk of injury
Spread the load evenly between the lashing
eyelets. Observe the loading guidelines.
X Turn mounting element 2in the loading
rail to N.
X Insert lashing eyelet 1into mounting ele-
ment 2.
X Turn mounting element 2to‹ until
you feel it clearly engage in the loading rail.
Belt reel Illustration: Estate
1
Belt reel
2 Mounting element
3 Locking button Controls
211_AKB; 2; 5, en-GB
mkalafa,
Version: 2.9.4 2008-02-29T16:57:07+01:00 - Seite 203 ZDateiname: 6515_3416_02_buchblock.pdf; preflight
Page 207 of 401
Loading and stowing
204
i
The belt reel can be used to secure light
loads against the side wall of the boot/lug-
gage compartment to prevent them from
moving around.
X Insert two mounting elements 2into a
loading rail.
X Turn mounting elements 2in the loading
rail to N.
X Insert belt reel 3into mounting ele-
ments 2.
X Turn mounting element 2to‹ until
you feel it clearly engage in the loading rail.
X Press locking button 1on the belt reel and
pull the safety net out in the direction of the
arrow.
X Place the load between the securing net
and the boot/luggage compartment side
wall.
X Press locking button 3on the belt reel
with one hand.
X With your other hand, slowly extend the net
around the load until it is secure. Telescopic rod Illustration: Estate
1
Telescopic rod
2 Mounting element
i The telescopic rod can be used to secure
the load against the rear seats to prevent it
from moving around.
X Insert one mounting element 2into each
loading rail.
X Turn mounting elements 2in the loading
rail to N.
X Insert telescopic rod 1into mounting ele-
ments 2.
X Turn mounting element 2to‹ until
you feel it clearly engage in the loading rail. EASY-PACK stowage box* (Estate) G
Risk of injury
When you are using the stowage box in the
luggage compartment, the backrests of the
seats directly in front of it must be fully
engaged to the rear and the combined lug-
gage cover and net must be fitted.
The maximum stowage box load is 20 kg. A
greater load could come loose in the event
of an accident or sudden and sharp braking,
and could injure yourself or other occu-
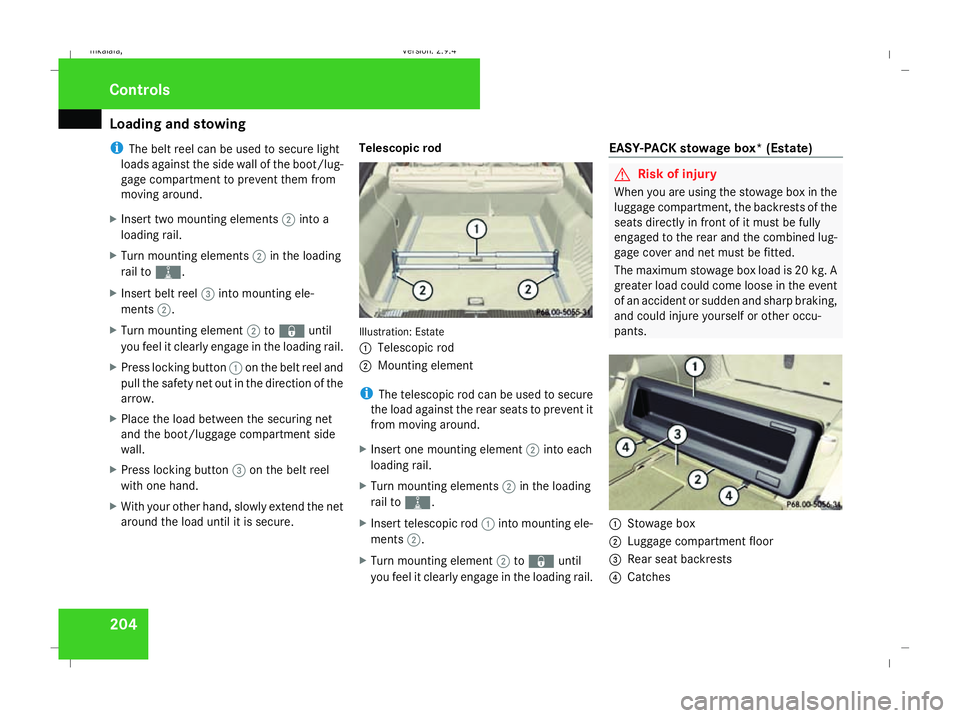
pants. 1
Stowage box
2 Luggage compartment floor
3 Rear seat backrests
4 Catches Controls
211_AKB; 2; 5, en-GB
mkalafa,
Version: 2.9.4 2008-02-29T16:57:07+01:00 - Seite 204Dateiname: 6515_3416_02_buchblock.pdf; preflight
Page 208 of 401
Loading and stowing
205
Installing the stowage box
X
Fold the two backrests 3forward
(Y page 198).
X Guide stowage box 1into the luggage
compartment through one of the rear doors
with the opening facing towards the front
of the vehicle.
X Press catches 4on stowage box 1into
the gap between backrest 3and the lug-
gage compartment floor.
X Fold backrest 3back (Y page 200).
i Stowage box 1is also held in place from
above by the combined luggage cover and
net.
Loading the stowage box
X Fold backrest 3forward (Y page 198).
X Load stowage box 1through the opening
on the front.
i Stowage box 1in the luggage compart-
ment is closed off by the rear bench seat
and can carry a maximum load of 20 kg.
X Fold backrest 3back (Y page 200). Removing the stowage box
X
Fold double backrest 3forward
(Y page 198).
X Slide stowage box 1with catches 4for-
wards to remove it from the mountings.
X Remove stowage box 1sideways through
a rear door.
X Fold backrest 3back (Y page 200). Stowage compartments
G
Risk of injury
The stowage compartments must be closed
when items are stored in them. Luggage
nets are not designed to secure heavy
items of luggage.
You or other vehicle occupants could be
injured by objects being thrown around if
you:
R brake sharply
R change direction suddenly
R have an accident
Sharp-edged and fragile objects must not
be carried in the luggage net. Do not carry hard objects in the ruffled
pockets. Objects must not protrude over
the top of the ruffled pockets.
i You will find an overview of the stowage
compartments on (Y page 36).
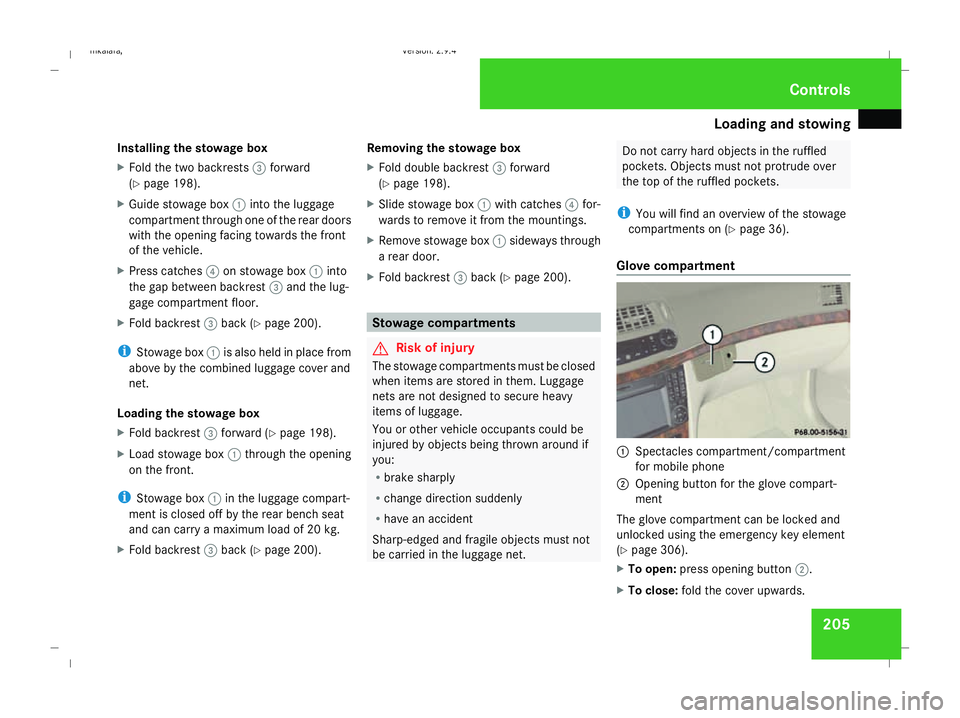
Glove compartment 1
Spectacles compartment/compartment
for mobile phone
2 Opening button for the glove compart-
ment
The glove compartment can be locked and
unlocked using the emergency key element
(Y page 306).
X To open: press opening button 2.
X To close: fold the cover upwards. Controls
211_AKB; 2; 5, en-GB
mkalafa,
Version: 2.9.4 2008-02-29T16:57:07+01:00 - Seite 205 ZDateiname: 6515_3416_02_buchblock.pdf; preflight
Page 209 of 401
Loading and stowing
206
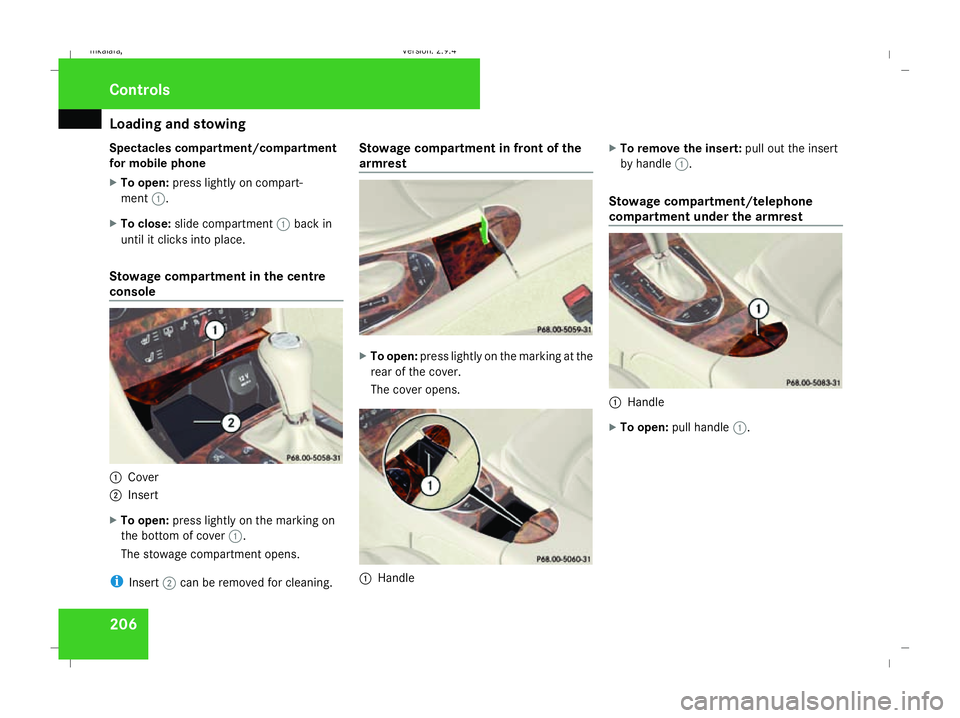
Spectacles compartment/compartment
for mobile phone
X To open: press lightly on compart-
ment 1.
X To close: slide compartment 1back in
until it clicks into place.
Stowage compartment in the centre
console 1
Cover
2 Insert
X To open: press lightly on the marking on
the bottom of cover 1.
The stowage compartment opens.
i Insert 2can be removed for cleaning. Stowage compartment in front of the
armrest
X
To open: press lightly on the marking at the
rear of the cover.
The cover opens. 1
Handle X
To remove the insert: pull out the insert
by handle 1.
Stowage compartment/telephone
compartment under the armrest 1
Handle
X To open: pull handle 1. Controls
211_AKB; 2; 5, en-GB
mkalafa,
Version: 2.9.4 2008-02-29T16:57:07+01:00 - Seite 206Dateiname: 6515_3416_02_buchblock.pdf; preflight
Page 210 of 401
Features
207
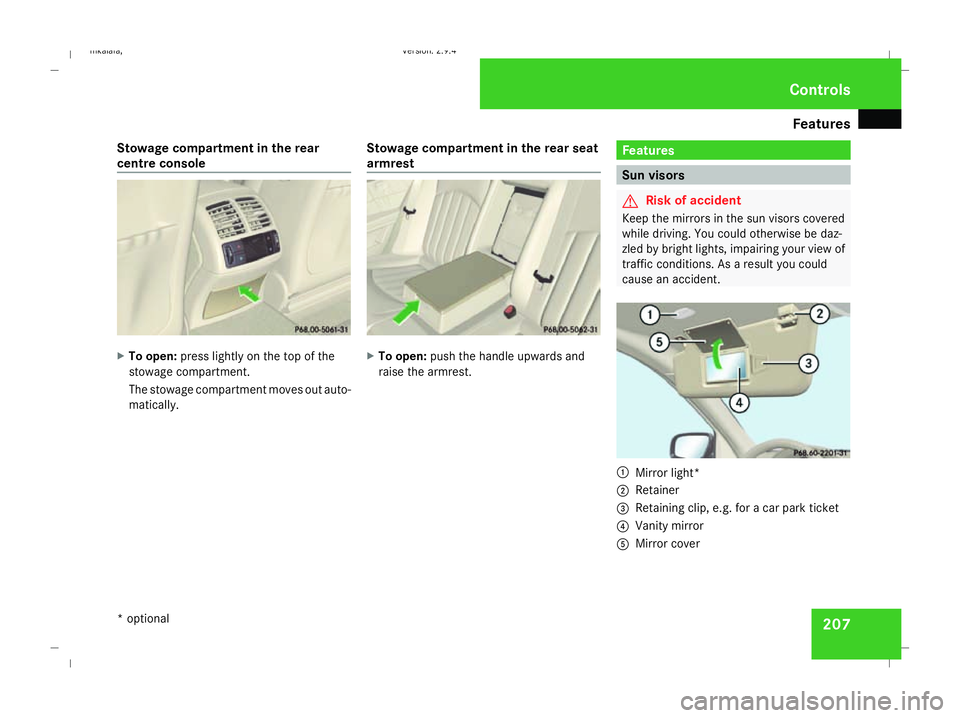
Stowage compartment in the rear
centre console
X
To open: press lightly on the top of the
stowage compartment.
The stowage compartment moves out auto-
matically. Stowage compartment in the rear seat
armrest X
To open: push the handle upwards and
raise the armrest. Features
Sun visors
G
Risk of accident
Keep the mirrors in the sun visors covered
while driving. You could otherwise be daz-
zled by bright lights, impairing your view of
traffic conditions. As a result you could
cause an accident. 1
Mirror light*
2 Retainer
3 Retaining clip, e.g. for a car park ticket
4 Vanity mirror
5 Mirror cover Cont
rols
* optional
211_AKB; 2; 5, en-GB
mkalafa
,V ersion: 2.9.4
2008-02-29T16:57:07+01:00 - Seite 207 ZDateiname: 6515_3416_02_buchblock.pdf; preflight
Page 211 of 401
Features
208
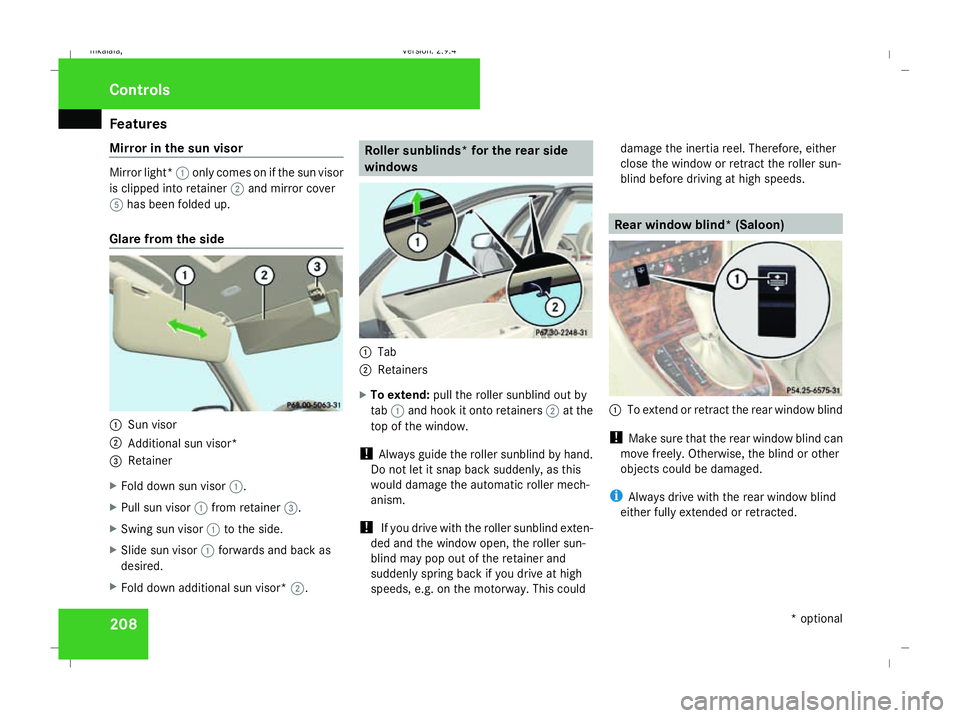
Mirror in the sun visor Mirror light*
1only comes on if the sun visor
is clipped into retainer 2and mirror cover
5 has been folded up.
Glare from the side 1
Sun visor
2 Additional sun visor*
3 Retainer
X Fold down sun visor 1.
X Pull sun visor 1from retainer 3.
X Swing sun visor 1to the side.
X Slide sun visor 1forwards and back as
desired.
X Fold down additional sun visor* 2. Roller sunblinds* for the rear side
windows
1
Tab
2 Retainers
X To extend: pull the roller sunblind out by
tab 1and hook it onto retainers 2at the
top of the window.
! Always guide the roller sunblind by hand.
Do not let it snap back suddenly, as this
would damage the automatic roller mech-
anism.
! If you drive with the roller sunblind exten-
ded and the window open, the roller sun-
blind may pop out of the retainer and
suddenly spring back if you drive at high
speeds, e.g. on the motorway. This could damage the inertia reel. Therefore, either
close the window or retract the roller sun-
blind before driving at high speeds. Rear window blind* (Saloon)
1
To extend or retract the rear window blind
! Make sure that the rear window blind can
move freely. Otherwise, the blind or other
objects could be damaged.
i Always drive with the rear window blind
either fully extended or retracted. Cont
rols
* optional
211_AKB; 2; 5, en-GB
mkalafa
,V ersion: 2.9.4
2008-02-29T16:57:07+01:00 - Seite 208 Dateiname: 6515_3416_02_buchblock.pdf; preflight