2008 MERCEDES-BENZ E-CLASS ESTATE ignition
[x] Cancel search: ignitionPage 215 of 401
Features
212Example illustration
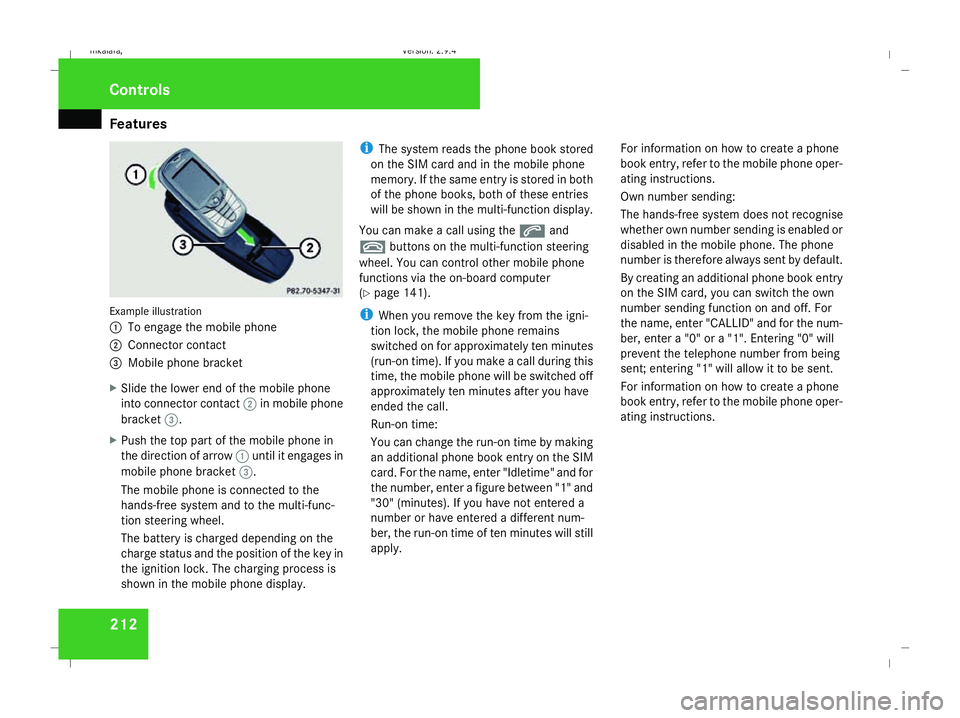
1
To engage the mobile phone
2 Connector contact
3 Mobile phone bracket
X Slide the lower end of the mobile phone
into connector contact 2in mobile phone
bracket 3.
X Push the top part of the mobile phone in
the direction of arrow 1until it engages in
mobile phone bracket 3.
The mobile phone is connected to the
hands-free system and to the multi-func-
tion steering wheel.
The battery is charged depending on the
charge status and the position of the key in
the ignition lock. The charging process is
shown in the mobile phone display. i
The system reads the phone book stored
on the SIM card and in the mobile phone
memory. If the same entry is stored in both
of the phone books, both of these entries
will be shown in the multi-function display.
You can make a call using the sand
t buttons on the multi-function steering
wheel. You can control other mobile phone
functions via the on-board computer
(Y page 141).
i When you remove the key from the igni-
tion lock, the mobile phone remains
switched on for approximately ten minutes
(run-on time). If you make a call during this
time, the mobile phone will be switched off
approximately ten minutes after you have
ended the call.
Run-on time:
You can change the run-on time by making
an additional phone book entry on the SIM
card. For the name, enter "Idletime" and for
the number, enter a figure between "1" and
"30" (minutes). If you have not entered a
number or have entered a different num-
ber, the run-on time of ten minutes will still
apply. For information on how to create a phone
book entry, refer to the mobile phone oper-
ating instructions.
Own number sending:
The hands-free system does not recognise
whether own number sending is enabled or
disabled in the mobile phone. The phone
number is therefore always sent by default.
By creating an additional phone book entry
on the SIM card, you can switch the own
number sending function on and off. For
the name, enter "CALLID" and for the num-
ber, enter a "0" or a "1". Entering "0" will
prevent the telephone number from being
sent; entering "1" will allow it to be sent.
For information on how to create a phone
book entry, refer to the mobile phone oper-
ating instructions.Controls
211_AKB; 2; 5, en-GB
mkalafa,
Version: 2.9.4 2008-02-29T16:57:07+01:00 - Seite 212Dateiname: 6515_3416_02_buchblock.pdf; preflight
Page 218 of 401
Features
215
X
Erase the memory of the integrated remote
control (Y page 216) before programming
it for the first time.
X Turn the key to position 2in the ignition
lock.
X Press and hold one of transmitter buttons
2 to4 on the integrated remote control.
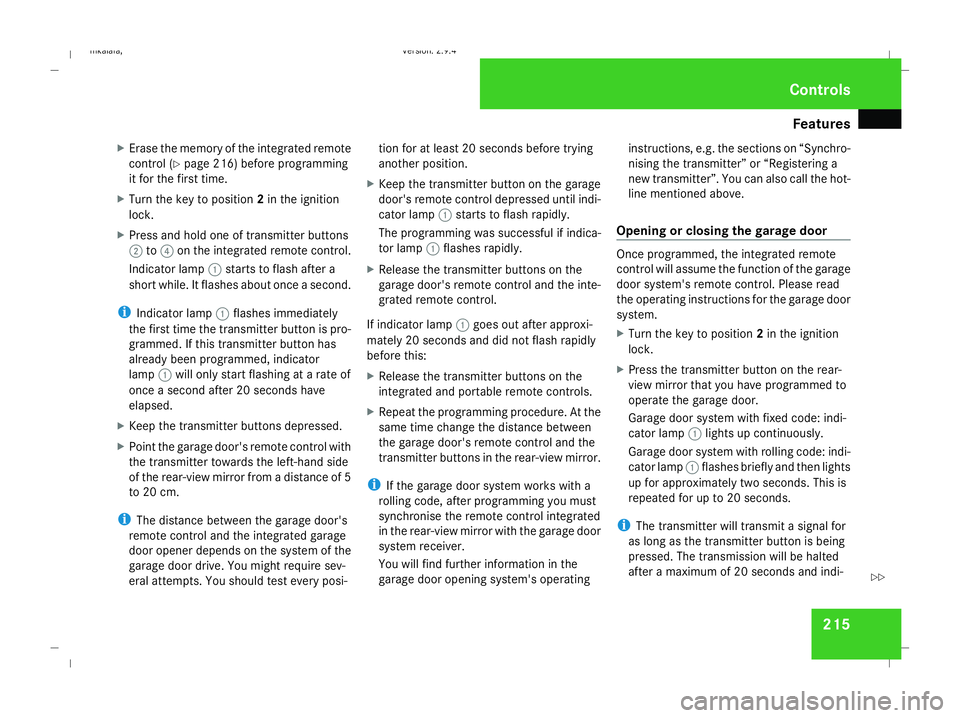
Indicator lamp 1starts to flash after a
short while. It flashes about once a second.
i Indicator lamp 1flashes immediately
the first time the transmitter button is pro-
grammed. If this transmitter button has
already been programmed, indicator
lamp 1will only start flashing at a rate of
once a second after 20 seconds have
elapsed.
X Keep the transmitter buttons depressed.
X Point the garage door's remote control with
the transmitter towards the left-hand side
of the rear-view mirror from a distance of 5
to 20 cm.
i The distance between the garage door's
remote control and the integrated garage
door opener depends on the system of the
garage door drive. You might require sev-
eral attempts. You should test every posi- tion for at least 20 seconds before trying
another position.
X Keep the transmitter button on the garage
door's remote control depressed until indi-
cator lamp 1starts to flash rapidly.
The programming was successful if indica-
tor lamp 1flashes rapidly.
X Release the transmitter buttons on the
garage door's remote control and the inte-
grated remote control.
If indicator lamp 1goes out after approxi-
mately 20 seconds and did not flash rapidly
before this:
X Release the transmitter buttons on the
integrated and portable remote controls.
X Repeat the programming procedure. At the
same time change the distance between
the garage door's remote control and the
transmitter buttons in the rear-view mirror.
i If the garage door system works with a
rolling code, after programming you must
synchronise the remote control integrated
in the rear-view mirror with the garage door
system receiver.
You will find further information in the
garage door opening system's operating instructions, e.g. the sections on “Synchro-
nising the transmitter” or “Registering a
new transmitter”. You can also call the hot-
line mentioned above.
Opening or closing the garage door Once programmed, the integrated remote
control will assume the function of the garage
door system's remote control. Please read
the operating instructions for the garage door
system.
X
Turn the key to position 2in the ignition
lock.
X Press the transmitter button on the rear-
view mirror that you have programmed to
operate the garage door.
Garage door system with fixed code: indi-
cator lamp 1lights up continuously.
Garage door system with rolling code: indi-
cator lamp 1flashes briefly and then lights
up for approximately two seconds. This is
repeated for up to 20 seconds.
i The transmitter will transmit a signal for
as long as the transmitter button is being
pressed. The transmission will be halted
after a maximum of 20 seconds and indi- Cont
rols
211_AKB; 2; 5, en-GB
mkalafa
,V ersion: 2.9.4
2008-02-29T16:57:07+01:00 - Seite 215 ZDateiname: 6515_3416_02_buchblock.pdf; preflight
Page 219 of 401
Features
216cator lamp
1will flash. Press the trans-
mitter button again if necessary.
Clearing the remote control memory X
Turn the key to position 2in the ignition
lock.
X Press and hold transmitter buttons 2and
4 for approximately 20 seconds until indi-
cator lamp 1flashes rapidly.
The memory is cleared.
i You should clear the remote control mem-
ory before selling the vehicle. Floormat* on the driver's side
G
Risk of accident
Make sure that there is sufficient clearance
around the pedals when floormats are
used, and that the floormats are properly
secured.
The floormats must be secured at all times
using retainers and studs.
Before you drive off, make sure that the
floormats are secure and rectify if neces-
sary. A floormat which is not properly secured can slip and thereby interfere with
the movement of the pedals.
Do not place floormats on top of one
another.
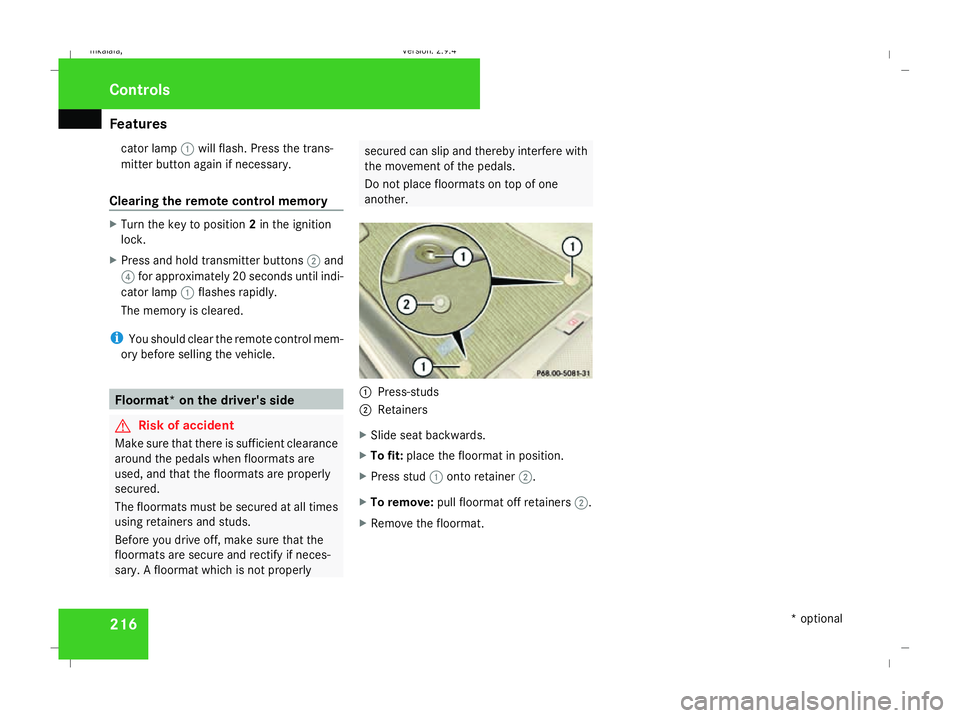
1
Press-studs
2 Retainers
X Slide seat backwards.
X To fit: place the floormat in position.
X Press stud 1onto retainer 2.
X To remove: pull floormat off retainers 2.
X Remove the floormat. Cont
rols
* optional
211_AKB; 2; 5, en-GB
mkalafa
,V ersion: 2.9.4
2008-02-29T16:57:07+01:00 - Seite 216 Dateiname: 6515_3416_02_buchblock.pdf; preflight
Page 222 of 401
Refuelling
219
!
If the wrong fuel has been added by mis-
take, do not switch on the ignition. If you
do, the fuel could enter the fuel lines. The
tank and the fuel lines would then have to
be emptied. Inform a qualified specialist
workshop and have the tank and the fuel
lines emptied completely.
When you open or close the vehicle with the
key or KEYLESS GO*, the fuel filler flap is
automatically unlocked or locked.
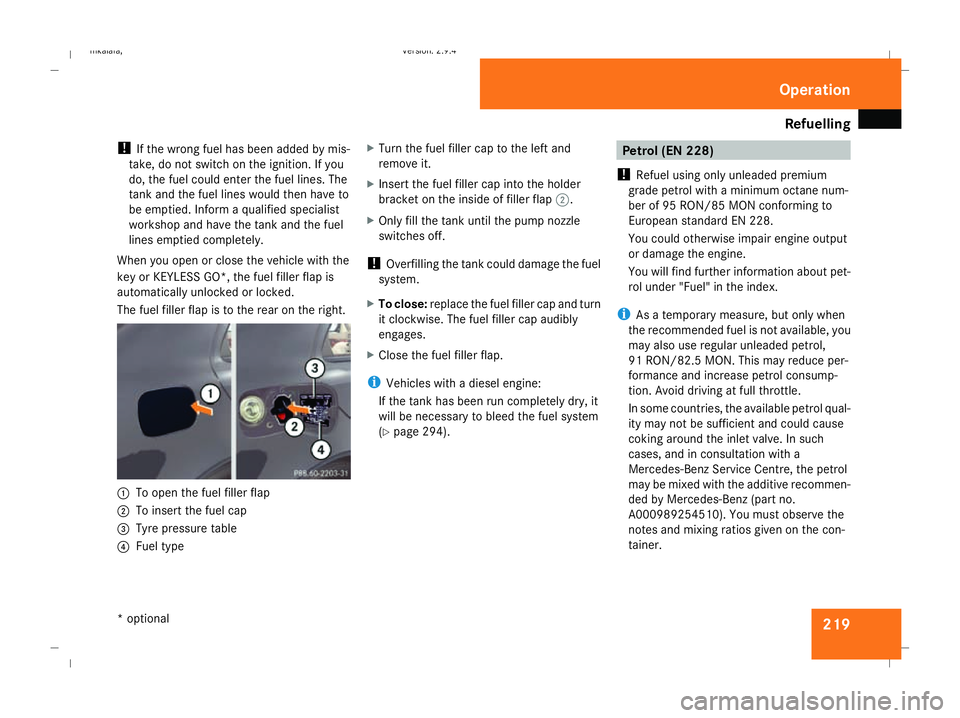
The fuel filler flap is to the rear on the right. 1
To open the fuel filler flap
2 To insert the fuel cap
3 Tyre pressure table
4 Fuel type X
Turn the fuel filler cap to the left and
remove it.
X Insert the fuel filler cap into the holder
bracket on the inside of filler flap 2.
X Only fill the tank until the pump nozzle
switches off.
! Overfilling the tank could damage the fuel
system.
X To close: replace the fuel filler cap and turn
it clockwise. The fuel filler cap audibly
engages.
X Close the fuel filler flap.
i Vehicles with a diesel engine:
If the tank has been run completely dry, it
will be necessary to bleed the fuel system
(Y page 294). Petrol (EN 228)
! Refuel using only unleaded premium
grade petrol with a minimum octane num-
ber of 95 RON/85 MON conforming to
European standard EN 228.
You could otherwise impair engine output
or damage the engine.
You will find further information about pet-
rol under "Fuel" in the index.
i As a temporary measure, but only when
the recommended fuel is not available, you
may also use regular unleaded petrol,
91 RON/82.5 MO N. Thismay reduce per-
formance and increase petrol consump-
tion. Avoid driving at full throttle.
In some countries, the available petrol qual-
ity may not be sufficient and could cause
coking around the inlet valve. In such
cases, and in consultation with a
Mercedes-Benz Service Centre, the petrol
may be mixed with the additive recommen-
ded by Mercedes-Benz (part no.
A000989254510). You must observe the
notes and mixing ratios given on the con-
tainer. Operation
* optional
211_AKB; 2; 5, en-GB
mkalafa,
Version: 2.9.4 2008-02-29T16:57:07+01:00 - Seite 219 ZDateiname: 6515_3416_02_buchblock.pdf; preflight
Page 225 of 401

Engine compartment
222 Engine compartment
Bonnet
G
Risk of accident
Do not pull the release lever while the vehi-
cle is in motion. If you do so, the bonnet
may open up and block your view.
Opening G
Risk of injury
There is a risk of injury if the bonnet is open,
even if the engine is not running.
Some engine components can become
very hot.
To avoid the risk of burns, only touch those
components described in the Owner’s Man-
ual and observe the relevant safety notes. G
Risk of injury
The radiator fan between the radiator and
the engine can start automatically, even if
the key has been removed from the ignition
lock. For this reason you must not reach
into the turning area of the fan. You can
otherwise be injured. Vehicles with a petrol engine:
the electronic ignition system uses high
voltage. For this reason you must never
touch components of the ignition system
(ignition coil, ignition cable, spark plug con-
nector or test socket) when:
R the engine is running
R the engine is being started
R the ignition is switched on and the engine
is being cranked by hand
Vehicles with a diesel engine:
the electronic injection control uses high
voltage. Therefore, never touch fuel injec-
tion system components when:
R the engine is running
R the engine is being started
R the ignition is switched on
X Make sure that the windscreen wipers are
switched off. G
Risk of injury
The windscreen wipers and wiper linkage
could be set in motion.
When the bonnet is open, you or others
could be injured by the wiper rods. Make sure that the windscreen wipers are
switched off and that the key has been
pulled out of the ignition lock before open-
ing the bonnet.
The bonnet release lever is located in the
driver's footwell. 1
Bonnet release lever
X Pull release lever 1.
The bonnet is released.
! Make sure that the windscreen wipers
are not folded out away from the wind-
screen. You can otherwise damage the
windscreen wipers or the bonnet. Operation
211_AKB; 2; 5, en-GB
mkalafa,
Version: 2.9.4 2008-02-29T16:57:07+01:00 - Seite 222Dateiname: 6515_3416_02_buchblock.pdf; preflight
Page 226 of 401
Engine compartment
223
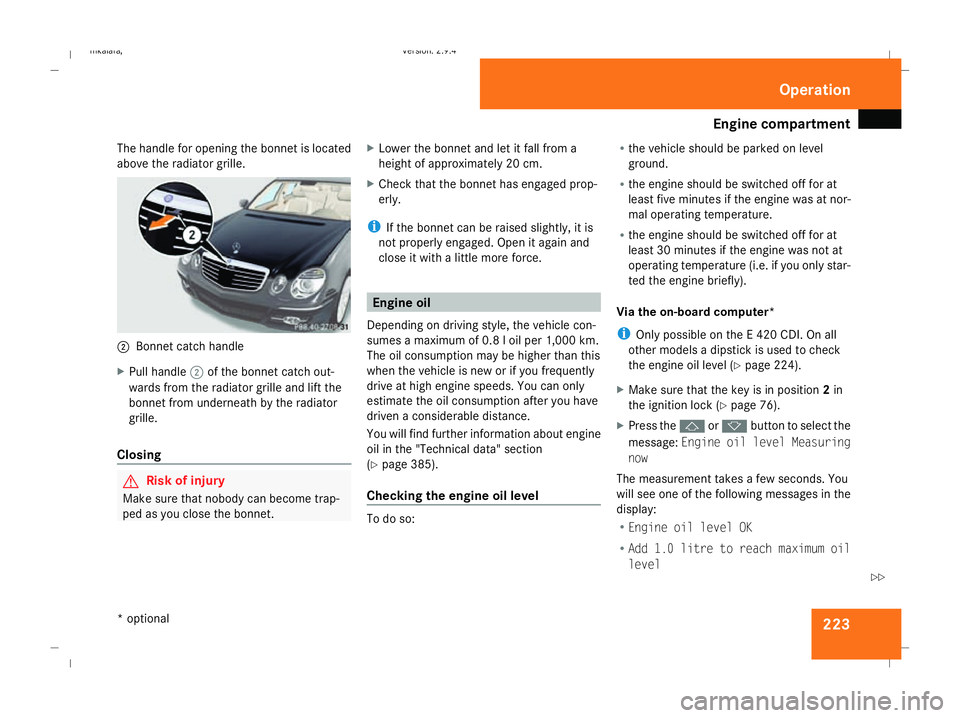
The handle for opening the bonnet is located
above the radiator grille. 2
Bonnet catch handle
X Pull handle 2of the bonnet catch out-
wards from the radiator grille and lift the
bonnet from underneath by the radiator
grille.
Closing G
Risk of injury
Make sure that nobody can become trap-
ped as you close the bonnet. X
Lower the bonnet and let it fall from a
height of approximately 20 cm.
X Check that the bonnet has engaged prop-
erly.
i If the bonnet can be raised slightly, it is
not properly engaged. Open it again and
close it with a little more force. Engine oil
Depending on driving style, the vehicle con-
sumes a maximum of 0.8 l oil per 1,000 km.
The oil consumption may be higher than this
when the vehicle is new or if you frequently
drive at high engine speeds. You can only
estimate the oil consumption after you have
driven a considerable distance.
You will find further information about engine
oil in the "Technical data" section
(Y page 385).
Checking the engine oil level To do so:R
the vehicle should be parked on level
ground.
R the engine should be switched off for at
least five minutes if the engine was at nor-
mal operating temperature.
R the engine should be switched off for at
least 30 minutes if the engine was not at
operating temperature (i.e. if you only star-
ted the engine briefly).
Via the on-board computer*
i Only possible on the E 420 CDI. On all
other models a dipstick is used to check
the engine oil level (Y page 224).
X Make sure that the key is in position 2in
the ignition lock (Y page 76).
X Press the jork button to select the
message: Engine oil level Measuring
now
The measurement takes a few seconds. You
will see one of the following messages in the
display:
R Engine oil level OK
R Add 1.0 litre to reach maximum oil
level Operation
* optional
211_AKB; 2; 5, en-GB
mkalafa,
Version: 2.9.4 2008-02-29T16:57:07+01:00 - Seite 223 ZDateiname: 6515_3416_02_buchblock.pdf; preflight
Page 227 of 401

Engine compartment
224
R
Add 1.5 litres to reach maximum oil
level
R Add 2.0 litres to reach maximum oil
level
X Top up the oil if necessary ( Ypage 225).
Other messages in the multi-function dis-
play
If the engine is at normal operating tempera-
ture and there is too much oil, you will see the
following message:
Eng. oil level
Reduce oil level
X Have excess oil siphoned off.
! There is a risk of damage to the engine or
the catalytic converter if there is excess oil
in the engine.
If the Switch ignition on to check
engine oil level message appears:
X Turn the key to position 2in the ignition
lock (Y page 76).
You will see the following message if you did
not observe the required waiting time:
Observe waiting period X
Repeat the measurement after about five
minutes if the engine is at normal operating
temperature.
X Repeat the measurement after about
30 minutes if the engine is not at normal
operating temperature (if the engine was
only started briefly).
The following message appears if the engine
is running:
Engine oil level Not when engine on
X Switch off the engine and wait for five
minutes if the engine is at normal operating
temperature, or for about 30 minutes if the
engine is not at normal operating temper-
ature (if the engine was only started
briefly), before measuring.
i If you wish to cancel the measurement,
press the korj button on the multi-
function steering wheel. Using the oil dipstick Illustration: vehicle with a petrol engine (E 350)
1
Oil dipstick
2 Maximum mark
3 Minimum mark
X Pull oil dipstick 1out of the oil dipstick
tube.
X Wipe off oil dipstick 1.
X Insert oil dipstick 1into the oil dipstick
tube to the stop, and take it out again.
The oil level is correct if the level is between
minimum mark 3and maximum mark
2.
X Top up the oil if necessary. Operation
211_AKB; 2; 5, en-GB
mkalafa,
Version: 2.9.4
2008-02-29T16:57:07+01:00 - Seite 224 Dateiname: 6515_3416_02_buchblock.pdf; preflight
Page 234 of 401
Tyres and wheels
231pressure, e.g. if the tyre is penetrated by a
foreign object.
In the event of a sudden loss of pressure,
bring the vehicle to a halt by braking care-
fully. Do not make any sudden steering
movements when doing so.
While the vehicle is in motion, the tyre pres-
sure loss warning system monitors the set
tyre pressure using the rotational speed of
the wheels. This enables the system to detect
significant pressure loss in a tyre. If the speed
of rotation of a wheel changes as a result of
a loss of pressure, a corresponding warning
message will appear in the multi-function dis-
play.
The function of the tyre pressure loss warning
system is limited or delayed if:
R snow chains are fitted to your vehicle's
tyres
R road conditions are wintry
R you are driving on sand or gravel
R you adopt a very sporty driving style (cor-
nering at high speeds or driving with high
rates of acceleration)
R you are towing a very heavy or large trailer
R you are driving with a heavy load (in the
vehicle or on the roof) Restarting the tyre pressure loss warn-
ing system Restart the tyre pressure loss warning system
if you have:
R
changed the tyre pressure
R changed the wheels or tyres
R fitted new wheels or tyres
X Before restarting, consult the table of tyre
pressures on the inside of the fuel filler flap
to ensure that the tyre pressure in all four
tyres is set correctly for the operating con-
ditions concerned.
X Also observe the notes in the section on
tyre pressures (Y page 229). G
Risk of accident
The tyre pressure loss warning system can
only give reliable warnings if you have set
the correct tyre pressure.
If an incorrect tyre pressure is set, these
incorrect values will be monitored.
A tyre with insufficient pressure results in
an instability of the vehicle when driving,
thus increasing the risk of an accident. X
Make sure that the key is in position 2in
the ignition lock.
The standard display appears in the multi-
function display (Y page 125).
X Press korj to select the tyre pres-
sure function:
Run Flat Indicator active
Menu: R-Button æ
X Press the reset button on the left of the
instrument cluster.
The following message appears in the
multi-function display:
Restart Run Flat Indicator?
Yes Cancel
If you wish to confirm the restart:
X Press the æbutton.
The following message appears in the
multi-function display:
Run Flat Indicator restarted
After a teach-in period, the tyre pressure
loss warning system will monitor the set
tyre pressures of all four tyres.
If you wish to cancel the restart:
X Press the çbutton.
or
X Wait until the message Operation
211_AKB; 2; 5, en-GB
mkalafa
,V ersion: 2.9.4
2008-02-29T16:57:07+01:00 - Seite 231 ZDateiname: 6515_3416_02_buchblock.pdf; preflight