2008 MERCEDES-BENZ E-CLASS ESTATE wheel
[x] Cancel search: wheelPage 174 of 401
Air conditioning
171
4-zone Thermotronic*: the temperature for
each of the four air-conditioning zones can be
set individually. You can set the temperature
separately for the driver's and front-
passenger sides as well as for the left and
right sides of the rear compartment.
Setting the temperature in the front
compartment using 2-zone Thermatic X
Make sure that the key is in position 2in
the ignition lock.
X To increase/reduce: turn thumbwheels
1 and 7clockwise or anti-clockwise
(Y page 164). Only change the temperature
setting in small increments. Start at 22 †.
Setting the temperature in the front
compartment via 4-zone
Thermotronic* X
Make sure that the key is in position 2in
the ignition lock.
X To increase/reduce: press the$or
% button. Only change the temperature
setting in small increments. Start at 22 †.
The set temperature is shown in the 4-zone
Thermotronic* display. Setting the temperature in the rear
compartment via 4-zone
Thermotronic* X
Make sure that the key is in position 2in
the ignition lock.
X Press the ™button.
The 4-zone Thermotronic* display switches
to the rear-compartment air-conditioning
settings.
X To increase/reduce: press the$or
% button. Only change the temperature
setting in small increments. Start at 22 †.
The set temperature is shown in the 4-zone
Thermotronic* display. The 4-zone
Thermotronic* display changes back to the
standard display about five seconds after a
button is pressed.
i You can also return to the standard dis-
play by pressing the ™button again. Setting the rear-compartment temper-
ature via the rear-compartment air con-
ditioning* X
Make sure that the key is in position 2in
the ignition lock.
X To increase/reduce: press the$or
% button. Only change the temperature
setting in small increments. Start at 22 †. Adjusting the air vents
G
Risk of injury
Very hot or very cold air can flow from the
air vents. This could cause burns or frost-
bite to bare skin in the immediate vicinity
of the vents. Keep bare skin away from
these air outlets. If necessary, direct the
airflow away to a different area of the vehi-
cle interior.
Please observe the following notes to ensure
that the air can flow freely through the air
vents:
R Keep the air inlet between the windscreen
and the bonnet free of deposits, such as ice Cont
rols
* optional
211_AKB; 2; 5, en-GB
mkalafa ,V ersion: 2.9.4
2008-02-29T16:57:07+01:00 - Seite 171 ZDateiname: 6515_3416_02_buchblock.pdf; preflight
Page 175 of 401
Air conditioning
172and snow, to guarantee the supply of fresh
air into the vehicle interior.
R Never cover the vents or air inlet and outlet
grilles in the vehicle interior.
i Position the sliders for the centre air
vents in the central position to provide vir-
tually draught-free ventilation.
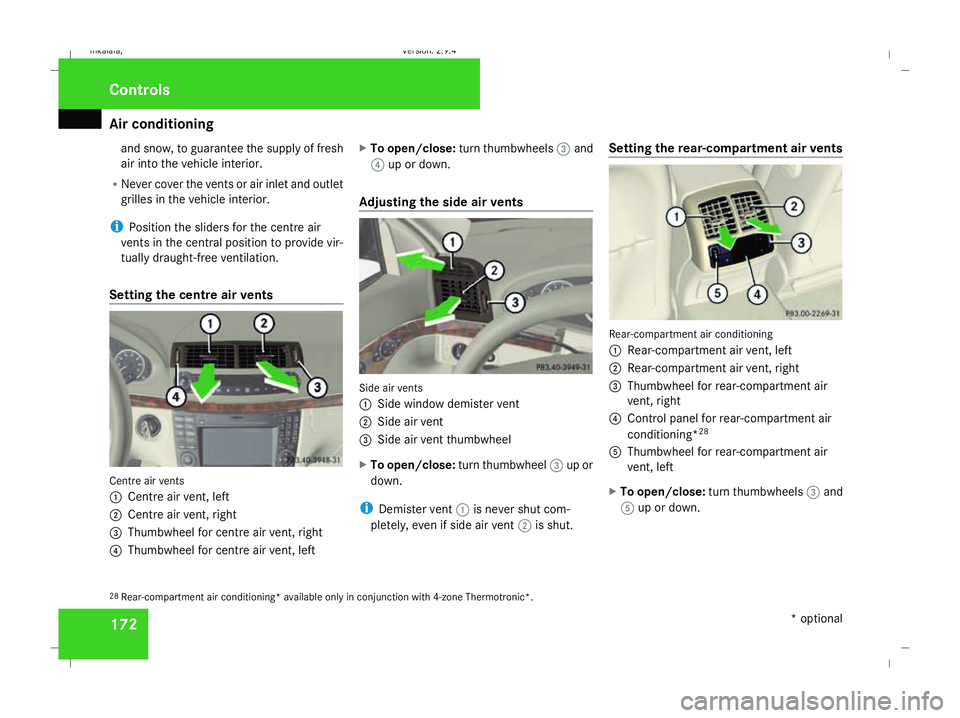
Setting the centre air vents Centre air vents
1
Centre air vent, left
2 Centre air vent, right
3 Thumbwheel for centre air vent, right
4 Thumbwheel for centre air vent, left X
To open/close: turn thumbwheels 3and
4 up or down.
Adjusting the side air vents Side air vents
1
Side window demister vent
2 Side air vent
3 Side air vent thumbwheel
X To open/close: turn thumbwheel 3up or
down.
i Demister vent 1is never shut com-
pletely, even if side air vent 2is shut. Setting the rear-compartment air vents Rear-compartment air conditioning
1
Rear-compartment air vent, left
2 Rear-compartment air vent, right
3 Thumbwheel for rear-compartment air
vent, right
4 Control panel for rear-compartment air
conditioning* 28
5 Thumbwheel for rear-compartment air
vent, left
X To open/close: turn thumbwheels 3and
5 up or down.
28 Rear-compartment air conditioning* available only in conjunction with 4-zone Thermotronic*. Cont
rols
* optional
211_AKB; 2; 5, en-GB
mkalafa
,V ersion: 2.9.4
2008-02-29T16:57:07+01:00 - Seite 172 Dateiname: 6515_3416_02_buchblock.pdf; preflight
Page 176 of 401
Air conditioning
173
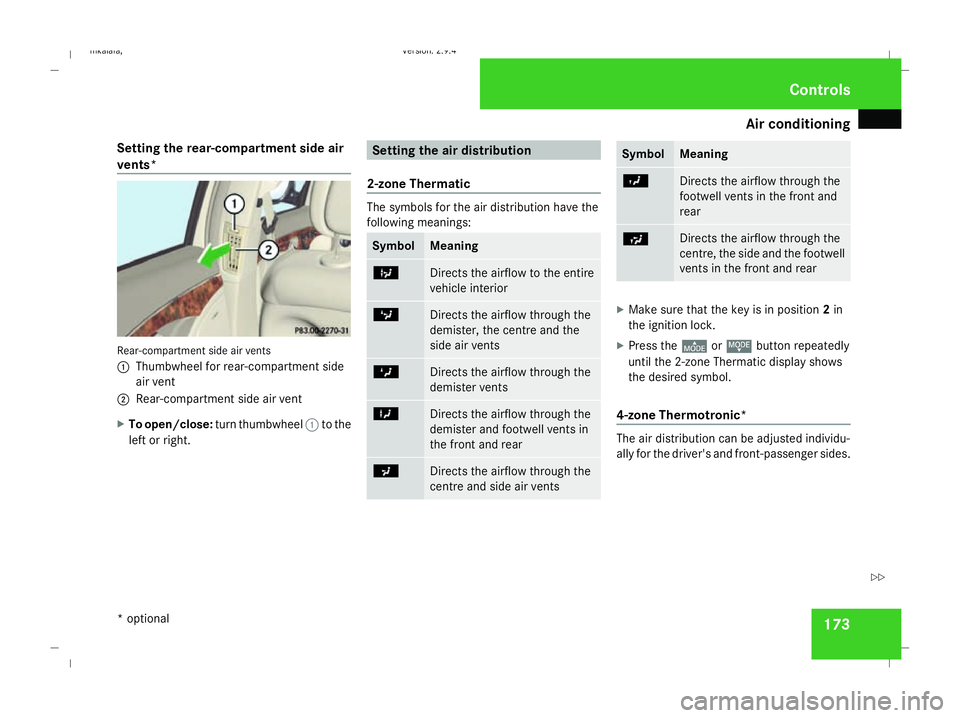
Setting the rear-compartment side air
vents* Rear-compartment side air vents
1
Thumbwheel for rear-compartment side
air vent
2 Rear-compartment side air vent
X To open/close: turn thumbwheel 1to the
left or right. Setting the air distribution
2-zone Thermatic The symbols for the air distribution have the
following meanings: Symbol Meaning
b
Directs the airflow to the entire
vehicle interior c
Directs the airflow through the
demister, the centre and the
side air vents Z
Directs the airflow through the
demister vents X
Directs the airflow through the
demister and footwell vents in
the front and rear a
Directs the airflow through the
centre and side air vents Symbol Meaning
Y
Directs the airflow through the
footwell vents in the front and
rear
Ú Directs the airflow through the
centre, the side and the footwell
vents in the front and rear
X
Make sure that the key is in position 2in
the ignition lock.
X Press the ©orª button repeatedly
until the 2-zone Thermatic display shows
the desired symbol.
4-zone Thermotronic* The air distribution can be adjusted individu-
ally for the driver's and front-passenger sides. Cont
rols
* optional
211_AKB; 2; 5, en-GB
mkalafa
,V ersion: 2.9.4
2008-02-29T16:57:07+01:00 - Seite 173 ZDateiname: 6515_3416_02_buchblock.pdf; preflight
Page 177 of 401
Air conditioning
174
The symbols for the air distribution have the
following meanings: Symbol Meaning
Z
Directs the airflow through the
centre, the side and the demis-
ter air vents
a
Directs the airflow through the
centre and side air vents
X
Directs the airflow to the entire
vehicle interior
Y
Directs the airflow through the
centre, the side and the foot-
well vents in the front and rear
X
Make sure that the key is in position 2in
the ignition lock.
X Turn thumbwheel 1or7 to the corre-
sponding symbol (Y page 166). The thumb-
wheel can also be turned to the area
between two symbols. Setting the airflow
X Make sure that the key is in position 2in
the ignition lock.
X To increase/reduce: press theQor
· button. Demisting the windscreen
i You should only select the "demisting"
function until the windscreen is clear again.
X Make sure that the key is in position 2in
the ignition lock.
X To activate: press theybutton.
The indicator lamp in the ybutton
comes on.
The system automatically switches to the
following functions:
R cooling with air dehumidification on
R high airflow 29
R high temperature 29
R air distribution to the windscreen and
front side windows
R air-recirculation mode off X
To deactivate: press theybutton.
The indicator lamp in the ybutton goes
out. The previously selected settings come
into effect again. The cooling with air dehu-
midification function remains on. Air-recir-
culation mode remains deactivated.
or
X Press the Ubutton.
The indicator lamp in the ybutton goes
out. Airflow and air distribution are set to
automatic mode.
or
X 2-zone Thermatic: turn thumbwheels1
or 7 clockwise or anti-clockwise
(Y page 164).
or
X 2-zone Thermatic: press theQor
· button.
29 Depending on the outside temperature. Cont
rols
211_AKB; 2; 5, en-GB
mkalafa
,V ersion: 2.9.4
2008-02-29T16:57:07+01:00 - Seite 174 Dateiname: 6515_3416_02_buchblock.pdf; preflight
Page 178 of 401
Air conditioning
175Demisting the windows
Windows misted up on the inside X
Activate the "cooling function with air-
dehumidification" function.
X Activate the automatic mode.
X If the windows continue to mist up, activate
the "demisting" function.
Windows misted up on the outside X
Activate the windscreen wipers.
X 2-zone Thermatic: press and hold the
© orª button until the a,Ú
or Y symbol is shown in the display.
X 4-zone Thermotronic*: turn the thumb-
wheel for air distribution to the Yor
a symbol.
i You should only select this setting until
the windscreen is clear again. Switching the rear window heating
on/off
G
Risk of accident
Clear all windows of ice or snow before set-
ting off. Impaired visibility could otherwise
endanger you and others.
i At very low temperatures, the rear win-
dow heating is only switched on once the
vehicle interior has warmed up.
i The rear window heating has a high cur-
rent draw. You should therefore switch it
off as soon as the window is clear, as it only
switches off automatically after approxi-
mately six to twenty minutes.
i If the battery voltage is too low, the rear
window heating may switch off.
i Saloon: there are aerial wires in the upper
area of the rear window; this area is there-
fore not heated.
X Make sure that the key is in position 2in
the ignition lock.
X Press the ¯button.
The indicator lamp in the ¯button lights
up or goes out. Activating/deactivating air-recircula-
tion mode
You can deactivate the flow of fresh air if
unpleasant odours are entering the vehicle
from outside. The air already inside the vehi-
cle will then be recirculated. G
Risk of accident
Only switch over to air-recirculation mode
briefly at low outside temperatures. Other-
wise, the windows could mist up, thus
impairing visibility and endangering your-
self and others. This may prevent you from
observing the traffic conditions, thereby
causing an accident.
X Make sure that the key is in position 2in
the ignition lock.
X To activate: press the,button.
The indicator lamp in the ,button
comes on.
i Air-recirculation mode is activated auto-
matically at high outside temperatures.
When air-recirculation mode is activated
automatically, the indicator lamp in
the , button is not lit.
Outside air is added after about
30 minutes. Cont
rols
* optional
211_AKB; 2; 5, en-GB
mkalafa ,V ersion: 2.9.4
2008-02-29T16:57:07+01:00 - Seite 175 ZDateiname: 6515_3416_02_buchblock.pdf; preflight
Page 215 of 401
Features
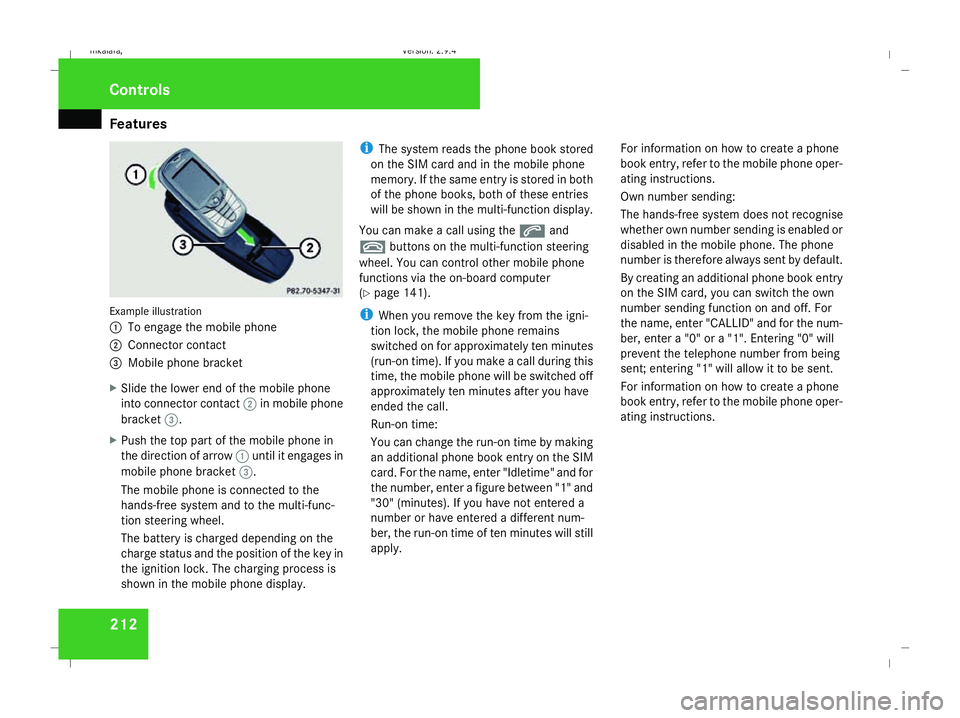
212Example illustration
1
To engage the mobile phone
2 Connector contact
3 Mobile phone bracket
X Slide the lower end of the mobile phone
into connector contact 2in mobile phone
bracket 3.
X Push the top part of the mobile phone in
the direction of arrow 1until it engages in
mobile phone bracket 3.
The mobile phone is connected to the
hands-free system and to the multi-func-
tion steering wheel.
The battery is charged depending on the
charge status and the position of the key in
the ignition lock. The charging process is
shown in the mobile phone display. i
The system reads the phone book stored
on the SIM card and in the mobile phone
memory. If the same entry is stored in both
of the phone books, both of these entries
will be shown in the multi-function display.
You can make a call using the sand
t buttons on the multi-function steering
wheel. You can control other mobile phone
functions via the on-board computer
(Y page 141).
i When you remove the key from the igni-
tion lock, the mobile phone remains
switched on for approximately ten minutes
(run-on time). If you make a call during this
time, the mobile phone will be switched off
approximately ten minutes after you have
ended the call.
Run-on time:
You can change the run-on time by making
an additional phone book entry on the SIM
card. For the name, enter "Idletime" and for
the number, enter a figure between "1" and
"30" (minutes). If you have not entered a
number or have entered a different num-
ber, the run-on time of ten minutes will still
apply. For information on how to create a phone
book entry, refer to the mobile phone oper-
ating instructions.
Own number sending:
The hands-free system does not recognise
whether own number sending is enabled or
disabled in the mobile phone. The phone
number is therefore always sent by default.
By creating an additional phone book entry
on the SIM card, you can switch the own
number sending function on and off. For
the name, enter "CALLID" and for the num-
ber, enter a "0" or a "1". Entering "0" will
prevent the telephone number from being
sent; entering "1" will allow it to be sent.
For information on how to create a phone
book entry, refer to the mobile phone oper-
ating instructions.Controls
211_AKB; 2; 5, en-GB
mkalafa,
Version: 2.9.4 2008-02-29T16:57:07+01:00 - Seite 212Dateiname: 6515_3416_02_buchblock.pdf; preflight
Page 220 of 401
217
Running-in notes
............................... 218
Refuelling ........................................... 218
Engine compartment ........................222
Tyres and wheels .............................. 227
Winter driving ................................... 234
Driving tips ........................................ 236
Driving abroad ................................... 238
Trailer towing .................................... 239
Service ............................................... 243
Care .................................................... 244 Operation
211_AKB; 2; 5, en-GB
mkalafa,
Version: 2.9.4 2008-02-29T16:57:07+01:00 - Seite 217Dateiname: 6515_3416_02_buchblock.pdf; preflight
Page 227 of 401

Engine compartment
224
R
Add 1.5 litres to reach maximum oil
level
R Add 2.0 litres to reach maximum oil
level
X Top up the oil if necessary ( Ypage 225).
Other messages in the multi-function dis-
play
If the engine is at normal operating tempera-
ture and there is too much oil, you will see the
following message:
Eng. oil level
Reduce oil level
X Have excess oil siphoned off.
! There is a risk of damage to the engine or
the catalytic converter if there is excess oil
in the engine.
If the Switch ignition on to check
engine oil level message appears:
X Turn the key to position 2in the ignition
lock (Y page 76).
You will see the following message if you did
not observe the required waiting time:
Observe waiting period X
Repeat the measurement after about five
minutes if the engine is at normal operating
temperature.
X Repeat the measurement after about
30 minutes if the engine is not at normal
operating temperature (if the engine was
only started briefly).
The following message appears if the engine
is running:
Engine oil level Not when engine on
X Switch off the engine and wait for five
minutes if the engine is at normal operating
temperature, or for about 30 minutes if the
engine is not at normal operating temper-
ature (if the engine was only started
briefly), before measuring.
i If you wish to cancel the measurement,
press the korj button on the multi-
function steering wheel. Using the oil dipstick Illustration: vehicle with a petrol engine (E 350)
1
Oil dipstick
2 Maximum mark
3 Minimum mark
X Pull oil dipstick 1out of the oil dipstick
tube.
X Wipe off oil dipstick 1.
X Insert oil dipstick 1into the oil dipstick
tube to the stop, and take it out again.
The oil level is correct if the level is between
minimum mark 3and maximum mark
2.
X Top up the oil if necessary. Operation
211_AKB; 2; 5, en-GB
mkalafa,
Version: 2.9.4
2008-02-29T16:57:07+01:00 - Seite 224 Dateiname: 6515_3416_02_buchblock.pdf; preflight