2008 MERCEDES-BENZ E-CLASS ESTATE keyless
[x] Cancel search: keylessPage 283 of 401
Display
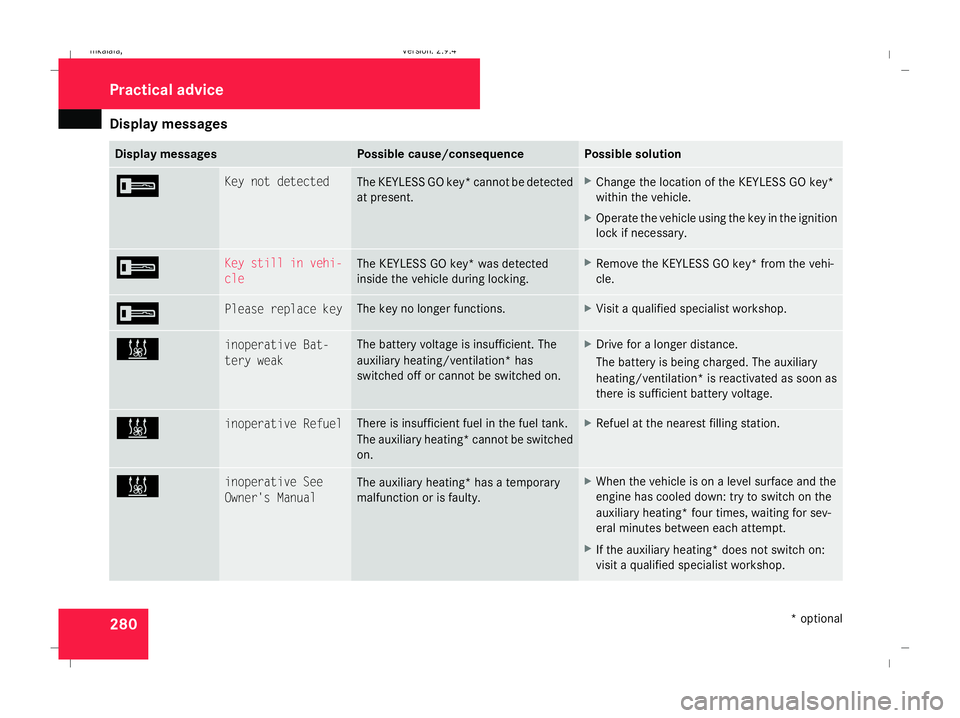
messages 280 Display messages Possible cause/consequence Possible solution
I Key not detected
The KEYLESS GO key* cannot be detected
at present. X
Change the location of the KEYLESS GO key*
within the vehicle.
X Operate the vehicle using the key in the ignition
lock if necessary. I Key still in vehi-
cle
The KEYLESS GO key* was detected
inside the vehicle during locking. X
Remove the KEYLESS GO key* from the vehi-
cle. I Please replace key The key no longer functions. X
Visit a qualified specialist workshop. X inoperative Bat-
tery weak The battery voltage is insufficient. The
auxiliary heating/ventilation* has
switched off or cannot be switched on. X
Drive for a longer distance.
The battery is being charged. The auxiliary
heating/ventilation* is reactivated as soon as
there is sufficient battery voltage. X inoperative Refuel There is insufficient fuel in the fuel tank.
The auxiliary heating* cannot be switched
on. X
Refuel at the nearest filling station. X inoperative See
Owner's Manual
The auxiliary heating* has a temporary
malfunction or is faulty. X
When the vehicle is on a level surface and the
engine has cooled down: try to switch on the
auxiliary heating* four times, waiting for sev-
eral minutes between each attempt.
X If the auxiliary heating* does not switch on:
visit a qualified specialist workshop. Practical advi
ce
* optional
211_AKB; 2; 5, en-GB
mkalafa,
Version: 2.9.4 2008-02-29T16:57:07+01:00 - Seite 280Dateiname: 6515_3416_02_buchblock.pdf; preflight
Page 306 of 401
Troubleshooting
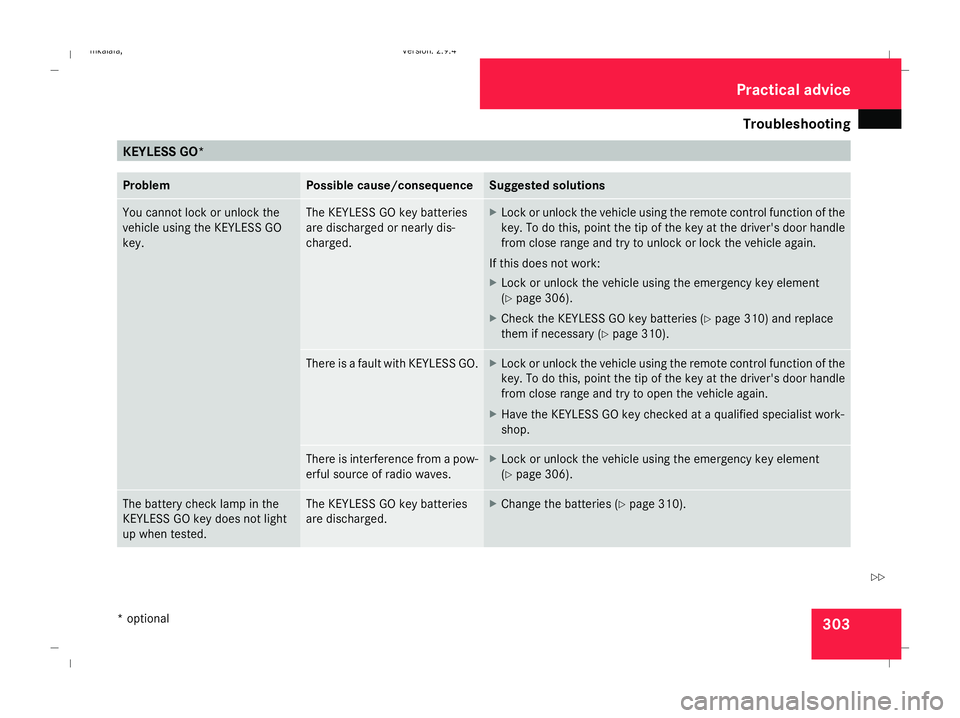
303KEYLESS GO*
Problem Possible cause/consequence Suggested solutions
You cannot lock or unlock the
vehicle using the KEYLESS GO
key. The KEYLESS GO key batteries
are discharged or nearly dis-
charged. X
Lock or unlock the vehicle using the remote control function of the
key. To do this, point the tip of the key at the driver's door handle
from close range and try to unlock or lock the vehicle again.
If this does not work:
X Lock or unlock the vehicle using the emergency key element
(Y page 306).
X Check the KEYLESS GO key batteries (Y page 310) and replace
them if necessary (Y page 310). There is a fault with KEYLESS GO. X
Lock or unlock the vehicle using the remote control function of the
key. To do this, point the tip of the key at the driver's door handle
from close range and try to open the vehicle again.
X Have the KEYLESS GO key checked at a qualified specialist work-
shop. There is interference from a pow-
erful source of radio waves. X
Lock or unlock the vehicle using the emergency key element
(Y page 306). The battery check lamp in the
KEYLESS GO key does not light
up when tested. The KEYLESS GO key batteries
are discharged. X
Change the batteries (Y page 310). Practical advice
* optional
211_AKB; 2; 5, en-GB
mkalafa
,V ersion: 2.9.4
2008-02-29T16:57:07+01:00 - Seite 303 ZDateiname: 6515_3416_02_buchblock.pdf; preflight
Page 307 of 401
Troubleshooting
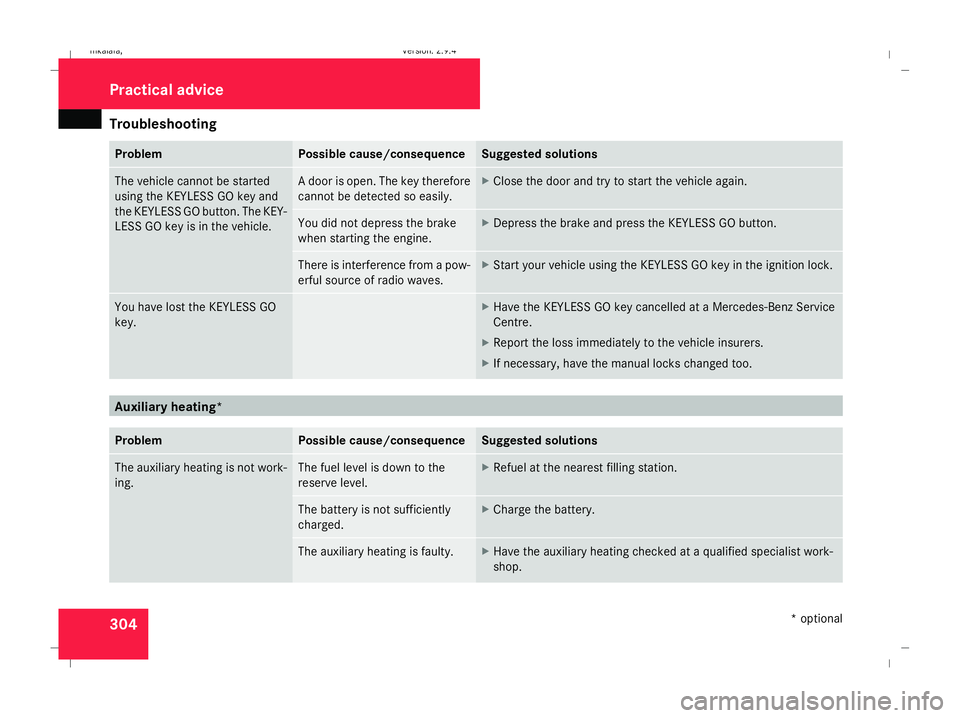
304 Problem Possible cause/consequence Suggested solutions
The vehicle cannot be started
using the KEYLESS GO key and
the KEYLESS GO button. The KEY-
LESS GO key is in the vehicle. A door is open. The key therefore
cannot be detected so easily. X
Close the door and try to start the vehicle again. You did not depress the brake
when starting the engine. X
Depress the brake and press the KEYLESS GO button. There is interference from a pow-
erful source of radio waves. X
Start your vehicle using the KEYLESS GO key in the ignition lock. You have lost the KEYLESS GO
key. X
Have the KEYLESS GO key cancelled at a Mercedes-Benz Service
Centre.
X Report the loss immediately to the vehicle insurers.
X If necessary, have the manual locks changed too. Auxiliary heating*
Problem Possible cause/consequence Suggested solutions
The auxiliary heating is not work-
ing. The fuel level is down to the
reserve level. X
Refuel at the nearest filling station. The battery is not sufficiently
charged. X
Charge the battery. The auxiliary heating is faulty. X
Have the auxiliary heating checked at a qualified specialist work-
shop. Practical advice
* optional
211_AKB; 2; 5, en-GB
mkalafa
,V ersion: 2.9.4
2008-02-29T16:57:07+01:00 - Seite 304 Dateiname: 6515_3416_02_buchblock.pdf; preflight
Page 309 of 401
Locking/unlocking in an emergency
306 Locking/unlocking in an emergency
Emergency key
If the vehicle can no longer be unlocked or
locked with the key or the KEYLESS GO
key*, use the emergency key element.
If you use the emergency key element to
unlock and open the driver's door or the boot
lid (Saloon), the anti-theft alarm system* will
be triggered (Y page 62).
There are several ways to turn off the alarm:
X Press the korj button on the key.
or
X Insert the key into the ignition lock.
or
X Press the KEYLESS GO button* on the
selector lever. The KEYLESS GO key* must
be in the vehicle.
or
X Lock or unlock the vehicle using KEYLESS
GO*. The KEYLESS GO key* must be out-
side the vehicle. Releasing and removing the emergency
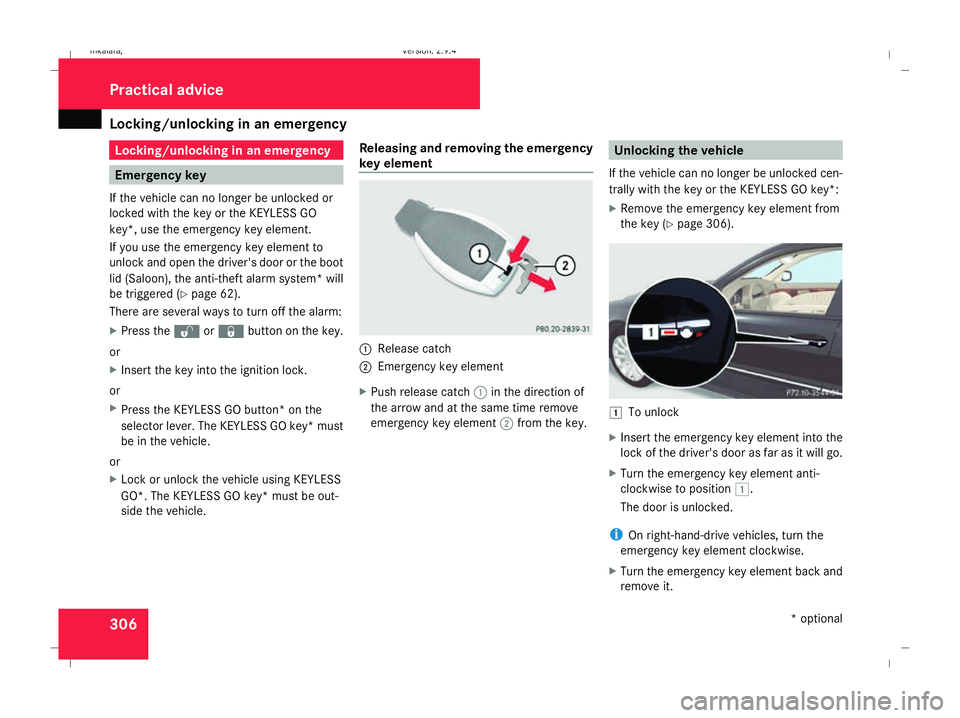
key element 1
Release catch
2 Emergency key element
X Push release catch 1in the direction of
the arrow and at the same time remove
emergency key element 2from the key. Unlocking the vehicle
If the vehicle can no longer be unlocked cen-
trally with the key or the KEYLESS GO key*:
X Remove the emergency key element from
the key (Y page 306). $
To unlock
X Insert the emergency key element into the
lock of the driver's door as far as it will go.
X Turn the emergency key element anti-
clockwise to position $.
The door is unlocked.
i On right-hand-drive vehicles, turn the
emergency key element clockwise.
X Turn the emergency key element back and
remove it. Practical advice
* optional
211_AKB; 2; 5, en-GB
mkalafa,
Version: 2.9.4 2008-02-29T16:57:07+01:00 - Seite 306Dateiname: 6515_3416_02_buchblock.pdf; preflight
Page 310 of 401
Locking/unlocking in an emergency
307Locking the vehicle
If the vehicle can no longer be locked cen-
trally with the key or the KEYLESS GO key*:
X Open the driver's door.
X Close the front-passenger door, the rear
doors and the boot lid/tailgate.
X Press the locking button (Y page 70).
X Check whether the locking knobs on the
doors are still visible. Press the locking
knobs down manually if necessary.
X Close the driver's door.
X Remove the emergency key element from
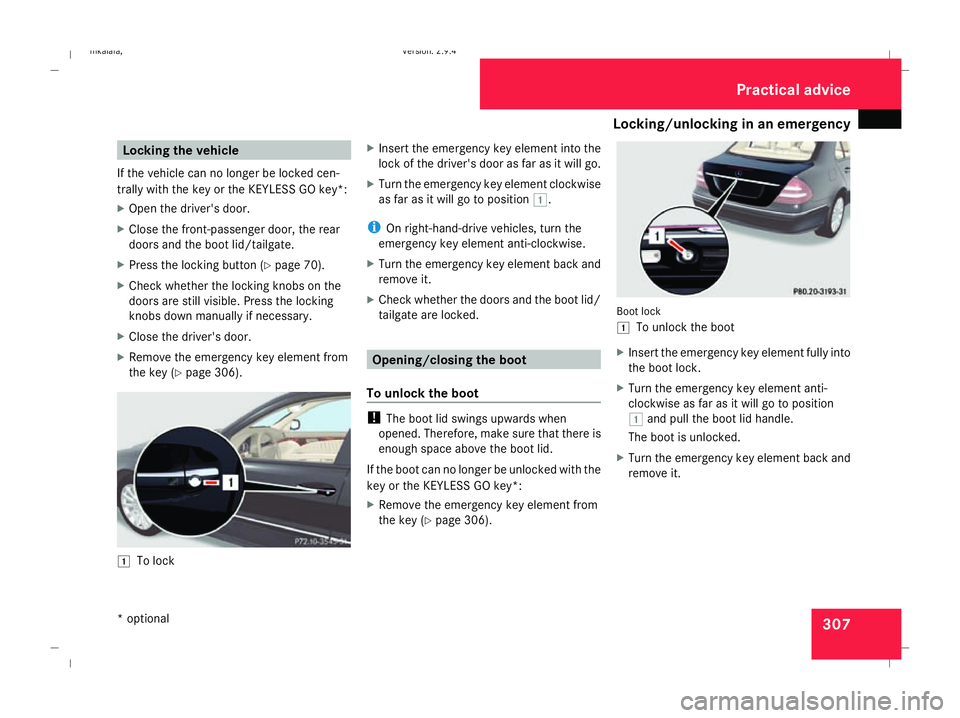
the key (Y page 306). $
To lock X
Insert the emergency key element into the
lock of the driver's door as far as it will go.
X Turn the emergency key element clockwise
as far as it will go to position $.
i On right-hand-drive vehicles, turn the
emergency key element anti-clockwise.
X Turn the emergency key element back and
remove it.
X Check whether the doors and the boot lid/
tailgate are locked. Opening/closing the boot
To unlock the boot !
The boot lid swings upwards when
opened. Therefore, make sure that there is
enough space above the boot lid.
If the boot can no longer be unlocked with the
key or the KEYLESS GO key*:
X Remove the emergency key element from
the key (Y page 306). Boot lock
$
To unlock the boot
X Insert the emergency key element fully into
the boot lock.
X Turn the emergency key element anti-
clockwise as far as it will go to position
$ and pull the boot lid handle.
The boot is unlocked.
X Turn the emergency key element back and
remove it. Practical advice
* optional
211_AKB; 2; 5, en-GB
mkalafa,
Version: 2.9.4 2008-02-29T16:57:07+01:00 - Seite 307 ZDateiname: 6515_3416_02_buchblock.pdf; preflight
Page 313 of 401
Changing the batteries
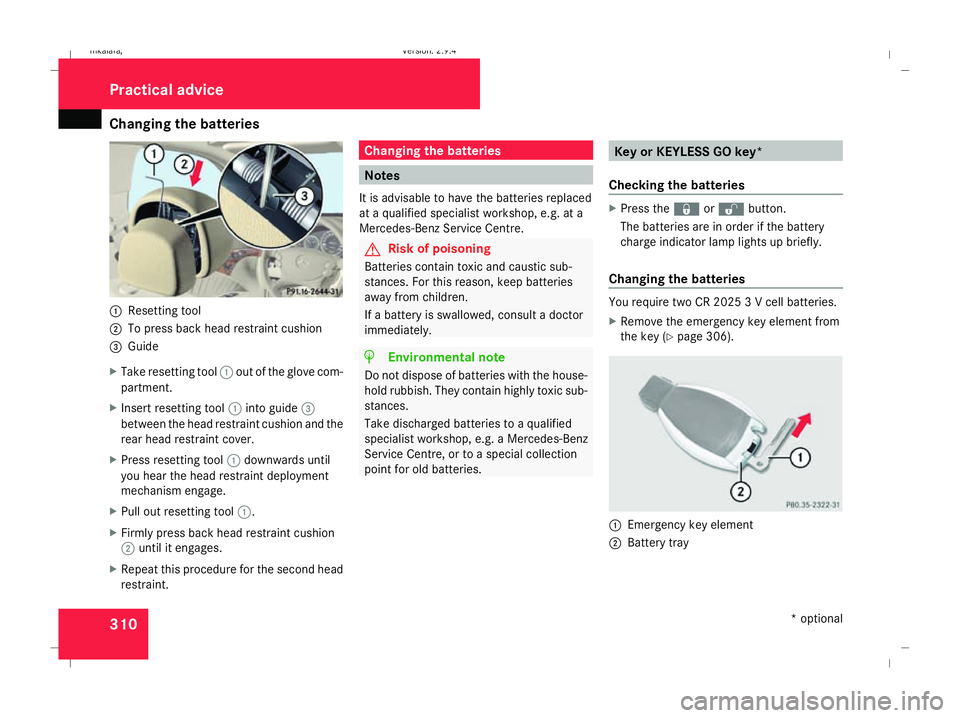
3101
Resetting tool
2 To press back head restraint cushion
3 Guide
X Take resetting tool 1out of the glove com-
partment.
X Insert resetting tool 1into guide 3
between the head restraint cushion and the
rear head restraint cover.
X Press resetting tool 1downwards until
you hear the head restraint deployment
mechanism engage.
X Pull out resetting tool 1.
X Firmly press back head restraint cushion
2 until it engages.
X Repeat this procedure for the second head
restraint. Changing the batteries
Notes
It is advisable to have the batteries replaced
at a qualified specialist workshop, e.g. at a
Mercedes-Benz Service Centre. G
Risk of poisoning
Batteries contain toxic and caustic sub-
stances. For this reason, keep batteries
away from children.
If a battery is swallowed, consult a doctor
immediately. H
Environmental note
Do not dispose of batteries with the house-
hold rubbish. They contain highly toxic sub-
stances.
Take discharged batteries to a qualified
specialist workshop, e.g. a Mercedes-Benz
Service Centre, or to a special collection
point for old batteries. Key or KEYLESS GO key*
Checking the batteries X
Press the jork button.
The batteries are in order if the battery
charge indicator lamp lights up briefly.
Changing the batteries You require two CR 2025 3 V cell batteries.
X
Remove the emergency key element from
the key (Y page 306). 1
Emergency key element
2 Battery tray Practical advice
* optional
211_AKB; 2; 5, en-GB
mkalafa,
Version: 2.9.4 2008-02-29T16:57:07+01:00 - Seite 310Dateiname: 6515_3416_02_buchblock.pdf; preflight
Page 318 of 401
Replacing the wiper blades
315Changing the rear bulbs
Changing the bulbs in the licence plate
lamps Licence plate lamps (Saloon)
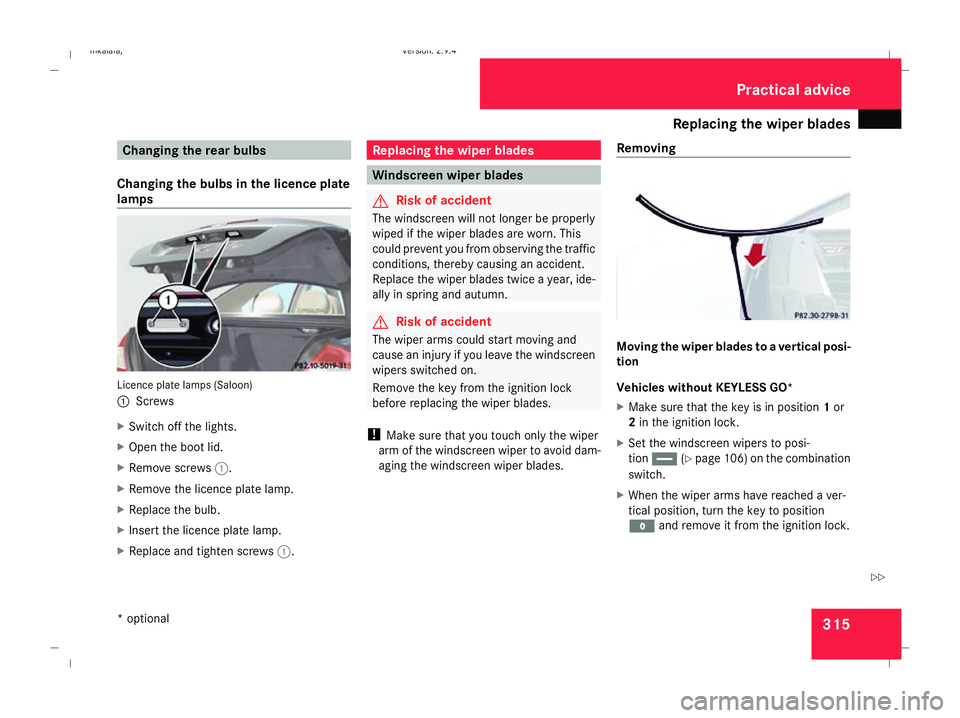
1
Screws
X Switch off the lights.
X Open the boot lid.
X Remove screws 1.
X Remove the licence plate lamp.
X Replace the bulb.
X Insert the licence plate lamp.
X Replace and tighten screws 1. Replacing the wiper blades
Windscreen wiper blades
G
Risk of accident
The windscreen will not longer be properly
wiped if the wiper blades are worn. This
could prevent you from observing the traffic
conditions, thereby causing an accident.
Replace the wiper blades twice a year, ide-
ally in spring and autumn. G
Risk of accident
The wiper arms could start moving and
cause an injury if you leave the windscreen
wipers switched on.
Remove the key from the ignition lock
before replacing the wiper blades.
! Make sure that you touch only the wiper
arm of the windscreen wiper to avoid dam-
aging the windscreen wiper blades. Removing Moving the wiper blades to a vertical posi-
tion
Vehicles without KEYLESS GO*
X
Make sure that the key is in position 1or
2 in the ignition lock.
X Set the windscreen wipers to posi-
tion u (Ypage 106) on the combination
switch.
X When the wiper arms have reached a ver-
tical position, turn the key to position
M and remove it from the ignition lock. Practical advice
* optional
211_AKB; 2; 5, en-GB
mkalafa ,V ersion: 2.9.4
2008-02-29T16:57:07+01:00 - Seite 315 ZDateiname: 6515_3416_02_buchblock.pdf; preflight
Page 319 of 401
Replacing the wiper blades
316
X
Fold the wiper arm away from the wind-
screen until it engages.
X Set the wiper blade at right angles to the
wiper arm.
Vehicles with KEYLESS GO*
X Switch off the engine.
X Take your foot off the brake pedal.
X Set the windscreen wipers to posi-
tion u (Ypage 106) on the combination
switch.
X Press the KEYLESS GO button repeatedly
until the windscreen wipers start.
X When the wiper arms have reached a ver-
tical position, press the KEYLESS GO but-
ton.
X Fold the wiper arm away from the wind-
screen until it engages.
X Set the wiper blade at right angles to the
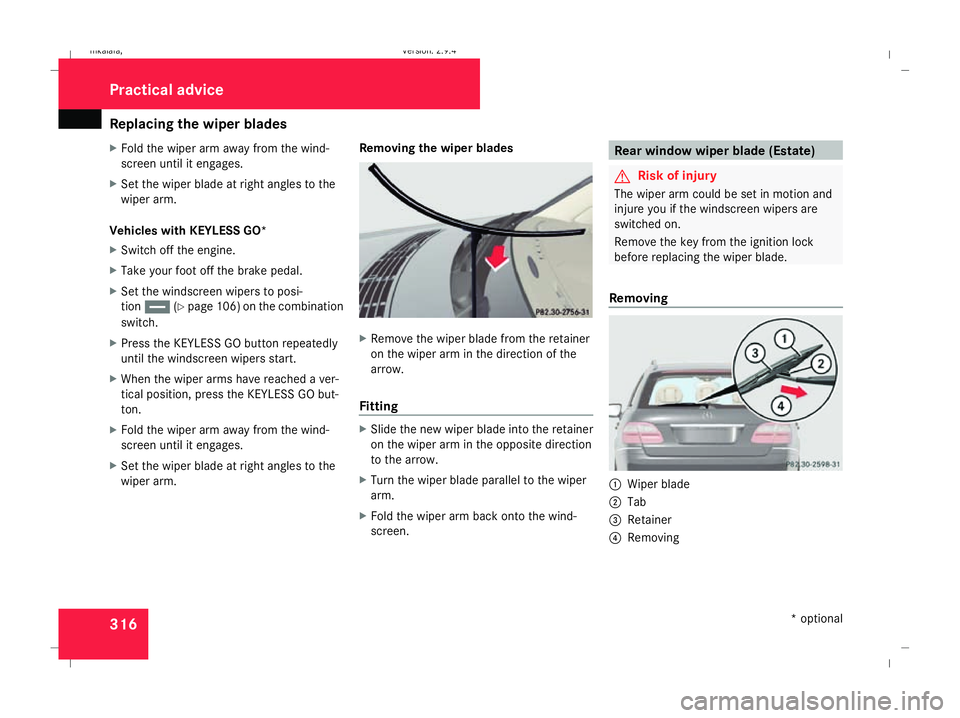
wiper arm. Removing the wiper blades X
Remove the wiper blade from the retainer
on the wiper arm in the direction of the
arrow.
Fitting X
Slide the new wiper blade into the retainer
on the wiper arm in the opposite direction
to the arrow.
X Turn the wiper blade parallel to the wiper
arm.
X Fold the wiper arm back onto the wind-
screen. Rear window wiper blade (Estate)
G
Risk of injury
The wiper arm could be set in motion and
injure you if the windscreen wipers are
switched on.
Remove the key from the ignition lock
before replacing the wiper blade.
Removing 1
Wiper blade
2 Tab
3 Retainer
4 Removing Practical advice
* optional
211_AKB; 2; 5, en-GB
mkalafa
, Version: 2.9.4 2008-02-29T16:57:07+01:00 - Seite 316Dateiname: 6515_3416_02_buchblock.pdf; preflight