2008 MERCEDES-BENZ CLS COUPE battery
[x] Cancel search: batteryPage 169 of 329
Air conditioning
166
i
The auxiliary heating/ventilation is auto-
matically deactivated after about 30
minutes, or when:
R the ignition is switched on
R the battery voltage drops Auxiliary heating/ventilation*
G
Risk of poisoning
Exhaust fumes are produced when the aux-
iliary heating is in operation. Inhaling these
exhaust fumes can be poisonous. You
should therefore switch off the auxiliary
heating in confined spaces without an
extraction system, e.g. a garage. G
Risk of fire
When operating the auxiliary heating, parts
of the vehicle may become very hot, and
highly inflammable material such as fuels
could be ignited. Operating the auxiliary
heating is thus prohibited at filling stations
or when your vehicle is being refuelled. You
must therefore switch off the auxiliary heat-
ing at filling stations.
The auxiliary heating heats the air in the vehi-
cle interior to a temperature between 20 °C and 24 °C without using the heat of the run-
ning engine. The auxiliary heating is operated
using fuel directly from the vehicle's fuel tank.
For this reason, the tank content must be at
least at reserve fuel level to ensure that the
auxiliary heating functions.
The auxiliary heating/ventilation automati-
cally adjusts to changes in temperature and
weather conditions. For this reason, the aux-
iliary heating could automatically switch over
from ventilation mode to heating mode or
from heating mode to ventilation mode.
You cannot use the auxiliary ventilation to
cool the vehicle interior to a temperature
lower than the outside temperature.
Before activating
X
Set the temperature to a value between
20 † and 24 †.
The auxiliary heating/ventilation can be acti-
vated even when the air conditioning is being
controlled manually. Optimum comfort can
be attained when the system is set to auto-
matic mode. Set the desired temperature
within this range. If a higher temperature is
set, the vehicle is heated to 24 †. If a lower
temperature is set, the vehicle is heated to
20 †. Activating or deactivating the auxiliary
heating/ventilation The auxiliary heating/ventilation can be acti-
vated or deactivated via the remote control
or the button on the centre console.
The on-board computer can be used to spec-
ify up to three departure times, one of which
may be preselected (
Y page 128).
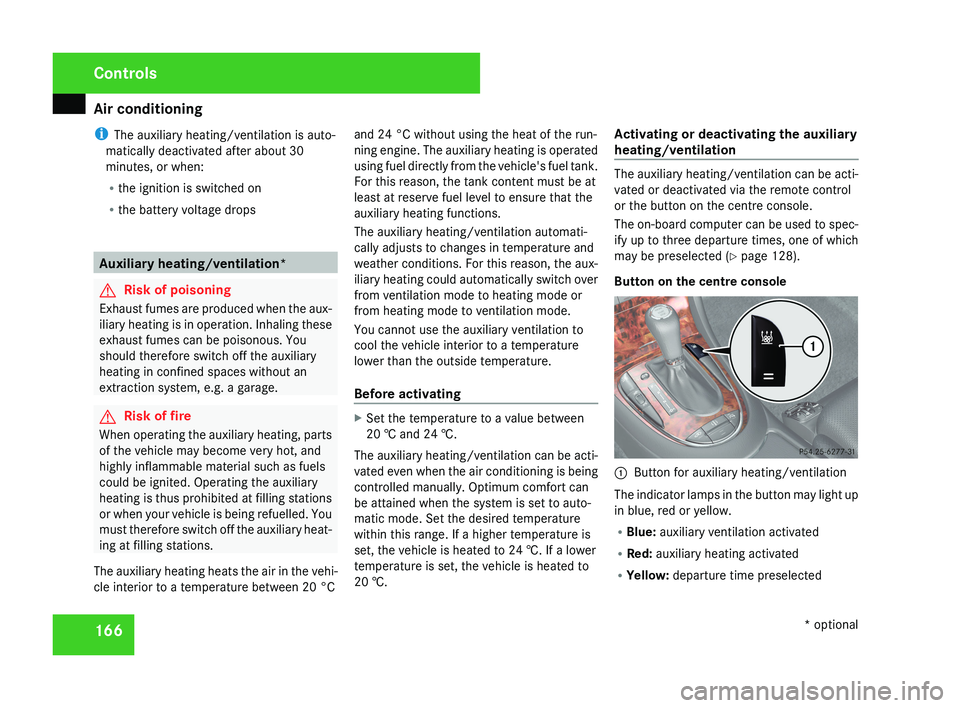
Button on the centre console 1
Button for auxiliary heating/ventilation
The indicator lamps in the button may light up
in blue, red or yellow.
R Blue: auxiliary ventilation activated
R Red: auxiliary heating activated
R Yellow: departure time preselected Controls
* optional
219_AKB; 2; 4, en-GB
mkalafa,
2007-11-13T09:28:36+01:00 - Seite 166
Page 170 of 329
Air conditioning
167
Activating the auxiliary heating/ventila-
tion
If the key is in position 1 or 2:
X
Press and hold button 1 for at least two
seconds.
The red or blue indicator lamp in the button
lights up.
If the key is removed or in position 0:
X Briefly press button 1.
The red or blue indicator lamp in the button
lights up.
Deactivating the auxiliary heating/venti-
lation
X Briefly press button 1.
The red or blue indicator lamp in the button
goes out.
Remote control
Your vehicle comes with one remote control.
You may use two additional remote controls
for your vehicle. For further information, con-
sult a qualified specialist workshop, e.g. a
Mercedes-Benz Service Centre. The remote control has a maximum range of
approximately 300 metres. This range may be
reduced by:
R
sources of radio interference
R solid objects between the remote control
and the vehicle
R the remote control being in an unfavoura-
ble position in relation to the vehicle
R transmitting from an enclosed space
i The optimum range can be achieved if you
hold the remote control vertically, pointing
upwards when you press one of the but-
tons.
i A battery symbol appears in the display
when the batteries in the remote control
are low. Replace the remote control bat-
teries (Y page 270).
i More information about the auxiliary
heating can be found in the "Practical
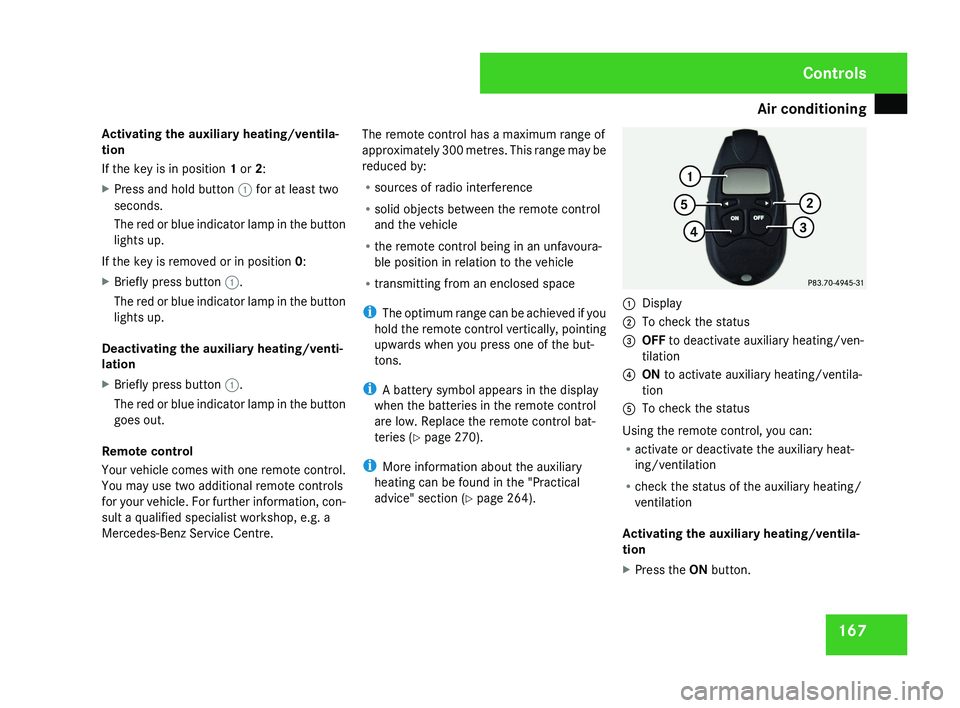
advice" section ( Y page 264).1
Display
2 To check the status
3 OFF to deactivate auxiliary heating/ven-
tilation
4 ON to activate auxiliary heating/ventila-
tion
5 To check the status
Using the remote control, you can:
R activate or deactivate the auxiliary heat-
ing/ventilation
R check the status of the auxiliary heating/
ventilation
Activating the auxiliary heating/ventila-
tion
X Press the ON button.
Controls
219_AKB; 2; 4, en-GB
mkalafa,
2007-11-13T09:28:36+01:00 - Seite 167
Page 171 of 329
Air conditioning
168
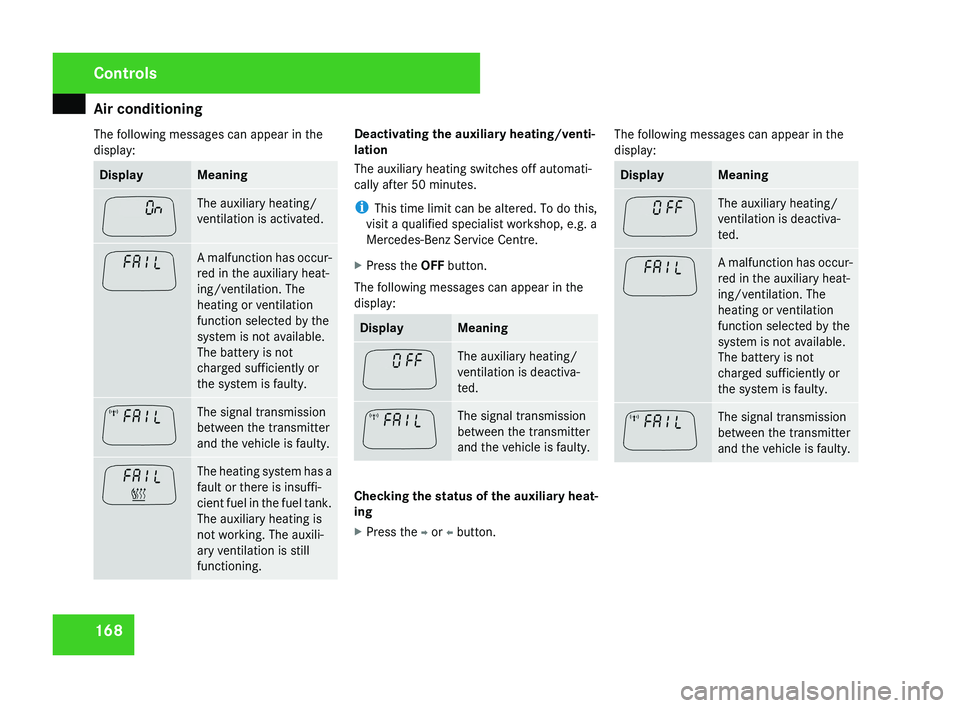
The following messages can appear in the
display: Display Meaning
The auxiliary heating/
ventilation is activated.
A malfunction has occur-
red in the auxiliary heat-
ing/ventilation. The
heating or ventilation
function selected by the
system is not available.
The battery is not
charged sufficiently or
the system is faulty.
The signal transmission
between the transmitter
and the vehicle is faulty.
The heating system has a
fault or there is insuffi-
cient fuel in the fuel tank.
The auxiliary heating is
not working. The auxili-
ary ventilation is still
functioning. Deactivating the auxiliary heating/venti-
lation
The auxiliary heating switches off automati-
cally after 50 minutes.
i
This time limit can be altered. To do this,
visit a qualified specialist workshop, e.g. a
Mercedes-Benz Service Centre.
X Press the OFF button.
The following messages can appear in the
display: Display Meaning
The auxiliary heating/
ventilation is deactiva-
ted.
The signal transmission
between the transmitter
and the vehicle is faulty.
Checking the status of the auxiliary heat-
ing
X
Press the p or o button. The following messages can appear in the
display: Display Meaning
The auxiliary heating/
ventilation is deactiva-
ted.
A malfunction has occur-
red in the auxiliary heat-
ing/ventilation. The
heating or ventilation
function selected by the
system is not available.
The battery is not
charged sufficiently or
the system is faulty.
The signal transmission
between the transmitter
and the vehicle is faulty.Controls
219_AKB; 2; 4, en-GB
mkalafa,
2007-11-13T09:28:36+01:00 - Seite 168
Page 174 of 329

Sliding sunroof
171
Lowering and closing X
To lower manually: pull the switch in the
direction of arrow 2 and hold it until the
sliding/tilting
sunroof is in the desired posi-
tion.
X To lower fully: pull the switch briefly
beyond the pressure point in the direction
of arrow 2 and release it.
X To stop: push or pull the switch in any
direction.
Rain closing feature The sliding/tilting sunroof closes automati-
cally:
R
if it starts to rain
R at extreme outside temperatures
R after 12 hours
R if
there is a malfunction in the power supply
The rear of the sliding/tilting sunroof is then
raised in order to ventilate the interior of the
vehicle.
i The sliding/tilting sunroof is opened
slightly again if it is obstructed while being
closed by the rain closing feature. The rain
closing feature is then deactivated. i
The
sliding/tilting sunroof does not close
if:
R it is raised at the rear
R it is blocked
R no rain is falling on the windscreen (e.g.
because the vehicle is under a bridge or
in a carport)
Opening and closing the cover The cover functions as a sunblind. When you
open the sliding/tilting sunroof, the cover
moves back with it.
When the sliding/tilting sunroof is closed or
raised at the rear, you can open or close the
cover manually.
Resetting the sliding/tilting sunroof
Reset the sliding/tilting sunroof if it does not
move smoothly, or if the battery was discon-
nected or flat:
X
Remove the fuse for the sliding/tilting sun-
roof in the main fuse box (Y page 296).
X Reinsert the fuse.
X Make sure that the key is in position 2 in
the ignition lock. X
Press the switch in the direction of
arrow 3
and hold it until the sliding/tilting
sunroof is fully raised at the rear.
X Keep the switch pressed for an additional
second.
X Make sure that the sliding/tilting sunroof
can be opened or closed fully again
(Y page 170).
X If this is not the case, consult a qualified
specialist workshop. Controls
219_AKB; 2; 4, en-GB
mkalafa,
2007-11-13T09:28:36+01:00 - Seite 171
Page 187 of 329
Features
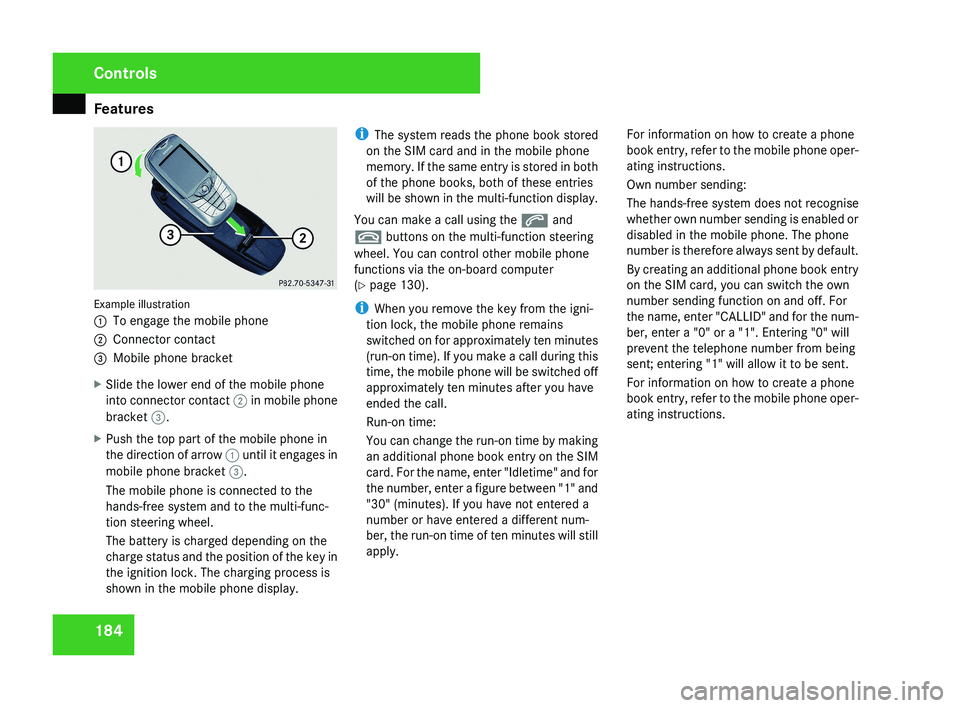
184Example illustration
1
To engage the mobile phone
2 Connector contact
3 Mobile phone bracket
X Slide the lower end of the mobile phone
into connector contact 2 in mobile phone
bracket 3.
X Push the top part of the mobile phone in
the direction of arrow 1 until it engages in
mobile phone bracket 3.
The mobile phone is connected to the
hands-free system and to the multi-func-
tion steering wheel.
The battery is charged depending on the
charge status and the position of the key in
the ignition lock. The charging process is
shown in the mobile phone display. i
The system reads the phone book stored
on the SIM card and in the mobile phone
memory. If the same entry is stored in both
of the phone books, both of these entries
will be shown in the multi-function display.
You can make a call using the s and
t buttons on the multi-function steering
wheel. You can control other mobile phone
functions via the on-board computer
(Y page 130).
i When you remove the key from the igni-
tion lock, the mobile phone remains
switched on for approximately ten minutes
(run-on time). If you make a call during this
time, the mobile phone will be switched off
approximately ten minutes after you have
ended the call.
Run-on time:
You can change the run-on time by making
an additional phone book entry on the SIM
card. For the name, enter "Idletime" and for
the number, enter a figure between "1" and
"30" (minutes). If you have not entered a
number or have entered a different num-
ber, the run-on time of ten minutes will still
apply. For information on how to create a phone
book entry, refer to the mobile phone oper-
ating instructions.
Own number sending:
The hands-free system does not recognise
whether own number sending is enabled or
disabled in the mobile phone. The phone
number is therefore always sent by default.
By creating an additional phone book entry
on the SIM card, you can switch the own
number sending function on and off. For
the name, enter "CALLID" and for the num-
ber, enter a "0" or a "1". Entering "0" will
prevent the telephone number from being
sent; entering "1" will allow it to be sent.
For information on how to create a phone
book entry, refer to the mobile phone oper-
ating instructions.
Controls
219_AKB; 2; 4, en-GB
mkalafa,
2007-11-13T09:28:36+01:00 - Seite 184
Page 212 of 329
Service
209Service
Active Service System PLUS
ASSYST PLUS, the Active Service System,
tells you when the next service is due. When-
ever a service is due, this is shown in the
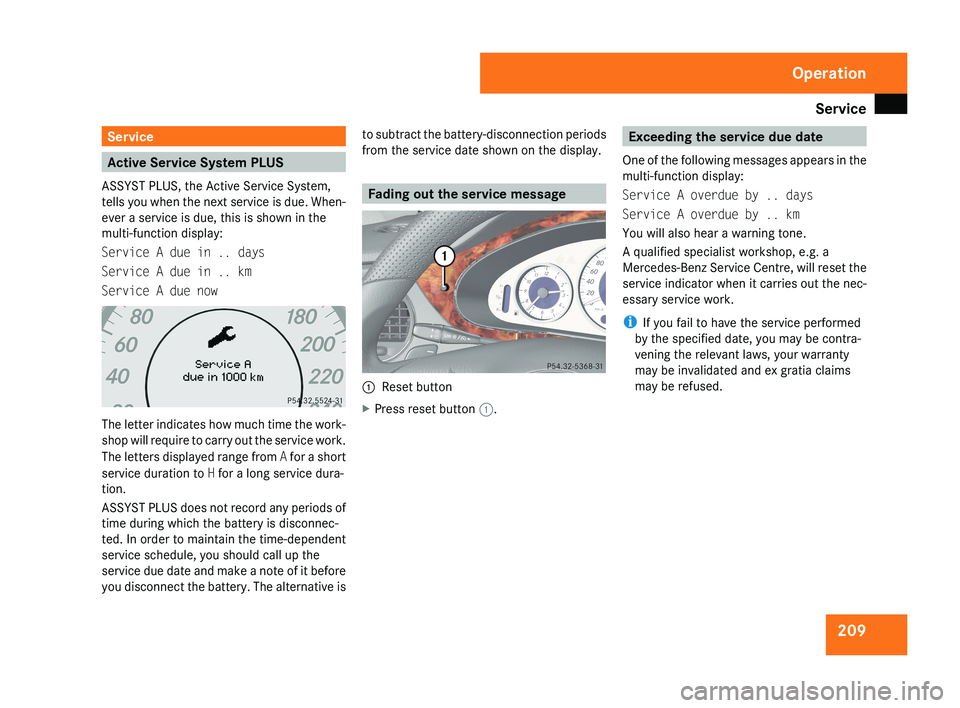
multi-function display:
Service A due in .. days
Service A due in .. km
Service A due nowThe letter indicates how much time the work-
shop will require to carry out the service work.
The letters displayed range from A for a short
service duration to H for a long service dura-
tion.
ASSYST PLUS does not record any periods of
time during which the battery is disconnec-
ted. In order to maintain the time-dependent
service schedule, you should call up the
service due date and make a note of it before
you disconnect the battery. The alternative is to subtract the battery-disconnection periods
from the service date shown on the display.
Fading out the service message
1
Reset button
X Press reset button 1.
Exceeding the service due date
One of the following messages appears in the
multi-function display:
Service A overdue by .. days
Service A overdue by .. km
You will also hear a warning tone.
A qualified specialist workshop, e.g. a
Mercedes-Benz Service Centre, will reset the
service indicator when it carries out the nec-
essary service work.
i If you fail to have the service performed
by the specified date, you may be contra-
vening the relevant laws, your warranty
may be invalidated and ex gratia claims
may be refused.
Operation
219_AKB; 2; 4, en-GB
mkalafa,
2007-11-13T09:28:36+01:00 - Seite 209
Page 214 of 329
Care
211
Automatic car wash G
Risk of accident
The vehicle is braked when HOLD is activa-
ted. Therefore, deactivate HOLD before the
vehicle is washed in an automatic car wash.
You can wash the vehicle in an automatic car
wash from the very start.
! Do not use a touch-free automatic car
wash that uses chemical agents to wash
the vehicle.
Preferably use one with high-pressure jets for
prewashing.
If the vehicle is very dirty, prewash it before
cleaning it in an automatic car wash.
! Make sure that the automatic car wash is
suitable for the size of the vehicle. Fold in
the exterior mirrors before the vehicle is
washed. There is otherwise a risk of dam-
age to the exterior mirrors.
! Make sure the side windows are com-
pletely closed, the ventilation/heater
blower is fully turned off and the wind-
screen wiper switch is set to 0. The rain
sensor may otherwise be activated, for
instance, leading to inadvertent wiper sweeps being triggered. This could cause
damage to the vehicle.
After using an automatic car wash, wipe off
wax from the windscreen and the wiper
blades. This will prevent smears and reduce
wiping
noises caused by residue on the wind-
screen.
High-pressure cleaners G
Risk of accident
Do not use high-pressure cleaners with cir-
cular-jet nozzles (dirt grinders) to clean
your vehicle or - especially - the tyres. You
could otherwise damage the tyres and
cause an accident.
! Observe the instructions issued by the
equipment manufacturer concerning the
distance to be maintained between the
nozzle
of the high-pressure cleaner and the
vehicle (at least 30 cm).
Move the high-pressure cleaner nozzle
around when cleaning your vehicle.
Do not aim directly at any of the following:
R Tyres
R Door joint
R Electrical components R
Battery
R Connectors
R Bulbs
R Seals
Damaged seals or electrical components
can lead to failures or leaks.
Cleaning the wiper blades and the out-
side of the windscreen G
Risk of injury
Turn the key to position 0 in the ignition
lock
before cleaning the windscreen or the
wiper blades. There is otherwise a risk of
the windscreen wipers being set in motion
and causing injury.
X Turn the key to position 1 in the ignition
lock (Y page 74).
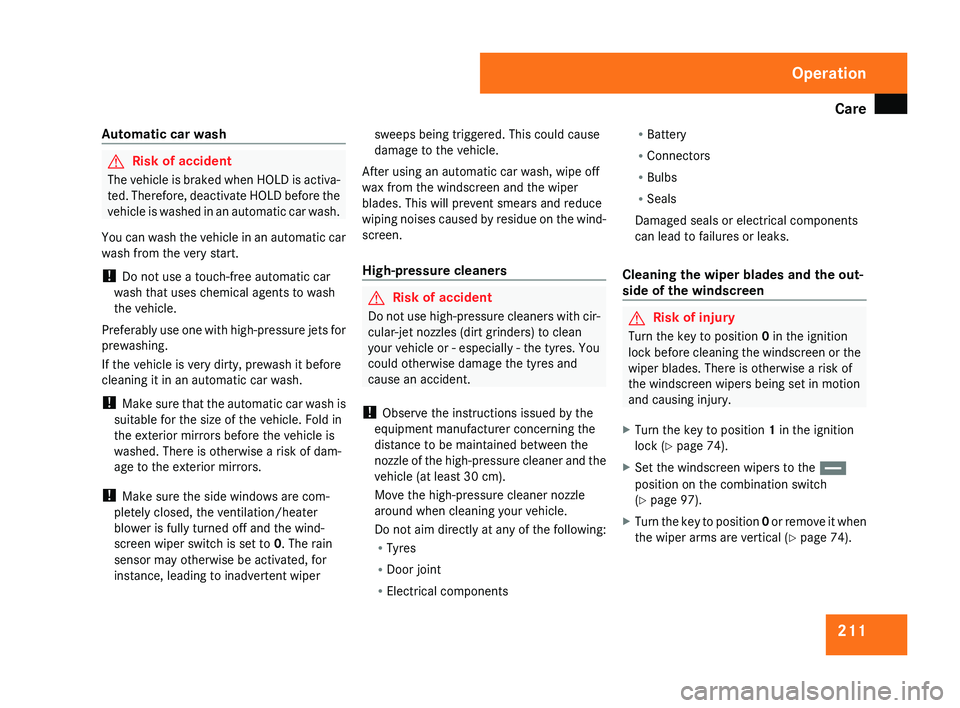
X Set the windscreen wipers to the u
position on the combination switch
(Y page 97).
X Turn the key to position 0
or remove it when
the wiper arms are vertical ( Y page 74). Operation
219_AKB; 2; 4, en-GB
mkalafa,
2007-11-13T09:28:36+01:00 - Seite 211
Page 218 of 329
215
Where will I find...? ...........................
216
Display messages ............................. 219
Troubleshooting ................................ 241
Locking/unlocking in an emer-
gency ................................................. 266
Resetting triggered NECK-PRO
head restraints .................................. 269
Changing the batteries .....................269
Changing the bulbs ...........................271
Replacing the wiper blades ..............275
Flat tyre ............................................. 276
Battery ............................................... 288
Jump-starting .................................... 291
Towing and tow-starting .................. 293
Fuses .................................................. 295
Practical advice
219_AKB; 2; 4, en-GB
mkalafa,
2007-11-13T09:28:36+01:00 - Seite 215