2008 MERCEDES-BENZ CLS COUPE fuel
[x] Cancel search: fuelPage 70 of 329

Opening and closing
67
X
To change the setting: press the k
and j buttons simultaneously for
approximately six seconds until the battery
check lamp flashes twice.
The key now functions as follows:
X To unlock the driver's door: press the
k button once.
X To unlock centrally: press the k but-
ton twice.
X To lock centrally: press the j button.
Restoring the factory settings X
Press the k and j buttons simulta-
neously for approximately six seconds until
the battery check lamp flashes twice. KEYLESS GO*
If you are carrying the KEYLESS GO key on
your person, you can use the KEYLESS GO
functions of your vehicle. The KEYLESS GO
key should not be more than one metre away
from the vehicle. However, you can also use
the KEYLESS GO key like a normal key with
remote control.
When you pull the door handle, the following
unlock centrally if the factory settings have
not been changed:
R the doors
R the boot lid
R the fuel filler flap G
Risk of accident
Never leave children unsupervised in the
vehicle. They could open a door from the
inside at any time, even if it has been
locked. Or they could start the vehicle if a
valid KEYLESS GO key is in the vehicle and
they press the KEYLESS GO button on the
gear selector lever. They could endanger
themselves and others. Switch off the
engine and take the KEYLESS GO key with
you, even if you are only leaving the vehicle
for a short time. 1
j Locking button
2 i Unlocking button for the boot lid
3 k Unlocking button
4 Battery check lamp
i You can also use the KEYLESS GO key to
open and close the side windows and slid-
ing/tilting sunroof* . You can open them
using the summer opening feature
(Y page 100). You can close them using
the convenience closing feature
(Y page 100).
i If the vehicle has been parked for a long
time, you must pull the door handle to acti-
vate the KEYLESS GO functions. Controls
* optional
219_AKB; 2; 4, en-GB
mkalafa,
2007-11-13T09:28:36+01:00 - Seite 67
Page 71 of 329
Opening and closing
68
Important notes R
If the KEYLESS GO key is removed from the
vehicle (in luggage or an article of clothing,
for instance), it will no longer be possible
to lock or start the vehicle.
R If the KEYLESS GO key is removed from the
vehicle while the engine is running, e.g. if
the front passenger leaves the vehicle with
the KEYLESS GO key, the following mes-
sage will appear in the multi-function dis-
play as you pull away: Key not detec-
ted.
R If the KEYLESS GO key is in the vehicle, the
vehicle can be started at any time. If you
have left the KEYLESS GO key in the vehi-
cle, you will see the following message in
the multi-function display when you lock
the vehicle: Key still in vehicle.
Factory settings X
To unlock centrally: pull the door handle.
The turn signals flash once. The locking
knobs in the doors pop up. The anti-theft
alarm system* is deactivated.
When it is dark, the surround lighting also
comes on if it is activated in the on-board
computer. i
If you do not open either a door or the
boot lid after you have unlocked the vehi-
cle, it will automatically relock after approx-
imately 40 seconds.
i When a door is opened, the side window
on that side opens slightly. When the door
is closed, the side window closes again.
! The side windows will not open or close
if the battery is discharged or if the side
windows have iced up. It will not be possi-
ble to close the door. Do not attempt to
force the door closed. You could otherwise
damage the door or the window.
i There is a danger of the vehicle being
unlocked accidentally. This could happen if
the KEYLESS GO key is within one metre of
the vehicle and the door handle is splashed
by water. This could also happen when you
are cleaning the door handle. 1
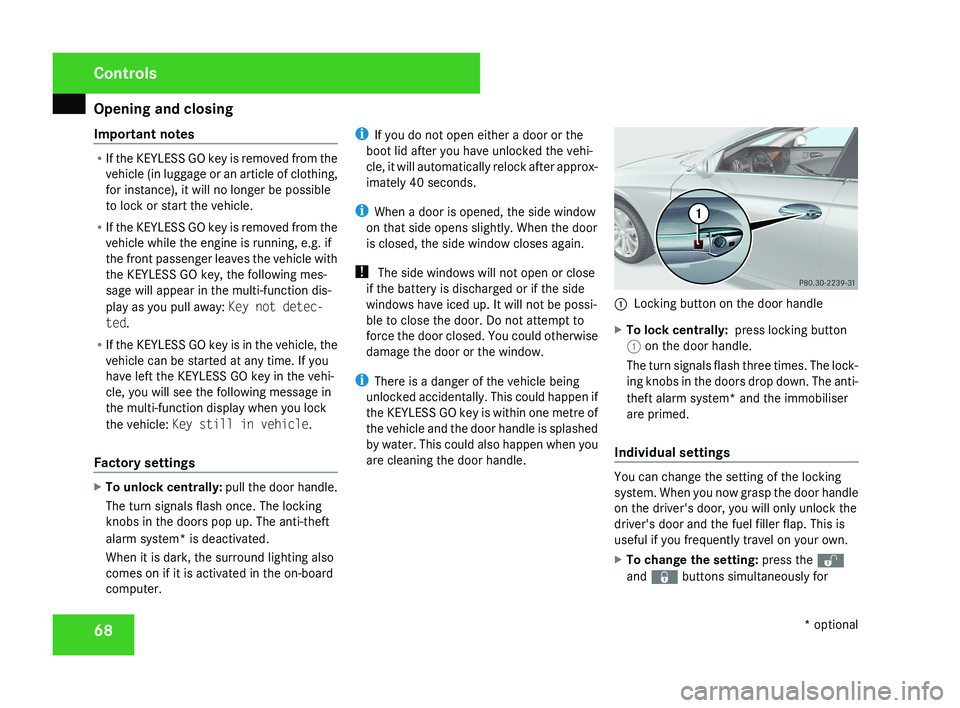
Locking button on the door handle
X To lock centrally: press locking button
1 on the door handle.
The turn signals flash three times. The lock-
ing knobs in the doors drop down. The anti-
theft alarm system* and the immobiliser
are primed.
Individual settings You can change the setting of the locking
system. When you now grasp the door handle
on the driver's door, you will only unlock the
driver's door and the fuel filler flap. This is
useful if you frequently travel on your own.
X
To change the setting: press the k
and j buttons simultaneously for Controls
* optional
219_AKB; 2; 4, en-GB
mkalafa,
2007-11-13T09:28:36+01:00 - Seite 68
Page 111 of 329
Transmission
108
Downshifting G
Risk of accident
Do not change down for additional engine
braking on a slippery road surface. This
could cause the drive wheels to lose their
grip and the vehicle could skid.
X Pull left-hand paddle 1.
The automatic transmission shifts down to
the next gear. If you are not driving in man-
ual gearshift program M, the shift range will
be restricted.
i When the selector lever is in position P,
N or R, you cannot change gear using the
steering wheel gearshift paddles.
If the manual gearshift program M has been
selected and you restart the engine, the
automatic transmission will switch to an
automatic gearshift program. If the auto-
matic gearshift program S or C has been
selected, the automatic transmission will
resume the relevant gearshift program
when you restart the engine.
Manual gearshift program In the manual gearshift program
M, you can
change gear using the steering wheel gear- shift paddles or the selector lever. The man-
ual gearshift program
M can be selected
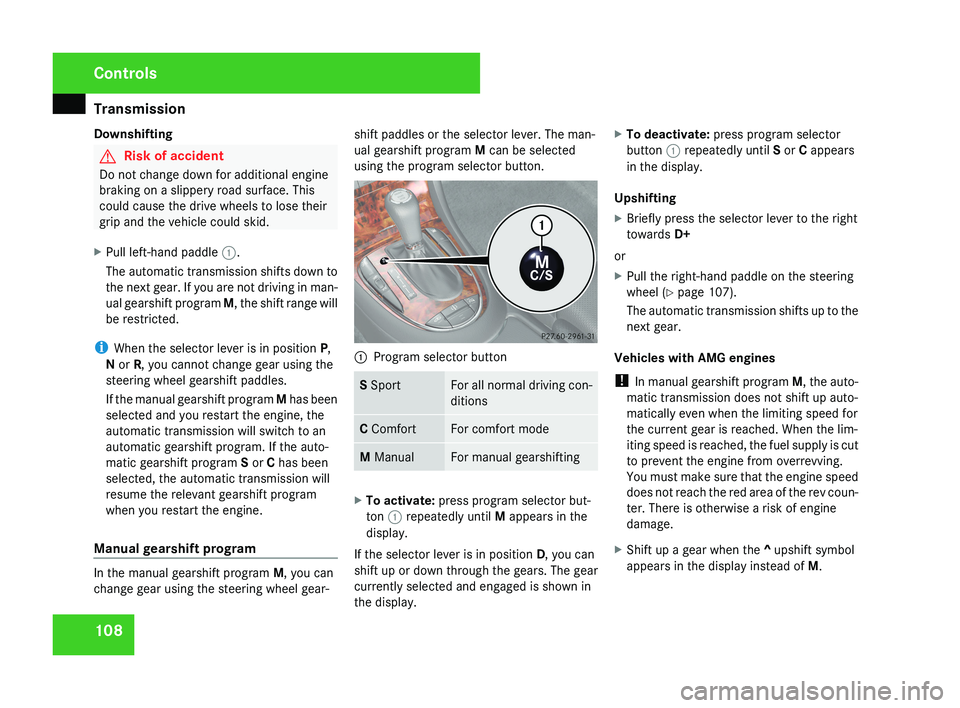
using the program selector button. 1
Program selector button S Sport For all normal driving con-
ditions
C Comfort For comfort mode
M Manual For manual gearshifting
X
To activate: press program selector but-
ton 1 repeatedly until M appears in the
display.
If the selector lever is in position D, you can
shift up or down through the gears. The gear
currently selected and engaged is shown in
the display. X
To deactivate: press program selector
button 1 repeatedly until S or C appears
in the display.
Upshifting
X Briefly press the selector lever to the right
towards D+
or
X Pull the right-hand paddle on the steering
wheel (Y page 107).
The automatic transmission shifts up to the
next gear.
Vehicles with AMG engines
! In manual gearshift program M, the auto-
matic transmission does not shift up auto-
matically even when the limiting speed for
the current gear is reached. When the lim-
iting speed is reached, the fuel supply is cut
to prevent the engine from overrevving.
You must make sure that the engine speed
does not reach the red area of the rev coun-
ter. There is otherwise a risk of engine
damage.
X Shift up a gear when the ^ upshift symbol
appears in the display instead of M.Controls
219_AKB; 2; 4, en-GB
mkalafa,
2007-11-13T09:28:36+01:00 - Seite 108
Page 114 of 329
On-board computer
111Rev counter
The red band in the rev counter indicates the
engine's overrevving range. The fuel supply is
interrupted to protect the engine when the
red band is reached.
! Do not drive in the overrevving range.
Doing so will damage the engine. H
Environmental note
Avoid driving at high engine speeds, as this
increases your vehicle's consumption
unnecessarily and pollutes the environ-
ment through increased emissions. Outside temperature display
G
Risk of accident
The road surface may be icy, especially in
wooded areas or on bridges, even if tem-
peratures are just above freezing point. The
vehicle could skid if you fail to adapt your
driving style. You should therefore always
adapt your driving style and speed to suit
the weather conditions.
There is a short delay before a change in out-
side temperature is displayed. On-board computer
Points to remember
The on-board computer is activated as soon
as the key is turned to position 1 in the igni-
tion lock. You can use the on-board computer
to call up information relating to your vehicle
and to make and adjust settings.
You can call up the next service due date,
select the display language for the instrument
cluster and set other functions. G
Risk of accident
Only use the on-board computer when road
and traffic conditions permit. You would
otherwise be distracted and unable to con-
centrate properly on driving, and could
cause an accident.
The on-board computer shows information in
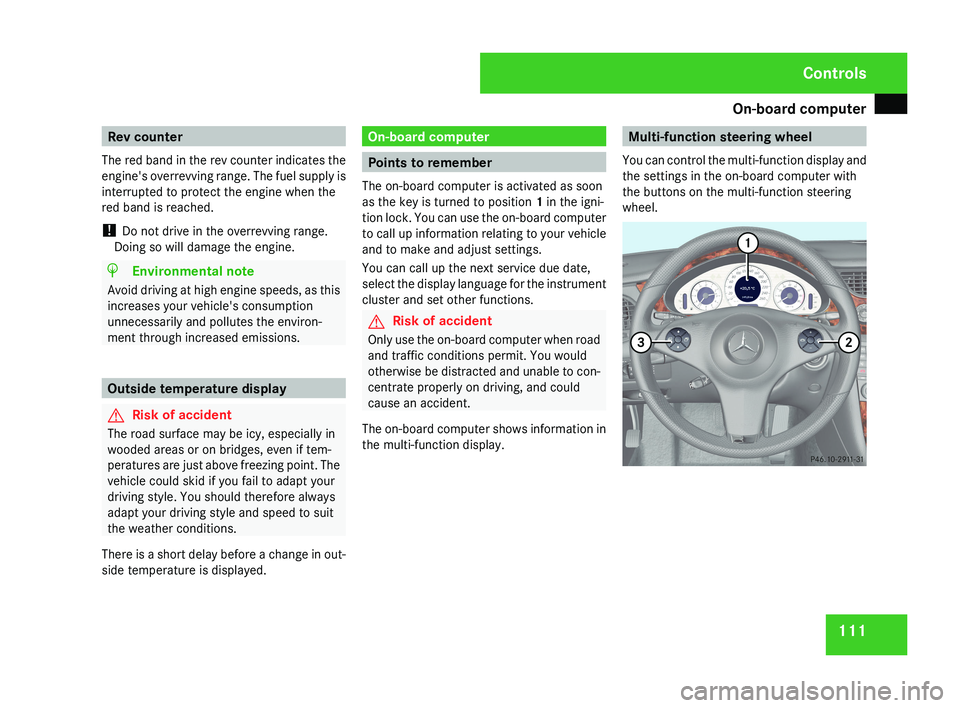
the multi-function display. Multi-function steering wheel
You can control the multi-function display and
the settings in the on-board computer with
the buttons on the multi-function steering
wheel.Controls
219_AKB; 2; 4, en-GB
mkalafa,
2007-11-13T09:28:36+01:00 - Seite 111
Page 130 of 329
On-board computer
127
X
Press the æ or ç button to select the
Lighting submenu.
X Press the j button to select Interior
lighting delayed switch-off.
X Press the æ or ç button to activate
or deactivate the Interior lighting
delayed switch-off feature.
X Press the j, è or ÿ button to
select a different display.
Activating/deactivating the automatic
door locking feature The Automatic door locking feature
allows you to set whether your vehicle will
lock centrally from a speed of about
15 km/h
upwards.
i For more information on the automatic
locking feature, see ( Y page 69).
X Press the è
or · button to select the
Settings... menu.
X Press the j
button to call up the selec-
tion of submenus.
X Press the æ
or ç button to select the
Vehicle submenu. X
Press the j
button to select Automatic
door locking.
X Press the æ or ç button to switch
the Automatic door locking feature on
or off.
X Press the j, è or ÿ button to
select a different display.
Selecting the switch-on time for the
auxiliary heating* This function is only available if the vehicle
has an auxiliary heating system.
The
Auxiliary
heat. function allows you to
select three switch-on times. You can set the
exact switch-on time using the other func-
tions in the Heater submenu.
The auxiliary heating adopts the Thermatic or
4-zone Thermotronic* temperature setting.
The minimum and maximum temperature set-
tings for the auxiliary heating are 20 † and
24 † respectively.
You can switch off the auxiliary heating by
using the remote control or the auxiliary heat-
ing button on the centre console.
The auxiliary heating is switched off automat-
ically after 50 minutes. This time can be
changed. To do this, visit a qualified specialist workshop, e.g. a Mercedes-Benz Service
Centre. G
Risk of fire and poisoning
The operation of the auxiliary heating pro-
duces hot, toxic exhaust fumes. The fuel
vapours produced during refuelling could
ignite on the hot exhaust system.
Do not switch on the auxiliary heating at
filling stations or in enclosed spaces, for
instance,
a garage, if there is no air extrac-
tion system.
You could otherwise endanger yourself and
others.
The Auxiliary heat. function can be called
up directly.
X Turn the key to position 1
or 2 in the ignition
lock.
X Press the button for the auxiliary heating on
the centre console
(Y page 166).
or
X Press the è
or · button to select the
Settings... menu.
X Press the j
button to call up the selec-
tion of submenus.
X Press the æ
or ç button to select the
Heater submenu. Controls
* optional
219_AKB; 2; 4, en-GB
mkalafa,
2007-11-13T09:28:36+01:00 - Seite 127 Z
Page 132 of 329
On-board computer
129
If you have switched the function on and you
fold in the exterior mirrors using the button
on the door (Y page 85), they will not fold out
automatically. The exterior mirrors can then
only be folded out using the button on the
door.
X Press the è or · button to select the
Settings... menu.
X Press the j button to call up the selec-
tion of submenus.
X Press the æ or ç button to select the
Convenience submenu.
X Press the j button to select Fold in
mirrors when locking.
X Press the æ or ç button to activate
or deactivate the Fold in mirrors when
locking feature.
X Press the j, è or ÿ button to
select a different display.
Selecting a setting for the dynamic driv-
ing seat* i
For more information on the dynamic driv-
ing seat, see ( Y page 79). X
Press the è or · button to select the
Settings... menu.
X Press the j button to call up the selec-
tion of submenus.
X Press the æ or ç button to select the
Driving dynamics seat adjustment
submenu.
X Press the j button to select Driving
dyn. seat adjust., driver or Driving
dyn. seat adjust., front-pass..
X Press the æ or ç button to select the
desired seat setting: Gentle for a soft seat
setting or Vigorous for a hard seat setting.
X Press the j, è or ÿ button to
select a different display. Trip computer menu
You can use the Trip computer menu to call
up or reset statistical data for your vehicle.
i You can select km or miles as the unit of
measurement for distance (Y page 123).
i Menu overview: see ( Y page 114).
Use the buttons on the multi-function steer-
ing wheel.
X Press the è or · button to select
From start.
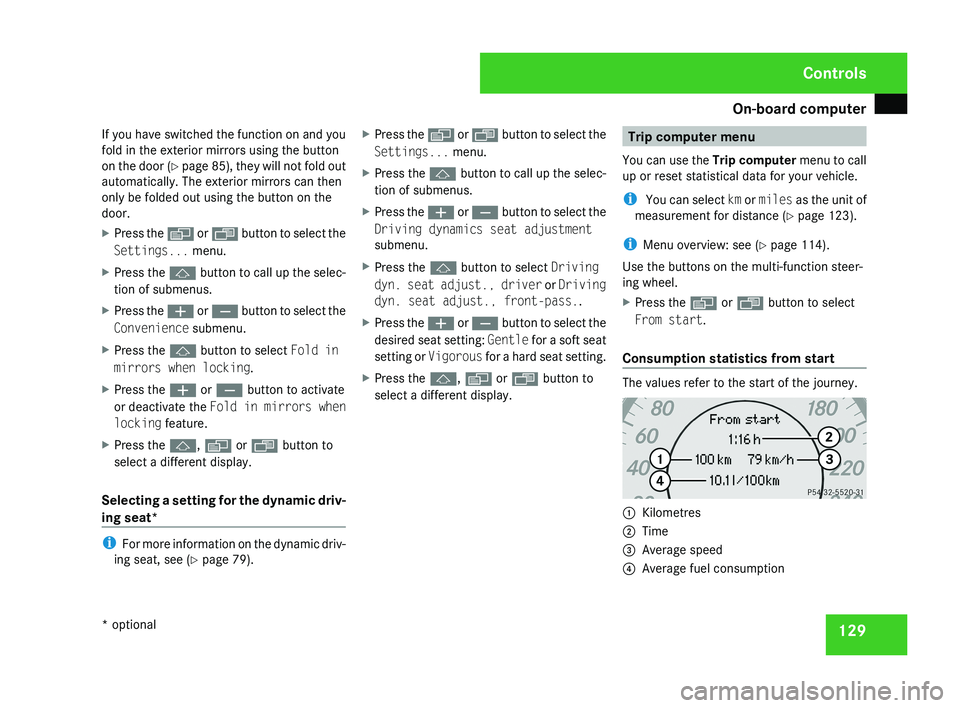
Consumption statistics from start The values refer to the start of the journey.
1
Kilometres
2 Time
3 Average speed
4 Average fuel consumption Controls
* optional
219_AKB; 2; 4, en-GB
mkalafa,
2007-11-13T09:28:36+01:00 - Seite 129
Page 133 of 329
On-board computer
130
If the vehicle is parked for more than 4 hours,
the From start consumption statistics are
reset (key in position
0 of the ignition lock or
removed).
The values will not be reset if you turn the key
to position 1 or 2 during this time.
Consumption statistics from the last
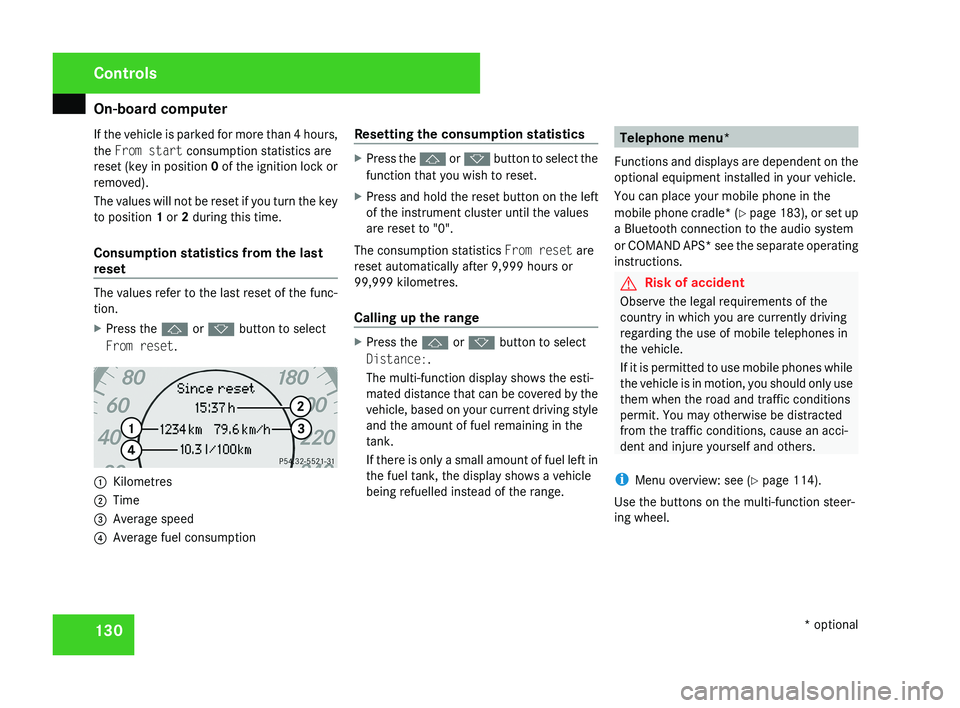
reset The values refer to the last reset of the func-
tion.
X
Press the j or k button to select
From reset. 1
Kilometres
2 Time
3 Average speed
4 Average fuel consumption Resetting the consumption statistics X
Press the j or k button to select the
function that you wish to reset.
X Press and hold the reset button on the left
of the instrument cluster until the values
are reset to "0".
The consumption statistics From reset are
reset automatically after 9,999 hours or
99,999 kilometres.
Calling up the range X
Press the j or k button to select
Distance:.
The multi-function display shows the esti-
mated distance that can be covered by the
vehicle, based on your current driving style
and the amount of fuel remaining in the
tank.
If there is only a small amount of fuel left in
the fuel tank, the display shows a vehicle
being refuelled instead of the range. Telephone menu*
Functions and displays are dependent on the
optional equipment installed in your vehicle.
You can place your mobile phone in the
mobile phone cradle* (Y page 183), or set up
a Bluetooth connection to the audio system
or COMAND APS* see the separate operating
instructions. G
Risk of accident
Observe the legal requirements of the
country in which you are currently driving
regarding the use of mobile telephones in
the vehicle.
If it is permitted to use mobile phones while
the vehicle is in motion, you should only use
them when the road and traffic conditions
permit. You may otherwise be distracted
from the traffic conditions, cause an acci-
dent and injure yourself and others.
i Menu overview: see ( Y page 114).
Use the buttons on the multi-function steer-
ing wheel. Controls
* optional
219_AKB; 2; 4, en-GB
mkalafa,
2007-11-13T09:28:36+01:00 - Seite 130
Page 169 of 329
Air conditioning
166
i
The auxiliary heating/ventilation is auto-
matically deactivated after about 30
minutes, or when:
R the ignition is switched on
R the battery voltage drops Auxiliary heating/ventilation*
G
Risk of poisoning
Exhaust fumes are produced when the aux-
iliary heating is in operation. Inhaling these
exhaust fumes can be poisonous. You
should therefore switch off the auxiliary
heating in confined spaces without an
extraction system, e.g. a garage. G
Risk of fire
When operating the auxiliary heating, parts
of the vehicle may become very hot, and
highly inflammable material such as fuels
could be ignited. Operating the auxiliary
heating is thus prohibited at filling stations
or when your vehicle is being refuelled. You
must therefore switch off the auxiliary heat-
ing at filling stations.
The auxiliary heating heats the air in the vehi-
cle interior to a temperature between 20 °C and 24 °C without using the heat of the run-
ning engine. The auxiliary heating is operated
using fuel directly from the vehicle's fuel tank.
For this reason, the tank content must be at
least at reserve fuel level to ensure that the
auxiliary heating functions.
The auxiliary heating/ventilation automati-
cally adjusts to changes in temperature and
weather conditions. For this reason, the aux-
iliary heating could automatically switch over
from ventilation mode to heating mode or
from heating mode to ventilation mode.
You cannot use the auxiliary ventilation to
cool the vehicle interior to a temperature
lower than the outside temperature.
Before activating
X
Set the temperature to a value between
20 † and 24 †.
The auxiliary heating/ventilation can be acti-
vated even when the air conditioning is being
controlled manually. Optimum comfort can
be attained when the system is set to auto-
matic mode. Set the desired temperature
within this range. If a higher temperature is
set, the vehicle is heated to 24 †. If a lower
temperature is set, the vehicle is heated to
20 †. Activating or deactivating the auxiliary
heating/ventilation The auxiliary heating/ventilation can be acti-
vated or deactivated via the remote control
or the button on the centre console.
The on-board computer can be used to spec-
ify up to three departure times, one of which
may be preselected (
Y page 128).
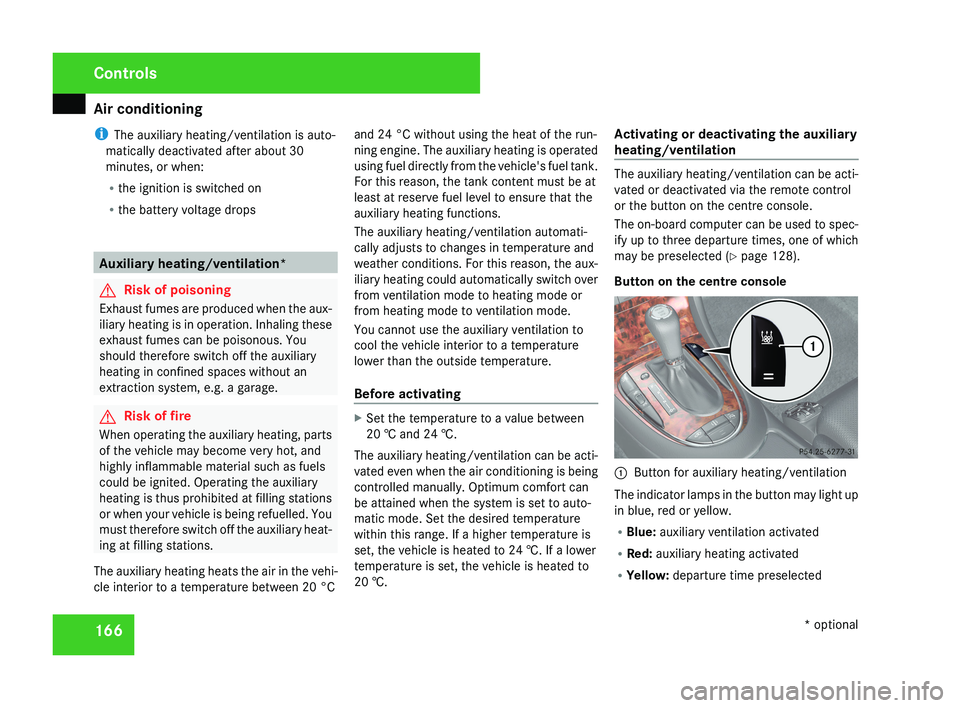
Button on the centre console 1
Button for auxiliary heating/ventilation
The indicator lamps in the button may light up
in blue, red or yellow.
R Blue: auxiliary ventilation activated
R Red: auxiliary heating activated
R Yellow: departure time preselected Controls
* optional
219_AKB; 2; 4, en-GB
mkalafa,
2007-11-13T09:28:36+01:00 - Seite 166