2008 MERCEDES-BENZ CLS COUPE air conditioning
[x] Cancel search: air conditioningPage 159 of 329
Air conditioning
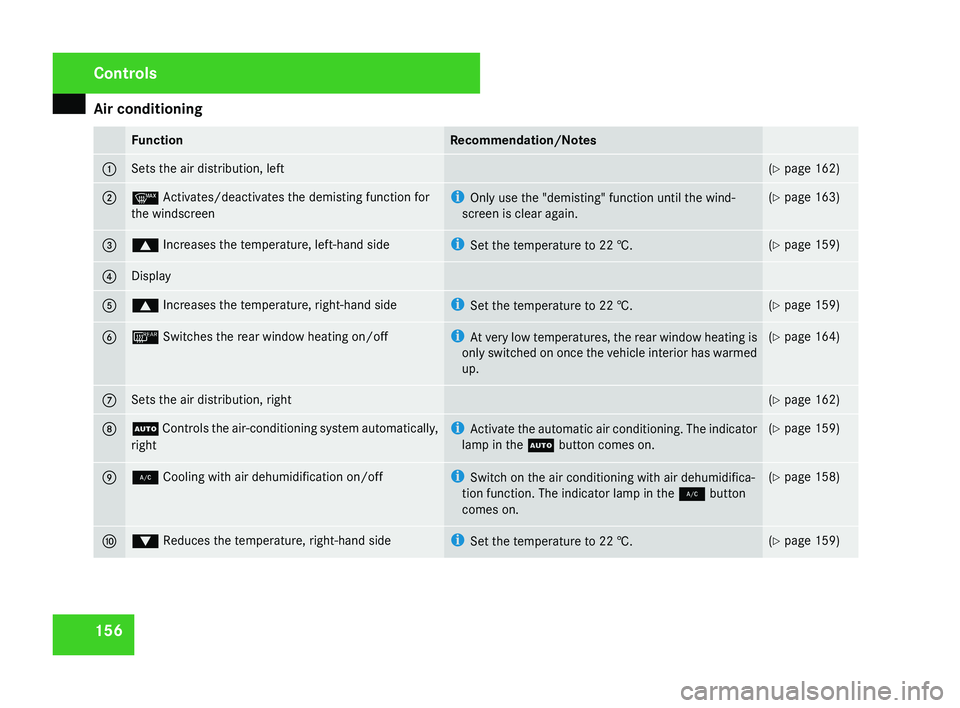
156 Function Recommendation/Notes
1 Sets the air distribution, left (Y page 162)
2 y Activates/deactivates the demisting function for
the windscreen i
Only use the "demisting" function until the wind-
screen is clear again. (Y page 163)
3 $ Increases the temperature, left-hand side i
Set the temperature to 22 †. (Y page 159)
4 Display
5 $ Increases the temperature, right-hand side i
Set the temperature to
22 †. (Y page 159)
6 ¯ Switches the rear window heating on/off i
At
very low temperatures, the rear window heating is
only switched on once the vehicle interior has warmed
up. (Y page 164)
7 Sets the air distribution, right (Y page 162)
8 U
Controls the air-conditioning system automatically,
right i
Activate the automatic air conditioning. The indicator
lamp in the U button comes on. (Y page 159)
9 2 Cooling with air dehumidification on/off i
Switch on the air conditioning with air dehumidifica-
tion function. The indicator lamp in the 2 button
comes on. (Y page 158)
a % Reduces the temperature, right-hand side i
Set the temperature to
22 †. (Y page 159)Controls
219_AKB; 2; 4, en-GB
mkalafa,
2007-11-13T09:28:36+01:00 - Seite 156
Page 160 of 329
Air conditioning
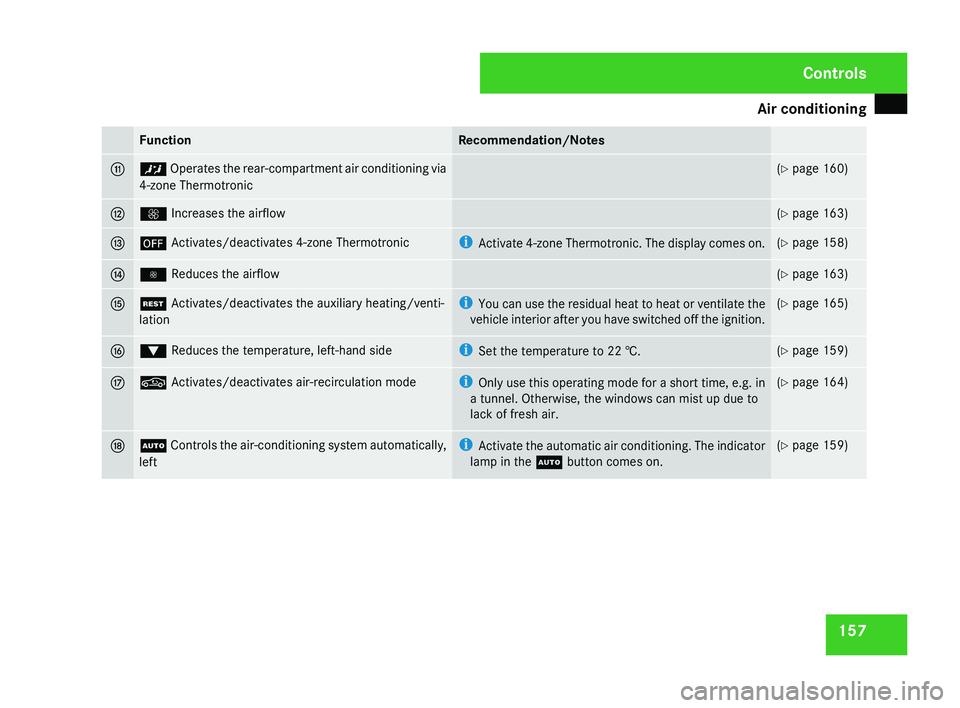
157Function Recommendation/Notes
b ™ Operates the rear-compartment air conditioning via
4-zone Thermotronic (Y page 160)
c Q Increases the airflow (Y page 163)
d ´ Activates/deactivates 4-zone Thermotronic i
Activate
4-zone Thermotronic. The display comes on. (Y page 158)
e · Reduces the airflow (Y page 163)
f T Activates/deactivates the auxiliary heating/venti-
lation i
You
can use the residual heat to heat or ventilate the
vehicle interior after you have switched off the ignition. (Y page 165)
g % Reduces the temperature, left-hand side i
Set the temperature to
22 †. (Y page 159)
h , Activates/deactivates air-recirculation mode i
Only
use this operating mode for a short time, e.g. in
a tunnel. Otherwise, the windows can mist up due to
lack of fresh air. (Y page 164)
j U
Controls the air-conditioning system automatically,
left i
Activate the automatic air conditioning. The indicator
lamp in the U button comes on. (Y page 159) Controls
219_AKB; 2; 4, en-GB
mkalafa,
2007-11-13T09:28:36+01:00 - Seite 157
Page 161 of 329
Air conditioning
158
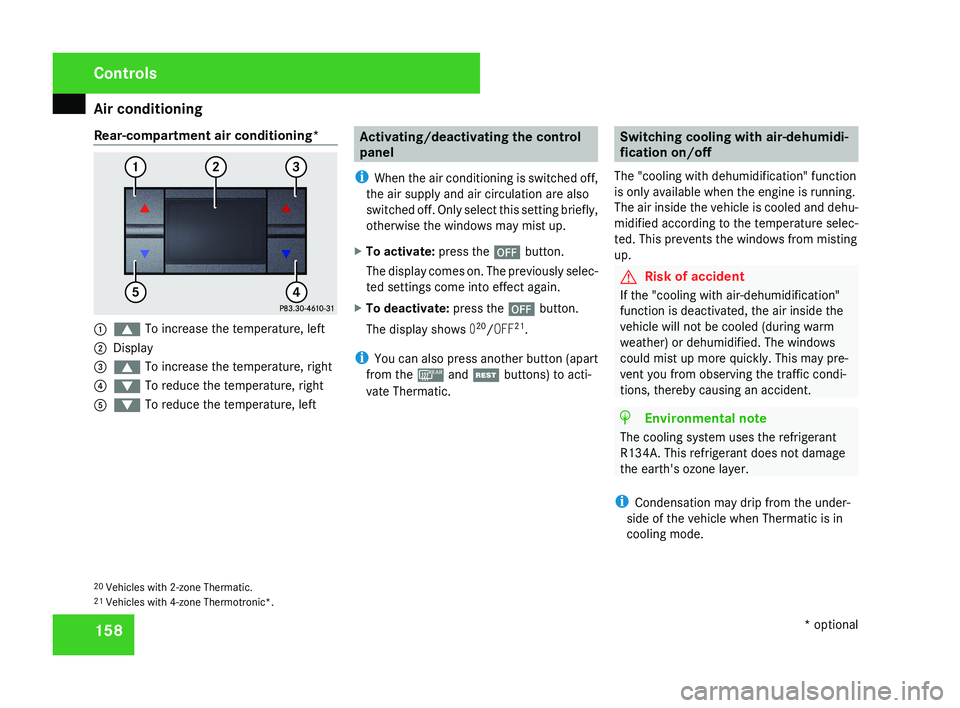
Rear-compartment air conditioning*
1
$ To increase the temperature, left
2 Display
3 $ To increase the temperature, right
4 % To reduce the temperature, right
5 % To reduce the temperature, left Activating/deactivating the control
panel
i When the air conditioning is switched off,
the air supply and air circulation are also
switched off. Only select this setting briefly,
otherwise the windows may mist up.
X To activate: press the ´ button.
The display comes on. The previously selec-
ted settings come into effect again.
X To deactivate: press the ´ button.
The display shows 020
/OFF 21
.
i You can also press another button (apart
from the ¯ and T buttons) to acti-
vate Thermatic. Switching cooling with air-dehumidi-
fication on/off
The "cooling with dehumidification" function
is only available when the engine is running.
The air inside the vehicle is cooled and dehu-
midified according to the temperature selec-
ted. This prevents the windows from misting
up. G
Risk of accident
If the "cooling with air-dehumidification"
function is deactivated, the air inside the
vehicle will not be cooled (during warm
weather) or dehumidified. The windows
could mist up more quickly. This may pre-
vent you from observing the traffic condi-
tions, thereby causing an accident. H
Environmental note
The cooling system uses the refrigerant
R134A. This refrigerant does not damage
the earth's ozone layer.
i Condensation may drip from the under-
side of the vehicle when Thermatic is in
cooling mode.
20 Vehicles with 2-zone Thermatic.
21 Vehicles with 4-zone Thermotronic*. Controls
* optional
219_AKB; 2; 4, en-GB
mkalafa,
2007-11-13T09:28:36+01:00 - Seite 158
Page 162 of 329
Air conditioning
159
X
To switch on: press the œ button.
The indicator lamp in the œ button
comes on.
X To deactivate: press the œ button.
The indicator lamp in the œ button goes
out. The cooling with air dehumidification
function has a delayed switch-off feature.
i The cooling with air dehumidification
function in the rear compartment is only
operative if the 4-zone Thermotronic cool-
ing with air dehumidification function* is
switched on. Controlling the air conditioning auto-
matically
In automatic mode, the set temperature is
maintained at a constant level fully automat-
ically. To do so, the system automatically
regulates the temperature of the dispensed
air, the airflow and the air distribution.
The automatic air conditioning will achieve
optimal operation if "cooling with air dehu-
midification" is also activated. If necessary,
cooling
with air dehumidification can be deac-
tivated. X
Make sure that the key is in position 2 in
the ignition lock.
X Set the desired temperature.
X To activate: press the U button.
The AUTO
display for the air distribution and
airflow comes on. The indicator lamp 22
on
the U button lights up. Airflow and air
distribution are set to automatic mode.
X To deactivate: press the Q or ·
button.
The AUTO display for the airflow goes out.
The automatic control is deactivated and
the airflow is controlled according to the
selected
setting. Automatic air distribution
remains activated.
or
X 2-zone Thermatic only: press
the © or
ª air distribution button.
The AUTO display for the air distribution
goes out. The automatic control is deacti-
vated and the air distribution is controlled
according to the selected setting. Auto-
matic airflow remains activated. or
X
4-zone Thermotronic only*: turn air dis-
tribution thumbwheel 1 or 7 to the
desired symbol
(Y page 155).
The indicator lamp in the U button goes
out. The automatic control is deactivated
and the air distribution is controlled
according to the selected setting. Auto-
matic airflow remains activated. Setting the temperature
2-zone Thermatic Different temperatures can be set for the
driver's and front-passenger sides.
X
To increase/reduce: turn thumbwheels
1 and 7 clockwise or anti-clockwise
(Y
page 153). Only change the temperature
setting in small increments. Start at 22 †.
4-zone Thermotronic* The interior temperature for each of the four
air-conditioning zones can be adjusted sepa-
rately.
22 Only for vehicles with 4-zone Thermotronic*. Controls
* optional
219_AKB; 2; 4, en-GB
mkalafa,
2007-11-13T09:28:36+01:00 - Seite 159 Z
Page 163 of 329
Air conditioning
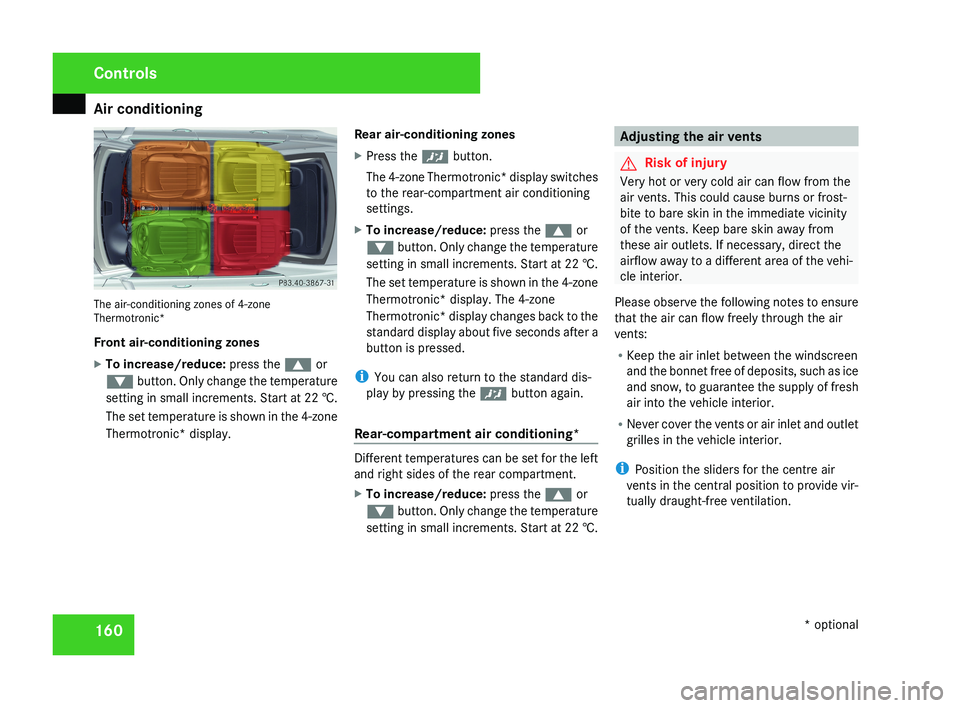
160The air-conditioning zones of 4-zone
Thermotronic*
Front air-conditioning zones
X
To increase/reduce: press the $ or
% button. Only change the temperature
setting in small increments. Start at 22 †.
The set temperature is shown in the 4-zone
Thermotronic* display. Rear air-conditioning zones
X
Press the ™ button.
The 4-zone Thermotronic* display switches
to the rear-compartment air conditioning
settings.
X To increase/reduce: press the $ or
% button. Only change the temperature
setting in small increments. Start at 22 †.
The set temperature is shown in the 4-zone
Thermotronic* display. The 4-zone
Thermotronic* display changes back to the
standard display about five seconds after a
button is pressed.
i You can also return to the standard dis-
play by pressing the ™ button again.
Rear-compartment air conditioning*
Different temperatures can be set for the left
and right sides of the rear compartment.
X To increase/reduce: press the $ or
% button. Only change the temperature
setting in small increments. Start at 22 †.
Adjusting the air vents
G Risk of injury
Very hot or very cold air can flow from the
air vents. This could cause burns or frost-
bite to bare skin in the immediate vicinity
of the vents. Keep bare skin away from
these air outlets. If necessary, direct the
airflow away to a different area of the vehi-
cle interior.
Please observe the following notes to ensure
that the air can flow freely through the air
vents:
R Keep the air inlet between the windscreen
and the bonnet free of deposits, such as ice
and snow, to guarantee the supply of fresh
air into the vehicle interior.
R Never cover the vents or air inlet and outlet
grilles in the vehicle interior.
i Position the sliders for the centre air
vents in the central position to provide vir-
tually draught-free ventilation.
Controls
* optional
219_AKB; 2; 4, en-GB
mkalafa,
2007-11-13T09:28:36+01:00 - Seite 160
Page 164 of 329
Air conditioning
161
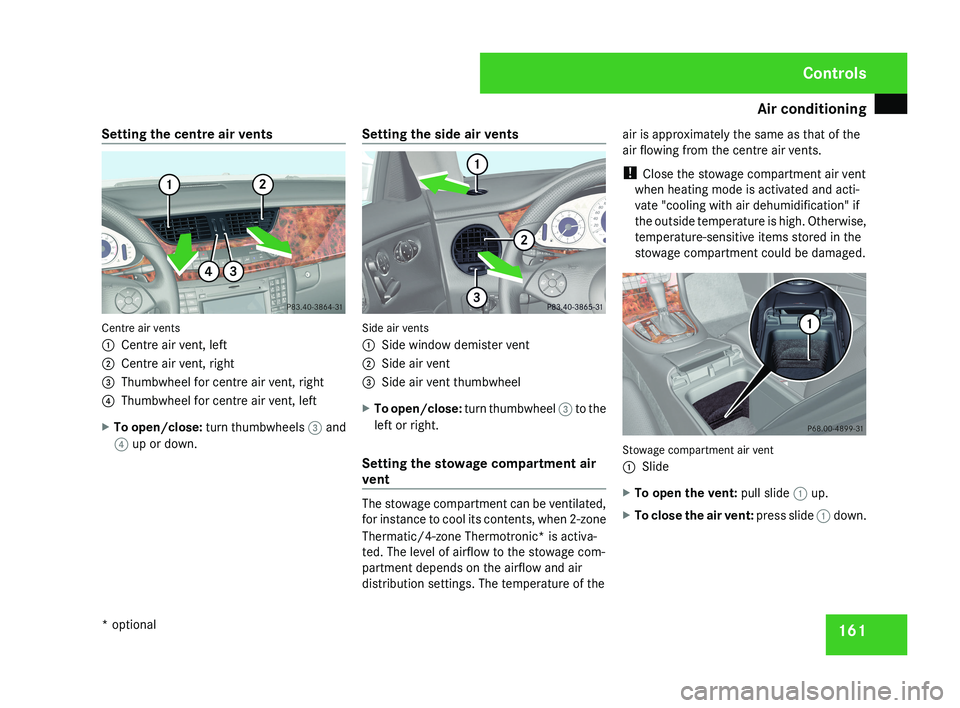
Setting the centre air vents
Centre air vents
1
Centre air vent, left
2 Centre air vent, right
3 Thumbwheel for centre air vent, right
4 Thumbwheel for centre air vent, left
X To open/close: turn thumbwheels 3 and
4 up or down. Setting the side air vents Side air vents
1
Side window demister vent
2 Side air vent
3 Side air vent thumbwheel
X To open/close: turn thumbwheel 3 to the
left or right.
Setting the stowage compartment air
vent The stowage compartment can be ventilated,
for instance to cool its contents, when 2-zone
Thermatic/4-zone Thermotronic* is activa-
ted. The level of airflow to the stowage com-
partment depends on the airflow and air
distribution settings. The temperature of theair is approximately the same as that of the
air flowing from the centre air vents.
!
Close the stowage compartment air vent
when heating mode is activated and acti-
vate "cooling with air dehumidification" if
the outside temperature is high. Otherwise,
temperature-sensitive items stored in the
stowage compartment could be damaged. Stowage compartment air vent
1
Slide
X To open the vent: pull slide 1 up.
X To close the air vent: press slide 1 down. Controls
* optional
219_AKB; 2; 4, en-GB
mkalafa,
2007-11-13T09:28:36+01:00 - Seite 161
Page 165 of 329
Air conditioning
162
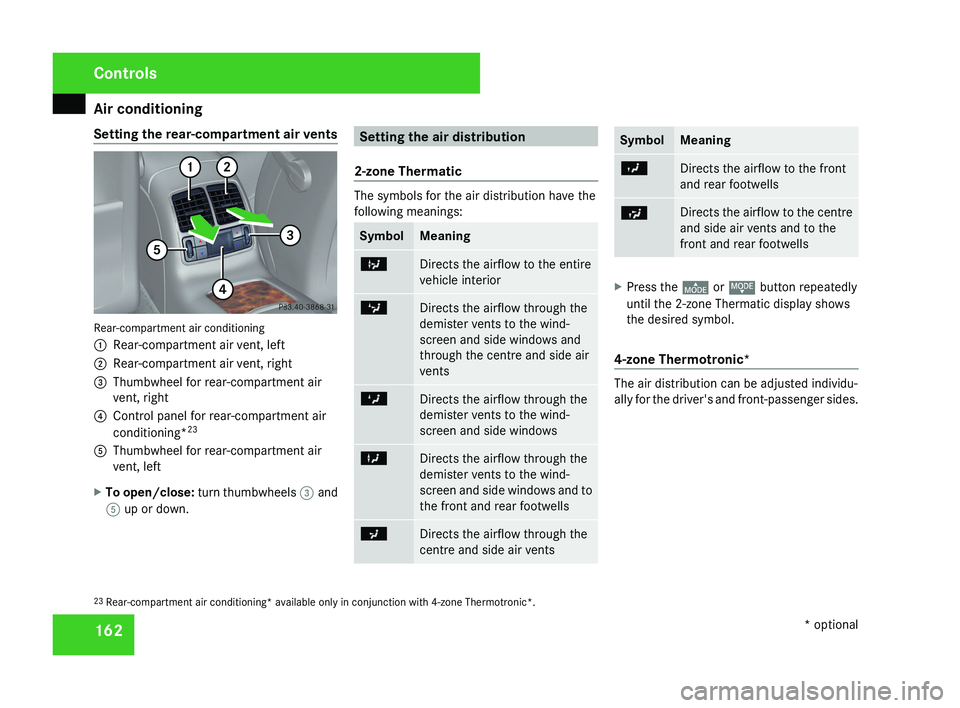
Setting the rear-compartment air vents
Rear-compartment air conditioning
1
Rear-compartment air vent, left
2 Rear-compartment air vent, right
3 Thumbwheel for rear-compartment air
vent, right
4 Control panel for rear-compartment air
conditioning* 23
5 Thumbwheel for rear-compartment air
vent, left
X To open/close: turn thumbwheels 3 and
5 up or down. Setting the air distribution
2-zone Thermatic The symbols for the air distribution have the
following meanings:
Symbol Meaning
b
Directs the airflow to the entire
vehicle interior
c
Directs the airflow through the
demister vents to the wind-
screen and side windows and
through the centre and side air
vents
Z
Directs the airflow through the
demister vents to the wind-
screen and side windows
X
Directs the airflow through the
demister vents to the wind-
screen and side windows and to
the front and rear footwells
a
Directs the airflow through the
centre and side air vents Symbol Meaning
Y
Directs the airflow to the front
and rear footwells
Ú Directs the airflow to the centre
and side air vents and to the
front and rear footwells
X
Press the © or ª button repeatedly
until the 2-zone Thermatic display shows
the desired symbol.
4-zone Thermotronic* The air distribution can be adjusted individu-
ally for the driver's and front-passenger sides.
23 Rear-compartment air conditioning* available only in conjunction with 4-zone Thermotronic*. Controls
* optional
219_AKB; 2; 4, en-GB
mkalafa,
2007-11-13T09:28:36+01:00 - Seite 162
Page 166 of 329
Air conditioning
163
The symbols for the air distribution have the
following meanings: Symbol Meaning
Z
Directs the airflow through the
centre,
side and demister vents
to the windscreen and side win-
dows a
Directs the airflow through the
centre and side air vents
X
Directs the airflow to the entire
vehicle interior
Y
Directs the airflow to the centre
and side air vents and to the
front and rear footwells
X
Turn thumbwheel 1 or 7 to the corre-
sponding
symbol (Y page 155). The thumb-
wheel can also be turned to the area
between two symbols. Setting the airflow
X To increase/reduce: press the Q or
· button. Demisting the windscreen
i You should only select the "demisting"
function
until the windscreen is clear again.
X To activate: press the y button.
The indicator lamp in the y button
comes on.
The system automatically switches to the
following functions:
R cooling with air dehumidification on
R high airflow 24
R high temperature 24
R air distribution to the windscreen and
front side windows
R air-recirculation mode off
X To deactivate: press the y button.
The
indicator lamp in the y button goes
out. The previously selected settings come
into effect again. The cooling with air dehu- midification function remains on. Air-recir-
culation mode remains deactivated.
or
X Press the U button.
The
indicator lamp in the y button goes
out. Airflow and air distribution are set to
automatic mode.
or
X 2-zone Thermatic only: turn thumbwheel
1 or 7 clockwise or anti-clockwise
(Y page 153).
or
X 2-zone Thermatic only: press
the Q or
· button.
24 Depending on the outside temperature. Controls
219_AKB; 2; 4, en-GB
mkalafa,
2007-11-13T09:28:36+01:00 - Seite 163