Page 123 of 509
 past the resistance
point and release.
The corresponding window opens com-
pletely.
�Express-closing: Pull t")
122 Controls in detail
Power windows
�Express-opening: Press the switch1
to4 (
�page 120) past the resistance
point and release.
The corresponding window opens com-
pletely.
�Express-closing: Pull the switch1
to4 (
�page 120) past the resistance
point and release.
The corresponding window closes com-
pletely.
�Stopping during Express-operation:
Briefly press the respective power win-
dow switch again.
Warning!G
Driver’s door only:
If within 5 seconds you again press the
switch past the resistance point and re-
lease, the automatic reversal will not oper-
ate.
Warning!G
If a window is blocked while closing and re-
opens, it can be closed with greater force if
you pull the switch to the resistance point
within 2 seconds.
If the window is blocked again and reopens,
you can close it with deactivated anti-trap
protection by pulling the switch again to the
resistance point within 2 seconds.
When closing windows with the anti-trap
protection deactivated, make sure no one
can become trapped, as this could result in
serious or fatal injuries.
!If the upward movement of the window is
blocked during the closing procedure, the win-
dow will stop and open slightly. Remove the ob-
struction, press the respective power window
switch again past the resistance point and re-
lease. If the window still does not close when
there is no obstruction, press and hold the re-
spective power window switch. The side window
will then close without the protection of the au-
tomatic reversal feature.
��
Page 134 of 509

133 Controls in detail
Driving and parking
Parking
1Release handle
2Parking brake pedal
Warning!G
With the engine not running, there is no
power assistance for the brake and the
steering systems. In this case, it is impor-
tant to keep in mind that a considerably
higher degree of effort is necessary to brake
and steer the vehicle.
Warning!G
Do not park this vehicle in areas where com-
bustible materials such as grass, hay, or
leaves can come into contact with the hot
exhaust system, as these materials could be
ignited and cause a vehicle fire.
To reduce the risk of personal injury as a re-
sult of vehicle movement, before turning off
the engine and leaving the vehicle always:
�Keep right foot on brake pedal.
�Manual transmission: Move the gear-
shift lever into neutral position (no gear
is selected).
�Firmly depress parking brake pedal.
�Manual transmission: Move the gear-
shift lever into first or reverse gear.
�Automatic transmission*: Move the
gear selector lever to positionP.
�Slowly release brake pedal.
�When parked on an incline, turn front
wheels towards the road curb.
�Turn the SmartKey to starter switch
position0 and remove, or press
KEYLESS-GO* start/stop button
(
�page 84).
�Take the SmartKey or the SmartKey with
KEYLESS-GO* with you and lock vehicle
when leaving.
Warning!G
Engaging the parking brake while the vehicle
is in motion can cause the rear wheels to
lock up. You could lose control of the vehicle
and cause an accident. In addition, the
vehicle’s brake lights do not light up when
the parking brake is engaged.
��
Page 143 of 509

142 Controls in detail
Automatic transmission*
Driving tips
Accelerator position
Your driving style influences the
transmission’s shifting behavior:
Less throttle Earlier upshifting
More throttle Later upshifting
Kickdown
Use kickdown when you want maximum
acceleration.
�Press the accelerator past the point of
resistance.
Depending on the engine speed the
transmission shifts into a lower gear.
�Ease on the accelerator when you have
reached the desired speed.
The transmission shifts up again.Stopping
When you stop briefly, e.g. at traffic lights:
�Leave the transmission in gear.
�Hold the vehicle with the brake.
When you stop for a longer period of time
with the engine idling and/or on a hill:
�Set the parking brake.
�Move the gear selector lever to park
positionP.
Maneuvering
When you maneuver in tight areas,
e.g. when pulling into a parking space:
�Control the vehicle speed by gradually
releasing the brakes.
�Accelerate gently.
�Never abruptly step on the accelerator.Working on the vehicle
Warning!G
When working on the vehicle, set the
parking brake and move gear selector lever
to park positionP. Otherwise the vehicle
could roll away.
Page 149 of 509

148 Controls in detail
Instrument cluster
Adjusting instrument cluster display
illumination
1Dimmer
�Brightening illumination: Turn
dimmer1 clockwise.
�Dimming illumination: Turn
dimmer1 counterclockwise.
Coolant temperature gauge
The coolant temperature gauge is on the
left side in the instrument cluster
(
�page 26).
iThe instrument cluster illumination is
dimmed or brightened automatically to suit am-
bient light conditions.
The instrument cluster illumination will also be
adjusted automatically when you switch on the
vehicle’s exterior lamps.
Warning!G
�Driving when your engine is overheated
can cause some fluids which may have
leaked into the engine compartment to
catch fire. You could be seriously
burned.
�Steam from an overheated engine can
cause serious burns and can occur just
by opening the hood. Stay away from
the engine if you see or hear steam com-
ing from it.
Stop the vehicle in a safe location away from
other traffic. Turn off the engine, get out of
the vehicle and do not stand near the vehicle
until the engine has cooled down.
Page 167 of 509

166 Controls in detail
Control system
Resetting all settings
You can reset most of the functions of the
submenus to the factory settings.
�Press ( or & to select the
Settings menu.
�Press % or $ to select the
Factory settings function.
�Press #.
The menu
Reset to factory settings
No/Yes
appears in the multifunction
display.
�Press % or $ to select Yes or No.
Select
Yes if you want to reset to facto-
ry settings.
�Press # to confirm.
The confirmation message appears in
the multifunction display.
The functions of the submenus will re-
set to factory settings.
Submenus in the Settings menu
�Press ( or & to select the Set-
tings
menu.
�Press % or $ to select a sub-
menu.The submenus are arranged by hierarchy.
Scroll down with%, scroll up
with$.
With the selection marker on the desired
submenu, use the# to access the indi-
vidual functions within that submenu.
Once within the submenu, you can use
the$ to move to the next function or
the% to move to the previous function
within that submenu.
The table below shows what settings can
be changed within the various submenus.
Detailed instructions on making individual
settings can be found on the following
pages.
iFor safety reasons, the following function
are not reset while driving:
�the Headlamp mode function in the Light-
ing
submenu
Page 168 of 509
167 Controls in detail
Control system
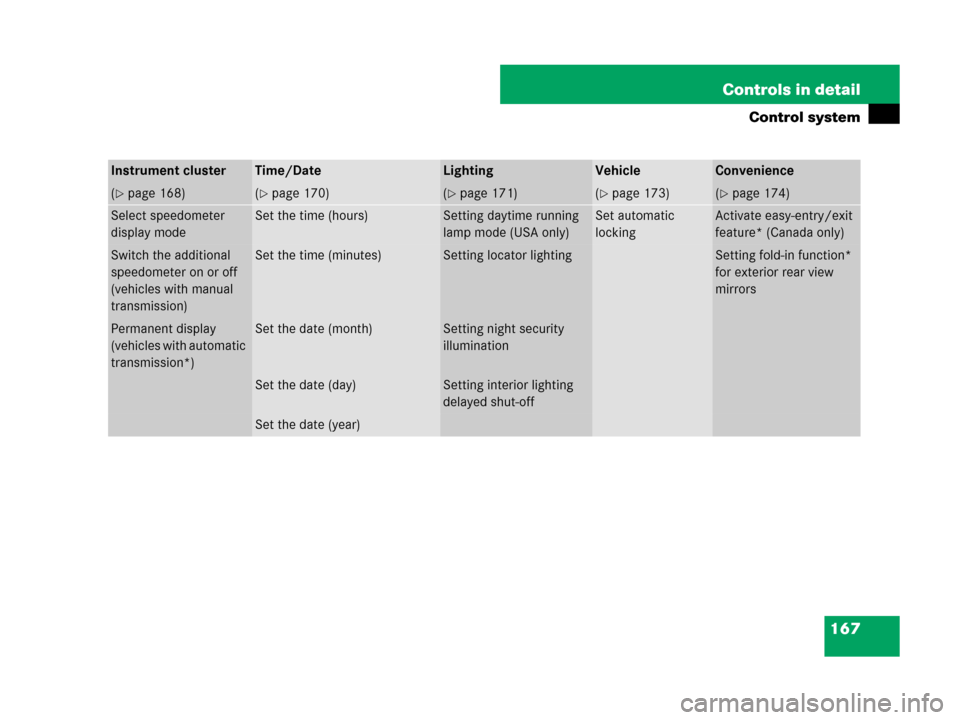
Instrument clusterTime/DateLightingVehicleConvenience
(�page 168)(�page 170)(�page 171)(�page 173)(�page 174)
Select speedometer
display modeSet the time (hours)Setting daytime running
lamp mode (USA only)Set automatic
lockingActivate easy-entry/exit
feature* (Canada only)
Switch the additional
speedometer on or off
(vehicles with manual
transmission)Set the time (minutes)Setting locator lightingSetting fold-in function*
for exterior rear view
mirrors
Permanent display
(vehicles with automatic
transmission*)Set the date (month)Setting night security
illumination
Set the date (day)Setting interior lighting
delayed shut-off
Set the date (year)
Page 171 of 509

170 Controls in detail
Control system
Time/date submenu
Access the
Time/date submenu via the
Settings menu. Use the Time/Date
submenu to change the instrument cluster
display settings.
The following functions are available:Set the time
This function is not available if your vehicle
is equipped with the COMAND* system
and navigation module*.
�Press % or $ to select the
Instr. Cluster submenu.
�Press #.
�Press % or $ to select the
Time/date function.
�Press #.
�Press % or $ to select the Time
function.
�Press #.
The current time appears in the multi-
function display.
�To set a new time press # again.
�Press button ( or & to select
the setting you wish to change: hours
or minutes.
�Press button % or $ to change
the setting which is highlighted.
�Press # to store the entry.
Set the date
This function is not available if your vehicle
is equipped with the COMAND* system
and navigation module*.
�Press % or $ to select the
Instr. Cluster submenu.
�Press #.
�Press % or $ to select the
Time/date function.
�Press #.
FunctionPage
Set the time (hours)170
Set the time (minutes)170
Set the date (month)170
Set the date (day)170
Set the date (year)170
iVehicles with COMAND*:
For information on setting the time, refer to the
separate COMAND operating instructions.
iVehicles with COMAND*:
For information on setting the date, refer to the
separate COMAND operating instructions.
Page 172 of 509

171 Controls in detail
Control system
�Press % or $ to select the date
function.
�Press #.
The current date appears in the multi-
function display.
�To set a new date press # again.
�Press button ( or & to select
the setting you wish to change: month,
day or minutes.
�Press button % or $ to change
the setting which is highlighted.
�Press # to store the entry.Lighting submenu
Access the
Lights submenu via the
Settings menu. Use the Lights submenu
to change the lamp and lighting settings on
your vehicle.
The following functions are available:Setting daytime running lamp mode
(USA only)
�Press % or $ to select the
Lights submenu.
�Press #.
�Press % or $ to select the Day-
time Running Lamps
feature.
�Press #.
The current setting
Enabled
or
Disabled is shown.
�Press # again if you would like to
change the current status.
FunctionPage
Setting daytime running lamp
mode (USA only)171
Setting locator lighting172
Setting interior lighting delayed
shut-off173
iThis function is not available in countries
where the daytime running lamp mode is manda-
tory and therefore in a constant mode.
��