2008 MERCEDES-BENZ A-CLASS HATCHBACK ESP
[x] Cancel search: ESPPage 229 of 305

Troubleshooting
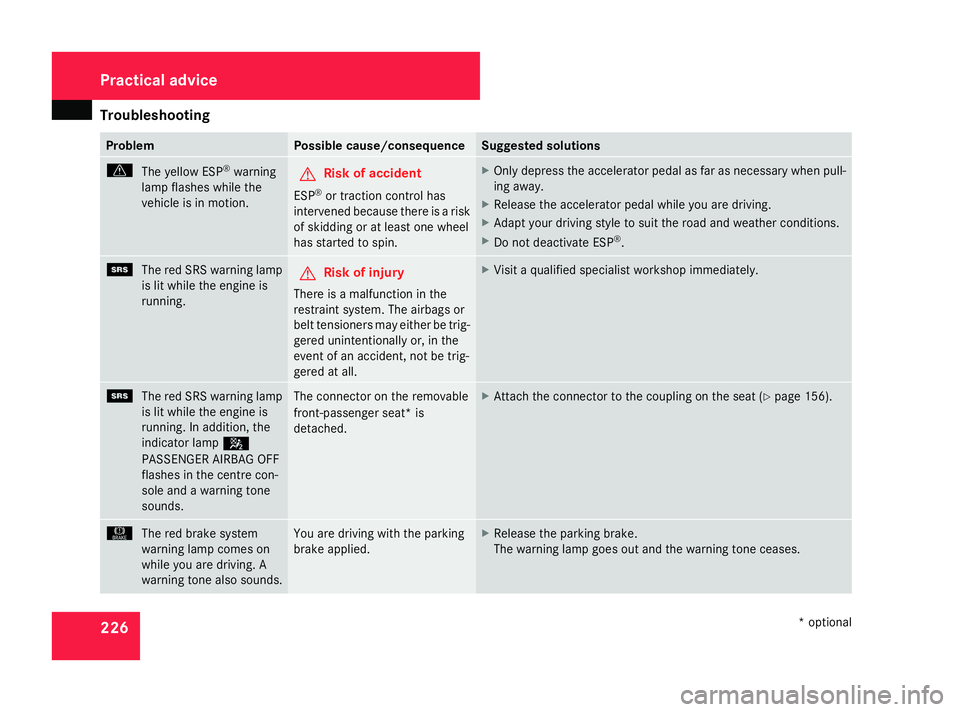
226 Problem Possible cause/consequence Suggested solutions
v
Theyellow ESP ®
warning
lamp flashes while the
vehicle is in motion. G
Risk of accident
ESP ®
or traction control has
intervened because there is a risk
of skidding or at least one wheel
has started to spin. X
Only depress the accelerator pedal as far as necessary when pull-
ing away.
X Release the accelerator pedal while you are driving.
X Adapt your driving style to suit the road and weather conditions.
X Do not deactivate ESP ®
. 1
The red SRS warning lamp
is lit while the engine is
running. G
Risk of injury
There is a malfunction in the
restraint system. The airbags or
belt tensioners may either be trig-
gered unintentionally or, in the
event of an accident, not be trig-
gered at all. X
Visit a qualified specialist workshop immediately. 1
The red SRS warning lamp
is lit while the engine is
running. In addition, the
indicator lamp 5
PASSENGER AIRBAG OFF
flashes in the centre con-
sole and a warning tone
sounds. The connector on the removable
front-passenger seat* is
detached. X
Attach the connector to the coupling on the seat (Y page 156).H
The red brake system
warning lamp comes on
while you are driving. A
warning tone also sounds. You are driving with the parking
brake applied. X
Release the parking brake.
The warning lamp goes out and the warning tone ceases. Practical advice
* optional
169_AKB; 2; 4, en-GB
wdomann
,V ersion: 2.10.6
2008-07-16T08:52:06+02:00 - Seite 226 Dateiname: 6515_0315_02_buchblock.pdf; preflight
Page 236 of 305

Troubleshooting
233Engine
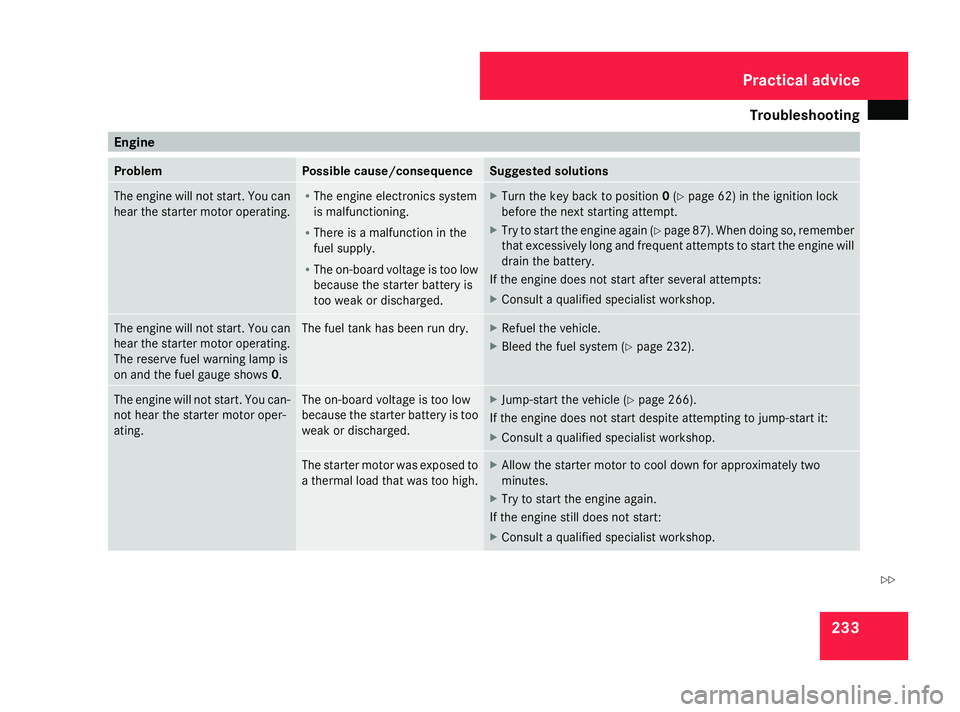
Problem Possible cause/consequence Suggested solutions
The engine will not start. You can
hear the starter motor operating. R
The engine electronics system
is malfunctioning.
R There is a malfunction in the
fuel supply.
R The on-board voltage is too low
because the starter batter y is
too weak or discharged. X
Turn the key back to position 0(Y page 62) in the ignition lock
before the next starting attempt.
X Try to start the engine again (Y page 87). When doing so, remember
that excessively long and frequent attempts to start the engine will
drain the battery.
If the engine does not start after several attempts:
X Consult a qualified specialist workshop. The engine will not start. You can
hear the starter motor operating.
The reserve fuel warning lamp is
on and the fuel gauge shows 0. The fuel tank has been run dry. X
Refuel the vehicle.
X Bleed the fuel system (Y page 232).The engine will not start. You can-
not hear the starter motor oper-
ating. The on-board voltage is too low
because the starter battery is too
weak or discharged. X
Jump-start the vehicle (Y page 266).
If the engine does not start despite attempting to jump-start it:
X Consult a qualified specialist workshop. The starter motor was exposed to
a thermal load that was too high. X
Allow the starter motor to cool down for approximately two
minutes.
X Try to start the engine again.
If the engine still does not start:
X Consult a qualified specialist workshop. Practical advice
169_AKB; 2; 4, en-GB
wdomann
,V ersion: 2.10.6
2008-07-16T08:52:06+02:00 - Seite 233 ZDateiname: 6515_0315_02_buchblock.pdf; preflight
Page 253 of 305

Changing the bulbs
250
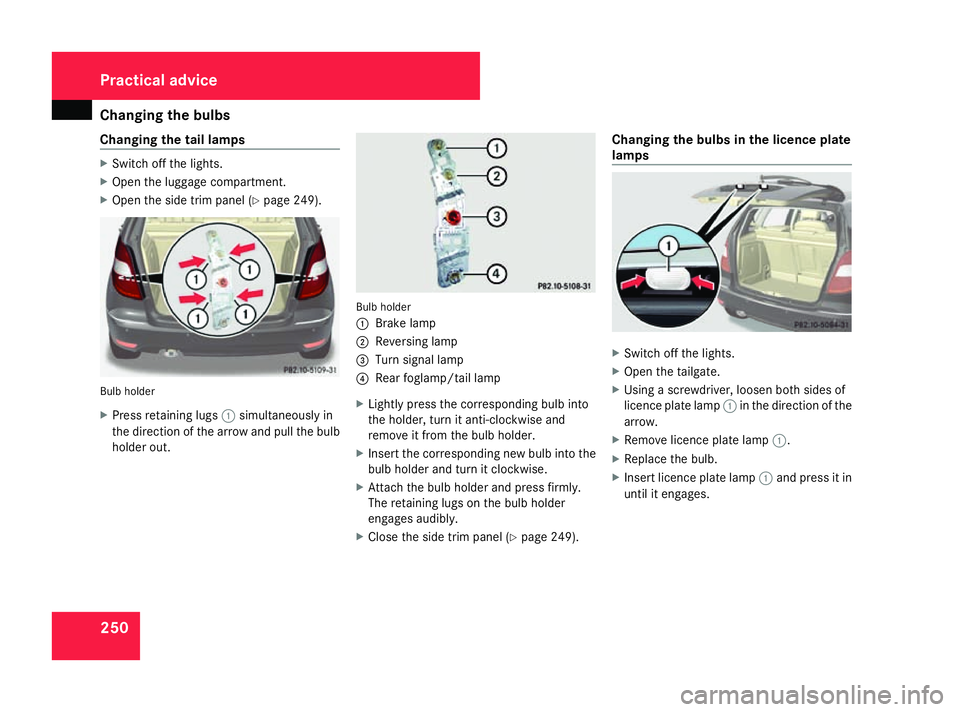
Changing the tail lamps X
Switch off the lights.
X Open the luggage compartment.
X Open the side trim panel (Y page 249).Bulb holder
X
Press retaining lugs 1simultaneously in
the direction of the arrow and pull the bulb
holder out. Bulb holder
1
Brake lamp
2 Reversing lamp
3 Turn signal lamp
4 Rear foglamp/tail lamp
X Lightly press the corresponding bulb into
the holder, turn it anti-clockwise and
remove it from the bulb holder.
X Insert the corresponding new bulb into the
bulb holder and turn it clockwise.
X Attach the bulb holder and press firmly.
The retaining lugs on the bulb holder
engages audibly.
X Close the side trim panel (Y page 249).Changing the bulbs in the licence plate
lamps
X
Switch off the lights.
X Open the tailgate.
X Using a screwdriver, loosen both sides of
licence plate lamp 1in the direction of the
arrow.
X Remove licence plate lamp 1.
X Replace the bulb.
X Insert licence plate lamp 1and press it in
until it engages. Practical advice
169_AKB; 2; 4, en-GB
wdomann
,V ersion: 2.10.6
2008-07-16T08:52:06+02:00 - Seite 250 Dateiname: 6515_0315_02_buchblock.pdf; preflight
Page 262 of 305

Flat tyre
259Changing a wheel/fitting the spare
wheel*
G
Risk of accident
The wheel dimensions and tyre size of the
"Minispare" emergency spare wheel* may
differ from those of the standard wheels.
Your vehicle's handling characteristics will
change when a "Minispare" emergency
spare wheel* is fitted. Adapt your style of
driving accordingly.
The "Minispare" emergency spare wheel*
may only be used for a short time. Do not
exceed the maximum speed of 80 km/h
and do not deactivate ESP ®
.
Never drive the vehicle with more than one
"Minispare" emergency spare wheel* fit-
ted. G
Risk of accident
Have the "Minispare" emergency spare
wheel* or the spare wheel* replaced with
a new wheel as soon as possible at a quali-
fied specialist workshop which has the nec-
essary specialist knowledge and tools to
carry out the work required. Mercedes-
Benz recommends that you use a
Mercedes-Benz Service Centre for this pur- pose. In particular, work relevant to safety
or on safety-related systems must be car-
ried out at a qualified specialist workshop.
Preparing the vehicle X
Prepare the vehicle as described
(Y page 253).
X If a trailer is coupled, uncouple it.
X Place the wheels in the straight-ahead posi-
tion.
X Take the "Minispare" emergency spare
wheel* or the spare wheel* out of the stow-
age well under the luggage compartment
floor.
X Take the following out of the left-hand
stowage compartment in the luggage com-
partment
R
the vehicle tool kit
R the wheel chock
R the jack
X Secure the vehicle to prevent it from rolling
away.
On level ground: place chocks or similar
items under the front and rear of the wheel
that is diagonally opposite the wheel you
wish to change. X
On downhill gradients: place chocks or
similar behind both wheels of the other
axle. Steel wheel with wheel trim
X
Vehicles with steel wheels: carefully
reach into two wheel trim openings and
remove the wheel trim. Practical advice
* optional
169_AKB; 2; 4, en-GB
wdomann, Version: 2.10.6 2008-07-16T08:52:06+02:00 - Seite 259 ZDateiname: 6515_0315_02_buchblock.pdf; preflight
Page 263 of 305

Flat tyre
2601
Wheel wrench
X Using wheel wrench 1, loosen the bolts on
the wheel you wish to change by about one
full turn. Do not unscrew the bolts com-
pletely.
Raising the vehicle G
Risk of injury
The jack is designed only to raise the vehi-
cle for a short time while a wheel is being
changed.
The vehicle must be placed on stands if you
intend to work under it.
Make sure that the jack is placed on a firm,
non-slip, level surface. Do not use wooden
blocks or similar objects as a jack underlay. Otherwise, the jack will not be able to ach-
ieve its load-bearing capacity due to the
restricted height.
Do not start the engine at any time while
the wheel is being changed.
Do not lie under the vehicle when it is being
supported by the jack. If you do not raise
the vehicle as described, it could slip off the
jack (e.g. if the engine is started or a door
or the tailgate is opened or closed) and you
could be seriously injured. G
Risk of accident
If you fail to position the jack correctly, the
vehicle may:
R slip off the jack
R injure you or others
R be damaged
Thus, it is important to make sure that the
jack is positioned correctly in the respec-
tive jacking points. Before positioning the
jack, remove any dirt that may have collec-
ted in the jacking points.
The jacking points for the jack are located
behind the wheel housings of the front wheels
and in front of the wheel housings of the rear
wheels. 1
Jacking point
2 Jack
3 Ratchet ring spanner with socket wrench
X Position jack 2at jacking point 1. Practical advice
169_AKB; 2; 4, en-GB
wdomann,
Version: 2.10.6
2008-07-16T08:52:06+02:00 - Seite 260 Dateiname: 6515_0315_02_buchblock.pdf; preflight
Page 266 of 305

Battery
263R
ESP ®
is intervening constantly.
R there are tears in the sidewalls of the
tyre.
After driving in run-flat mode, you must
have the wheel(s) checked for damage at a
qualified specialist workshop which has the
necessary specialist knowledge and tools
to carry out the work required. The faulty
tyre must be replaced in every case.
Mercedes-Benz recommends that you use
a Mercedes-Benz Service Centre for this
purpose. In particular, work relevant to
safety or on safety-related systems must be
carried out at a qualified specialist work-
shop.
i On a vehicle with MOExtended tyres, only
use MOExtended spare tyres. These must
be of the size specified for the vehicle. Battery
Notes on the vehicle battery
In order for the battery to achieve the maxi-
mum possible service life, it must always be
sufficiently charged.
Have the battery charge checked more fre-
quently if you use the vehicle mainly for short
trips or if you leave it standing idle for a
lengthy period.
To prevent damage from corrosion, only
replace the battery with one that has a central
ventilation cover.
Consult a Mercedes-Benz Service Centre if
you wish to leave your vehicle parked up for
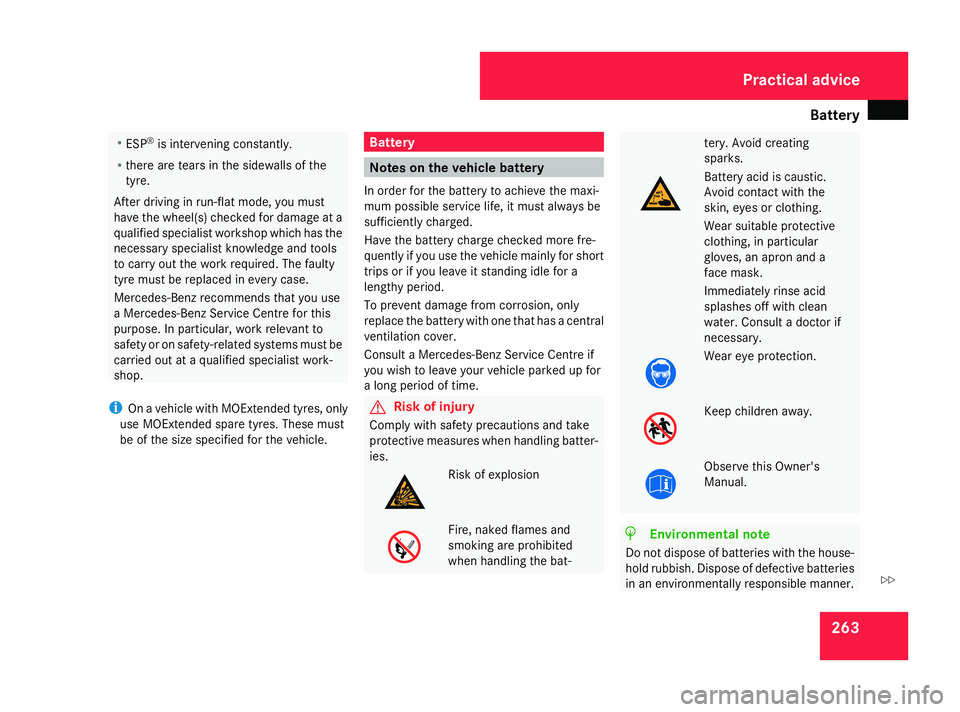
a long period of time. G
Risk of injury
Comply with safety precautions and take
protective measures when handling batter-
ies. Risk of explosion
Fire, naked flames and
smoking are prohibited
when handling the bat- tery. Avoid creating
sparks.
Battery acid is caustic.
Avoid contact with the
skin, eyes or clothing.
Wear suitable protective
clothing, in particular
gloves, an apron and a
face mask.
Immediately rinse acid
splashes off with clean
water. Consult a doctor if
necessary.
Wear eye protection.
Keep children away.
Observe this Owner's
Manual.
H
Environmental note
Do not dispose of batteries with the house-
hold rubbish. Dispose of defective batteries
in an environmentally responsible manner. Practical advice
169_AKB; 2; 4, en-GB
wdomann, Version: 2.10.6 2008-07-16T08:52:06+02:00 - Seite 263 ZDateiname: 6515_0315_02_buchblock.pdf; preflight
Page 271 of 305

Towing and tow-starting
268 Towing and tow-starting
Points to remember
G
Risk of accident
If you have the vehicle towed, you must use
a rigid towing bar if:
R the engine is not running.
R there is a brake system malfunction.
R there is a malfunction in the voltage sup-
ply or the vehicle's electrical system.
The electric power steering and the brake
force booster do not work when the engine
is not running. Greater braking force will
then be required and brake pedal travel will
be longer. If necessary, depress the brake
pedal with full force.
Do not tow the vehicle if the key cannot be
turned in the ignition lock. If this is the case,
the steering is locked and the vehicle can-
not be steered.
If you tow or tow-start another vehicle, its
weight must not exceed the maximum per-
missible gross vehicle weight of your vehi-
cle.
It is better to have the vehicle transported
than to have it towed. When towing, observe the legal requirements
in all countries concerned.
!
When towing, pull away slowly and with-
out jerking. If the tractive power is too high,
the vehicles could be damaged.
! Do not use the towing eye for recovery,
as this could damage the vehicle. If in
doubt, recover the vehicle with a crane.
! You may tow the vehicle for a maximum
of 50 km. A towing speed of 50 km/h must
not be exceeded.
With towing distances over 50 km, the
entire vehicle needs to be lifted up and
transported.
! Only secure the tow cable or towing bar
to the towing eyes. You may otherwise
damage the vehicle.
R Vehicles with AUTOTRONIC* must not be
tow-started.
R If the engine does not start, try jump-start-
ing it (Y page 266).
R If it is not possible to jump-start the vehicle,
have it towed to the nearest qualified spe-
cialist workshop, e.g. a Mercedes-Benz
Service Centre. R
The selector lever must be in position N
when towing a vehicle with AUTO-
TRONIC*.
R If you are towing the vehicle over a consid-
erable distance, this must only be done
with the front axle raised.
R The ignition must be switched off if you are
towing the vehicle with the front/rear axle
raised. Intervention by ESP ®
could other-
wise damage the brake system.
R Before towing the vehicle, make sure that
the battery is connected and charged. Oth-
erwise:
-you cannot switch on the ignition
- you cannot move the selector lever
to N(on vehicles with AUTOTRONIC*)
- you have no support when braking
i Switch off the automatic locking feature
before the vehicle is towed (Y page 111).
You could otherwise be locked out when
pushing or towing the vehicle. Practical advice
* optional
169_AKB; 2; 4, en-GB
wdomann,
Version: 2.10.6
2008-07-16T08:52:06+02:00 - Seite 268 Dateiname: 6515_0315_02_buchblock.pdf; preflight
Page 272 of 305

Towing and tow-starting
269Fitting the towing eye
Vehicles with a trailer tow hitch: if you
intend to use the vehicle for towing, fit the ball
coupling (Y page 186) and connect the tow-
bar to this.
Opening the front cover The mountings for the removable towing eyes
are in the bumpers. They are located at the
front and rear behind covers on the right-hand
side of the vehicle when viewed in the direc-
tion of travel.
1
Cover
X Press cover 1back in the direction of the
arrow.
X Take cover 1off the opening. Opening the rear cover
1
Cover
X Press cover 1back in the direction of the
arrow.
X Take cover 1off the opening.
Securing the towing eye X
Take the towing eye and the wheel wrench
from the vehicle tool kit ( Ypage 200).
X Screw in the towing eye clockwise to the
stop.
X Insert the wheel wrench handle into the
towing eye and tighten it. Towing the vehicle
! You may tow the vehicle for a maximum
of 50 km. A towing speed of 50 km/h must
not be exceeded.
With towing distances over 50 km, the
entire vehicle needs to be lifted up and
transported.
! The engine must be switched off (key in
ignition lock in position 0or position 1) if
the vehicle is being towed with the front
axle raised or if the parking brake is being
tested on a dynamometer. Intervention by
ESP ®
could otherwise damage the brake
system.
Vehicles with manual transmission X
Turn the key to position 2(Y page 62) in
the ignition lock.
X Fully depress the clutch pedal.
X Shift to neutral. Practical advice
169_AKB; 2; 4, en-GB
wdomann,
Version: 2.10.6 2008-07-16T08:52:06+02:00 - Seite 269 ZDateiname: 6515_0315_02_buchblock.pdf; preflight