2008 MERCEDES-BENZ A-CLASS HATCHBACK ESP
[x] Cancel search: ESPPage 129 of 305

Driving sys
tems 126
i
In tight parking spaces, you will achieve
the best parking results by reversing as far
as possible. When doing so, also observe
the Parktronic messages.
X Stop as soon as Parktronic sounds the con-
tinuous warning tone, if not before.
Manoeuvring may be required in tight park-
ing spaces.
Vehicles with manual transmission: the mes-
sage Park Assist active Please shift
to a forward gear appears in the multi-
function display.
Vehicles with AUTOTRONIC*: the message
Park Assist active Please shift to
D appears in the multi-function display.
X Vehicles with manual transmission: When
the car is stationary, shift to first gear.
Vehicles with AUTOTRONIC*: When the car
is stationary, set the selector lever to posi-
tion R.
Active parking assist immediately steers in
the other direction.
On the multi-function display, the message:
Park Assist active Please acceler- ate and brake the vehicle yourself
appears.
i You will achieve the best parking results
by waiting for the steering procedure to
complete before moving forwards.
X Drive forwards and be ready to brake at all
times.
X Stop as soon as Parktronic sounds the con-
tinuous warning tone, if not before.
Vehicles with manual transmission: the mes-
sage Park Assist active Please shift
into reverse gear appears in the multi-
function display.
Vehicles with AUTOTRONIC*, the message
Park Assist active Please shift to
R appears in the multi-function display.
X Further gear changes* may be necessary.
As soon as the parking procedure is com-
plete, the message Parking assistance
finished Please take over appears.
Active parking assist is now deactivated.
Parktronic is still available.
X Manoeuvre if necessary.
X Always observe the warning messages dis-
played by Parktronic (Y page 121).Cancelling active parking assist You can cancel active parking assist at any
time.
X
Stop the movement of the multi-function
steering wheel or steer yourself.
Active parking assist will be cancelled at
once. The multi-function display shows the
message: Park Assist cancelled.
or
X Press the Parktronic button on the centre
console (Y page 122).
Parktronic is switched off and active park-
ing assist is immediately cancelled. The
multi-function display shows the message:
Park Assist cancelled.
Active parking assist is cancelled automati-
cally if:
R a gear is changed* too early
R parking using active parking assist is no
longer possible
R you are driving faster than 10 km/h
R a wheel spins, ESP ®
is activated or fails. In
such cases the vwarning lamp lights
up in the instrument cluster. Controls
* optional
169_AKB; 2; 4, en-GB
wdomann,
Version: 2.10.6
2008-07-16T08:52:06+02:00 - Seite 126 Dateiname: 6515_0315_02_buchblock.pdf; preflight
Page 141 of 305

Air conditioning
138midification" if the outside temperature is
high. Otherwise, temperature-sensitive
items stored in the glove compartment
could be damaged. 1
Air vent thumbwheel
2 Air vent
X To open/close: turn thumbwheel 1
clockwise or anti-clockwise. Setting the rear-compartment air vents 1
Rear-compartment air vent, left
2 Rear-compartment air vent, right
3 Thumbwheel for rear-compartment air
vents
X To open/close: turn thumbwheel 3to the
left or right. Setting the air distribution
Heatmatic/air-conditioning system* X
Turn the key to position 2in the ignition
lock.
X Turn thumbwheel 5to the corresponding
symbol ( Ypage 131), (Y page 132). The
thumbwheel can also be turned to the area
between two symbols.
Thermotronic* X
Turn the key to position 2in the ignition
lock.
X Turn thumbwheel 9to the corresponding
symbol (Y page 134). The thumbwheel can
also be turned to the area between two
symbols. Controls
* optional
169_AKB; 2; 4, en-GB
wdomann,
Version: 2.10.6
2008-07-16T08:52:06+02:00 - Seite 138 Dateiname: 6515_0315_02_buchblock.pdf; preflight
Page 154 of 305

Loading and stowing
151
3 and 5-door vehicles
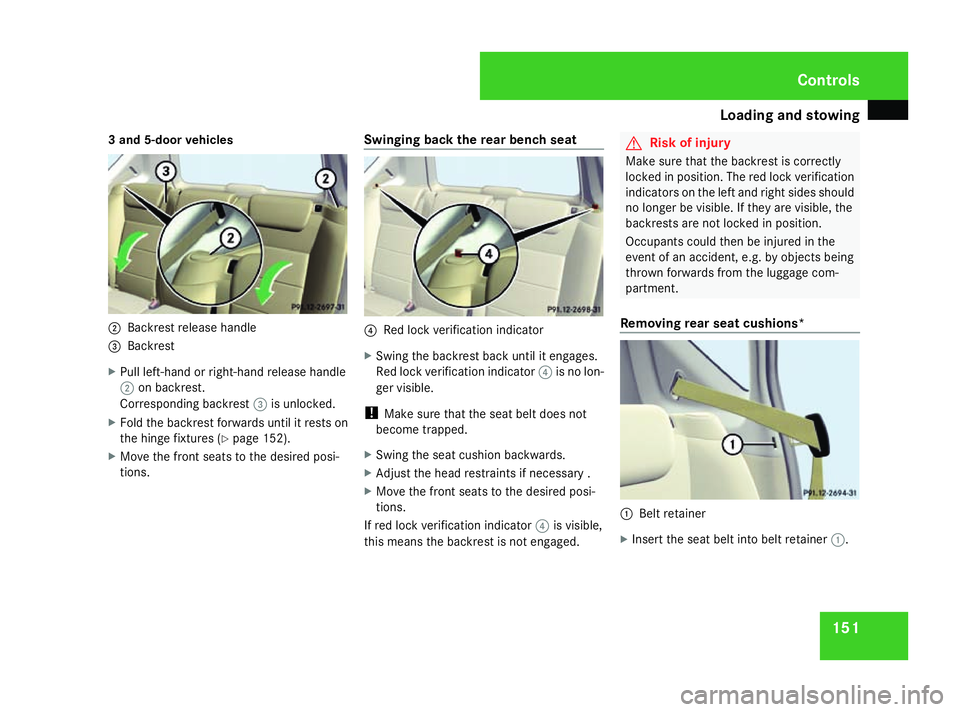
2
Backrest release handle
3 Backrest
X Pull left-hand or right-hand release handle
2 on backrest.
Corresponding backrest 3is unlocked.
X Fold the backrest forwards until it rests on
the hinge fixtures (Y page 152).
X Move the front seats to the desired posi-
tions. Swinging back the rear bench seat 4
Red lock verification indicator
X Swing the backrest back until it engages.
Red lock verification indicator 4is no lon-
ger visible.
! Make sure that the seat belt does not
become trapped.
X Swing the seat cushion backwards.
X Adjust the head restraints if necessary .
X Move the front seats to the desired posi-
tions.
If red lock verification indicator 4is visible,
this means the backrest is not engaged. G
Risk of injury
Make sure that the backrest is correctly
locked in position. The red lock verification
indicators on the left and right sides should
no longer be visible. If they are visible, the
backrests are not locked in position.
Occupants could then be injured in the
event of an accident, e.g. by objects being
thrown forwards from the luggage com-
partment.
Removing rear seat cushions* 1
Belt retainer
X Insert the seat belt into belt retainer 1. Controls
169_AKB; 2; 4, en-GB
wdomann
, Version: 2.10.6 2008-07-16T08:52:06+02:00 - Seite 151 ZDateiname: 6515_0315_02_buchblock.pdf; preflight
Page 156 of 305

Loading and stowing
1531
Connector
2 Connector holder
3 Lever Warning symbol on the connector of the rear seat
belt status indicator X
Press seat belt buckle 1on the grooved
surface and remove seat belt buckle 1
from holder 3.
i When the ignition is switched on an indi-
cator is shows the status of the corre-
sponding rear seats in the upper multi-
function display. If, for example, neither
seat belt buckle are is engaged, the mes-
sage:
X Stow seat belt buckle 1on seat belt
buckle holder 2on the vehicle floor.
X Pull holder 3upwards and hold it securely. 4
Backrest release handle
5 Backrest X
Pull left-hand or right-hand release handle
4 on backrest 5.
Corresponding backrest 5is unlocked.
X Fold backrest 5forwards past the vertical
to an angle of approximately 20°.
X Hold backrest 5with your free hand and
lift the backrest by pulling lever 3.
i For greater convenience, there is a recess
on the rear of the 2/3 backrest which
makes it easier to grasp the backrest.
X Remove backrest 5from the vehicle
through the rear door.
Fitting the backrest* 1
Recesses Controls
169_AKB; 2; 4, en-GB
wdomann
, Version: 2.10.6 2008-07-16T08:52:06+02:00 - Seite 153 ZDateiname: 6515_0315_02_buchblock.pdf; preflight
Page 179 of 305

Tyres and wheels
176 G
Risk of fire
Windscreen washer fluid is highly flamma-
ble. Fire, naked flames and smoking are
prohibited when handling washer fluid con-
centrate.
X At temperatures above freezing:
fill the washer fluid reservoir with a mix of
water and windscreen washer concentrate
(Y page 175).
X At temperatures below freezing:
fill the washer fluid reservoir with a mix of
water, antifreeze additive and windscreen
washer concentrate ( Ypage 175). Adapt
the mixing ratio to the outside tempera-
tures.
X Mix the windscreen washer fluid in a con-
tainer beforehand.
! Only use windscreen washer fluid which
is suitable for plastic lamp lenses. Unsuit-
able windscreen washer fluid could dam-
age the plastic lamp lenses of the head-
lamps.
X To open: pull cap1upwards by the tab.
X To close: press cap 1onto the filler neck
until it clicks into place. Tyres and wheels
Points to remember
! For safety reasons, Mercedes-Benz rec-
ommends that you only use tyres and
wheels which have been approved by
Mercedes-Benz specifically for your vehi-
cle. These tyres have been specially adap-
ted for use with the control systems, such
as ABS or ESP ®
, and are marked as follows:
R MO = Mercedes-Benz Original
R MOE = Mercedes-Benz Original Extended
(with run-flat characteristics)*
*Mercedes-Benz Original Extended tyres
should only be used on wheels that have
been specifically approved by Mercedes-
Benz.
If you use other tyres and wheels,
Mercedes-Benz cannot accept any respon-
sibility for damage that may result from
this. Further information about tyres,
wheels and approved combinations can be
obtained from any Mercedes-Benz Service
Centre.
If you use tyres other than those tested and
recommended for Mercedes-Benz vehi-
cles, characteristics such as handling, vehi-
cle noise emissions and fuel consumption may be adversely affected. In addition, the
wheels may come into contact with the
body or axle components when heavily loa-
ded or when driving with snow chains. This
could result in damage to the tyres or the
vehicle.
! Retreaded tyres are neither tested nor
recommended by Mercedes-Benz, since
previous damage cannot always be detec-
ted on retreaded tyres. As a result,
Mercedes-Benz cannot guarantee vehicle
safety if retreaded tyres are fitted. Do not
fit used tyres if you have no information
about their previous usage. G
Risk of accident
If wheels or tyres other than those which
have been tested are fitted:
R the brakes or chassis components could
be damaged.
R wheel and tyre clearances can no longer
be guaranteed.
This could cause an accident.
Modification work on the brake system and
wheels is not permitted, nor is the use of
spacer plates or brake dust shields. This inva- Operation
* optional
169_AKB; 2; 4, en-GB
wdomann,
Version: 2.10.6
2008-07-16T08:52:06+02:00 - Seite 176 Dateiname: 6515_0315_02_buchblock.pdf; preflight
Page 182 of 305

Tyres and wheels
179R
Check the tyre for foreign bodies.
R Check whether the wheel is losing air or
the valve is leaking.
Tyre pressure that is too low has a negative
effect on the vehicle’s active safety, which
could lead to your causing an accident.
Tyre pressure changes by approximately
0.1 bar for every 10 °C change in ambient
temperature.
If you measure the tyre pressure in enclosed
spaces where the temperature differs from
the outside temperature, you will have to cor-
rect the measured value accordingly.
When the vehicle is driven, the tyre tempera-
ture, and with it the tyre pressure, will
increase depending on the road speed and
the load on the tyres.
Therefore, you should only correct tyre pres-
sures when the tyres are cold.
The pressure of warm tyres should only be
corrected if it is too low for the current oper-
ating conditions. Driving with tyre pressure that is too high or
too low can:
R
shorten the service life of the tyres
R increase the likelihood of tyre damage
R have a negative effect on handling charac-
teristics (e.g. by causing aquaplaning)
i The tyre pressure values given for low
loads are minimum values which offer you
good ride comfort characteristics.
However, you can also use the values given
for higher loads. These are permissible and
will not adversely affect the running of the
vehicle. H
Environmental note
Check the tyre pressure regularly, at least
every 14 days. Tyre pressure loss warning system
While the vehicle is in motion, the tyre pres-
sure loss warning system monitors the set
tyre pressure using the rotational speed of
the wheels. This enables the system to detect
significant pressure loss in a tyre. If the speed
of rotation of a wheel changes as a result of
a loss of pressure, a corresponding warning
message will appear in the multi-function dis-
play. G
Risk of accident
The tyre pressure loss warning system does
not warn you of an incorrectly set tyre pres-
sure. The table on the inside of the fuel filler
flap will help you decide whether the tyre
pressures should be corrected.
The tyre pressure loss warning system does
not replace the need to regularly check
your vehicle's tyre pressures, since an even
loss of pressure on several tyres at the
same time cannot be detected by the tyre
pressure loss warning system.
The tyre pressure loss warning system is
not able to warn you of a sudden loss of
pressure, e.g. if the tyre is penetrated by a
foreign object.
In the event of a sudden loss of pressure,
bring the vehicle to a halt by braking care- Operation
169_AKB; 2; 4, en-GB
wdomann,
Version: 2.10.6 2008-07-16T08:52:06+02:00 - Seite 179 ZDateiname: 6515_0315_02_buchblock.pdf; preflight
Page 184 of 305

Winter driving
181Interchanging the wheels
G
Risk of accident
Interchange the front and rear wheels only
if they have the same dimensions: for exam-
ple size, offset, etc.
After every wheel interchange/change,
have the tightening torque checked at a
qualified specialist workshop that has the
necessary specialist knowledge and tools
to carry out the work required. Mercedes-
Benz recommends that you use a
Mercedes-Benz Service Centre for this pur-
pose. In particular, work relevant to safety
or on safety-related systems must be car-
ried out at a qualified specialist workshop.
The wheels could work loose if they are not
tightened to a torque of 130 Nm.
For safety reasons, Mercedes-Benz recom-
mends that you only use wheel bolts of the
correct size which have been approved for
Mercedes-Benz vehicles.
The wear patterns on the front and rear tyres
differ, depending on the operating conditions.
Interchange the wheels before a clear wear
pattern has formed on the tyres. Front tyres
typically wear more on the shoulders and the
rear tyres in the centre. Interchange the wheels every 5,000 km to
10,000 km depending on the degree of tyre
wear, provided that the vehicle has the same
size front and rear tyres. Do not reverse the
direction of tyre rotation.
Clean the contact surfaces of the wheel and
the brake disc thoroughly every time a wheel
is changed. Check the tyre pressure and, if
necessary, restart the tyre pressure loss
warning system. Winter driving
Points to remember
Have your vehicle winterproofed at a qualified
specialist workshop, e.g. at a Mercedes-Benz
Service Centre, at the onset of winter. Winter tyres
Use winter tyres at temperatures below +7 °C
and on snow or ice-covered roads. Only then
can the effect of the ABS and ESP ®
driving
systems be ensured in winter too.
Use winter tyres of the same make and tread
on all wheels to maintain safe handling char-
acteristics. G
Risk of accident
Winter tyres with a tread depth of less than
4 mm must be replaced immediately. They
are no longer suitable for winter use and
can no longer provide sufficient grip. This
could cause you to lose control of your
vehicle and cause an accident.
Always observe the maximum permitted
speed specified for the winter tyres you have
fitted. If you fit winter tyres which have a
lower maximum permitted speed than that of
the vehicle, affix an appropriate warning sign Operation
169_AKB; 2; 4, en-GB
wdomann,
Version: 2.10.6 2008-07-16T08:52:06+02:00 - Seite 181 ZDateiname: 6515_0315_02_buchblock.pdf; preflight
Page 185 of 305

Winter driving
182
in the driver's field of vision. This can be
obtained at a qualified specialist workshop,
e.g. from a Mercedes-Benz Service Centre.
Under these circumstances, you should also
restrict the maximum speed of the vehicle
using permanent Speedtronic* 25
to the max-
imum permissible speed for the winter tyres
(Y page 120).
Once you have fitted the winter tyres:
X Check the tyre pressures (Y page 178).G
Risk of accident
If you fit the spare wheel* when driving with
winter tyres, bear in mind that driving sta-
bility will be impaired owing to unstable
cornering characteristics caused by the dif-
ferent tyres. You should therefore adapt
your driving style and drive carefully.
Have the spare wheel* replaced at the
nearest qualified specialist workshop
which has the necessary specialist knowl-
edge and tools to carry out the work
required. Mercedes-Benz recommends
that you use a Mercedes-Benz Service
Centre for this purpose. In particular, work
relevant to safety or on safety-related sys- tems must be carried out at a qualified spe-
cialist workshop. Snow chains
For safety reasons, Mercedes-Benz recom-
mends that you only use snow chains which
have been specially approved for your vehicle
by Mercedes-Benz, or are of a corresponding
standard of quality.
! Information about the use of snow chain-
compatible AMG winter tyres is applicable
for AMG tyres. Use of snow chains is only
permissible with these tyres.
If you intend to fit snow chains, please bear
the following points in mind:
R snow chains cannot be fitted to all wheel/
tyre combinations.
R snow chains must not be fitted to emer-
gency spare wheels, e.g. on a "Minispare"
emergency spare wheel.
R Fit snow chains only in pairs and only to the
front wheels. Comply with the manufactur-
er's installation instructions.
! Vehicles with 17" tyres You may only fit snow chains as a pulling-
away aid. Only use fine-link snow chains.
When snow chains are fitted, you may only
drive straight ahead. The snow chains could
otherwise come into contact with the body-
work when you turn the front wheels.
When snow chains are fitted, you cannot use
Active Park Assist* (Y page 123).
Do not exceed the maximum permissible
speed of 50 km/h. Winter driving
G
Risk of accident
Do not shift down for additional engine
braking on a slippery road surface. This
could cause the drive wheels to lose their
grip and the vehicle could skid.
You should drive particularly carefully on slip-
pery road surfaces. Avoid sudden accelera-
tion, steering and braking manoeuvres.
If the vehicle threatens to skid or cannot be
stopped when moving at low speed:
25 Only available for certain countries. Operation
* optional
169_AKB; 2; 4, en-GB
wdomann,
Version: 2.10.6
2008-07-16T08:52:06+02:00 - Seite 182 Dateiname: 6515_0315_02_buchblock.pdf; preflight