2008 MERCEDES-BENZ A-CLASS HATCHBACK ESP
[x] Cancel search: ESPPage 83 of 305

Lights
80
Main-beam headlamps X
Turn the ignition key to position 2in the
ignition lock or start the engine.
X Turn the light switch to BorU 9
.
X To switch on: press the combination
switch in the direction of arrow 1.
The A main-beam indicator lamp in the
instrument cluster lights up.
X To switch off: move the combination
switch back to its normal position.
The A main-beam indicator lamp in the
instrument cluster goes out.
Headlamp flasher X
To switch on: briefly pull the combination
switch in the direction of arrow =. Hazard warning lamps
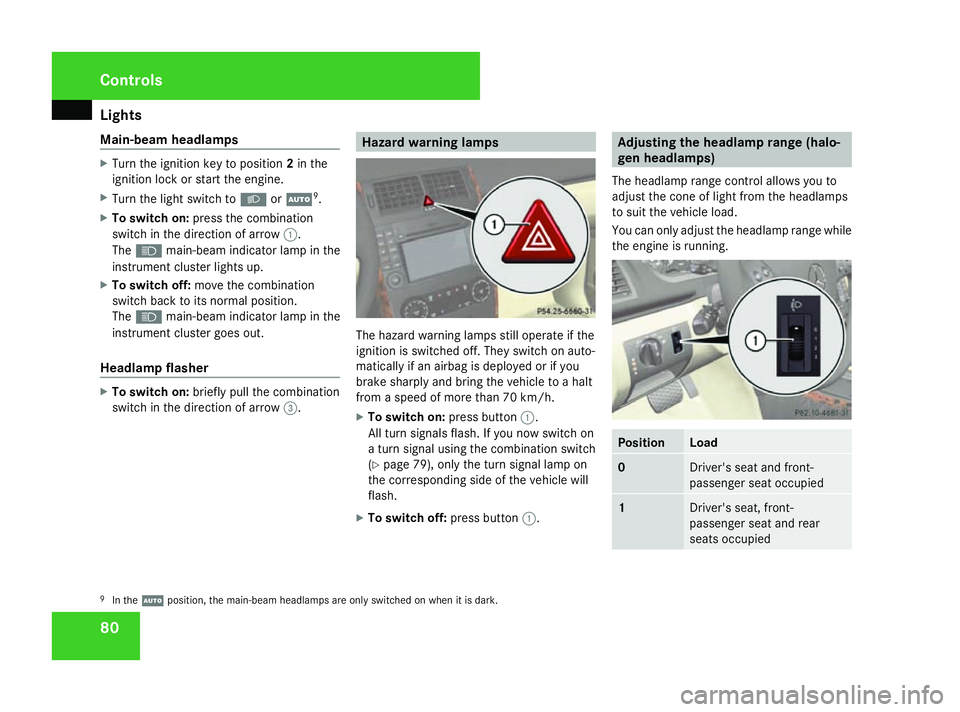
The hazard warning lamps still operate if the
ignition is switched off. They switch on auto-
matically if an airbag is deployed or if you
brake sharply and bring the vehicle to a halt
from a speed of more than 70 km/h.
X
To switch on: press button1.
All turn signals flash. If you now switch on
a turn signal using the combination switch
(Y page 79), only the turn signal lamp on
the corresponding side of the vehicle will
flash.
X To switch off: press button1. Adjusting the headlamp range (halo-
gen headlamps)
The headlamp range control allows you to
adjust the cone of light from the headlamps
to suit the vehicle load.
You can only adjust the headlamp range while
the engine is running. Position Load
0
Driver's seat and front-
passenger seat occupied
1
Driver's seat, front-
passenger seat and rear
seats occupied
9
In the Uposition, the main-beam headlamps are only switched on when it is dark. Controls
169_AKB; 2; 4, en-GB
wdomann,
Version: 2.10.6
2008-07-16T08:52:06+02:00 - Seite 80 Dateiname: 6515_0315_02_buchblock.pdf; preflight
Page 84 of 305

Lights
81Position Load
2
Driver's seat, front passenger
seat and rear seats occupied,
luggage compartment laden
3
Not required
X
Turn headlamp range control 1to the
position which corresponds to the load in
your vehicle. Headlamp cleaning system*
The headlamps are cleaned automatically if
the "Wipe with windscreen washer fluid" func-
tion is operated five times while the lights are
on and the engine is running. When you
switch off the ignition, the automatic head-
lamp cleaning system is reset and counting is
resumed from 0. Cornering light function* (bi-xenon
headlamps*)
Specially designed headlamps light up the
area into which you are driving when turning
corners.
If you are driving at speeds below 40 km/h,
the cornering light function is activated either
by the turn signals or when the steering wheel
is turned. If you are driving at speeds above
40 km/h the cornering light function is deac-
tivated.
Activating X
Start the engine.
X Switch on the dipped-beam headlamps.
X Switch off the foglamps*.
X Switch on the turn signal.
The cornering lamp on the same side as the
turn signal comes on, even if you turn the
steering wheel in the opposite direction
after indicating.
or
X Turn the steering wheel in the desired
direction.
When in a forwards gear: the cornering
lamp on the inside of the bend comes on. When in reverse gear: the cornering lamp
on the outside of the bend comes on.
Deactivating X
Turn the steering wheel back to the straight
ahead position.
The turn signal goes off. The cornering lamp
may remain lit for a short time.
or
X Switch off the turn signal.
The cornering lamp may remain lit for a
short time.
The cornering light will go out after a maxi-
mum of three minutes. Controls
* optional
169_AKB; 2; 4, en-GB
wdomann,
Version: 2.10.6 2008-07-16T08:52:06+02:00 - Seite 81 ZDateiname: 6515_0315_02_buchblock.pdf; preflight
Page 88 of 305

Side windows
85
i
Related topics:
R convenience opening (Y page 86)
R convenience closing (Y page 86)
R override controls in the rear compart-
ment (Y page 54)
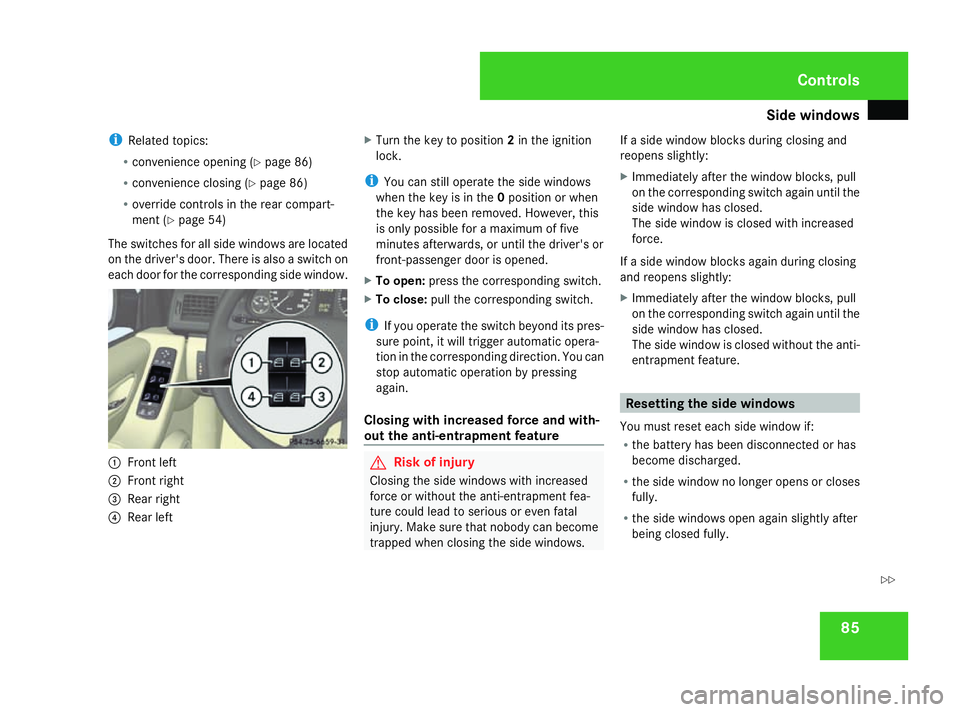
The switches for all side windows are located
on the driver's door. There is also a switch on
each door for the corresponding side window. 1
Front left
2 Front right
3 Rear right
4 Rear left X
Turn the key to position 2in the ignition
lock.
i You can still operate the side windows
when the key is in the 0position or when
the key has been removed. However, this
is only possible for a maximum of five
minutes afterwards, or until the driver's or
front-passenger door is opened.
X To open: press the corresponding switch.
X To close: pull the corresponding switch.
i If you operate the switch beyond its pres-
sure point, it will trigger automatic opera-
tion in the corresponding direction. You can
stop automatic operation by pressing
again.
Closing with increased force and with-
out the anti-entrapment feature G
Risk of injury
Closing the side windows with increased
force or without the anti-entrapment fea-
ture could lead to serious or even fatal
injury. Make sure that nobody can become
trapped when closing the side windows. If a side window blocks during closing and
reopens slightly:
X
Immediately after the window blocks, pull
on the corresponding switch again until the
side window has closed.
The side window is closed with increased
force.
If a side window blocks again during closing
and reopens slightly:
X Immediately after the window blocks, pull
on the corresponding switch again until the
side window has closed.
The side window is closed without the anti-
entrapment feature. Resetting the side windows
You must reset each side window if:
R the battery has been disconnected or has
become discharged.
R the side window no longer opens or closes
fully.
R the side windows open again slightly after
being closed fully. Controls
169_AKB; 2; 4, en-GB
wdomann,
Version: 2.10.6
2008-07-16T08:52:06+02:00 - Seite 85 ZDateiname: 6515_0315_02_buchblock.pdf; preflight
Page 89 of 305

Side windows
86
X
Turn the key to position 2in the ignition
lock.
X Pull the corresponding switch until the side
window is closed.
X Hold the switch for an additional second.
If the side window opens again slightly:
X Pull the corresponding switch again imme-
diately and hold it for approx. one second. Convenience opening*
You can ventilate the vehicle before a journey.
To do this, you can use the key to simultane-
ously:
R open the side windows
R open the panorama louvred sliding sun-
roof* or move it to the ventilation position
i The "Convenience opening" feature can
only be operated using the key. X
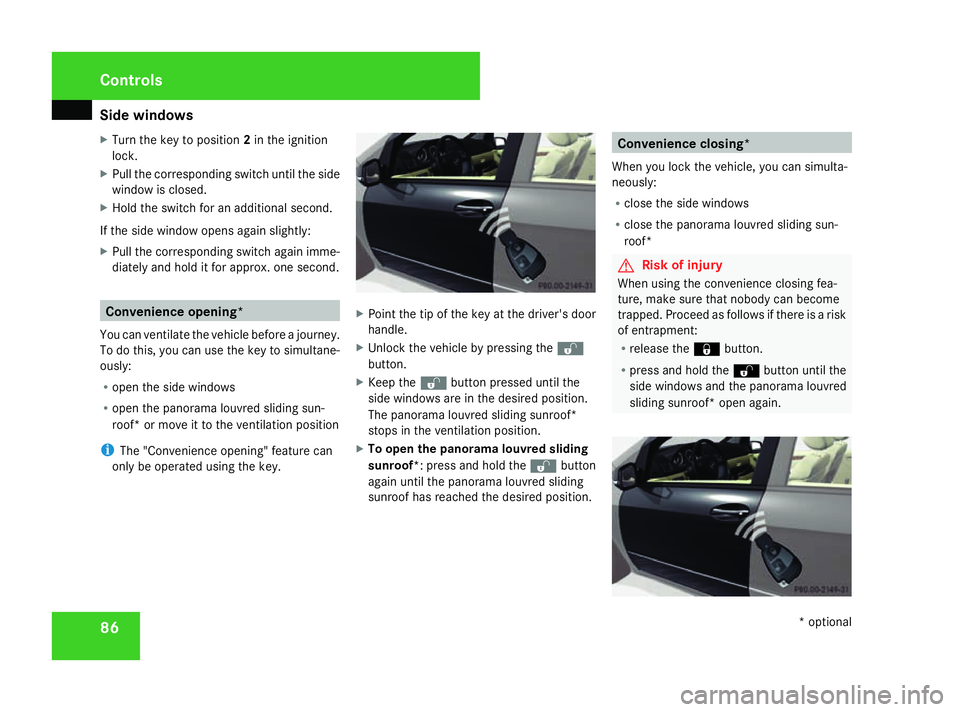
Point the tip of the key at the driver's door
handle.
X Unlock the vehicle by pressing the k
button.
X Keep the kbutton pressed until the
side windows are in the desired position.
The panorama louvred sliding sunroof*
stops in the ventilation position.
X To open the panorama louvred sliding
sunroof*: press and hold the kbutton
again until the panorama louvred sliding
sunroof has reached the desired position. Convenience closing*
When you lock the vehicle, you can simulta-
neously:
R close the side windows
R close the panorama louvred sliding sun-
roof* G
Risk of injury
When using the convenience closing fea-
ture, make sure that nobody can become
trapped. Proceed as follows if there is a risk
of entrapment:
R release the jbutton.
R press and hold the kbutton until the
side windows and the panorama louvred
sliding sunroof* open again. Controls
* optional
169_AKB; 2; 4, en-GB
wdomann,
Version: 2.10.6
2008-07-16T08:52:06+02:00 - Seite 86 Dateiname: 6515_0315_02_buchblock.pdf; preflight
Page 93 of 305

Driving and pa
rking 90
Hill start assist Hill start assist helps you when pulling away
on uphill gradients. It holds the vehicle for a
short time after you have removed your foot
from the brake pedal. This gives you enough
time to move your foot from the brake pedal
to the accelerator pedal and depress it before
the vehicle begins to roll. G
Risk of accident
Never leave the vehicle when it is held by
hill start assist. After approximately one
second, hill start assist will no longer brake
your vehicle and it could roll away.
X Remove your foot from the brake pedal.
i Once you have taken your foot off the
brake pedal, the vehicle is held for around
one second.
X Pull away.
Hill start assist does not function if:
R you are pulling away on a level road or a
downhill gradient.
R on vehicles with AUTOTRONIC *,the selec-
tor lever is in the Nposition. R
the vehicle is secured with the parking
brake.
R ESP ®
is malfunctioning. Parking
G
Risk of accident
Only remove the key from the ignition lock
when the vehicle is stationary as you can-
not steer the vehicle with the key removed.
Never leave children unsupervised in the
vehicle. They could release the parking
brake. This could lead to a serious or fatal
accident. G
Risk of fire
Make sure that the exhaust system does
not under any circumstances come into
contact with easily ignitable material such
as dry grass or petrol. The material could
otherwise ignite and set the vehicle on fire. Parking brake 1
Parking brake
2 Release button
X To apply: pull parking brake 1up firmly.
The 3 warning lamp in the instrument
cluster lights up if the engine is running.
i On steep slopes, turn the front wheels
towards the kerb. Controls
* optional
169_AKB; 2; 4, en-GB
wdomann,
Version: 2.10.6
2008-07-16T08:52:06+02:00 - Seite 90 Dateiname: 6515_0315_02_buchblock.pdf; preflight
Page 96 of 305

Transmission
93
6-speed manual transmission
Vehicles without ECO Start-Stop-Function* (6-
speed manual transmission)
!
When shifting between 5thand 6thgear,
you should always push the gear lever all
the way to the right. You could otherwise
shift unintentionally into 3rdor4th gear
and damage the transmission.
Do not exceed the maximum speed for the
individual gears.
If you shift down at too high a speed (trans-
mission braking), this can cause the engine
to overrev, leading to engine damage.
! On long and steep downhill gradients,
especially when the vehicle is laden, you
must shift to a lower gear in time. This will use the braking effect of the engine, so less
braking will be required to prevent the vehi-
cle from gaining speed. This relieves the
load on the brake system and prevents the
brakes from overheating and wearing too
quickly.
Engaging reverse gear
! Only engage reverse gear when the vehi-
cle is stationary, otherwise the transmis-
sion could be damaged.
X Pull the gear lever up, move it to the left and
then back.
Gearshift indicator (BlueEFFI-
CIENCY*vehicles) i
Observing the gearshift indicator in the
instrument cluster's multi-function display
will help you to improve the fuel economy
of your vehicle. 1
Upshift indicator
X Shift up or down a gear when the corre-
sponding indicator appears in the instru-
ment cluster's multi-function display.
The shift indicator is meant as a recommen-
dation for an economical driving style. How-
ever, always observe traffic conditions, as
your driving style is determined, in the first
instance, by the traffic situation. Controls
* optional
169_AKB; 2; 4, en-GB
wdomann,
Version: 2.10.6 2008-07-16T08:52:06+02:00 - Seite 93 ZDateiname: 6515_0315_02_buchblock.pdf; preflight
Page 98 of 305

Transmission
95ë
Neutral
No power is transmitted from the
engine to the drive wheels. Releas-
ing the brakes will allow you to
move the vehicle freely, e.g. to
push it or tow it.
If ESP
®
is deactivated or faulty:
only move the selector lever to Nif
the vehicle is in danger of skidding,
e.g. on icy roads. ê
Drive
The transmission selects the opti-
mum gear ratio automatically for
forward mode.
One-touch gearshifting (manual opera-
tion) When the selector lever is in position
D, you
can select the seven gears yourself.
Activating manual operation
X Press the selector lever lightly to the left
towards D-or to the right towards D+.
M is shown in the multi-function display.
Manual operation is activated. X
To shift down: briefly press the selector
lever to the left towards D–.
The transmission shifts down to the next
gear, depending on the gear currently
selected.
i To prevent the engine from overrevving,
the transmission does not shift down if you
push the selector lever towards D–while
driving at too high a speed.
i AUTOTRONIC shifts down automatically if
the engine speed reaches the lower speed
range for the gear currently selected.
X To shift up: briefly press the selector lever
to the right towards D+.
The transmission shifts up to the next gear,
depending on the gear currently selected.
i If the upper engine speed limit for the gear
currently engaged is reached and you con-
tinue to accelerate, AUTOTRONIC shifts up
automatically.
X To select the ideal gear: press and hold
the selector lever to the left towards D–.
The transmission will shift to a range which
allows ideal acceleration and deceleration.
To do this, the transmission will shift down
one or more gears. Deactivating manual operation
X Press and hold the selector lever towards
D+ until Dis shown again in the multi-func-
tion display.
The transmission shifts from the current
gear to D.
Or:
X Briefly press the program selector button
next to the selector lever.
The letter for the last selected drive pro-
gram Cor Sis shown again in the multi-
function display. The transmission shifts
from the current gear to D.
i If you restart the engine and Mmanual
operation is selected, AUTOTRONIC shifts
into the automatic drive program Cor S. If
automatic drive program Cor Shas been
selected, the automatic transmission will
resume the relevant drive program when
you restart the engine. Controls
169_AKB; 2; 4, en-GB
wdomann,
Version: 2.10.6 2008-07-16T08:52:06+02:00 - Seite 95 ZDateiname: 6515_0315_02_buchblock.pdf; preflight
Page 101 of 305

On-board computer
98 Resetting the trip meter
X Select the Standard display menu
(Y page 103).
X Press and hold the reset button on the left-
hand side of the instrument cluster until the
trip meter is reset. Rev counter
The red band in the rev counter indicates the
engine's overrevving range. The fuel supply is
interrupted to protect the engine when the
red band is reached.
! Do not drive in the overrevving range.
Doing so will damage the engine. H
Environmental note
Avoid driving at high engine speeds, as this
increases your vehicle's consumption
unnecessarily and pollutes the environ-
ment through increased emissions. Clock
On vehicles without an audio system or with
Audio 5*/Audio 20*, you can set the time
using the on-board computer (Y page 109). Outside temperature display
G
Risk of accident
The road surface may be icy, especially in
wooded areas or on bridges, even if tem-
peratures are just above freezing point. The
vehicle could skid if you fail to adapt your
driving style. You should therefore always
adapt your driving style and speed to suit
the weather conditions.
Changes in the outside temperature are dis-
played after a short delay. On-board computer
Points to remember
The on-board computer is activated as soon
as you turn the key to position 1in the ignition
lock. You can use the on-board computer to
call up information relating to your vehicle
and to make and adjust settings. G
Risk of accident
Only use the on-board computer when road
and traffic conditions permit. You would
otherwise be distracted and unable to con-
centrate properly on driving, and could
cause an accident. Multi-function steering wheel
You can control the multi-function display and
the settings in the on-board computer using
the buttons on the multi-function steering
wheel. Controls
* optional
169_AKB; 2; 4, en-GB
wdomann,
Version: 2.10.6
2008-07-16T08:52:06+02:00 - Seite 98 Dateiname: 6515_0315_02_buchblock.pdf; preflight