2008 MERCEDES-BENZ A-CLASS HATCHBACK engine
[x] Cancel search: enginePage 130 of 305

Driving sys
tems 127
A warning tone sounds. the multi-function
display shows the message:
Park Assist
cancelled.
When active parking assist is cancelled, you
must steer again yourself.
Trailer towing* For vehicles with a trailer coupling, the mini-
mum length for parking spaces is slightly
increased.
If you have attached a trailer to your vehicle,
you should not use active parking assist.
Once the electrical connection is established
between your vehicle and the trailer, active
parking assist is no longer available. Park-
tronic is deactivated for the rear area. ECO start/stop function*
The ECO start/stop function automatically
switches off the engine as soon as you stop
the vehicle and restarts the engine as soon as
you prepare to pull away again. Each time the
engine is started using the key, the ECO
start/stop function is activated.
Conditions for the automatic engine
switch-off The ECO start/stop function automatically
switches off the engine if all of the following
conditions are met:
R you have shifted to neutral
R the clutch pedal is not depressed
R the brake pedal is depressed
R the vehicle speed is very low
R the engine has reached its operating tem-
perature
R the indicator lamp in the ECO button is lit
green
R the bonnet is closed
R the outside temperature is within the com-
fort range R
the battery is sufficiently charged
R the brake vacuum is stable
Conditions for the automatic engine
start The ECO start/stop function automatically
switches on the engine if one of the following
conditions is met:
R
the brake pedal is released
R the clutch pedal is depressed
R the vehicle speed exceeds a certain thresh-
old
R the ECO button is pressed
R the brake vacuum has decreased
R the battery charge has dropped
R the demister function of Thermotronic *is
selected Controls
* optional
169_AKB; 2; 4, en-GB
wdomann,
Version: 2.10.6 2008-07-16T08:52:06+02:00 - Seite 127 ZDateiname: 6515_0315_02_buchblock.pdf; preflight
Page 131 of 305

Driving sys
tems 128
Activating/deactivating the ECO start/
stop function 1
To activate/deactivate the ECO start/
stop function
2 Indicator lamp If indicator lamp
2is off, the ECO start/stop
function is deactivated. The engine will then
not be switched off automatically when the
vehicle stops.
i The next time that the engine is started
using the key, the ECO start/stop function
is automatically reactivated. Controls
169_AKB; 2; 4, en-GB
wdomann,
Version: 2.10.6
2008-07-16T08:52:06+02:00 - Seite 128 Dateiname: 6515_0315_02_buchblock.pdf; preflight
Page 133 of 305
Air conditioning
130 General notes
The air-conditioning system*/
Thermotronic* controls the temperature and
the humidity of the vehicle interior and filters
out undesirable substances from the air.
Heatmatic/the air-conditioning system*/
Thermotronic* is only operational when the
engine is running. Optimum operation is ach-
ieved only when you drive with the side win-
dows and panorama louvred sliding sun-
roof* closed. i
Ventilate the vehicle for a brief period
during warm weather, e.g. using the con-
venience opening feature (Y page 86). This
will speed up the cooling process and the
desired vehicle interior temperature will be
reached more quickly.
i The integrated filter filters out most par-
ticles of dust and completely filters out pol-
len. A clogged filter reduces the amount of
air supplied to the vehicle interior. For this
reason, you should always observe the interval for replacing the filter, which is
specified in the Service Booklet. As it
depends on environmental conditions, e.g.
heavy air pollution, the interval may be
shorter than stated in the Service Booklet. G
Risk of accident
Observe the settings recommended on the
following pages. The windows could other-
wise mist up. This may obstruct your view
of the traffic situation, thereby causing an
accident. Cont
rols
* optional
169_AKB; 2; 4, en-GB
wdomann
,V ersion: 2.10.6
2008-07-16T08:52:06+02:00 - Seite 130 Dateiname: 6515_0315_02_buchblock.pdf; preflight
Page 139 of 305

Air conditioning
136 Switching cooling with air dehumidi-
fication on/off
The "cooling with dehumidification" function
is only available when the engine is running.
The air inside the vehicle is cooled and dehu-
midified according to the temperature selec-
ted. This prevents the windows from misting
up. G
Risk of accident
If the "cooling with air dehumidification"
function is deactivated, the air inside the
vehicle will not be cooled (during warm
weather) or dehumidified. The windows
could mist up more quickly. This may pre-
vent you from observing the traffic condi-
tions, thereby causing an accident. H
Environmental note
The cooling system uses the refrigerant
R134A. This refrigerant does not damage
the earth's ozone layer.
Condensation may drip from the underside of
the vehicle when Thermatic is in cooling
mode.
The "cooling with air dehumidification" func-
tion is only available with air conditioning *or
Thermotronic*. X
To switch on: press theœbutton.
The indicator lamp in the œbutton lights
up.
X To deactivate: press theœbutton.
The indicator lamp in the œbutton goes
out. The cooling with air dehumidification
function has a delayed switch-off feature. Controlling the air conditioning auto-
matically
Only Thermotronic* features the "control air
conditioning automatically" function.
In automatic mode, the set temperature is
maintained automatically at a constant level.
The system automatically regulates the tem-
perature of the dispensed air, the airflow and
the air distribution.
The automatic air conditioning will achieve
optimal operation if "cooling with air dehu-
midification" is also activated. If necessary,
cooling with air dehumidification can be deac-
tivated. X
Turn the key to position 2in the ignition
lock.
X Set the desired temperature.
X To activate: press theUbutton.
The indicator lamp in the Ubutton
comes on. Automatic air distribution and
airflow are activated.
X To deactivate: press theUbutton.
The indicator lamp in the Ubutton goes
out. The airflow is regulated to the level set.
The air distribution is set to the bposi-
tion. Setting the temperature
Heatmatic/air-conditioning system* You can set the temperature for the entire
vehicle.
X
Turn the key to position 2in the ignition
lock.
X To increase/reduce: turn thumb-
wheel 1clockwise or anti-clockwise
(Y page 131), (Y page 132). Only adjust the
temperature in small increments. Start at
22 †. 17
17 Vehicles with air conditioning* Controls
* optional
169_AKB; 2; 4, en-GB
wdomann,
Version: 2.10.6
2008-07-16T08:52:06+02:00 - Seite 136 Dateiname: 6515_0315_02_buchblock.pdf; preflight
Page 145 of 305
Roof
142
i
If you open the side windows or the pan-
orama louvred sliding sunroof* manually
after closing with the convenience closing
feature, they will remain in this position
when opened using the convenience open-
ing feature. Switching the residual heat on/off
The "residual heat" function is only available
with Thermotronic*.
It is possible to make use of the residual heat
of the engine to continue heating the station-
ary vehicle for up to 30 minutes after the
engine has been switched off. The heating
time depends on the set interior temperature.
i The blower will run at a low speed regard-
less of the airflow setting.
i If you activate the "residual heat" function
at high temperatures, only the ventilation
will be activated. The blower runs at
medium speed.
X Turn the key to position 0in the ignition
lock or remove it.
X To activate: press theTbutton.
The indicator lamp in the Tbutton lights
up. X
To deactivate: press theTbutton.
The indicator lamp in the Tbutton goes
out.
i The residual heat automatically switches
off after around 30 minutes or if:
R the ignition is switched on
R the battery voltage drops Roof
Panorama roof*
G
Risk of injury
The glass in the panorama sunroof* could
break in an accident.
If you are not wearing a seat belt, there is
a risk that you could be thrown through the
opening in the event of the vehicle over-
turning. Therefore, always wear a seat belt
to reduce the risk of injuries. Panorama louvred sliding sunroof*
G
Risk of injury
Make sure that nobody can become trap-
ped when closing the panorama louvred
sliding sunroof. If danger threatens, release
the switch and press the switch again to
reopen the panorama louvred sliding sun-
roof. G
Risk of injury
Never leave children unsupervised in the
vehicle. Always remove the key from the
ignition lock, even if you are leaving the
vehicle only briefly. Controls
* optional
169_AKB; 2; 4, en-GB
wdomann,
Version: 2.10.6
2008-07-16T08:52:06+02:00 - Seite 142 Dateiname: 6515_0315_02_buchblock.pdf; preflight
Page 148 of 305
Loading and stowing
145
Benz vehicles. This helps to prevent dam-
age to the vehicle.
Position the load on the roof rack in such a
way that the vehicle will not sustain dam-
age even when it is in motion.
Depending on the vehicle's equipment,
make sure that you can:
R open the panorama louvred sliding sun-
roof* fully
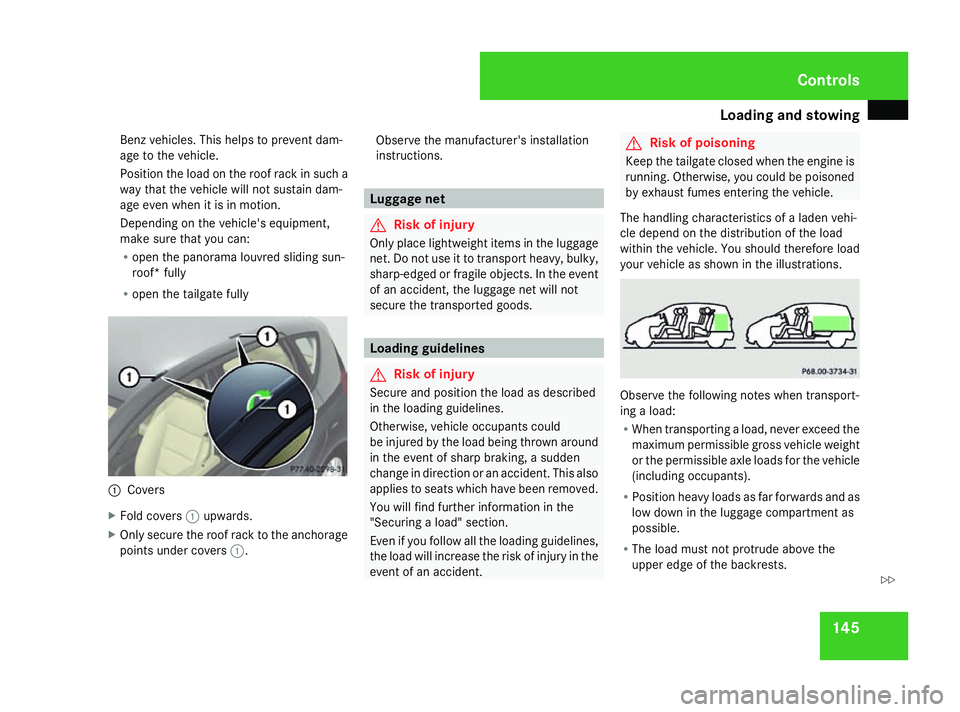
R open the tailgate fully 1
Covers
X Fold covers 1upwards.
X Only secure the roof rack to the anchorage
points under covers 1. Observe the manufacturer's installation
instructions. Luggage net
G
Risk of injury
Only place lightweight items in the luggage
net. Do not use it to transport heavy, bulky,
sharp-edged or fragile objects. In the event
of an accident, the luggage net will not
secure the transported goods. Loading guidelines
G
Risk of injury
Secure and position the load as described
in the loading guidelines.
Otherwise, vehicle occupants could
be injured by the load being thrown around
in the event of sharp braking, a sudden
change in direction or an accident. This also
applies to seats which have been removed.
You will find further information in the
"Securing a load" section.
Even if you follow all the loading guidelines,
the load will increase the risk of injury in the
event of an accident. G
Risk of poisoning
Keep the tailgate closed when the engine is
running. Otherwise, you could be poisoned
by exhaust fumes entering the vehicle.
The handling characteristics of a laden vehi-
cle depend on the distribution of the load
within the vehicle. You should therefore load
your vehicle as shown in the illustrations. Observe the following notes when transport-
ing a load:
R
When transporting a load, never exceed the
maximum permissible gross vehicle weight
or the permissible axle loads for the vehicle
(including occupants).
R Position heavy loads as far forwards and as
low down in the luggage compartment as
possible.
R The load must not protrude above the
upper edge of the backrests. Controls
169_AKB; 2; 4, en-GB
wdomann
, Version: 2.10.6
2008-07-16T08:52:06+02:00 - Seite 145 ZDateiname: 6515_0315_02_buchblock.pdf; preflight
Page 159 of 305
Loading and stowing
156
X
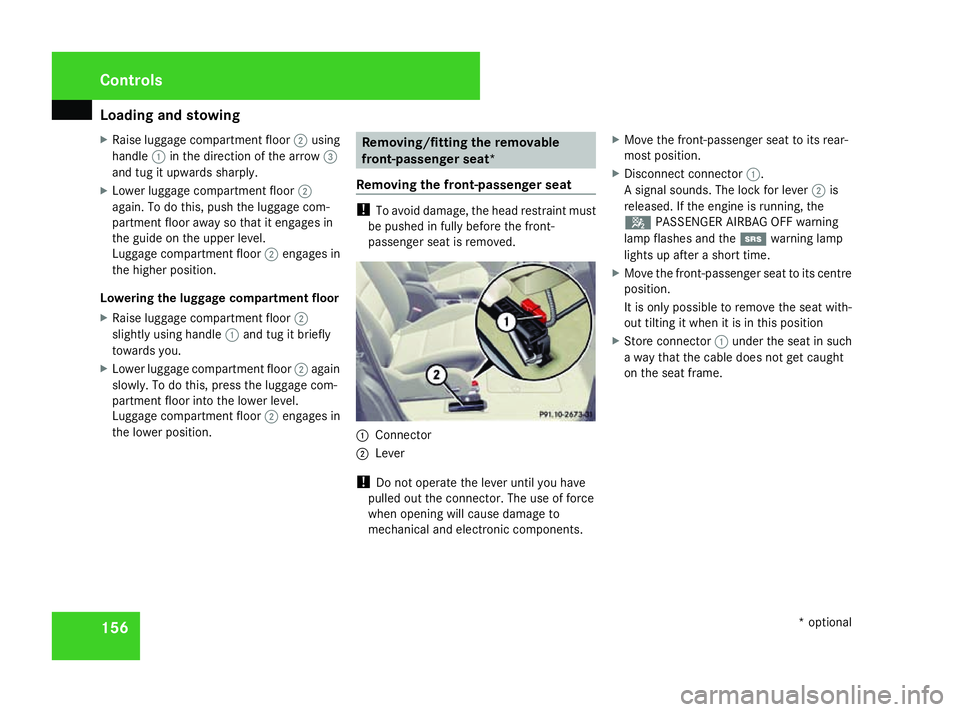
Raise luggage compartment floor 2using
handle 1in the direction of the arrow 3
and tug it upwards sharply.
X Lower luggage compartment floor 2
again. To do this, push the luggage com-
partment floor away so that it engages in
the guide on the upper level.
Luggage compartment floor 2engages in
the higher position.
Lowering the luggage compartment floor
X Raise luggage compartment floor 2
slightly using handle 1and tug it briefly
towards you.
X Lower luggage compartment floor 2again
slowly. To do this, press the luggage com-
partment floor into the lower level.
Luggage compartment floor 2engages in
the lower position. Removing/fitting the removable
front-passenger seat*
Removing the front-passenger seat !
To avoid damage, the head restraint must
be pushed in fully before the front-
passenger seat is removed. 1
Connector
2 Lever
! Do not operate the lever until you have
pulled out the connector. The use of force
when opening will cause damage to
mechanical and electronic components. X
Move the front-passenger seat to its rear-
most position.
X Disconnect connector 1.
A signal sounds. The lock for lever 2is
released. If the engine is running, the
5 PASSENGER AIRBAG OFF warning
lamp flashes and the 1warning lamp
lights up after a short time.
X Move the front-passenger seat to its centre
position.
It is only possible to remove the seat with-
out tilting it when it is in this position
X Store connector 1under the seat in such
a way that the cable does not get caught
on the seat frame. Controls
* optional
169_AKB; 2; 4, en-GB
wdomann,
Version: 2.10.6
2008-07-16T08:52:06+02:00 - Seite 156 Dateiname: 6515_0315_02_buchblock.pdf; preflight
Page 160 of 305
Loading and stowing
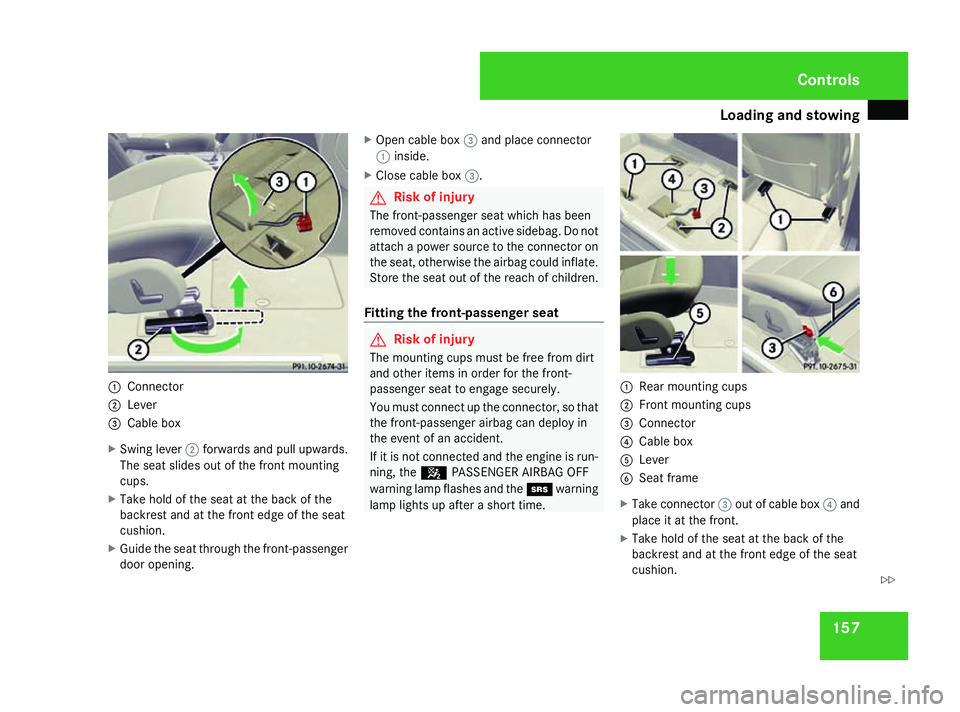
1571
Connector
2 Lever
3 Cable box
X Swing lever 2forwards and pull upwards.
The seat slides out of the front mounting
cups.
X Take hold of the seat at the back of the
backrest and at the front edge of the seat
cushion.
X Guide the seat through the front-passenger
door opening. X
Open cable box 3and place connector
1 inside.
X Close cable box 3. G
Risk of injury
The front-passenger seat which has been
removed contains an active sidebag. Do not
attach a power source to the connector on
the seat, otherwise the airbag could inflate.
Store the seat out of the reach of children.
Fitting the front-passenger seat G
Risk of injury
The mounting cups must be free from dirt
and other items in order for the front-
passenger seat to engage securely.
You must connect up the connector, so that
the front-passenger airbag can deploy in
the event of an accident.
If it is not connected and the engine is run-
ning, the 5PASSENGER AIRBAG OFF
warning lamp flashes and the 1warning
lamp lights up after a short time. 1
Rear mounting cups
2 Front mounting cups
3 Connector
4 Cable box
5 Lever
6 Seat frame
X Take connector 3out of cable box 4and
place it at the front.
X Take hold of the seat at the back of the
backrest and at the front edge of the seat
cushion. Controls
169_AKB; 2; 4, en-GB
wdomann,
Version: 2.10.6
2008-07-16T08:52:06+02:00 - Seite 157 ZDateiname: 6515_0315_02_buchblock.pdf; preflight