Page 245 of 305

Locking/unlocking in an emergency
242
X
Turn the emergency key element back and
remove it.
X Pull the door handle again. Locking the vehicle
If the vehicle can no longer be locked cen-
trally with the key:
5-door X
Close the front-passenger door, the rear
door on the front-passenger side and the
tailgate.
X Open the driver’s door and the rear door on
the driver’s side.
X Press the locking button on the driver’s
door (Y page 61).
The locking knobs in the front-passenger
door and in the rear doors drop down.
X Press the locking knobs in the front-
passenger and rear doors down manually,
if necessary.
X Close the driver's door from the outside.
X Press down the locking knob in the driver's
door by reaching through the open rear
door. i
Make sure that you have the key with you
and have not left it in the vehicle.
X Close the rear door on the driver’s side.
The vehicle is locked.
3-door X
Close the front-passenger door.
X Open the driver's door and the tailgate.
X Press the locking button on the driver’s
door (Y page 61).
The locking knob in the front-passenger
door moves down.
X Press down the locking knob manually, if
necessary.
X Close the driver's door from the outside.
X Press down the locking knob in the driver's
door by reaching through the open tailgate.
i Make sure that you have the key with you
and have not left it in the vehicle.
X Close the tailgate.
The vehicle is locked. Emergency fuel filler flap release
G
Risk of injury
The corners of the vehicle walls may be
sharp-edged. You could injure yourself
while carrying out an emergency release of
the fuel filler flap. Avoid contact with the
edges of the vehicle walls.
The emergency release is located on the
right-hand side of the luggage compartment,
behind the side trim panel when viewed in the
direction of travel.
X Open the tailgate.
X Open the cover on the right-hand side of
the luggage compartment (Y page 161). 1
Emergency release Practical advice
169_AKB; 2; 4, en-GB
wdomann,
Version: 2.10.6 2008-07-16T08:52:06+02:00 - Seite 242Dateiname: 6515_0315_02_buchblock.pdf; preflight
Page 253 of 305

Changing the bulbs
250
Changing the tail lamps X
Switch off the lights.
X Open the luggage compartment.
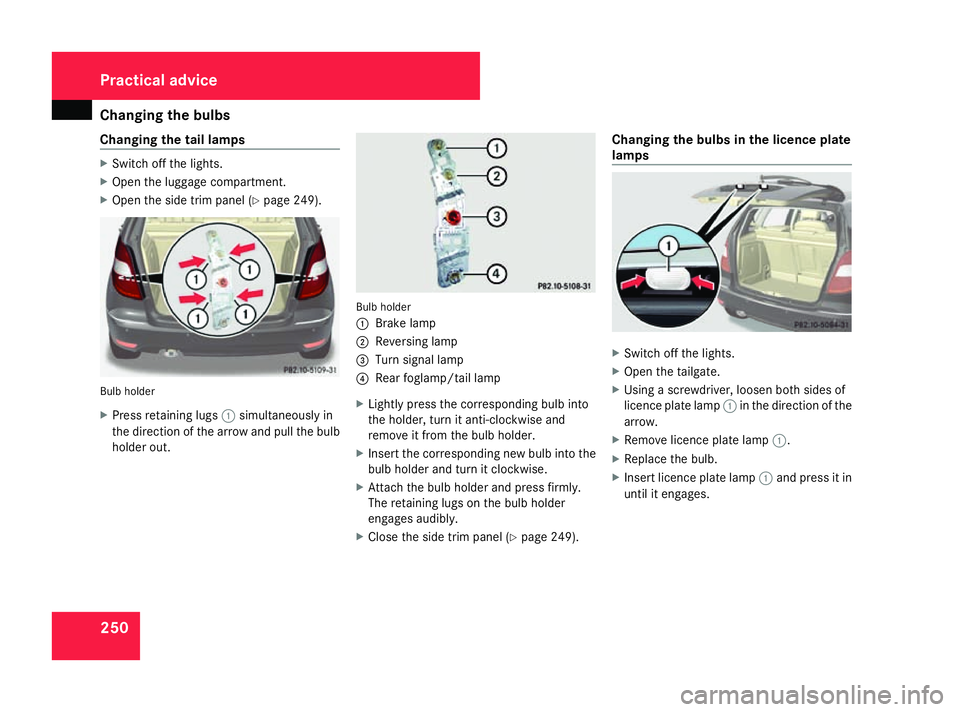
X Open the side trim panel (Y page 249).Bulb holder
X
Press retaining lugs 1simultaneously in
the direction of the arrow and pull the bulb
holder out. Bulb holder
1
Brake lamp
2 Reversing lamp
3 Turn signal lamp
4 Rear foglamp/tail lamp
X Lightly press the corresponding bulb into
the holder, turn it anti-clockwise and
remove it from the bulb holder.
X Insert the corresponding new bulb into the
bulb holder and turn it clockwise.
X Attach the bulb holder and press firmly.
The retaining lugs on the bulb holder
engages audibly.
X Close the side trim panel (Y page 249).Changing the bulbs in the licence plate
lamps
X
Switch off the lights.
X Open the tailgate.
X Using a screwdriver, loosen both sides of
licence plate lamp 1in the direction of the
arrow.
X Remove licence plate lamp 1.
X Replace the bulb.
X Insert licence plate lamp 1and press it in
until it engages. Practical advice
169_AKB; 2; 4, en-GB
wdomann
,V ersion: 2.10.6
2008-07-16T08:52:06+02:00 - Seite 250 Dateiname: 6515_0315_02_buchblock.pdf; preflight
Page 263 of 305

Flat tyre
2601
Wheel wrench
X Using wheel wrench 1, loosen the bolts on
the wheel you wish to change by about one
full turn. Do not unscrew the bolts com-
pletely.
Raising the vehicle G
Risk of injury
The jack is designed only to raise the vehi-
cle for a short time while a wheel is being
changed.
The vehicle must be placed on stands if you
intend to work under it.
Make sure that the jack is placed on a firm,
non-slip, level surface. Do not use wooden
blocks or similar objects as a jack underlay. Otherwise, the jack will not be able to ach-
ieve its load-bearing capacity due to the
restricted height.
Do not start the engine at any time while
the wheel is being changed.
Do not lie under the vehicle when it is being
supported by the jack. If you do not raise
the vehicle as described, it could slip off the
jack (e.g. if the engine is started or a door
or the tailgate is opened or closed) and you
could be seriously injured. G
Risk of accident
If you fail to position the jack correctly, the
vehicle may:
R slip off the jack
R injure you or others
R be damaged
Thus, it is important to make sure that the
jack is positioned correctly in the respec-
tive jacking points. Before positioning the
jack, remove any dirt that may have collec-
ted in the jacking points.
The jacking points for the jack are located
behind the wheel housings of the front wheels
and in front of the wheel housings of the rear
wheels. 1
Jacking point
2 Jack
3 Ratchet ring spanner with socket wrench
X Position jack 2at jacking point 1. Practical advice
169_AKB; 2; 4, en-GB
wdomann,
Version: 2.10.6
2008-07-16T08:52:06+02:00 - Seite 260 Dateiname: 6515_0315_02_buchblock.pdf; preflight