Page 273 of 312

it from working. Information about your vehicle’s emission system is on
the Vehicle Emission Control Information Decal located on or near the
engine. This decal identifies engine displacement and gives some tune up
specifications.
Please consult yourWarranty Information Booklet for complete
emission warranty information.
On board diagnostics (OBD-II)
Your vehicle is equipped with a computer that monitors the engine’s
emission control system. This system is commonly known as the On
Board Diagnostics System (OBD-II). The OBD-II system protects the
environment by ensuring that your vehicle continues to meet
government emission standards. The OBD-II system also assists your
authorized dealer in properly servicing your vehicle. When the
indicator illuminates, the OBD-II system has detected a malfunction.
Temporary malfunctions may cause the
indicator to illuminate.
Examples are:
1. The vehicle has run out of fuel—the engine may misfire or run poorly.
2. Poor fuel quality or water in the fuel—the engine may misfire or run poorly.
3. The fuel cap may not have been securely tightened. See Fuel filler
cap in this chapter.
4. Driving through deep water—the electrical system may be wet.
These temporary malfunctions can be corrected by filling the fuel tank
with good quality fuel, properly tightening the fuel cap or letting the
electrical system dry out. After three driving cycles without these or any
other temporary malfunctions present, the
indicator should stay off
the next time the engine is started. A driving cycle consists of a cold
engine startup followed by mixed city/highway driving. No additional
vehicle service is required.
If the
indicator remains on, have your vehicle serviced at the first
available opportunity. Although some malfunctions detected by the
OBD-II may not have symptoms that are apparent, continued driving
with the
indicator on can result in increased emissions, lower fuel
economy, reduced engine and transmission smoothness, and lead to more
costly repairs.
2008 Tribute Hybrid (thv)
Owners Guide (post-2002-fmt)
USA (fus)
Maintenance and Specifications
273
Page 274 of 312

Readiness for Inspection/Maintenance (I/M) testing
Some state/provincial and local governments may have
Inspection/Maintenance (I/M) programs to inspect the emission control
equipment on your vehicle. Failure to pass this inspection could prevent
you from getting a vehicle registration. Your vehicle may not pass the I/M
test if the
indicator is on or not working properly (bulb is burned
out), or if the OBD-II system has determined that some of the emission
control systems have not been properly checked. In this case, the vehicle
is considered not ready for I/M testing.
If the
indicator is on or the bulb does not work, the vehicle may
need to be serviced. Refer to the On board diagnostics (OBD-II)
description in this chapter.
If the vehicle’s engine or transmission has just been serviced, or the
battery has recently run down or been replaced, the OBD-II system may
indicate that the vehicle is not ready for I/M testing. To determine if the
vehicle is ready for I/M testing, turn the ignition key to the ON position
for 15 seconds without cranking the engine. If the
indicator blinks
eight times, it means that the vehicle is not ready for I/M testing; if
the
indicator stays on solid, it means that the vehicle is ready for
I/M testing.
The OBD-II system is designed to check the emission control system
during normal driving. A complete check may take several days. If the
vehicle is not ready for I/M testing, the following driving cycle consisting
of mixed city and highway driving may be performed:
15 minutes of steady driving on an expressway/highway followed by 20
minutes of stop-and-go driving with at least four 30-second idle periods.
Allow the vehicle to sit for at least eight hours without starting the
engine. Then, start the engine and complete the above driving cycle. The
engine must warm up to its normal operating temperature. Once started,
do not turn off the engine until the above driving cycle is complete. If
the vehicle is still not ready for I/M testing, the above driving cycle will
have to be repeated.
2008 Tribute Hybrid (thv)
Owners Guide (post-2002-fmt)
USA (fus)
Maintenance and Specifications
274
Page 275 of 312

BRAKE FLUID
The fluid level will drop slowly as
the brakes wear, and will rise when
the brake components are replaced.
Check fluid levels with the ignition
in the RUN position. Fluid levels
between the “MIN” and “MAX” lines
are within the normal operating
range; there is no need to add fluid.
If the fluid levels are outside of the
normal operating range the
performance of your brake system could be compromised; seek service
from your authorized dealer immediately.
Brake pad replacement information
The Regenerative Braking System checks the integrity of the brake
system at times when the vehicle is parked. This is done by developing
brake pressure for short periods of time. In order to change the brake
pads, it is necessary to enter the Pad Service Mode. This will prevent
brake pressure from being applied.
To enter the Pad Service Mode, perform the following with the vehicle
stationary:1. Place the vehicle in Park and turn ignition to the ON position.
2. Apply the brake pedal.
3. Turn the ignition OFF, then ON three times and then release the brake pedal. The total time elapsed for the three ignition cycles and
brake release must be less than 3 seconds.
The brake warning lamp will:
• flash as stored hydraulic pressure is released.
• remain illuminated once the pressure is completely released.
• flash if the brake is applied.
To exit the Pad Service Mode: 1. Apply the brake pedal and turn the ignition OFF then ON. This will cause brake pressure to be developed within the brake system. Once
brake pressure is developed, the brake warning light will turn off.
2. The Pad Service Mode will also be exited if the gear shift lever is moved from the (P) Park position, the vehicle is moved (wheels
rotate) or the ignition is turned OFF.
MAX
MIN
2008 Tribute Hybrid (thv)
Owners Guide (post-2002-fmt)
USA (fus)
Maintenance and Specifications
275
Page 276 of 312

Note:The brake system on this vehicle can only be bled at a authorized
dealer.
TRANSMISSION FLUID
Checking electronically controlled continuously variable
transmission (eCVT)
Refer to your scheduled maintenance information chapter for
scheduled intervals for fluid checks and changes. Your transaxle does not
consume fluid. It is designed to be filled for life. However, the fluid level
should be checked if you notice some sign of fluid leakage.
Automatic transmission fluid expands when warmed. To obtain an
accurate fluid check, drive the vehicle until it is warmed up
(approximately 20 miles [30 km]). If your vehicle has been
operated for an extended period at high speeds, in city traffic
during hot weather or pulling a trailer, the vehicle should be
turned off for about 30 minutes to allow fluid to cool before
checking.
1. Drive the vehicle 20 miles (30 km) or until it reaches normal operating temperature.
2. Park the vehicle on a level surface and engage the parking brake.
3. With the parking brake engaged and your foot on the brake
pedal, turn the key to the
ACCESSORY position but do not
start the engine. Turn the wheel
to the left to gain access to the
check plug.
4. Latch the gearshift lever in P (Park) and make sure that the engine is OFF by placing the ignition in the Lock position.
2008 Tribute Hybrid (thv)
Owners Guide (post-2002-fmt)
USA (fus)
Maintenance and Specifications
276
Page 277 of 312
5. Using the hole in the splashshield, remove the check plug
from the side of the
transmission.
If this is the first check of the
transmission fluid, it may be
necessary to remove the perforated
section of the splash shield (as
indicated on the splash shield). 6. Be sure the engine has been stopped for at least 3 minutes before performing the fluid level check.
2008 Tribute Hybrid (thv)
Owners Guide (post-2002-fmt)
USA (fus)
Maintenance and Specifications
277
Page 278 of 312

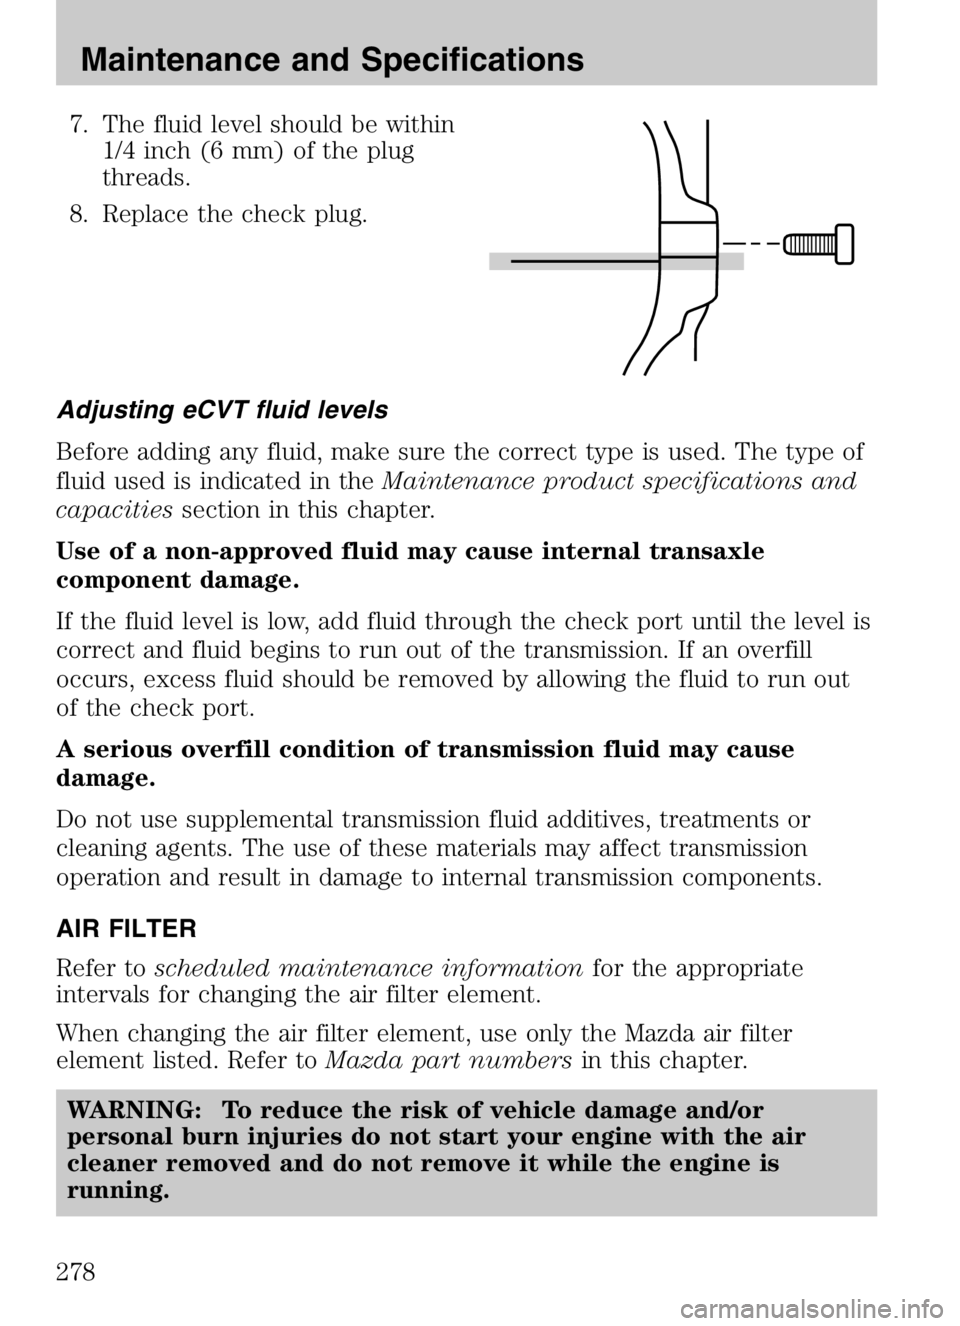
7. The fluid level should be within1/4 inch (6 mm) of the plug
threads.
8. Replace the check plug.
Adjusting eCVT fluid levels
Before adding any fluid, make sure the correct type is used. The type of
fluid used is indicated in the Maintenance product specifications and
capacities section in this chapter.
Use of a non-approved fluid may cause internal transaxle
component damage.
If the fluid level is low, add fluid through the check port until the level is
correct and fluid begins to run out of the transmission. If an overfill
occurs, excess fluid should be removed by allowing the fluid to run out
of the check port.
A serious overfill condition of transmission fluid may cause
damage.
Do not use supplemental transmission fluid additives, treatments or
cleaning agents. The use of these materials may affect transmission
operation and result in damage to internal transmission components.
AIR FILTER
Refer to scheduled maintenance information for the appropriate
intervals for changing the air filter element.
When changing the air filter element, use only the Mazda air filter
element listed. Refer to Mazda part numbersin this chapter.
WARNING: To reduce the risk of vehicle damage and/or
personal burn injuries do not start your engine with the air
cleaner removed and do not remove it while the engine is
running.
2008 Tribute Hybrid (thv)
Owners Guide (post-2002-fmt)
USA (fus)
Maintenance and Specifications
278
Page 279 of 312

Changing the air filter element1. Release the clamps that secure the air filter housing cover.
2. Carefully separate the two halves of the air filter housing.
3. Remove the air filter element from the air filter housing.
4. Wipe the air filter housing and cover clean to remove any dirt or debris and to ensure good sealing.
5. Install a new air filter element. Be careful not to crimp the
filter element edges between
the air filter housing and cover.
This could cause filter damage
and allow unfiltered air to enter
the engine if not properly
seated.
6. Replace the air filter housing cover and secure the clamps.
Note: Failure to use the correct air filter element may result in severe
engine damage. The customer warranty may be voided for any damage to
the engine if the correct air filter element is not used.
HIGH VOLTAGE BATTERY COOLING FILTER (REAR A/C)
MAINTENANCE
The high voltage battery has a dedicated A/C cooling system which
includes an air filter.
Refer to the scheduled maintenance information for the appropriate
intervals for air filter.
When changing the air filter element, use only the Mazda air filter
element listed. Refer to Mazda part numbersin this chapter.
2008 Tribute Hybrid(thv)
Owners Guide (post-2002-fmt)
USA (fus)
Maintenance and Specifications
279
Page 280 of 312
Changing the high voltage battery air filter element1. Remove access panel located in the rear cargo area on the
driver’s side trim panel to
expose the filter cover.
2. Push the tabs (located on each side of filter cover) while pulling
gently to remove filter cover.
3. Install new filter and filter cover (note arrows indicating top side).
4. Re-install the access panel into the trim panel.
2008 Tribute Hybrid (thv)
Owners Guide (post-2002-fmt)
USA (fus)
Maintenance and Specifications
280