2008 Lexus IS F change time
[x] Cancel search: change timePage 2 of 316
Finish
IS F/350/250_Navi_U
(L/O 0712)
1
Introduction
Thank you for your purchase of the Navigation System. Please read
this manual carefully to ensure proper use. Keep this manual in your
vehicle at all times.
The Navigation System is one of the most technologically advanced
vehicle accessories ever developed. The system receives satellite sig-
nals from the Global Positioning System (GPS) operated by the U.S.
Department of Defense. Using these signals and other vehicle sen-
sors, the system indicates your present position and assists in locating
a desired destination.
The navigation system is designed to select efficient routes from your
present starting location to your destination. The system is also designed
to direct you to a destination that is unfamiliar to you in an efficient manner.
The system uses DENSO maps. The calculated routes may not be the
shortest nor the least traffic congested. Your own personal local knowl-
edge or “short cut” may at times be faster than the calculated routes.
The navigation system’s database includes about 75 Point of Interest
categories to allow you to easily select destinations such as restaurants
and banks. If a destination is not in the database, you can enter the street
address or a major intersection close to it and the system will guide you
there.
The system will provide both a visual map and audio instructions. The au-
dio instructions will announce the distance remaining and the direction to
turn in approaching an intersection. These voice instructions will help you
keep your eyes on the road and are timed to provide enough time to allow
you to maneuver, change lanes or slow down.
Page 12 of 316
11
No.NameFunctionPage
6
Zoom out
touch−screen
buttonTouch this button to reduce the map
scale.34
7“Mark”
Touch this button to register the current
position or the cursor position as a
memory point.
29
8“Route”Touch this button to change the route.72, 74
9“Map View”
Touch this button to browse information
about guidance route, to set the Points
of Interest to be displayed on the
screen, or to record the route.
78, 81, 82, 83
10“ AA OFF”
Touch this button to obtain a broader
view. Some of the buttons on the screen
are not displayed. They are displayed
again by touching “ON""”.
11 0
11
Zoom in
touch− screen
buttonTouch this button to magnify the map
scale.34
12
Foot print map
touch− screen
buttonTouch this button to display the foot print
map and the building information.35
13“INFO” buttonPush this button to display the “Informa-
tion” screen.118, 122, 130, 180, 183, 183
14“DISP” buttonPush this button to display the “Display”
screen.178
15
Screen
configuration
touch− screen
button
Touch this button to change the screen
mode.32
16Distance and time
to destinationDisplays the distance, the estimated
travel time to the destination, and the
estimated arrival time at the destination.
71
17
“GPS” mark
(Global
Positioning
System)Whenever the vehicle is receiving sig-
nals from the GPS, this mark is dis-
played.
294
18
Speech
command system
indicatorThe microphone is shown by pushing
the talk switch. The speech command
system can be operated while this indi-
cator is shown.
174
IS F/350/250_Navi_U
(L/O 0712)
Finish
Page 40 of 316
Finish
DESTINATION SEARCH
39
8“Intersection”
The names of two intersecting streets can
be entered. This is helpful if only the gen-
eral vicinity, not the specific address, is
known. 57 ..........................
9“Freeway Ent./Exit”
The name of a freeway (interstate) en-
trance or exit can be entered. 58 ......
10“?”
Function help for the “Destination” screen
can be viewed on this screen. 27 ......
11“Del. Dest.”
Set destinations can be deleted. 59 ....
12“Change”
To change the selected region to search,
touch this button. 40 .................
13Quick access touch −screen but-
tons
One of 5 preset destinations can be se-
lected by touching the screen directly. If a
quick access point has not been regis-
tered, a message will be displayed and will
automatically switch to the setting screen.
To use this function, it is necessary to set
the “Quick Access” for each memory point.
(To register a “Quick Access”, see “ —
Editing memory points” on page 94.) 42
.................................
14Home touch− screen button
A personal home address can be selected
without entering the address each time. If
home has not been registered, a message
will be displayed and will automatically
switch to the setting screen. To use this
function, it is necessary to set “Home” for
the memory point. (To register “Home”,
see “ — Registering home” on page 100.) 42
.................................
15“Coordinates”
A destination can be set by using latitude
and longitude as coordinates. 59 ......
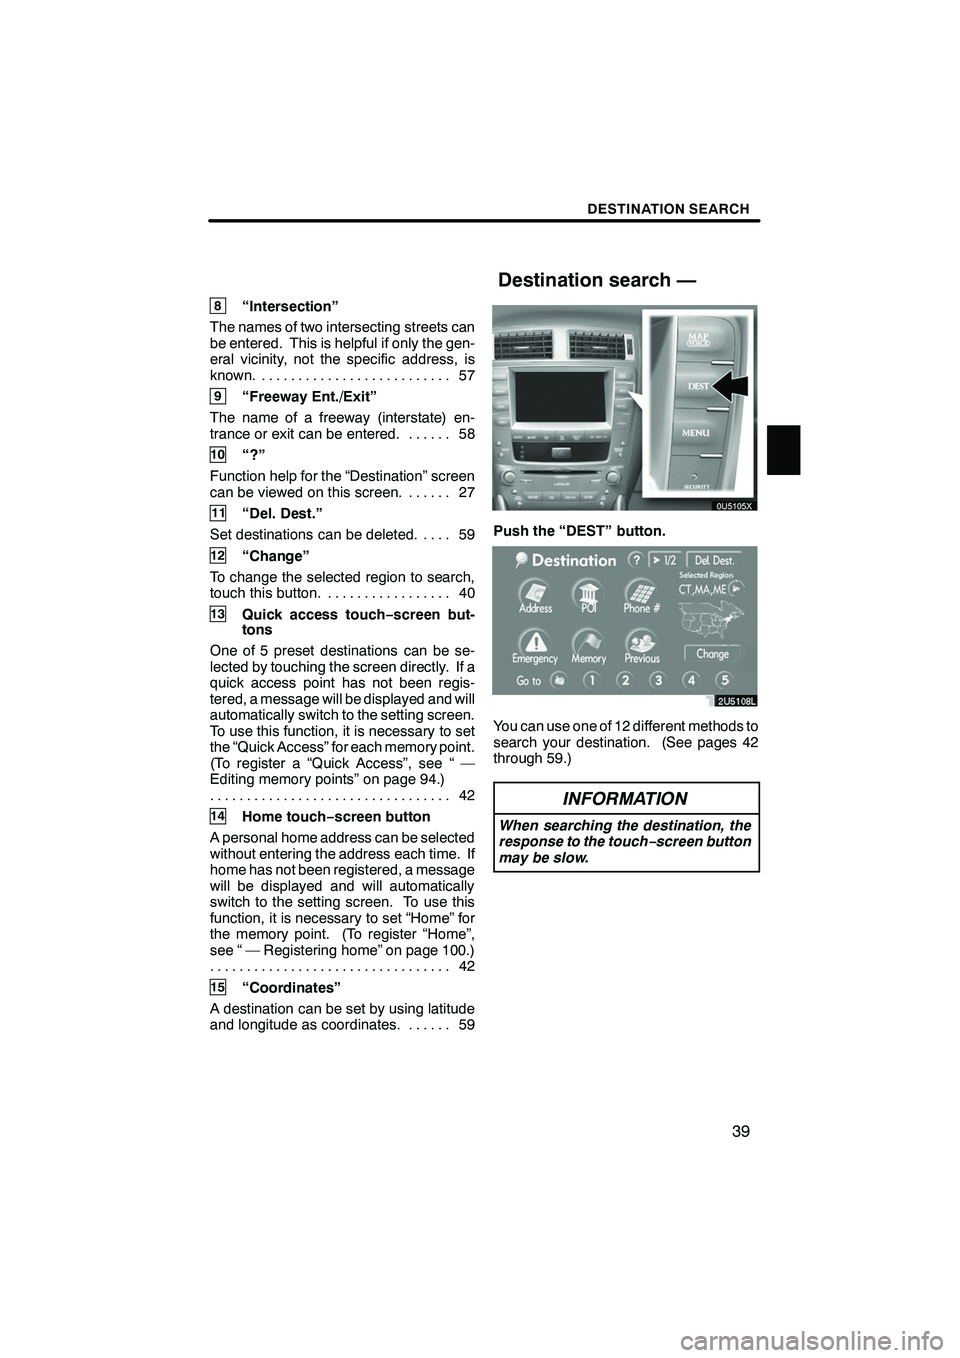
Push the “DEST” button.
You can use one of 12 different methods to
search your destination. (See pages 42
through 59.)
INFORMATION
When searching the destination, the
response to the touch−screen button
may be slow.
IS F/350/250_Navi_U
(L/O 0712)
Destination search —
Page 81 of 316

Finish
ROUTE GUIDANCE
80
D
To display the local POI list
Points of Interest that are within 20 miles
(32 km) of the current position will be listed
from among the selected categories.
1. Touch “Local POI List” on the “Dis-
play POI icons” screen.
2. Touch the button of the desired
Point of Interest.
The selected Points of Interest are dis-
played on the map screen.
“On Route”: When the indicator is illumi-
nated by touching this button, the list of the
items searched along the route is dis-
played.
DTo set a POI as a destination
You can select one of the Points of Interest
icons on the map screen as a destination
and use it for route guidance.
1. Directly touch the Point of Interest
icon that you want to set as a destina-
tion.
The map will shift so that the icon is cen-
tered on the screen and overlaps with the
cursor
. At this time, the distance from
the current position is displayed on the
screen. The distance shown is measured
as a straight line from the current vehicle
position to the POI.
2. When the desired Point of Interest
overlaps with the cursor, touch “Enter
”.
The screen changes and displays the map
location of the selected destination and
route preference. (See “Starting route
guidance” on page 60.)
IS F/350/250_Navi_U
(L/O 0712)
Page 88 of 316
Finish
ADVANCED FUNCTIONS
87
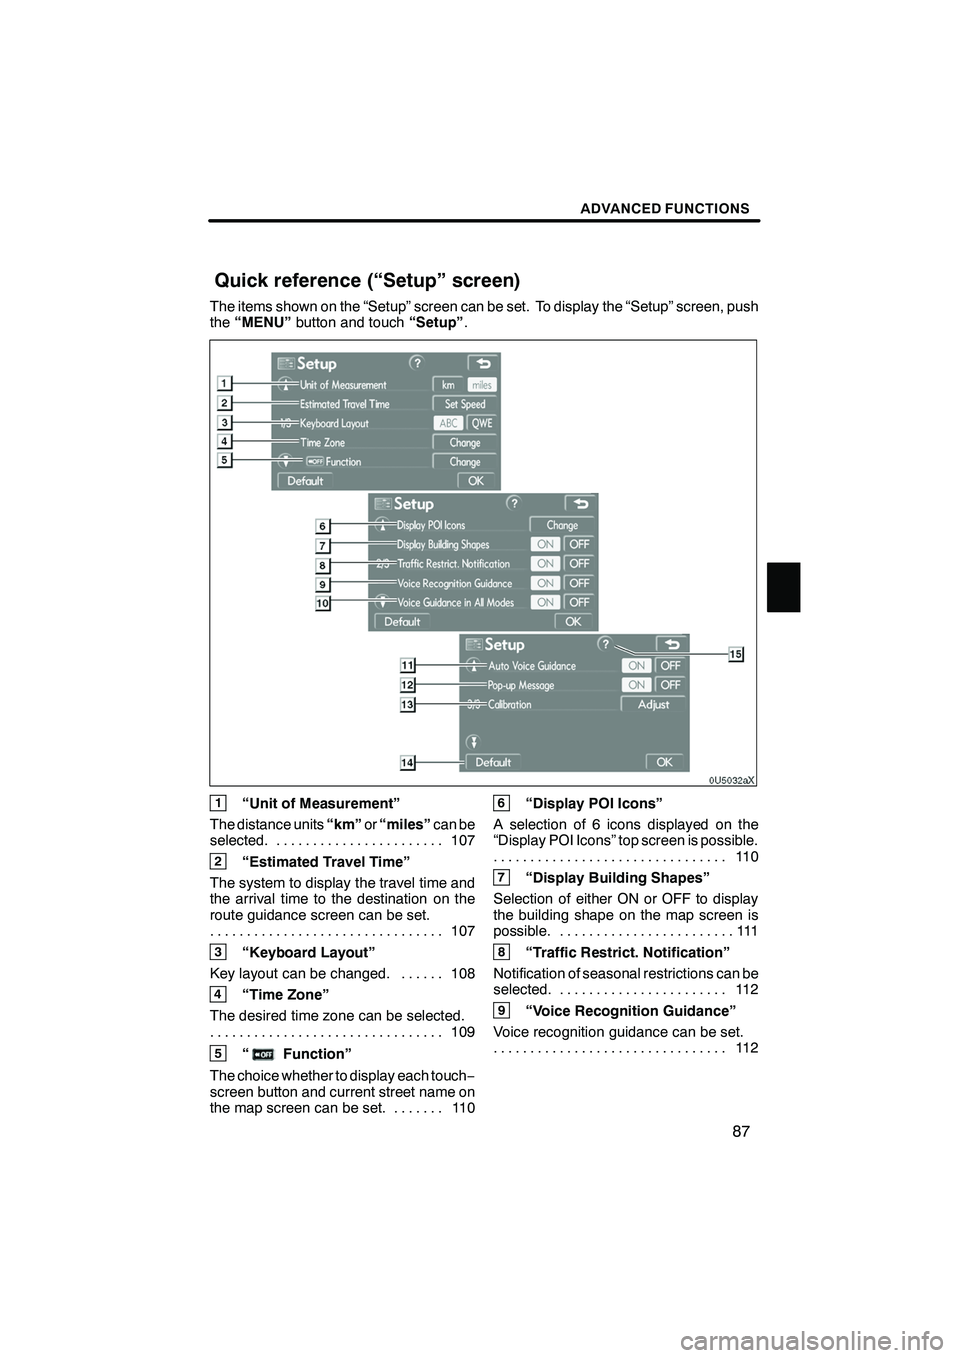
The items shown on the “Setup” screen can be set. To display the “Setup” screen, push
the“MENU” button and touch “Setup”.
1“Unit of Measurement”
The distance units “km”or“miles” can be
selected. 107 .......................
2“Estimated Travel Time”
The system to display the travel time and
the arrival time to the destination on the
route guidance screen can be set. 107
................................
3“Keyboard Layout”
Key layout can be changed. 108 ......
4“Time Zone”
The desired time zone can be selected. 109
................................
5“Function”
The choice whether to display each touch −
screen button and current street name on
the map screen can be set. 110 .......
6“Display POI Icons”
A selection of 6 icons displayed on the
“Display POI Icons” top screen is possible. 11 0
................................
7“Display Building Shapes”
Selection of either ON or OFF to display
the building shape on the map screen is
possible. 111 ........................
8“Traffic Restrict. Notification”
Notification of seasonal restrictions can be
selected. 112 .......................
9“Voice Recognition Guidance”
Voice recognition guidance can be set. 11 2
................................
IS F/350/250_Navi_U
(L/O 0712)
Quick reference (“Setup” screen)
Page 91 of 316
Finish
ADVANCED FUNCTIONS
90
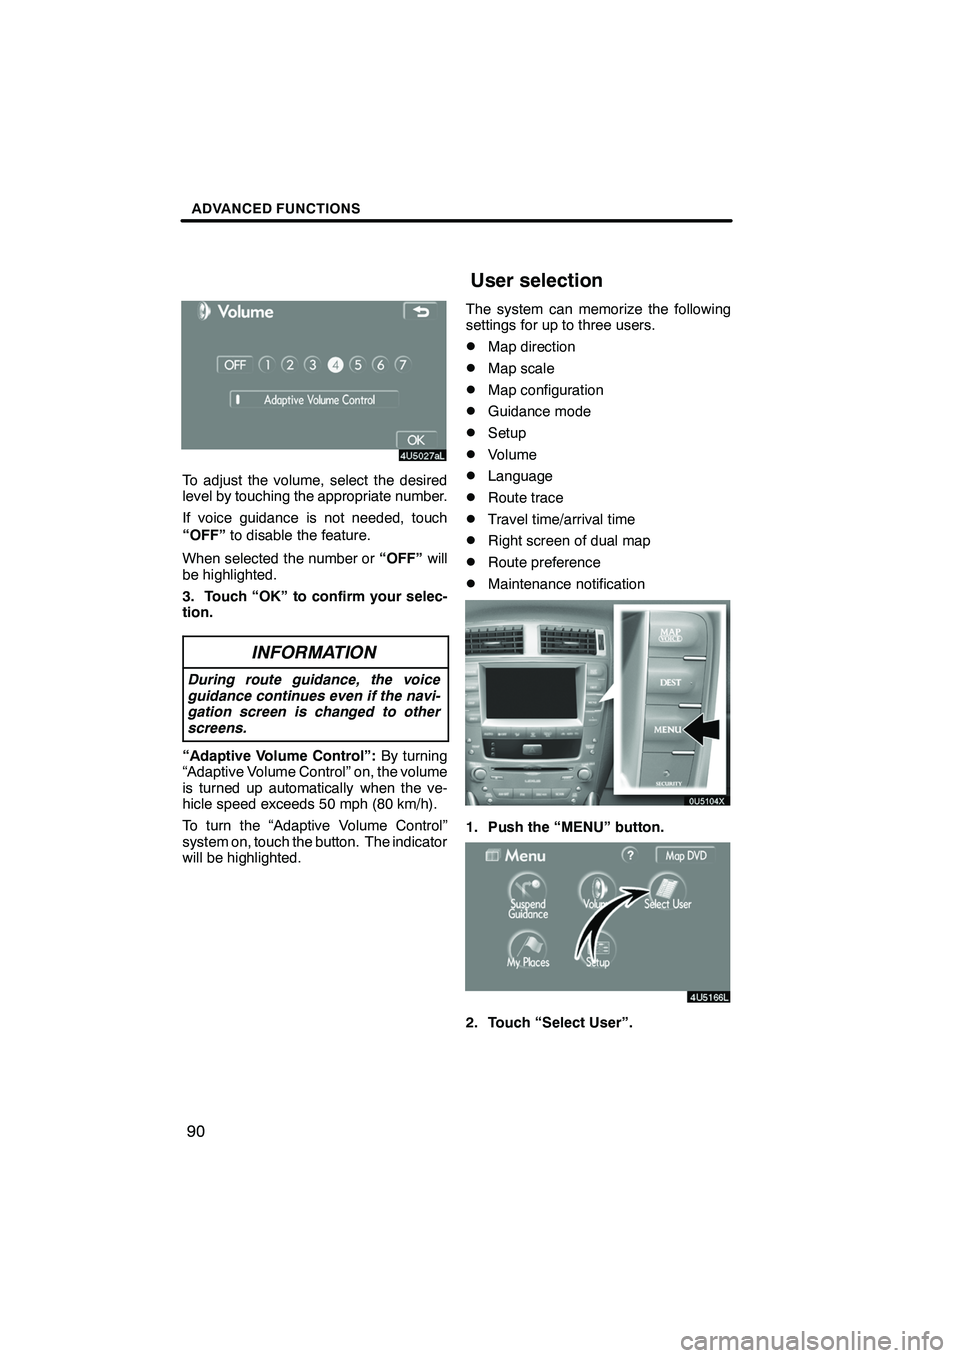
To adjust the volume, select the desired
level by touching the appropriate number.
If voice guidance is not needed, touch
“OFF”to disable the feature.
When selected the number or “OFF”will
be highlighted.
3. Touch “OK” to confirm your selec-
tion.
INFORMATION
During route guidance, the voice
guidance continues even if the navi-
gation screen is changed to other
screens.
“Adaptive Volume Control”: By turning
“Adaptive Volume Control” on, the volume
is turned up automatically when the ve-
hicle speed exceeds 50 mph (80 km/h).
To turn the “Adaptive Volume Control”
system on, touch the button. The indicator
will be highlighted. The system can memorize the following
settings for up to three users.
DMap direction
DMap scale
DMap configuration
DGuidance mode
DSetup
DVolume
DLanguage
DRoute trace
DTravel time/arrival time
DRight screen of dual map
DRoute preference
DMaintenance notification
1. Push the “MENU” button.
2. Touch “Select User”.
IS F/350/250_Navi_U
(L/O 0712)
User selection
Page 108 of 316

Finish
ADVANCED FUNCTIONS
107
D
Unit of measurement
Unit of measurement can be changed.
1. Push the “MENU” button.
2. Touch “Setup” on the “Menu”
screen.
3. Touch “km” or “miles” of “Unit of
Measurement” to choose the distance
unit.
The selected button is highlighted.
4. Touch “OK”.
INFORMATION
This function is available only in En-
glish or Spanish. To switch language,
see “Selecting a language” on page
183.
DEstimated travel time
The speed that is used for the calculation
of the estimated travel time and the esti-
mated arrival time can be set.
1. Push the “MENU” button.
2. Touch “Setup” on the “Menu”
screen.
3. Touch “Set Speed” of the “Esti-
mated Travel Time”.
4. Touchorto set the average
vehicle speeds for “Residential”, “Main
street”, and “Freeway”.
To set the default speeds, touch “De-
fault” .
5. After setting of the desired speeds is
completed, touch “OK”.
IS F/350/250_Navi_U
(L/O 0712)
Page 109 of 316

Finish
ADVANCED FUNCTIONS
108
INFORMATION
DThe displayed time to the destina-
tion is the approximate driving time
that is calculated based on the se-
lected speeds and the actual posi-
tion along the guidance route.
D The time shown on the screen may
vary greatly depending on prog-
ress along the route, which may be
affected by road conditions such
as traffic jams, and construction
work.
D It is possible to display up to 99
hours 59 minutes.
DInput key layout
Key layout can be changed.
1. Push the “MENU” button.
2. Touch “Setup” on the “Menu”
screen.
3. Touch “ABC” or “QWE” of “Key-
board Layout” to choose the input key
layout.
LAYOUT TYPE
" “ABC” type
"“QWE” type
The selected button is highlighted.
4. Touch “OK”.
IS F/350/250_Navi_U
(L/O 0712)