Page 289 of 326

715
Maintenance
POWER STEERING
Checking the power steering fluid
level
With the vehicle on level ground, check
the fluid level in the power steering reser-
voir periodically. The fluid should be
between MAX and MIN marks on the
side of the reservoir at the normal tem-
perature.
Before adding power steering fluid, thor-
oughly clean the area around the reser-
voir cap to prevent power steering fluid
contamination.
If the level is low, add fluid to the MAX
level.In the event the power steering system
requires frequent addition of fluid, the
vehicle should be inspected by an
Authorized Kia Dealer.
Use only the specified power steering
fluid. (Refer to "Recommended
Lubricants" later in this section.)
Power steering hose
Check the connections for oil leaks,
severe damage and the twists in the
power steering hose before driving.
OBL056007
CAUTION
• To avoid damage to the power
steering pump, do not operate the
vehicle for prolonged periods
with a low power steering fluid
level.
• Never start the engine when the
reservoir tank is empty.
• When adding fluid, be careful that
dirt does not get into the tank.
• Too little fluid can make the steer-
ing wheel heavier or strange
noise can be generated.
• The use of the non-specified fluid
could reduce the effectiveness of
the power steering wheel and
cause damage to it.
Page 290 of 326

Maintenance
16 7
AUTOMATIC TRANSMISSION (IF EQUIPPED)
Checking the automatic transmis-
sion fluid level
The automatic transmission fluid
level should be checked regularly.
Keep the vehicle on the level ground with
the parking brake applied and check the
fluid level according to the following pro-
cedure.
1. Place the selector lever in N (Neutral)
position and confirm the engine is run-
ning at idle speed.2. After the transmission is warmed up
sufficiently (fluid temperature 70~80°C
(158~176°F), for example by 10 min-
utes usual driving, shift the selector
lever through all positions then place
the selector lever in “N (Neutral) or P
(Park)” position.
3. Confirm that the fluid level is in “HOT”
range on the level gauge. If the fluid
level is lower, add the specified fluid
from the fill hole. If the fluid level is
higher, drain the fluid from the drain
hole.
4. If the fluid level is checked in cold con-
dition (fluid temperature 20~30°C
(68~86°F) add the fluid to “COLD” line
and then recheck the fluid level
according to the above step 2.
OBL056002
Automatic transmission fluid dipstick
25 C 75 C
E2BLA712A LowHOT
COLDFull
Low
Cold fluid scaleHot fluid scale
Full
Page 291 of 326

717
Maintenance
✽
NOTICE
“COLD” scale is for reference only and
should NOT be used to determine trans-
mission fluid level.
✽
NOTICE
New automatic transmission fluid
should be red. The red dye is added so
the assembly plant can identify it as
automatic transmission fluid and distin-
guish it from engine oil or antifreeze.
The red dye, which is not an indicator of
fluid quality, is not permanent. As the
vehicle is driven, the automatic trans-
mission fluid will begin to look darker.
The color may eventually appear light
brown. Therefore, have an Authorized
Kia dealer change the automatic trans-
mission fluid according to the Scheduled
Maintenance at the beginning of this
section.CAUTION
• Low fluid level causes transmis-
sion slippage. Overfilling can
cause foaming, loss of fluid and
transmission malfunction.
• The use of a non-specified fluid
could result in transmission mal-
function and failure.
WARNING- Parking brake
To avoid sudden movement of the
vehicle, apply parking brake and
depress the brake pedal before
moving the shift lever.
WARNING - Transmission
fluid
The transmission fluid level should
be checked when the engine is at
normal operating temperature. This
means that the engine, radiator,
radiator hose and exhaust system
etc., are very hot. Exercise great
care not to burn yourself during this
procedure.
Page 292 of 326

Maintenance
18 7
LUBRICANTS AND FLUIDS
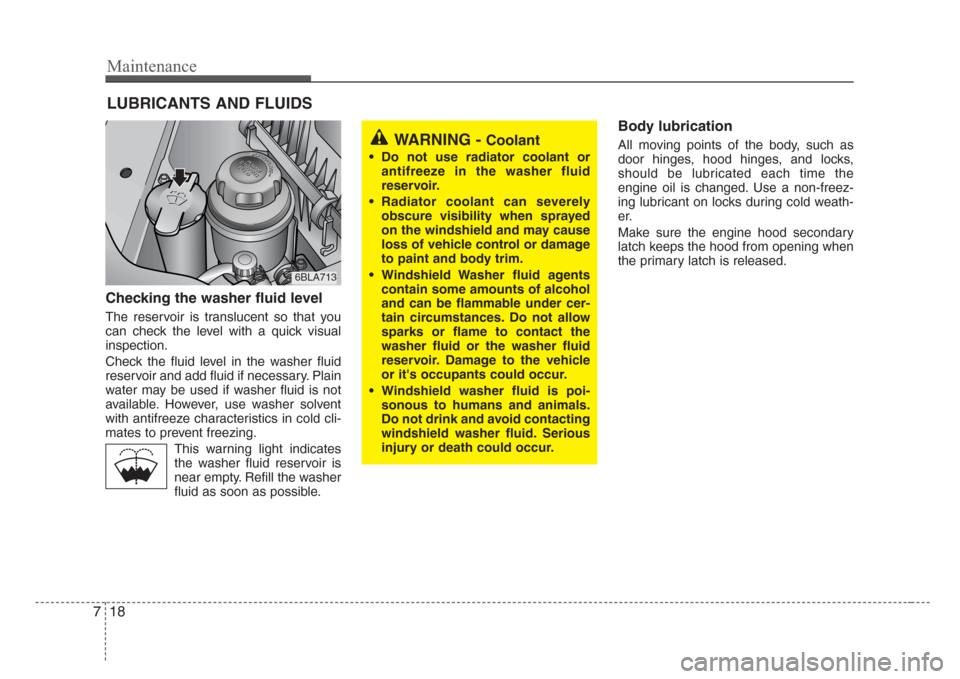
Checking the washer fluid level
The reservoir is translucent so that you
can check the level with a quick visual
inspection.
Check the fluid level in the washer fluid
reservoir and add fluid if necessary. Plain
water may be used if washer fluid is not
available. However, use washer solvent
with antifreeze characteristics in cold cli-
mates to prevent freezing.
This warning light indicates
the washer fluid reservoir is
near empty. Refill the washer
fluid as soon as possible.
Body lubrication
All moving points of the body, such as
door hinges, hood hinges, and locks,
should be lubricated each time the
engine oil is changed. Use a non-freez-
ing lubricant on locks during cold weath-
er.
Make sure the engine hood secondary
latch keeps the hood from opening when
the primary latch is released.WARNING - Coolant
• Do not use radiator coolant or
antifreeze in the washer fluid
reservoir.
• Radiator coolant can severely
obscure visibility when sprayed
on the windshield and may cause
loss of vehicle control or damage
to paint and body trim.
•Windshield Washer fluid agents
contain some amounts of alcohol
and can be flammable under cer-
tain circumstances. Do not allow
sparks or flame to contact the
washer fluid or the washer fluid
reservoir. Damage to the vehicle
or it's occupants could occur.
•Windshield washer fluid is poi-
sonous to humans and animals.
Do not drink and avoid contacting
windshield washer fluid. Serious
injury or death could occur.
6BLA713
Page 293 of 326
719
Maintenance
AIR CLEANER
Element replacement
Have the air cleaner element checked
and replaced in accordance with the
maintenance schedule.
✽
NOTICE
Do not drive with the air cleaner
removed; this will result in excessive
engine wear.
OBL076006N
CAUTION- Engine
Driving without an air cleaner
encourages backfiring, which could
cause a fire in the engine compart-
ment.
Page 294 of 326

Maintenance
20 7
CLIMATE CONTROL AIR FILTER (IF EQUIPPED)
The climate control air filter installed
behind the glove box filters the dust or
other pollutants that come into the vehi-
cle from the outside through the heating
and air conditioning system. If dust or
other pollutants accumulate in the filter
over a period of time, the air flow from the
air vents may decrease, resulting in
moisture accumulation on the inside of
the windshield even when the outside
(fresh) are position is selected. If this
happens, have the climate control air fil-
ter replaced by an Authorized Kia Dealer.The air filter should be replaced every
15,000 km (10,000 miles). If the vehicle
is operated in the severely air-polluted
cities or on dusty rough roads for a long
period, it should be inspected more fre-
quently and replaced earlier. When you
try to replace the air filter by owner main-
tenance, replace it performing the follow-
ing procedure, and in this case, be care-
ful to avoid damaging other components.
Wiper blade maintenance
Commercial hot waxes applied by
automatic car washes have been
known to make the windshield diffi-
cult to clean.
Contamination of either the windshield or
the wiper blades with foreign matter can
reduce the effectiveness of the wind-
shield wipers. Common sources of con-
tamination are insects, tree sap, and hot
wax treatments used by some commer-
cial car washes. If the blades are not wip-
ing properly, clean both the window and
the blades with a good cleaner or mild
detergent, and rinse thoroughly with
clean water.
6BLA523
Outside air
Recirculated
air
Blower
Evaporator core
Heater coreClimate control air filter
WIPER BLADES
CAUTION
To prevent damage to the wiper
blades, do not use gasoline,
kerosene, paint thinner, or other
solvents on or near them.
Page 295 of 326
721
Maintenance
Windshield wiper blade replace-
ment
When the wipers no longer clean ade-
quately, the blades may be worn or
cracked, and require replacement.
1. Raise the wiper arm and turn the wiper
blade assembly to expose the plastic
locking clip.
2. Compress the clip and slide the blade
assembly downward.
3. Lift it off the arm.
4. Install the blade assembly in the
reverse order of removal.
CAUTION
Do not allow the wiper arm to fall
against the windshield,since it may
chip or crack the windshield.
1LDA5023
CAUTION
To prevent damage to the wiper arms
or other components, do not attempt
to move the wipers manually.
CAUTION
The use of a non-specified wiper
blade could result in wiper malfunc-
tion and failure.
1JBA7037
1JBA7038
Page 296 of 326
Maintenance
22 7
Rear window wiper blade replace-
ment
1. Raise the wiper arm and pull out the
wiper blade assembly.2. Install the new blade assembly by
inserting the center part (
➀) into the
slot (
➁) in the wiper arm until it clicks
into place.
3. Make sure the blade assembly is
installed firmly by gently pulling on the
blade.
1KMB70381KMB7039
➀➁
WARNING- Battery
dangers
Always read the following
instructions carefully when
handling a battery.
Keep lighted cigarettes and
all other flames or sparks
away from the battery.
Hydrogen, a highly com-
bustible gas,is always
present in battery cells and
may explode if ignited.
Keep batteries out of the
reach of children because
batteries contain highly
corrosive SULFURIC ACID.
Do not allow battery acid to
contact your skin, eyes,
clothing or paint finish.
(Continued)
BATTERY