Page 113 of 326
Knowing your vehicle
104 3
1. Power ON-OFF / Volume Control knob
2. EQ button (Model D446) / Load button
(Model D465)
3. CD EJECT Button
4. Audio Control knob
5. Sound properties
6. AM, FM (Model D465), FM1 (Model
D446), FM2 (Model D446), CD (Model
D465) buttons
7. Sound equalizer and digital signal pro-
cessing (Model D465) /
CD button (Model D446)
Model shown is Model D465. The buttons on your audio system may differ.
For details, see specific descriptions in the following sections.
OBL03465-0
Using Operational and Sound Controls
Page 114 of 326

3 105
Knowing your vehicle
1. Power ON-OFF / Volume Control
knob
Power
To operate your audio system, your igni-
tion key must be in the "ACC" or "ON"
position.
Press the knob to switch on the audio
system. The audio system resumes oper-
ation in either the Radio or CD mode.
Press the knob again to switch off the
audio system.
Volume Control Knob
Rotate the knob clockwise to increase
the volume and rotate the knob counter-
clockwise to reduce the volume.
2. Loading CDs
Model D446:
Only one CD can be loaded at any one
time. If there is already a disc inserted in
the CD player, eject the disc before load-
ing a new CD.
To load a CD, gently insert the CD into
the CD slot. The CD will be automatically
loaded. The CD player then starts to play
the CD.
✽
NOTICE
Do not force-load the CD as it will
damage the loading mechanism and
cause your disc to jam in the player.
If a CD cannot be loaded, check if
there is already a disc in the player
and eject it first.
Model D465:
Press the LOAD button to automatically
switch the audio system on in CD player
mode.
Follow the instructions on the LCD
screen to load and play your CDs.
✽
NOTICE
To load more than 1 CD (maximum of
6), press and hold the load button for
more than 2 seconds. The disc number
indicator will flash to indicate how
many CDs you can still load.
Page 115 of 326

Knowing your vehicle
106 3
3. CD EJECT ( ) Button
Model D446:
Press the button once to eject the CD
from the CD player.
Model D465
Press the button once to eject the
last CD played.
Press and hold button for more than
2 seconds to eject all the CDs in the
changer in sequence beginning with the
last CD played.
✽
NOTICE
You can eject discs even if the audio sys-
tem is switched off.
4. Audio Control knob
Use the audio control knob to change
how music playback sounds and also to
control how sound is distributed to the
speaker system.Sound properties
Press the knob repeatedly to display the
corresponding audio control settings
(Bass, Middle, Treble, Fader, Balance).
The LCD screen displays the audio con-
trol settings in sequence. Once the audio
control setting you want is displayed,
rotate the knob clockwise/anti-clock-
wiseto change the level of that audio
setting.
Bass
Increases/decreases Bass response of
audio reproduction
Middle
Increases/decreases Mid-range
response of audio reproduction
Treble
Increases/decreases Treble response of
audio reproduction
Fader
Sets front/rear balance level for your
speaker system
Balance
Sets left/right balance level for your
speaker system
✽
NOTICE
To return all audio control settings to
the default (centered) positions, press
and hold the audio control knob for
more than 2 seconds. An audible beep
indicates that all audio controls have
been returned to the default setting.
Page 116 of 326

3 107
Knowing your vehicle
5. AM, FM, FM1, FM2, CD buttons
Model D446: AM, FM1, FM2, CD
Model D465: AM, FM, CD
Use the input source selector buttons to
select/switch operation modes. Press the
AMband selector button, FM/FM1/FM2
band selector button(s) or CDor button
to resume operation in the corresponding
mode.
Pressing any of these buttons automati-
cally switches the audio system on.
The LCD screen displays either the radio
frequency you are tuned into or the track
currently played back.
✽
NOTICE
Remember that station Presets (1-6)
stored in FM1 mode can only be
accessed in FM1 mode. Similarly,
FM2 presets can only be accessed in
FM2 mode.
For Model D465:
Press the FM band selector button
repeatedly to switch between the FM1
and FM2 modes.
6. Sound equalizer and digital signal
processing
Both Model D446 and Model D465:EQ
button
EQbutton:
Press the EQbutton repeatedly to select
the sound equalizer setting you want.
The 6 settings are:ROCK, POP, JAZZ,
CLASSIC, TALKand equalizer off. If no
icon is displayed in the LCD screen, the
equalizer is switched off.
The 5 preset equalizer settings have
been optimized for the 5 common genres
of music. For example, the ROCKsetting
enhances bass reproduction with rock
music whereas the CLASSICsetting
enhances the clarity of string instruments
during audio reproduction of classical
music. You may want to experiment with
the different settings to confirm your per-
sonal preferences.
✽
NOTICE
If you store a station Preset (1~6) with a
specific equalizer setting, that setting is
automatically used across other stations
preset.
Page 117 of 326
Knowing your vehicle
108 3
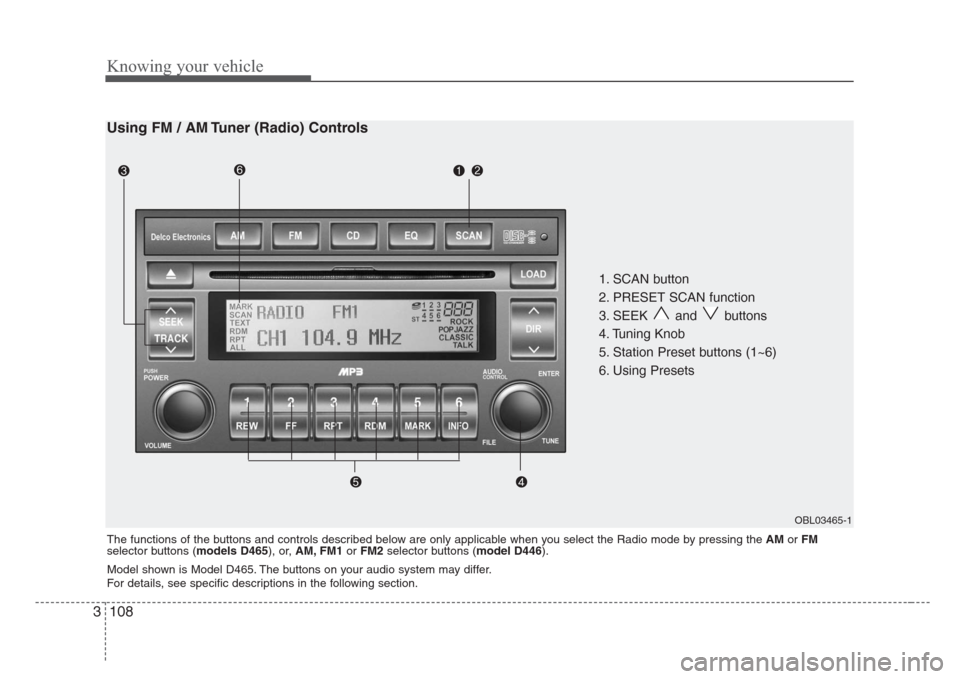
1. SCAN button
2. PRESET SCAN function
3. SEEK and buttons
4. Tuning Knob
5. Station Preset buttons (1~6)
6. Using Presets
OBL03465-1
Using FM / AM Tuner (Radio) Controls
The functions of the buttons and controls described below are only applicable when you select the Radio mode by pressing the AMorFM
selector buttons (models D465), or, AM, FM1orFM2selector buttons (model D446).
Model shown is Model D465. The buttons on your audio system may differ.
For details, see specific descriptions in the following section.
Page 118 of 326

3 109
Knowing your vehicle
1. SCAN button
Frequency band scan function
Press the SCANbutton for the tuner to
scan for radio signals in the selected fre-
quency band (AM or FM). Once the tuner
locks onto the signal of a transmitting
station, it plays that station for 5 seconds
before scanning for the next available
station in the selected frequency band.
If you want to keep listening to a particu-
lar station and want to stop the scanning,
press the SCANbutton again.
This function is useful for providing you
with a good overview of all the radio sta-
tions within range of your tuner.
2. PRESET SCAN function
Press and hold the SCANbutton for
more than 2 seconds. Each preset radio
stations will be automatically played for 5
seconds. If you want to keep listening to
a particular preset station and want to
stop the scanning, press the SCANbut-
ton again.
3. SEEK and buttons
Automatic Channel Selection function
Press the and buttons to scan up
and down the frequency range for the
next available radio station and automat-
ically lock on to that frequency.
The LCD screen displays the frequency
of the radio station transmitting a clear
and strong signal.
Use this function to search for a radio
station you want. If you like a particular
station, you can store it as one of 6
Presets using the Presetbuttons below.
✽
NOTICE
This function is not effective if you are
experiencing poor reception in your
vicinity.
4. Tuning Knob
Manual Channel Selection
Rotate the knob clockwise or counter-
clockwise to manually advance up or
down the frequency range. The tuning
knob also gives you fine-grain control
which you can use to manually fine-tune
your frequency selection. This is useful if
you are searching for a radio signal
which is not strong enough for you to use
the Automatic Channel Selection func-
tion
✽
NOTICE
The speed at which you advance up or
down the frequency range depends on
how fast you turn the knob.
Page 119 of 326

Knowing your vehicle
110 3
5. Station Preset buttons (1~6)
There are 6 Station Preset buttons which
you can use to store the frequencies of
your 6 favorite radio stations. Saving a
station as a preset gives you one-touch
access to the station you want.
Remember that the 6 presets stations
you store are for the specific radio band
mode you are in. That means that you
can store up to 6 stations in AM mode, 6
in FM1 mode, and 6 in FM2 mode. This
means that you can store up to 18 of your
favorite stations in the preset memory.
✽
NOTICE
To switch between FM1 and FM2
mode:
Use the FM1 and FM2 buttons (for
Model D446)
Press the FM button to switch
between FM1 and FM2 modes (For
Model D465)
Remember that if you store a station
as preset 1 in FM2 mode, you must
first select FM2 mode before you can
use that preset button.
This function is not effective if you are
experiencing poor reception in your
vicinity.
6. Using Presets
To save a radio station as a preset:
1. Take note of the band selection dis-
played on the LCD screen (AM, FM1 or
FM2)
2. Tune in to the radio station you want
using either the SEEK UPandDOWN
buttons or the Tuning Knob.
3. Choose the Preset button (1~6) you
want to use to store the radio station.
4. Press and hold the Preset button for
more than 2 seconds.
The system beeps to indicate that it
has saved the new station and displays
the frequency and preset number on
the LCD screen.
✽
NOTICE
Saving a new station erases the previous
setting saved in that preset.
To tune in to a preset station:
1. Select the band (AM, FM1 or FM2) you
want using the band selector buttons.
2. Press the preset button corresponding
to the radio station you want.
The system automatically jumps to the
preset station. The frequency and pre-
set number is displayed on the LCD
screen.
Buttons not in use in Radio mode:
The following buttons and functions are
not used in Radio mode.
•REWbutton
•FFbutton
•RPTbutton
•RDMbutton
•MARKbutton
•NFObutton
Page 120 of 326
3 111
Knowing your vehicle
1. SCAN button
2. Track UP and DOWN buttons
3. CD selector buttons (1~6)
4. Rewind REW and Fast Forward FF
buttons
5. Dir and buttons (MP3 and
WMA discs)
6. File Search Knob
7. RPT, RDM, MARK & INFO buttons
OBL03465-0
The functions of the buttons and controls described below are only applicable when you select the CD mode by pressing the CDselector button
(for both Model D446 and Model D465).
Using CD player Controls
Model shown is D465. The buttons on your audio system may differ.
For details, see specific descriptions in the following section.