Page 222 of 283

69
In case of an emergency
Description Fus e rating Protected component
1 FUEL PUMP 20A Fuel pump
2 H/LP (LO-LH) 15A Headlight (low-left)
3 ABS 10A Anti-lock brake system
4 IGN COIL 15A Ignition coil
5 A/CON COMP 10A Air-conditioner compressor
6 ATM 20A Automatic transaxle control relay
7 MAIN 20A Engine control unit relay
8 O2 SNSR 15A Oxygen sensor
9 EGR 15A
Power train control system sensors
10 HORN 15A Horn
11 TAIL 20A Tail light
12 SUNROOF 20A Sun roof
13 P/SEAT (RH) 20A Power seat (right)
14 FOG LP (FR) 15A Fog light (front)
15 H/LP (HI) 15A Headlight (high)
16 SPARE 30A spare fuse
17 SPARE 20A spare fuse
18 SPARE 15A spare fuse
19 SPARE 10A spare fuse
20 P/SEAT (LH) 30A Power seat (left)
21 AMP 20A Radio amplifier
22 DRL* 15A Daytime running light
Engine compartment
Description Fus e rating Protected component
23 H/LP (LO-RH) 15A Headlight (low beam-right)
24 I/P B+ 30A All electrical system
25 ECU 10A Engine control unit
26 INJECTOR 10A Injector
27 ECS * 15A Electronic control suspension
BLOWER 40A Blower motor
IGN 1 30A Ignition switch
ABS 2 30A Anti-lock brake system
ABS 1 30A Anti-lock brake system
IGN 2 30A Ignition switch
S/WARM 30A Seat warmer
H/LP (LO-LH) - Headlight relay (low beam-left)
FUEL PUMP - Fuel pump relay
HORN - Horn relay
START - Start motor relay
A/CON - Air conditioner relay
H/LP (HI) - Headlight relay (high beam)
FOG LP (FR) - Fog light relay (front)
TAIL LP - Taillight relay
WIPER - Wiper relay
BATT 60A Alternator, Battery
ALT 150A Alternator
COOLING 60A Cooling fan
* : if equipped
Page 224 of 283

611
In case of an emergency
Power connector
Your vehicle is equipped with a power connector to prevent bat-
tery discharge if your vehicle is parked without being operated
for prolonged periods. Use the following procedures before
parking the vehicle for prolonged period.
1. Turn off the engine.
2. Turn off the headlights and tail lights.
3. Open the driver-side knee bolster cover and pull up the“POWER/CONN”.
✽NOTICE
If the power connector is pulled up from the fuse panel, the
warning chime, AV system, clock and intetrior lamps, etc.,
will not operate. Some items must be reset after replace-
ment.
Even though the power connector is pulled up, the battery can still be discharged by operation of the headlights or
other electrical devices.
Des cription Fus e rating Protected component
A/CON 10A Air-conditioning system
P/WDW(LH) 20A Power window (left)
TAIL LP(RH) 10A Taillight (right)
BACK WARN’G 10A Back warning system
DR LP 10A Door courtesy lamp
MIRROR HTD 15A Outside review mirror defroster
ENG SNSR 10A
Power train control system sensors
T/REDUCER10A Seat belt tension reducer
CLOCK 10A Clock
WIPER(FR) 25A Wiper (front)
EPS 10A Electronic power steering
TAIL LP(LH) 10A Tail light (left)
ROOM LP 10A Room lamp
AV, CLOCK 15A Audio, Clock
LAN UNIT 10A Lan unit
TPMS 15A -
H/LP WASHER 20A Headlight washer
SHUNT CONN - Switch illumination
POWER/CONN - Power connector
1GHA403
Power
connector
Page 229 of 283

In case of an emergency
166
When your vehicle is being towed
by another vehicle other than a
tow truck (In case of an emer-
gency)
• Turn the ignition switch to ACC so thesteering wheel isn’t locked.
• Place the transaxle shift lever in N (Neutral).
• Release the parking bake.
• Vehicle equipped with automatic transaxles should not exceed 45 km/h
(28 mph) and should not be towed
more than 80 km (50 miles).
• Press the brake pedal with more force than normal since you will have
reduced brake performance.
• More steering effort will be required because the power steering system
will be disabled.
• If you are driving down a long hill, the brakes may overheat and brake per-
formance will be reduced. Stop often
and let the brakes cool off.
Tips for towing a stuck vehicle
The following methods are effective
when your vehicle is stuck in mud, sand
or similar substances that prevent the
vehicle from being driven out under its
own power.
• Remove the soil and sand, etc. fromthe front and the back of the tires.
• Place a stone or wood under the tires.CAUTION
To prevent internal damage to the transaxle, never tow your vehiclefrom the rear (backward s) with all
four tires in contact with the sur- face.
Page 230 of 283

617
In case of an emergency
IF YOU HAVE A FLAT TIRE
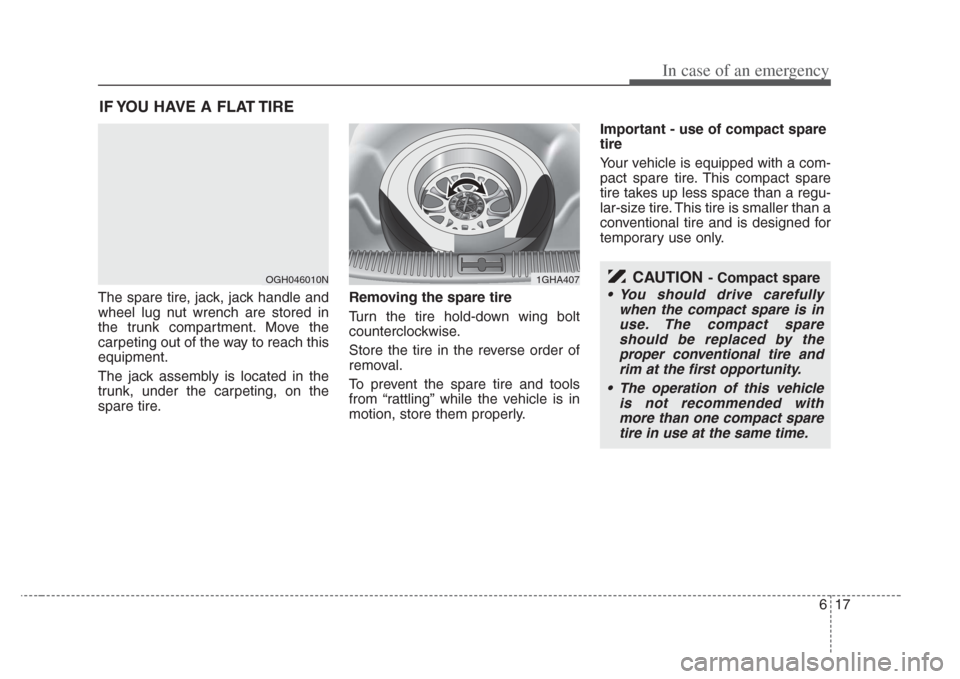
The spare tire, jack, jack handle and
wheel lug nut wrench are stored in
the trunk compartment. Move the
carpeting out of the way to reach this
equipment.
The jack assembly is located in the
trunk, under the carpeting, on the
spare tire.Removing the spare tire
Turn the tire hold-down wing bolt
counterclockwise.
Store the tire in the reverse order of
removal.
To prevent the spare tire and tools
from “rattling” while the vehicle is in
motion, store them properly.Important - use of compact spare
tire
Your vehicle is equipped with a com-
pact spare tire. This compact spare
tire takes up less space than a regu-
lar-size tire. This tire is smaller than a
conventional tire and is designed for
temporary use only.
OGH046010N1GHA407CAUTION- Compact spare
• You should drive carefully
when the compact spare is in u se. The compact s pare
s hould be replaced by the
proper conventional tire and rim at the fir st opportunity.
• The operation of thi s vehicle
i s not recommended with
more than one compact spare tire in use at the same time.
Page 233 of 283
In case of an emergency
206
4. Remove the wheel lug nut wrench,jack, jack handle, and spare tire
from the vehicle.
5. Block both the front and rear of the wheel that is diagonally opposite
the jack position. 6. Wrap a piece of cloth around the
tip of the screwdriver to avoid
scratching.
7. Insert a screwdriver into the notch of the wheel cover and pry gently
to remove the wheel cover (if
equipped).
WARNING-Changing a tire
• To prevent vehicle movementwhile changing a tire, alway s
set the parking brake fully, and
always block the wheel diago-
nally opposite the wheel being
changed.
• It is recommended that the wheels of the vehicle be
chocked, and that no per son
should remain in a vehicle that
is being jacked.
1JBA65042GHN409
Page 234 of 283

621
In case of an emergency
8. Loosen the wheel lug nuts coun-terclockwise one turn each, but do
not remove any nut until the tire
has been raised off the ground. 9. Place the jack at the front or rear
jacking position closest to the tire
you are changing. Place the jack
at the designated locations under
the frame. The jacking positions
are plates welded to the frame
with two tabs and a raised dot to
index with the jack. 10. Insert the jack handle into the
jack and turn it clockwise, raising
the vehicle until the tire just
clears the ground. This measure-
ment is approximately 30 mm
(1.2 in). Before removing the
wheel lug nuts, make sure the
vehicle is stable and that there is
no chance for movement or slip-
page.
11. Remove the wheel lug nuts by turning them counterclockwise,
then remove the wheel.
12. Mount the spare tire into position and install the wheel lug nuts
with the beveled edge inward.
WARNING- Jack location
To reduce the possibility of
injury, be sure to use only the
jack provided with the vehicle
and in the correct jack position;
never use any other part of the
vehicle for jack support.
1GHA41041GHA41032GHN409B
Page 240 of 283
75
Maintenance
MAINTENANCE SCHEDULE (CONTINUED)
Kilometers or time in months, whichever come s first
× 1,000 km 8 16 24 32 40 48 56 64 72 80 88 96 104 112 120 128
# Months 4 8 12 16 20 24 28 32 36 40 44 48 52 56 60 64
Automatic transaxle fluid (1) I I I I I R IIIIIRI III
Chassis & underbody bolts & nuts I I I I I I IIIIIII III
Tire condition & inflation pressure I I I I I I IIIIIII III
Wheel alignment (4)
Tire rotation
Steering operation & linkage I I I I I I IIIIIII III
Power steering fluid & lines I I I IIIII
Driveshaft dust boots I I I I I
Safety belts, buckles & anchors I I I I I I IIIIIII III
Lock, hinges & hood latch L L L L L L LLLLLLL LLL
MAINTENANCE
INTERVALS
MAINTENANCE
ITEM
Inspect when abnormal condition noted
Rotate the tires every 12,000 km
Chassis and body (Continued)
Page 243 of 283

Maintenance
87
At least monthly:
• Check coolant level in the coolantrecovery reservoir.
• Check the operation of all exterior lights, including the stoplights, turn sig-
nals and hazard warning flashers.
• Check the inflation pressures of all tires including the spare.
At least twice a year (i.e., every Spring and Fall) :
• Check radiator, heater and air condi- tioning hoses for leaks or damage.
• Check windshield washer spray and wiper operation. Clean wiper blades
with clean cloth dampened with wash-
er fluid.
• Check headlight alignment.
• Check muffler, exhaust pipes, shields and clamps.
• Check the lap/shoulder belts for wear and function.
• Check for worn tires and loose wheel lug nuts.
At least once a year :
• Clean body and door drain holes.
• Lubricate door hinges and checks, andhood hinges.
• Lubricate door and hood locks and latches.
• Lubricate door rubber weatherstrips.
• Check the air conditioning system before the warm weather season.
• Check the power steering fluid level.
• Inspect and lubricate automatic transaxle linkage and controls.
• Clean battery and terminals.
• Check the brake fluid level.