Page 8 of 283

Your vehicle at a glance
22
INTERIOR OVERVIEW
OGH006002N
1. Door lock/unlock button ......................3-9
2. Power window switches....................3-14
3. Outside rearview mirror control switch ...............................................3-84
4. Seat adjust knob ..............................3-19
5. Hood release lever ...........................3-80
6. Parking brake pedal .........................4-13
7. Parking brake release lever..............4-13
8. Instrument panel illumination ...........4-27
9. Steering wheel .................................4-17
10. Instrument cluster...........................4-25
11. Inside rearview mirror ....................3-86
12. Trunk release lever .........................3-76
13. Fuel filler lid release button ............3-81
14. Seat ................................................3-17
15. Master power door lock control ......3-10
16. Master power window control lock ..3-15
17. Brake pedal ....................................4-10
18. Vent controls...................................4-50
19. Steering wheel tilt...........................4-18
20. Power adjustable pedal switch*......4-12
*: if equipped
Page 9 of 283

23
Your vehicle at a glance
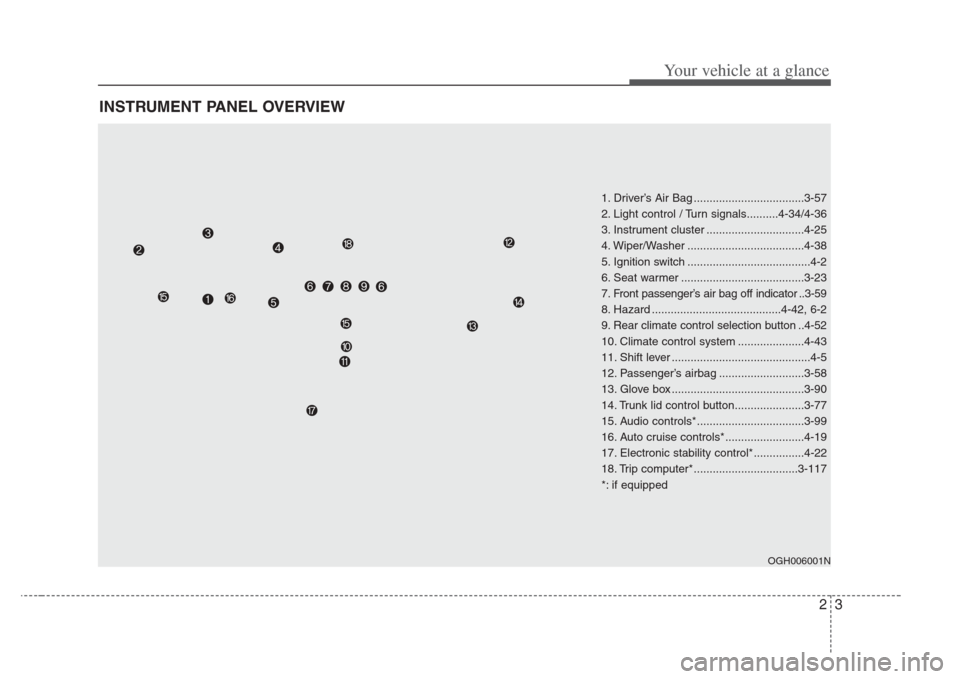
INSTRUMENT PANEL OVERVIEW
1. Driver’s Air Bag ...................................3-57
2. Light control / Turn signals..........4-34/4-36
3. Instrument cluster ...............................4-25
4. Wiper/Washer .....................................4-38
5. Ignition switch .......................................4-2
6. Seat warmer .......................................3-23
7. Front passenger’s air bag off indicator ..3-59
8. Hazard .........................................4-42, 6-2
9. Rear climate control selection button ..4-52
10. Climate control system .....................4-43
11. Shift lever ............................................4-5
12. Passenger’s airbag ...........................3-58
13. Glove box ..........................................3-90
14. Trunk lid control button......................3-77
15. Audio controls*..................................3-99
16. Auto cruise controls* .........................4-19
17. Electronic stability control*................4-22
18. Trip computer* .................................3-117
*: if equipped
OGH006001N
Page 11 of 283
3
Keys / 3-2
Remote keyless entry / 3-4
Immobilizer system / 3-7
Door locks / 3-9
Windows / 3-13
Seats / 3-17
Driver position memory system / 3-28
Safety belts / 3-30
Air bags-advanced supplemental restraint system / 3-52
Trunk / 3-76
Hood / 3-80
Fuel filler lid / 3-81
Mirrors / 3-84
Interior lights / 3-88
Storage compartments / 3-89
Interior features / 3-91
Sunroof / 3-96
Antenna / 3-98
Audio remote control / 3-99
Audio systems / 3-100
Knowing your vehicle
Page 12 of 283

Knowing your vehicle
23
The key code number is stamped on the
plate attached to the key set. Should you
lose your keys, this number will enable
an authorized Kia Dealer to duplicate the
keys easily. Remove the plate and store it
in a safe place. Also, record the code
number and keep it in a safe and handy
place, but not in the vehicle.Key operations
➀Master key
Used to start the engine, lock and unlock the doors, lock and unlock the
glove box, and open the trunk.
➁Sub key
Used only to start the engine and lock
and unlock the door.
➂Transmitter
Used to lock and unlock the doors
and trunk (trunk can only be opened
with the transmitter when the trunk lid
control button located in the glove
compartment is turned on. See page
3-3).
KEYS
OGH036001NOGH036002N
WARNING- Ignition key
Leaving children unattended in a
vehicle with the ignition key i s dan-
gerou s even if the key is not in the
ignition. Children copy adult s and
they could place the key in the igni-
tion. The ignition key would enable
children to operate power window s
or other control s, or even make the
vehicle move, which could re sult in
serious bodily injury or even death.
Never leave the keys in your vehicle
with unsupervised children.
➀
➁
➂
Page 13 of 283

33
Knowing your vehicle
Restrictions in handling keys
When leaving keys with parking lot and
valet attendants, the following proce-
dures will ensure that your vehicle’s trunk
and glove box compartment cannot be
opened in your absence.1. Unlock the glove box with the master
key and open it.
2. Set the trunk lid control button in the glove box compartment to OFF (not
depressed). In the OFF position, the
trunk cannot be unlocked with either
the trunk release lever inside the car or
trunk open button of transmitter.
3. Close the glove box, and lock the glove box using the master key.
4. Leave the sub key with the attendant. The trunk and glove box are secured
because the sub key only allows the
engine to start and locks and unlocks
the door.
1GHA2004
WARNING
Use only Kia original part s for the
ignition key in your vehicle. If an
aftermarket key i s used, the ignition
s witch may not return to ON after
START. If this happens, the starter
will continue to operate caus ing
damage to the starter motor and
possible fire due to excessive cur-
rent in the wiring.
Page 14 of 283

Knowing your vehicle
43
➀Lock button
➁ Unlock button
➂ Trunk lid open button
➃ Alarm button
➀Lock ( )
All doors are locked and the hazard
lamp will flash once if the lock button
is pressed. Also, the trunk is locked
and cannot be opened with the out-
side handle.
➁Unlock ( )
Driver’s door is unlocked and the haz-
ard lamp will flash twice if the unlock
button is pressed once. Also, the trunk
is unlocked and can be opened with
the outside handle. All doors are
unlocked if the unlock button is
pressed twice within 3 seconds.
After depressing this button, the
doors will be locked automatically
unless you open them within 30 sec-
onds.
➂ Trunk lid open ( )
The trunk lid opens if this button is
pressed. If this button is pressed while
all the doors are locked, the trunk will
open, however it will remain locked
when closed.
If any door is unlocked, the trunk will
remain unlocked when closed.
When the trunk lid control button in
the glove box is OFF, the trunk will not
open or unlock even when the button
on the transmitter is pressed.
➃ Alarm ( )
The horn sounds and hazard lamp
will flash for about 27 seconds if this
button is pressed.
REMOTE KEYLESS ENTRY (IF EQUIPPED)
2GHN3330A
➀
➂
➁➃
Page 37 of 283

327
Knowing your vehicle
Removal
To remove the headrest, raise it as far as
it can go then press the release button
(
➀) while pulling upward (➁).
Storing long/narrow cargo with trunkclo sed (if equipped)
Pull the armrest down using the strap
provided on the armrest. Pull the cover
down while pushing the release lever
down. Additional cargo space is provided
to accommodate long/narrow cargo
(skis, poles, lumber, etc.) not able to fit
properly in the trunk when closed.
1GHA2255
WARNING
To reduce the ri sk of head and neck
injuries, do not drive the vehicle
with the headres t removed or
improperly positioned.
1GHA2108
CAUTION
Be careful when loading cargo through the rear passenger seats to
prevent damage to the vehicle inte- rior.
WARNING
• Make sure the engine i s off, the
transaxle is in P and the parking
brake is applied whenever load-
ing or unloading cargo. Vehicle
may move if shift lever is inadver-
tently moved to another po sition.
• When cargo is loaded through the rear passenger seats,ensure the
cargo is properly secured to pre-
vent it from moving while driving.
Unsecured cargo in the passen-
ger compartment can cause dam-
age to the vehicle or injury to it s
occupants.
Page 54 of 283

Knowing your vehicle
443
(Continued)
• Since a safety belt or child
restraint system can become very
hot if it is left in a closed vehicle,
be sure to check the seat cover
and buckles before placing a
child there.
• When the child re straint system
is not in use, store it in the trunk
or fasten it with a safety belt or
LATCH system so that it will not
be thrown forward in the ca se of a
sudden stop or an accident.
• Children who are too large to be in a child restraint should sit in
the rear seat and be restrained
with the available lap/s houlder
belts. Never allow children to ride
in the front passenger seat.
(Continued)(Continued)
•Alway s make sure that the shoul-
der belt portion of the lap/ shoul-
der belt is positioned midway
over the shoulder, never across
the neck or behind the back. The
lap belt portion of the lap/shoul-
der belt mus t always be pos i-
tioned as low as possible on the
child's hips and as snug as pos-
sible.
• If the seat belt will not properly fit the child, an approved boo ster
seat in the rear seat must be used
in order to rai se the child's seat-
ing height so that the seat belt
will properly fit the child.
(Continued)(Continued)
• Never allow a child to stand up orkneel on the seat.
• Never us e an infant carrier or
child safety seat that "hooks "
over a seatback; it may not pro-
vide adequate security in an acci-
dent.
• Never allow a child to be held in a per son's arms while they are in a
moving vehicle, as this could
res ult in s erious injury to the
child in the event of an accident
or a sudden stop. Holding a child
in a moving vehicle doe s not pro-
vide the child with any mean s of
protection during an accident,
even if the per son holding the
child is wearing a seat belt.